
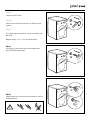
Safety and installation
During installation, please switch
the power off and ensure your
appliance is NOT connected to the
electricity supply.
✓ You have removed 3 transit bolts and 3 spacers (See Point 1)
✓ The water connections are not leaking (See Point 2)
✓ The drain hose is positioned to the correct height (See Point 3)
✓ The sink trap blanking plug has been removed, or the end has been cut off the
outlet pipe (See Point 3)
✓ The machine is level and cannot ‘rock’ when spinning - adjust the feet (See Point 5)
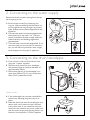
There are 3 transit bolts fi tted at the rear of the
machine to prevent damage in transit.
These bolts and their plastic spacers
MUST be removed before use.
For more detailed information
please refer to the instruction
manual.
Check list
1. Transit bolt removal
Important
Instructions

A
B
C
Step A
Unscrew the 3 bolts.
Step B
Hold the transit bolt and pull out the bolt and
spacer.
Step C
For safety place the plastic cover provided over
the hole.
Repeat steps ‘a’ to ‘c’ for all transit bolts.
Note:
At the end, you should have removed three
bolts AND three spacers.
Note:
Keep the parts in case you need them for future
transportation.

3. Connecting to the drain/standpipe
3 pin
30 cm
(12’’)
min. 60 cm
(23.6’’)
max. 100 cm
(39.4’’)
A. Form a hook in the end of the drain hose
using the ‘U piece’ supplied.
B. Place the drain hose into your standpipe,
which should have an internal diameter of
approximately 38mm.
C. Ensure that the top of the standpipe is no
more than 100cm (39.4”) and no less than
60cm (23.6”) above fl oor level.
Under a sink
A. If the outlet pipe has not been used before,
remove any blanking plug that may be in
place.
B. Push the drain hose onto the outlet pipe and
secure with a clip, ensure a loop is formed
in the drain hose. If you intend to drain the
hose from the machine into a sink, make sure
that the sink is empty and the plug hole is not
blocked. Use the plastic ‘U Piece’ supplied.
20
O
20
O
20
O
45
O
45
O
45
O
Ensure that there is water coming from the tap
you are going to use.
A. Set the hose correctly by loosening the
ring nut. After positioning the inlet hose, be
sure to tighten the ring nut again to prevent
leaks. Always use the hose supplied with the
appliance.
B. Connect the water inlet hose supplied with
the machine to a tap with a 14’’ (19mm)
thread. Installation should comply with local
water authority and building regulations’
requirements.
C. The inlet hose must not be lengthened. If it is
too short and you do not wish to move the
tap, you will have to purchase a new, longer
hose designed for this type of appliance.
2. Connecting to the water supply

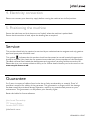
Service
Guarantee
This product should only be repaired or serviced by an authorised service engineer and only genuine
approved spare parts should be used.
This symbol
indicates that this product should not be treated as normal household waste and it
should be recycled. John Lewis do not operate instore take back, but as members of the Distributor
Take Back scheme have funded the development and upgrade of recycling facilities across the UK.
Please take it to your nearest collection facility or for further details contact your local council or visit
www.recycle-more.co.uk.
For 3 years in respect of defects found to be due to faulty workmanship or material. Proof of
purchase is required for validity of the guarantee. This guarantee is no longer valid if the damage
has been caused by accidental damage, alteration, repair by any unauthorised persons or poor
maintenance. This guarantee in no way affects your statutory rights.
Retain this leafl et for future reference.
John Lewis Partnership
171 Victoria Street
London SW1E SNN
johnlewis.com
4. Electricity connection
5. Positioning the machine
Please now connect your electricity supply before moving the machine into its fi nal position.
Ensure the inlet hose and drain hose are not ‘kinked’ when the machine is pushed back.
Ensure that the machine is level, adjust the levelling feet as required.
192944020-A-192017
-
 1
1
-
 2
2
-
 3
3
-
 4
4


John Lewis JLWM1437 Installation guide
- Type
- Installation guide
Ask a question and I''ll find the answer in the document
Finding information in a document is now easier with AI
Related papers
-
John Lewis JLDR14 User manual
-
-
-
-
-
-
-
-
-