
49-80691-1 04-14 GE
GEAppliances.com
Write the model and serial
numbers here:
Model # __________________
Serial # ___________________
You can find them on a label
behind the door or drawer.
Printed in the United States
Printed on
Recycled Paper
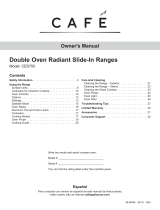
JB250 - 76.2 cm (30") International Free-Standing Range
JB650 - 76.2 cm (30") International Free-Standing Range
JB690 - 76.2 cm (30") International Free-Standing Range
Owner’s Manual
Ranges
Electric Free-Standing
Safety Information ............2
Warranty .......................7
Assistance / Accessories .....8
Using The Range
Surface Units .....................9
Cookware for Radiant
Glass Cooktop ..................12
Oven Controls ....................13
Special Features .................14
Oven Racks ......................15
Aluminum Foil and Oven Liners . . .15
Cookware ........................15
Cooking Modes ..................16
Cooking Guide ...................17
Care and Cleaning
Cleaning the Range – Exterior ....18
Cleaning the Range – Interior .....20
Cleaning the Glass Cooktop .......21
Maintenance .....................23
Troubleshooting Tips ........25

2
49-80691-1
SAVE THESE INSTRUCTIONS
Read all safety instructions before using the product. Failure to follow these instructions may result in fire,
electrical shock, serious injury or death.
ANTI-TIP DEVICE
WARNING
IMPORTANT SAFETY INFORMATION.
READ ALL INSTRUCTIONS BEFORE USING.
SAFETY INFORMATION
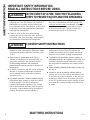
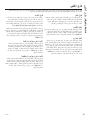
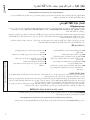
To reduce the risk of tipping the range,
the range must be secured by a properly
installed anti-tip bracket. See installation
instructions shipped with the bracket for
complete details before attempting to install.
For Free-Standing and Slide-In Ranges
To check if the bracket is installed and
engaged properly, look underneath the
range to see that the rear leveling leg
is engaged in the bracket. On some models, the storage
drawer or kick panel can be removed for easy inspection.
If visual inspection is not possible, slide the range forward,
confirm the anti-tip bracket is securely attached to the floor
or wall, and slide the range back so the rear leveling leg is
under the anti-tip bracket.
If the range is pulled from the wall for any reason, always
repeat this procedure to verify the range is properly secured
by the anti-tip bracket.
Never completely remove the leveling legs or the range will
not be secured to the anti-tip device properly.
A child or adult can tip the range and be killed.
Verify the anti-tip bracket has been properly installed
and engaged.
Ensure the anti-tip bracket is re-engaged when the range
is moved.
Do not operate the range without the anti-tip bracket in
place and engaged.
Failure to follow these instructions can result in death or
serious burns to children or adults.
Tip-Over Hazard
WARNING
Anti-Tip
Bracket
Leveling Leg
Free-Standing and Slide-In Ranges

49-80691-1
3
SAVE THESE INSTRUCTIONS
SAFETY INFORMATION
Ŷ8VHWKLVDSSOLDQFHRQO\IRULWVLQWHQGHGSXUSRVH
as described in this Owner’s Manual.
Ŷ%HVXUH\RXUDSSOLDQFHLVSURSHUO\LQVWDOOHGDQG
grounded by a qualified installer in accordance
with the provided installation instructions.
Ŷ'RQRWDWWHPSWWRUHSDLURUUHSODFHDQ\SDUWRI
your range unless it is specifically recommended
in this manual. All other servicing should be
transferred to a qualified technician.
Ŷ%HIRUHSHUIRUPLQJDQ\VHUYLFHXQSOXJWKHUDQJH
or disconnect the power supply at the household
distribution panel by removing the fuse or
switching off the circuit breaker.
Ŷ'RQRWOHDYHFKLOGUHQDORQH²FKLOGUHQVKRXOGQRW
be left alone or unattended in an area where an
appliance is in use. They should never be allowed
to climb, sit or stand on any part of the appliance.
Ŷ
CAUTION: 'RQRWVWRUHLWHPVRI
interest to children above a range or on the
EDFNJXDUGRIDUDQJH²FKLOGUHQFOLPELQJRQWKH
range to reach items could be seriously injured.
Ŷ8VHRQO\GU\SRWKROGHUV²PRLVWRUGDPSSRW
holders on hot surfaces may result in burns from
VWHDP'RQRWOHWSRWKROGHUVWRXFKKRWVXUIDFH
XQLWVRUKHDWLQJHOHPHQWV'RQRWXVHDWRZHORU
other bulky cloth in place of pot holders.
Ŷ 1HYHUXVH\RXUDSSOLDQFHIRUZDUPLQJRUKHDWLQJ
the room.
Ŷ 'RQRWWRXFKWKHVXUIDFHXQLWVWKHKHDWLQJ
elements or the interior surface of the oven.
These surfaces may be hot enough to burn
HYHQWKRXJKWKH\DUHGDUNLQFRORU'XULQJDQG
after use, do not touch, or let clothing or other
flammable materials contact the surface units,
areas nearby the surface units or any interior
area of the oven; allow sufficient time for cooling
first. Other surfaces of the appliance may
become hot enough to cause burns. Potentially
hot surfaces include the cooktop, areas facing
the cooktop, oven vent opening, surfaces near
the opening and crevices around the oven door.
Ŷ 'RQRWKHDWXQRSHQHGIRRGFRQWDLQHUV3UHVVXUH
could build up and the container could burst,
causing an injury.
Ŷ 'RQRWXVHDQ\W\SHRIIRLORUOLQHUWRFRYHUWKH
oven bottom or anywhere in the oven, except as
described in this manual. Oven liners can trap
heat or melt, resulting in damage to the product
and risk of shock, smoke or fire.
Ŷ $YRLGVFUDWFKLQJRULPSDFWLQJJODVVGRRUVFRRN
WRSVRUFRQWUROSDQHOV'RLQJVRPD\OHDGWR
JODVVEUHDNDJH'RQRWFRRNRQDSURGXFWZLWK
broken glass. Shock, fire or cuts may occur.
Ŷ &RRNPHDWDQGSRXOWU\WKRURXJKO\²PHDWWR
at least an internal temperature of 160°F and
poultry to at least an internal temperature of
)&RRNLQJWRWKHVHWHPSHUDWXUHVXVXDOO\
protects against foodborne illness.
GENERAL SAFETY INSTRUCTIONS
WARNING
Ŷ 'RQRWVWRUHRUXVHIODPPDEOHPDWHULDOVLQ
an oven or near the cooktop, including paper,
plastic, pot holders, linens, wall coverings,
curtains, drapes and gasoline or other flammable
vapors and liquids.
Ŷ
Never wear loose-fitting or hanging garments while
using the appliance. These garments may ignite if
they contact hot surfaces causing severe burns.
Ŷ 'RQRWOHWFRRNLQJJUHDVHRURWKHUIODPPDEOH
materials accumulate in or near the range.
Grease in the oven or on the cooktop may ignite.
Ŷ &OHDQYHQWLODWLQJKRRGVIUHTXHQWO\*UHDVH
should not be allowed to accumulate on the hood
or filter.
KEEP FLAMMABLE MATERIALS AWAY FROM THE RANGE
Failure to do so may result in fire or personal injury.
WARNING

4
49-80691-1
IMPORTANT SAFETY INFORMATION.
READ ALL INSTRUCTIONS BEFORE USING.
SAFETY INFORMATION
Ŷ 'RQRWXVHZDWHURQJUHDVHILUHV1HYHUSLFNXS
a flaming pan. Turn the controls off. Smother a
flaming pan on a surface unit by covering the
pan completely with a well-fitting lid, cookie sheet
RUIODWWUD\8VHDPXOWLSXUSRVHGU\FKHPLFDORU
foam-type fire extinguisher.
Ŷ If there is a fire in the oven during baking,
smother the fire by closing the oven door and
turning the oven off or by using a multi-purpose
dry chemical or foam-type fire extinguisher.
Ŷ If there is a fire in the oven during self-clean, turn
the oven off and wait for the fire to go out. 'R
not force the door open. Introduction of fresh air
at self-clean temperatures may lead to a burst
of flame from the oven. Failure to follow this
instruction may result in severe burns.
IN THE EVENT OF A FIRE, TAKE THE FOLLOWING
STEPS TO PREVENT INJURY AND FIRE SPREADING
WARNING
Ŷ
Never leave the surface units unattended at
PHGLXPRUKLJKKHDWVHWWLQJV%RLORYHUVFDXVH
smoking and greasy spillovers that may catch
on fire.
Ŷ 1HYHUOHDYHRLOXQDWWHQGHGZKLOHIU\LQJ,I
allowed to heat beyond its smoking point, oil
may ignite resulting in fire that may spread
WRVXUURXQGLQJFDELQHWV8VHDGHHSIDW
thermometer whenever possible to monitor oil
temperature.
Ŷ
To avoid oil spillover and fire, use a minimum
amount of oil when shallow pan-frying and
avoid cooking frozen foods with excessive
amounts of ice.
Ŷ 8VHSURSHUSDQVL]H²VHOHFWFRRNZDUHKDYLQJ
flat bottoms large enough to cover the surface
heating element. The use of undersized
cookware will expose a portion of the surface
unit to direct contact and may result in ignition
of clothing. Proper relationship of cookware to
surface unit will also improve efficiency.
Ŷ 2QO\FHUWDLQW\SHVRIJODVVJODVVFHUDPLF
earthenware or other glazed containers are
suitable for cooktop service; others may break
because of the sudden change in temperature.
Ŷ 7RPLQLPL]HWKHSRVVLELOLW\RIEXUQVLJQLWLRQRI
flammable materials and spillage, the handle of a
container should be turned toward the center of
the range without extending over nearby surface
units.
Ŷ :KHQSUHSDULQJIODPLQJIRRGVXQGHUDKRRGWXUQ
the fan on.
Ŷ ,ISRZHULVORVWWRDQHOHFWULFFRRNWRSZKLOHD
surface unit is ON, the surface unit will turn back
on as soon as power is restored. In the event of
power loss, failure to turn all surface unit knobs
to the OFF position may result in ignition of items
on or near the cooktop, leading to serious injury
or death.
COOKTOP SAFETY INSTRUCTIONS
WARNING
SAVE THESE INSTRUCTIONS

49-80691-1
5
SAVE THESE INSTRUCTIONS
SAFETY INFORMATION
Ŷ8VHFDUHZKHQWRXFKLQJWKHFRRNWRS7KHJODVV
surface of the cooktop will retain heat after the
controls have been turned off.
Ŷ'RQRWFRRNRQDEURNHQFRRNWRS,IJODVV
cooktop should break, cleaning solutions and
spillovers may penetrate the broken cooktop and
FUHDWHDULVNRIHOHFWULFVKRFN&RQWDFWDTXDOLILHG
technician immediately.
Ŷ$YRLGVFUDWFKLQJWKHJODVVFRRNWRS7KHFRRNWRS
can be scratched with items such as knives,
sharp instruments, rings or other jewelry, and
rivets on clothing.
Ŷ'RQRWSODFHRUVWRUHLWHPVWKDWFDQPHOWRUFDWFK
fire on the glass cooktop, even when it is not
being used. If the cooktop is inadvertently turned
on, they may ignite. Heat from the cooktop or
oven vent after it is turned off may cause them to
ignite also.
Ŷ8VH&(5$0$%5<7(
®
FHUDPLF&RRNWRS&OHDQHU
DQG&(5$0$%5<7(
®
&OHDQLQJ3DGWRFOHDQ
WKHFRRNWRS:DLWXQWLOWKHFRRNWRSFRROVDQG
the indicator light goes out before cleaning. A
wet sponge or cloth on a hot surface can cause
steam burns. Some cleaners can produce
noxious fumes if applied to a hot surface. Note:
Sugar spills are an exception. They should be
scraped off while still hot using an oven mitt and
DVFUDSHU6HHWKH&OHDQLQJWKHJODVVFRRNWRS
section for detailed instructions.
Ŷ5HDGDQGIROORZDOOLQVWUXFWLRQVDQGZDUQLQJVRQ
the cleaning cream label.
WARNING
COIL COOKTOP SAFETY INSTRUCTIONS
RADIANT COOKTOP SAFETY INSTRUCTIONS
Ŷ'RQRWLPPHUVHRUVRDNWKHUHPRYDEOHVXUIDFH
XQLWV'RQRWSXWWKHPLQDGLVKZDVKHU'RQRW
VHOIFOHDQWKHVXUIDFHXQLWVLQDQRYHQ'RLQJVR
may cause them to fail presenting a burn or fire
hazard.
Ŷ'RQRWXVHDVXUIDFHXQLWKHDWLQJHOHPHQWLI
it develops a glowing spot during use or shows
other signs of damage. A glowing spot indicates
the surface unit may fail and present a potential
burn, fire, or shock hazard. Turn the surface
unit off immediately and have it replaced by a
qualified service technician.
Ŷ7RDYRLGWKHSRVVLELOLW\RIDEXUQRUHOHFWULF
shock, always be certain that the controls for all
surface units are at the OFF position and all coils
are cool before attempting to lift or remove a coil
surface unit.
Ŷ'RQRWXVHDOXPLQXPIRLOWROLQHGULSSDQV)RLO
can trap heat or melt, resulting in damage to the
product and a shock or fire hazard.
Ŷ%HVXUHWKHGULSSDQVDUHQRWFRYHUHGDQGDUH
in place. Their absence during cooking could
damage range parts and wiring.
WARNING

6
49-80691-1
IMPORTANT SAFETY INFORMATION.
READ ALL INSTRUCTIONS BEFORE USING.
SAFETY INFORMATION
SAVE THESE INSTRUCTIONS
The self-cleaning feature operates the oven at temperatures high enough to burn away food soils in the
oven. Follow these instructions for safe operation.
Ŷ 'RQRWWRXFKRYHQVXUIDFHVGXULQJVHOIFOHDQ
operation. Keep children away from the oven
during self-cleaning. Failure to follow these
instructions may cause burns.
Ŷ
%HIRUHRSHUDWLQJWKHVHOIFOHDQF\FOHUHPRYHSDQV
shiny metal oven racks and other utensils from the
oven. Only gray porcelain-coated oven racks may
EHOHIWLQWKHRYHQ'RQRWXVHVHOIFOHDQWRFOHDQ
other parts, such as drip pans or bowls.
Ŷ %HIRUHRSHUDWLQJWKHVHOIFOHDQF\FOHZLSH
JUHDVHDQGIRRGVRLOVIURPWKHRYHQ([FHVVLYH
amount of grease may ignite leading to smoke
damage to your home.
Ŷ ,IWKHVHOIFOHDQLQJPRGHPDOIXQFWLRQVWXUQWKH
oven off and disconnect the power supply. Have
it serviced by a qualified technician.
Ŷ 'RQRWFOHDQWKHGRRUJDVNHW7KHGRRUJDVNHWLV
HVVHQWLDOIRUDJRRGVHDO&DUHVKRXOGEHWDNHQ
not to rub, damage or move the gasket.
Ŷ 'RQRWXVHRYHQFOHDQHUV1RFRPPHUFLDORYHQ
cleaner or oven liner protective coating of any kind
should be used in or around any part of the oven.
SELF-CLEANING OVEN SAFETY INSTRUCTIONS
WARNING
Ŷ 6WDQGDZD\IURPWKHUDQJHZKHQRSHQLQJWKH
oven door. Hot air or steam which escapes can
FDXVHEXUQVWRKDQGVIDFHDQGRUH\HV
Ŷ 'RQRWXVHWKHRYHQLIDKHDWLQJHOHPHQW
develops a glowing spot during use or shows
other signs of damage. A glowing spot indicates
the heating element may fail and present a
potential burn, fire, or shock hazard. Turn the
oven off immediately and have the heating
element replaced by a qualified service
technician.
Ŷ .HHSWKHRYHQYHQWXQREVWUXFWHG
Ŷ .HHSWKHRYHQIUHHIURPJUHDVHEXLOGXS*UHDVH
in the oven may ignite.
Ŷ 3ODFHRYHQUDFNVLQGHVLUHGORFDWLRQZKLOHRYHQ
is cool. If rack must be moved while oven is hot,
do not let pot holder contact hot heating element
in oven.
Ŷ :KHQXVLQJFRRNLQJRUURDVWLQJEDJVLQWKH
oven, follow the manufacturer’s directions.
Ŷ 3XOOWKHRYHQUDFNWRWKHVWRSORFNSRVLWLRQZKHQ
loading and unloading food from the oven. This
helps prevent burns from touching hot surfaces
of the door and oven walls.
Ŷ 'RQRWOHDYHLWHPVVXFKDVSDSHUFRRNLQJ
utensils or food in the oven when not in use.
Items stored in an oven can ignite.
Ŷ 1HYHUSODFHFRRNLQJXWHQVLOVSL]]DRUEDNLQJ
stones, or any type of foil or liner on the oven
floor. These items can trap heat or melt, resulting
in damage to the product and risk of shock,
smoke or fire.
OVEN SAFETY INSTRUCTIONS
WARNING

49-80691-1
7
GE Electric Range Warranty
GEAppliances.com
$OOZDUUDQW\VHUYLFHLVSURYLGHGE\RXU)DFWRU\6HUYLFH&HQWHUVRUDQDXWKRUL]HG&XVWRPHU&DUH
®
technician.
7RVFKHGXOHVHUYLFHRQOLQHYLVLWXVDWZZZJHDSSOLDQFHVFRPVHUYLFHBDQGBVXSSRUWRUFDOO*(&$5(6
3OHDVHKDYHVHULDOQXPEHUDQGPRGHOQXPEHUDYDLODEOHZKHQFDOOLQJIRUVHUYLFH
6HUYLFLQJ\RXUDSSOLDQFHPD\UHTXLUHWKHXVHRIWKHRQERDUGGDWDSRUWIRUGLDJQRVWLFV7KLVJLYHVD*(IDFWRU\
VHUYLFHWHFKQLFLDQWKHDELOLW\WRTXLFNO\GLDJQRVHDQ\LVVXHVZLWK\RXUDSSOLDQFHDQGKHOSV*(LPSURYHLWVSURGXFWV
E\SURYLGLQJ*(ZLWKLQIRUPDWLRQRQ\RXUDSSOLDQFH,I\RXGRQRWZDQW\RXUDSSOLDQFHGDWDWREHVHQWWR*(SOHDVH
DGYLVH\RXUWHFKQLFLDQQRWWRVXEPLWWKHGDWDWR*(DWWKHWLPHRIVHUYLFH
)RUWKHSHULRGRIRQH\HDUIURPWKHGDWHRIWKHRULJLQDOSXUFKDVH*(ZLOOSURYLGHDQ\SDUWRIWKHUDQJHZKLFKIDLOVGXH
WRDGHIHFWLQPDWHULDOVRUZRUNPDQVKLS'XULQJWKLVOLPLWHGRQH\HDUZDUUDQW\*(ZLOODOVRSURYLGHIUHHRIFKDUJHDOO
labor and in-home service to replace the defective part.
What GE will not cover:
Ŷ Service trips to your home to teach you how to use
the product.
Ŷ Improper installation, delivery or maintenance.
Ŷ Failure of the product if it is abused, misused,
modified or used for other than the intended purpose
or used commercially.
Ŷ 'DPDJHWRWKHJODVVFRRNWRSFDXVHGE\XVHRI
cleaners other than the recommended cleaning
creams and pads.
Ŷ 'DPDJHWRWKHJODVVFRRNWRSFDXVHGE\KDUGHQHG
spills of sugary materials or melted plastic that
are not cleaned according to the directions in the
Owner's Manual.
Ŷ Replacement of house fuses or resetting of circuit
breakers.
Ŷ 'DPDJHWRWKHSURGXFWFDXVHGE\DFFLGHQWILUH
floods or acts of God.
Ŷ Incidental or consequential damage caused by
possible defects with this appliance.
Ŷ 'DPDJHFDXVHGDIWHUGHOLYHU\
Ŷ Product not accessible to provide required service.
Ŷ 6HUYLFHWRUHSDLURUUHSODFHOLJKWEXOEVH[FHSW
IRU/('ODPSV
EXCLUSION OF IMPLIED WARRANTIES
<RXUVROHDQGH[FOXVLYHUHPHG\LVSURGXFWUHSDLUDVSURYLGHGLQWKLV/LPLWHG:DUUDQW\$Q\LPSOLHGZDUUDQWLHV
including the implied warranties of merchantability or fitness for a particular purpose, are limited to one year or the
shortest period allowed by law.
This warranty is extended to the original purchaser and any succeeding owner for products purchased for home use
ZLWKLQWKH86$,IWKHSURGXFWLVORFDWHGLQDQDUHDZKHUHVHUYLFHE\D*($XWKRUL]HG6HUYLFHULVQRWDYDLODEOH\RX
PD\EHUHVSRQVLEOHIRUDWULSFKDUJHRU\RXPD\EHUHTXLUHGWREULQJWKHSURGXFWWRDQ$XWKRUL]HG*(6HUYLFHORFDWLRQ
for service. In Alaska, the warranty excludes the cost of shipping or service calls to your home.
Some states do not allow the exclusion or limitation of incidental or consequential damages. This warranty gives you
specific legal rights, and you may also have other rights which vary from state to state. To know what your legal rights
are, consult your local or state consumer affairs office or your state’s Attorney General.
Warrantor: General Electric Company. Louisville, KY 40225
Extended Warranties:3XUFKDVHD*(H[WHQGHGZDUUDQW\DQGOHDUQDERXWVSHFLDOGLVFRXQWVWKDWDUHDYDLODEOHZKLOH
\RXUZDUUDQW\LVVWLOOLQHIIHFW<RXFDQSXUFKDVHLWRQOLQHDQ\WLPH
ZZZJHDSSOLDQFHVFRPVHUYLFHBDQGBVXSSRUWVKRSIRUH[WHQGHGVHUYLFHSODQVKWP
RUFDOOGXULQJQRUPDOEXVLQHVVKRXUV*(&RQVXPHU+RPH6HUYLFHVZLOOVWLOOEHWKHUHDIWHU\RXU
warranty expires.
Register Your Appliance: Register your new appliance on-line at your convenience!
ZZZJHDSSOLDQFHVFRPVHUYLFHBDQGBVXSSRUWUHJLVWHU
Timely product registration will allow for enhanced communication and prompt service under the terms of your warranty,
VKRXOGWKHQHHGDULVH<RXPD\DOVRPDLOLQWKHSUHSULQWHGUHJLVWUDWLRQFDUGLQFOXGHGLQWKHSDFNLQJPDWHULDO
Staple your receipt here. Proof of the original purchase
date is needed to obtain service under the warranty.
WARRANTY
Thank You! ... for your purchase of a GE Brand appliance.

8
49-80691-1
Schedule Service: ([SHUW*(UHSDLUVHUYLFHLVRQO\RQH
step away from your door. Get on-line and schedule your
VHUYLFHDWZZZJHDSSOLDQFHVFRPVHUYLFHBDQGBVXSSRUW
2UFDOO*(&$5(6GXULQJQRUPDO
business hours.
Parts and Accessories: Individuals qualified to service their
own appliances can have parts or accessories sent directly
WRWKHLUKRPHV9,6$0DVWHU&DUGDQG'LVFRYHUFDUGVDUH
DFFHSWHG2UGHURQOLQHWRGD\KRXUVHYHU\GD\RUE\
SKRQHDWGXULQJQRUPDOEXVLQHVVKRXUV
Instructions contained in this manual cover procedures
to be performed by any user. Other servicing generally
VKRXOGEHUHIHUUHGWRTXDOLILHGVHUYLFHSHUVRQQHO&DXWLRQ
must be exercised, since improper servicing may cause
unsafe operation.
Real Life Design Studio: *(VXSSRUWVWKH8QLYHUVDO
'HVLJQFRQFHSWRISURGXFWVVHUYLFHVDQGHQYLURQPHQWV
that can be used by people of all ages, sizes and
FDSDELOLWLHV:HUHFRJQL]HWKHQHHGWRGHVLJQIRUDZLGH
range of physical and mental abilities and impairments.
)RUGHWDLOVRI*(¶V8QLYHUVDO'HVLJQDSSOLFDWLRQV
including kitchen design ideas for people with disabilities,
FKHFNRXWRXU:HEVLWHWRGD\)RUWKHKHDULQJLPSDLUHG
SOHDVHFDOO7''*($&
Contact Us: If you are not satisfied with the service you
UHFHLYHIURP*(FRQWDFWXVRQRXU:HEVLWHZLWKDOOWKH
details including your phone number, or write to:
General Manager, Customer Relations
GE Appliances, Appliance Park Louisville, KY 40225
7U\WKH*($SSOLDQFHV:HEVLWHwww.geappliances.com/service_and_support/KRXUVDGD\DQ\GD\RIWKH
year! For greater convenience and faster service, you can now download Owner’s Manuals, order parts or even
schedule service on-line.
Accessories
Looking For Something More?
GE offers a variety of accessories to improve your cooking and maintenance experiences!
To place an order visit us online at:
www.GEApplianceParts.com86
or call 800.626.200286
The following products and more are available:
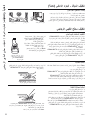
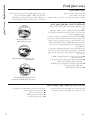
How to Remove Protective Shipping Film and Packaging Tape
&DUHIXOO\JUDVSDFRUQHURIWKHSURWHFWLYHVKLSSLQJILOP
with your fingers and slowly peel it from the appliance
VXUIDFH'RQRWXVHDQ\VKDUSLWHPVWRUHPRYHWKHILOP
Remove all of the film before using the appliance for the
first time.
To assure no damage is done to the finish of the
product, the safest way to remove the adhesive from
packaging tape on new appliances is an application of
a household liquid dishwashing detergent. Apply with a
soft cloth and allow to soak.
NOTE: The adhesive must be removed from all parts. It
cannot be removed if it is baked on.
Have a question or need assistance with your appliance?
ASSISTANCE / ACCESSORIES
Accessories
6PDOO%URLOHU3DQFP[FP[FPô´[ó´[ò³ :%;86
/DUJH%URLOHU3DQFP[FP[FPô´[ó´[ò³ :%;86
;/%URLOHU3DQFP[FP[FP´[ó´[³ :%;86
Parts
Oven racks Part numbers vary by model
Oven elements Part numbers vary by model
Light bulbs Part numbers vary by model
Cleaning Supplies
&LWUX6KLQH6WDLQOHVV6WHHO:LSHV :;;
&(5$0$%5<7(
®
6WDLQOHVV6WHHO$SSOLDQFH&OHDQHU 30;
&(5$0$%5<7(
®
&OHDQLQJ3DGVIRU&HUDPLF&RRNWRSV :;;
&(5$0$%5<7(
®
&HUDPLF&RRNWRS&OHDQHU :;;
&(5$0$%5<7(
®
&HUDPLF&RRNWRS6FUDSHU :;;
.LW.LWLQFOXGHVFUHDPDQGFRRNWRSVFUDSHU :%;
7KHODUJHEURLOHUSDQGRHVQRWILWLQ´´UDQJHV
7KH;/EURLOHUSDQGRHVQRWILWLQ´ZDOORYHQV´GURSLQVRU´´UDQJH

49-80691-1
9
USING THE RANGE: Surface Units
Surface Units
FIRE HAZARD: Never leave the range unattended with the cooktop on medium or high
settings. Keep flammable items away from the cooktop. Turn off all controls when done
cooking. Failure to follow these instructions can result in fire, serious injury or death.
WARNING
Throughout this manual, features and appearance may vary from your model.
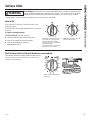
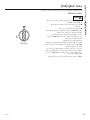
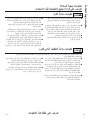
How to Set
Push the knob in and turn in either direction to the
setting you want.
A surface ON indicator light will glow when any surface
unit is on
For glass cooktop surfaces:
A HOT COOKTOP indicator light will:
Ŷ FRPHRQZKHQWKHXQLWLVKRWWRWKHWRXFK
Ŷ VWD\RQHYHQDIWHUWKHXQLWLVWXUQHGRII
Ŷ VWD\RQXQWLOWKHXQLWLVFRROHGWR
DSSUR[LPDWHO\)
Dual Surface Units and Control Knobs (on some models)
7KHVXUIDFHXQLWKDVFRRNLQJVL]HVWRVHOHFWIURPVR
you can match the size of the unit to the size of the
cookware you are using.
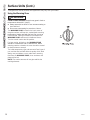
At both OFF and HI the control clicks
into position. You may hear slight
clicking sounds during cooking,
indicating the control is maintaining
your desired setting.
Be sure you turn the control knob to
OFF when you finish cooking.
Models with a Dual-Ring surface
element only
Melt setting (on some models) will
melt chocolate or butter.

10
49-80691-1
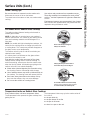
Surface Units (Cont.)
USING THE RANGE: Surface Units
Throughout this manual, features and appearance may vary from your model.
Using the Warming Zone
FOOD POISON HAZARD:%DFWHULDPD\JURZLQIRRGDW
WHPSHUDWXUHVEHORZ&)
Ŷ $OZD\VVWDUWZLWKKRWIRRG'RQRWXVHZDUPVHWWLQJWR
heat cold food.
Ŷ 'RQRWXVHZDUPVHWWLQJIRUPRUHWKDQKRXUV
The WARMING ZONE, located in the back center of
the glass surface, will keep hot, cooked food at serving
WHPSHUDWXUH$OZD\VVWDUWZLWKKRWIRRG'RQRWXVHWR
heat cold food. Placing uncooked or cold food on the
WARMING ZONE could result in foodborne illness.
Turn the control knob to the ON position.
For best results, all foods on the WARMING ZONE
VKRXOGEHFRYHUHGZLWKDOLGRUDOXPLQXPIRLO:KHQ
warming pastries or breads, the cover should be vented
to allow moisture to escape.
The initial temperature, type and amount of food, type of
pan, and the time held will affect the quality of the food.
Always use pot holders or oven mitts when removing
food from the WARMING ZONE, since cookware and
plates will be hot.
NOTE: The surface warmer will not glow red like the
cooking elements.
WARNING

49-80691-1
11
Home Canning Tips
%HVXUHWKHFDQQHULVFHQWHUHGRYHUWKHVXUIDFHXQLW
Make sure the canner is flat on the bottom.
To prevent burns from steam or heat, use caution when
canning.
8VHUHFLSHVDQGSURFHGXUHVIURPUHSXWDEOHVRXUFHV
7KHVHDUHDYDLODEOHIURPPDQXIDFWXUHUVVXFKDV%DOO
®
and Kerr
®
DQGWKH'HSDUWPHQWRI$JULFXOWXUH([WHQVLRQ
Service.
)ODWERWWRPHGFDQQHUVDUHUHFRPPHQGHG8VHRIZDWHU
bath canners with rippled bottoms may extend the time
required to bring the water to a boil.
Temperature Limiter on Radiant Glass Cooktops
(YHU\UDGLDQWVXUIDFHXQLWKDVDWHPSHUDWXUHOLPLWHU
The temperature limiter protects the glass cooktop from
getting too hot.
The temperature limiter may cycle the surface units off
for a time if:
Ŷ WKHSDQERLOVGU\
Ŷ WKHSDQERWWRPLVQRWIODW
Ŷ WKHSDQLVRIIFHQWHU
Ŷ WKHUHLVQRSDQRQWKHXQLW
For Models With a Radiant Glass Cooktop
The radiant cooktop features heating units beneath a
smooth glass surface.
NOTE: A slight odor is normal when a new cooktop is
used for the first time. It is caused by the heating of new
parts and insulating materials and will disappear in a
short time.
NOTE: On models with light-colored glass cooktops, it is
normal for the cooking zones to change color when hot
or cooling down. This is temporary and will disappear as
the glass cools to room temperature.
The surface unit will cycle on and off to maintain your
selected control setting.
It is safe to place hot cookware on the glass surface
even when the cooktop is cool.
(YHQDIWHUWKHVXUIDFHXQLWVDUHWXUQHGRIIWKHJODVV
cooktop retains enough heat to continue cooking. To
avoid overcooking, remove pans from the surface units
when the food is cooked. Avoid placing anything on the
surface unit until it has cooled completely.
Ŷ :DWHUVWDLQVPLQHUDOGHSRVLWVDUHUHPRYDEOHXVLQJ
the cleaning cream or full-strength white vinegar.
Ŷ 8VHRIZLQGRZFOHDQHUPD\OHDYHDQLULGHVFHQWILOPRQ
the cooktop. The cleaning cream will remove this film.
Ŷ 'RQ¶WVWRUHKHDY\LWHPVDERYHWKHFRRNWRS,IWKH\
drop onto the cooktop, they can cause damage.
Ŷ 'RQRWXVHWKHVXUIDFHDVDFXWWLQJERDUG
USING THE RANGE: Surface Units
Surface Units (Cont.)
Never cook directly on the glass.
Always use cookware.
Always place the pan in the center of
the surface unit you are cooking on.
Do not slide cookware across the cooktop
EHFDXVHLWFDQVFUDWFKWKHJODVV³WKHJODVV
is scratch-resistant, not scratch proof.

12
49-80691-1
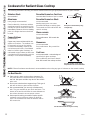
Cookware for Radiant Glass Cooktop
USING THE RANGE: Cookware for Radiant Glass Cooktop
The following information will help you choose cookware which will give good performance on glass cooktops.
NOTE: Follow all cookware manufacturer’s recommendations when using any type of cookware on the ceramic cooktop.
Stainless Steel:
recommended
Aluminum:
heavy weight recommended
Good conductivity. Aluminum residues
sometimes appear as scratches on the
cooktop but can be removed if cleaned
LPPHGLDWHO\%HFDXVHRILWVORZPHOWLQJ
point, thin weight aluminum should not
be used.
Copper Bottom:
recommended
&RSSHUPD\OHDYHUHVLGXHVZKLFKFDQ
appear as scratches. The residues can
be removed, as long as the cooktop
is cleaned immediately. However, do
not let these pots boil dry. Overheated
metal can bond to glass cooktops. An
overheated copper bottom pot will leave
a residue that will permanently stain the
cooktop if not removed immediately.
Porcelain Enamel on Cast Iron:
recommended if bottom of pan is coated
Porcelain Enamel on Steel:
not recommended
Heating empty pans can cause
permanent damage to cooktop glass.
The enamel can melt and bond to the
ceramic cooktop.
Glass-ceramic:
not recommended
3RRUSHUIRUPDQFH:LOOVFUDWFKWKH
surface.
Stoneware:
not recommended
Poor performance. May scratch the
surface.
Cast Iron:
QRWUHFRPPHQGHG²XQOHVVGHVLJQHG
specifically for glass cooktops
Poor conductivity and slow to absorb
KHDW:LOOVFUDWFKWKHFRRNWRSVXUIDFH
Check pans for flat bottoms by using
a straight edge.
Pans with rounded, curved, ridged or
warped bottoms are not recommended.
Do not place wet pans on the glass cooktop.
Do not use woks with support rings on the
glass cooktop.
Use flat-bottomed woks on the glass cooktop.
For Best Results
Ŷ 3ODFHRQO\GU\SDQVRQWKHVXUIDFHHOHPHQWV'R
not place lids on the surface elements, particularly
ZHWOLGV:HWSDQVDQGOLGVPD\VWLFNWRWKHVXUIDFH
when cool.
Ŷ 'RQRWXVHZRNVWKDWKDYHVXSSRUWULQJV7KLVW\SHRI
wok will not heat on glass surface elements.
Ŷ :HUHFRPPHQGWKDW\RXXVHRQO\DIODWERWWRPHG
wok. They are available at your local retail store. The
bottom of the wok should have the same diameter as
the surface element to ensure proper contact.
Ŷ 6RPHVSHFLDOFRRNLQJSURFHGXUHVUHTXLUHVSHFLILF
cookware such as pressure cookers or deep-fat
fryers. All cookware must have flat bottoms and be
the correct size.

49-80691-1
13
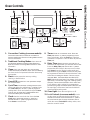
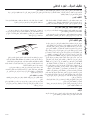
USING THE RANGE: Oven Controls
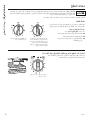
Oven Controls
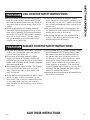
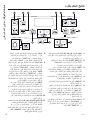
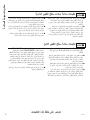
1. Convection Cooking (on some models):
&RQYHFWLRQEDNHXVHVLQFUHDVHGDLUFLUFXODWLRQWR
LPSURYHSHUIRUPDQFH6HHWKH&RRNLQJ0RGHVVHFWLRQ
for more information.
2. Traditional Cooking Modes: <RXURYHQKDV
WKHIROORZLQJWUDGLWLRQDOFRRNLQJPRGHV%DNHDQG
%URLO+L/R6HHWKH&RRNLQJ0RGHVVHFWLRQIRUPRUH
information.
3. Clean: <RXURYHQPD\KDYHXSWRWZRFOHDQLQJ
PRGHV6HOI&OHDQDQG6WHDP&OHDQ6HHWKH&OHDQLQJ
the Oven section for important information about using
these modes.
4. Start: Must be pressed to start any cooking,
cleaning, or timed function.
5. Cancel/Off: &DQFHOV$//RYHQRSHUDWLRQVH[FHSW
the clock and timer.
6. Cook Time: &RXQWVGRZQFRRNLQJWLPHDQGWXUQV
off the oven when the cooking time is complete. Press
the Cook TimeSDGXVHWKHSDGVWRSURJUDPD
cooking time in hours and minutes, then press Start.
7KLVFDQRQO\EHXVHGZLWK7UDGLWLRQDO%DNHDQG
&RQYHFWLRQ%DNHZKHUHDYDLODEOH
7. Clock: Sets the oven clock time. Press the Set
ClockSDGRUSUHVVDQGKROGWKHSDGVIRU
VHFRQGVDQGWKHSDGVWRSURJUDPWKHFORFN
Press Start to save the time.
8. Timer: :RUNVDVDFRXQWGRZQWLPHU3UHVVWKH
TimerSDGDQGWKHSDGVWRSURJUDPWKHWLPHLQ
hours and minutes. Press the Start pad. The timer
countdown is complete. To turn the timer off press the
Timer pad.
9. Delay Time: 'HOD\VZKHQWKHRYHQZLOOWXUQRQ
8VHWKLVWRVHWDWLPHZKHQ\RXZDQWWKHRYHQWRVWDUW
Press the Delay Time SDGDQGXVHWKHSDGVWR
program the time of day for the oven to turn on then
press Start. Press the desired cooking mode and
temperature then press Start$&RRN7LPHPD\DOVR
be programmed if desired. Follow the directions under
&RRN7LPHIRUVHWWLQJWKLVIHDWXUH7KLVFDQRQO\EH
XVHGZLWK%DNH&RQYHFWLRQ%DNHDQG6HOI&OHDQ
NOTE: :KHQXVLQJWKH'HOD\7LPHIHDWXUH foods that
VSRLOHDVLO\²VXFKDVPLONHJJVILVKVWXIILQJVSRXOWU\
DQGSRUN²VKRXOGQRWEHDOORZHGWRVLWIRUPRUHWKDQ
1 hour before or after cooking. Room temperature
SURPRWHVWKHJURZWKRIKDUPIXOEDFWHULD%HVXUHWKDW
the oven light is off because heat from the bulb will
speed harmful bacteria growth.
10. Oven Light: Turns the oven light on or off.
11. Lock Controls (on some models): Locks
out the control so that pressing the pads does not
DFWLYDWHWKHFRQWUROV3UHVVDQGKROGWKHSDGVRU
WKH/RFN&RQWUROVSDGIRUWKUHHVHFRQGVWRORFNRU
unlock the control. Cancel/Off is always active, even
when the control is locked.
10
Automatic Oven
Oven Light
2 3
9
645 8
17
11

14
49-80691-1
Adjust the Oven Temperature
This feature allows the oven baking and convection
EDNLQJWHPSHUDWXUHWREHDGMXVWHGXSWR&)
KRWWHURUGRZQWR&)FRROHU8VHWKLVIHDWXUH
if you believe your oven temperature is too hot or too
FROGDQGZLVKWRFKDQJHLW7KLVDGMXVWPHQWDIIHFWV%DNH
DQG&RQYHFWLRQ%DNHPRGHV1RRWKHUFRRNLQJPRGHV
are affected.
Press the Bake pad to enter the temperature adjustment
PRGH$QXPEHUEHWZHHQDQGZLOOGLVSOD\8VH
the +- pads to set the desired temperature adjustment
and use the Bake pad to change between negative and
positive.
Press the Start pad to save the temperature adjustment.
End of Timer Signals
This is the tone that signals the end of a timer. The tone
FDQEHFRQWLQXRXV&RQE((3RURQHUHSHDWLQJEHHS
E((3$FRQWLQXRXVVHWWLQJZLOOFRQWLQXHWRVRXQGD
tone until a button on the control is pressed. Press the
Timer pad to view the current setting and then to change
the setting.
Fahrenheit or Celsius Temperature Display
The oven control is set to use Fahrenheit temperatures
)EXW\RXFDQFKDQJHLWWRXVH&HOVLXVWHPSHUDWXUHV
&3UHVVWKHQXPEHUCook Time and Broil Hi/Lo pads
at the same time to view the current setting, press again
to change the setting.
Clock Display
This feature specifies how the time of day will be
GLVSOD\HGRULIQRWLPHRIGD\ZLOOEHGLVSOD\HG<RXFDQ
VHOHFWDVWDQGDUGKRXUFORFN+KRXUPLOLWDU\
WLPHGLVSOD\+RUQRFORFNGLVSOD\HGR))3UHVV
the Clock pad to view the current setting, press again to
change the setting.
Auto Recipe Conversion
:KHQXVLQJ&RQYHFWLRQ%DNH$XWR5HFLSH&RQYHUVLRQ
will automatically convert the regular baking
temperatures entered to convection bake cooking
temperatures when turned on. Note that this option
does not convert convection bake cooking times, it only
converts temperatures. Press the Convection Bake pad
to view the conversion settings, press again to toggle
EHWZHHQ2Q&RQ2QDQG2II&RQR))
12-hour auto shut-off and Sabbath
2SWLRQVIRUWKLVIHDWXUHDUH³6+GQ´³QR6+GQ´DQG
³6$EE$W+´
KRXUDXWRVKXWRIIWXUQVRIIWKHRYHQDIWHUKRXUVRI
continuous operations.
6DEEDWKPRGHGLVDEOHVWKHRYHQOLJKWVWKHRYHQOLJKW
ZLOOQRWWXUQRQZKHQWKHGRRULVRSHQHGDOOVRXQGV
WKHFRQWUROZLOOQRWEHHSZKHQDEXWWRQLVSUHVVHG
&RQYHFWLRQ%URLO&RRN7LPH7LPHU&ORFNDQG'HOD\
Time functions. Sabbath mode can only be used with
%DNH7KLVIHDWXUHFRQIRUPVWRWKH6WDU.-HZLVK
Sabbath requirements.
Press the Delay Time pad to view the current setting
and then to change the setting.
7RXVH6DEEDWKPRGHVHOHFW³6$EE$W+´DQGSUHVV
Start. A ] will appear in the display and the clock will not
display.
Once in Sabbath mode, at any time you can press
Bake, use the +- pads to enter a temperature between
&)DQG&)DQGSUHVVStart.
No sound will be given when the keys are pressed. At a
UDQGRPWLPHEHWZHHQVHFRQGVDQGPLQXWH][, will
appear in the display indicating the oven is running.
If you need to adjust the temperature, press Bake,
use the +- pads to enter a new temperature between
&)DQG&)DQGSUHVVStart.
To turn the oven off, press Cancel/Off at any time. The
oven will immediately turn off and ][ will change to ]
indicating that the oven has turned off.
To exit Sabbath mode, make sure that the oven is
turned off. Press and hold the Bake and BroilSDGVIRU
seconds to enter special features then press Delay Time
XQWLOHLWKHU³12 Shdn´RU³no Shdn´LVLQWKHGLVSOD\DQG
press Start.
NOTE: If power outage occurs during Sabbath mode the
unit will remain in Sabbath mode but off when power is
restored.
,I\RXZLVKWRXVHWKH&RRN7LPHIHDWXUHWREDNHLQWKH
oven and then have the oven automatically turn off, you
ZLOOQHHGWRSUHVVWKH&RRN7LPHEXWWRQHQWHUDFRRNLQJ
time duration, and press Start. Then enter special
features to start Sabbath mode as detailed above.
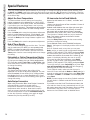
Special Features
USING THE RANGE: Special Features
There are several different special features on your range. To change the settings of these special features, press
the BAKE and BROIL pads at the same time and hold for three seconds. "SF" will appear in the display. Select the
IHDWXUH\RXZDQWWRFKDQJH:KHQWKHFKDQJHKDVEHHQPDGHSUHVVWKHSTART key to save the change and return
to the time of day.

49-80691-1
15
Recommended rack positions for various types of
IRRGVDUHSURYLGHGLQWKH&RRNLQJ*XLGH$GMXVWLQJ
rack position is one way to impact cooking results. For
example, if you would prefer darker tops on cakes,
muffins, or cookies, try moving food one rack position
higher. If you find foods are too brown on top try moving
them down next time.
:KHQEDNLQJZLWKPXOWLSOHSDQVDQGRQPXOWLSOHUDFNV
HQVXUHWKHUHLVDWOHDVWFPòEHWZHHQSDQVWR
allow sufficient space for air to flow.
To avoid possible burns, place the racks in the desired
position before you turn the oven on.
The number of rack positions may vary by model.
USING THE RANGE: Oven Racks / Aluminum Foil and Oven Liners / Cookware
Oven Racks
Cookware
Cookware Guidelines
The material, finish, and size of cookware affect baking
performance.
'DUNFRDWHGDQGGXOOSDQVDEVRUEKHDWPRUHUHDGLO\
than light, shiny pans. Pans that absorb heat more
readily can result in a browner, crisper, and thicker crust.
If using dark and coated cookware check food earlier
than minimum cook time. If undesirable results are
obtained with this type of cookware consider reducing
RYHQWHPSHUDWXUHE\&)QH[WWLPH
Shiny pans can produce more evenly cooked baked
goods such as cakes and cookies.
Glass and ceramic pans heat slowly but retain heat well.
These types of pans work well for dishes such as pies
and custards.
Air insulated pans heat slowly and can reduce bottom
browning.
Keep cookware clean to promote even heating.
CAUTION: Do not use any type of foil or oven liner to cover the oven bottom. These items can trap
heat or melt, resulting in damage to the product and risk of shock, smoke or fire. Damage from improper use
of these items is not covered by the product warranty.
)RLOPD\EHXVHGWRFDWFKVSLOOVE\SODFLQJDVKHHWRQDORZHUUDFNVHYHUDOLQFKHVEHORZWKHIRRG'RQRWXVHPRUH
IRLOWKDQQHFHVVDU\DQGQHYHUHQWLUHO\FRYHUDQRYHQUDFNZLWKDOXPLQXPIRLO.HHSIRLODWOHDVW´IURPRYHQZDOOV
to prevent poor heat circulation.
Aluminum Foil and Oven Liners

16
49-80691-1
<RXUQHZRYHQKDVDYDULHW\RIFRRNLQJPRGHVWRKHOS\RXJHWWKHEHVWUHVXOWV7KHVHPRGHVDUHGHVFULEHGEHORZ
5HIHUWRWKH&RRNLQJ*XLGHVHFWLRQIRUUHFRPPHQGDWLRQVIRUVSHFLILFIRRGV5HPHPEHU\RXUQHZRYHQPD\SHUIRUP
differently than the oven it is replacing.
Baking Modes
Select a mode for baking based on the type and
TXDQWLW\RIIRRG\RXDUHSUHSDULQJ:KHQSUHSDULQJ
baked goods such as cakes, cookies, and pastries
always preheat the oven first. Follow recipe
recommendations for food placement. If no guidelines
are provided, center food in the oven.
Traditional Bake
The traditional bake mode is intended for single rack
cooking. This mode uses heat primarily from the lower
element but also from the upper element to cook
food. To use this mode press the Bake pad, enter
a temperature, and then press Start. Preheating is
generally recommended when using this mode.
Convection Bake
7KH&RQYHFWLRQ%DNHPRGHLVLQWHQGHGIRUEDNLQJ
on multiple racks at the same time. This mode uses
heat from the upper and lower elements, along with
air movement from the convection fan to enhance
FRRNLQJHYHQQHVV<RXURYHQLVHTXLSSHGZLWK$XWR
5HFLSH&RQYHUVLRQVRLWLVQRWQHFHVVDU\WRFRQYHUWWKH
WHPSHUDWXUHZKHQXVLQJWKLVPRGH%DNLQJWLPHPLJKW
be slightly longer for multiple racks than what would be
expected for a single rack. To use this mode press the
Convection Bake pad, enter a temperature, and then
press Start. Always preheat when using this mode.
Broiling Modes
Always broil with the door open. Monitor food closely
ZKLOHEURLOLQJ8VHFDXWLRQZKHQEURLOLQJRQXSSHUUDFN
positions as placing food closer to the broil element
increases smoking, spattering, and the possibility of fats
igniting. For best performance center food below the broil
heating element. Broiling on rack position 7 is not
recommended.
Try broiling foods that you would normally grill. Adjust
rack positions to adjust the intensity of the heat to the
food. Place foods closer to the broil element when a
seared surface and rare interior is desired. Thicker foods
and foods that need to be cooked through should be
broiled on a rack position farther from the broiler or by
using Broil Lo.
Broil Hi
7KH7UDGLWLRQDO%URLO+LPRGHXVHVLQWHQVHKHDWIURP
WKHXSSHUHOHPHQWWRVHDUIRRGV8VH%URLO+LIRUWKLQQHU
FXWVRIPHDWDQGRUIRRGV\RXSUHIHUOHVVGRQHRQWKH
interior. To use this mode press the Broil pad once and
then press Start. It is not necessary to preheat when
using this mode.
Broil Lo
7KH7UDGLWLRQDO%URLO/RPRGHXVHVOHVVLQWHQVHKHDW
from the upper element to cook food thoroughly while
DOVRSURGXFLQJVXUIDFHEURZQLQJ8VH%URLO/RIRUWKLFNHU
FXWVRIPHDWDQGRUIRRGVWKDW\RXZRXOGOLNHFRRNHG
all the way through. To use this mode press the Broil
pad twice and then press Start. It is not necessary to
preheat when using this mode.
Cooking Modes
USING THE RANGE: Cooking Modes

49-80691-1
17
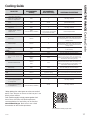
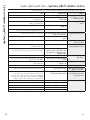
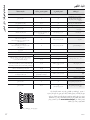
FOOD TYPE
RECOMMENDED
MODE(S)
RECOMMENDED
RACK POSITION(S) ADDITIONAL SUGGESTIONS
Baked Goods
/D\HU&DNHVVKHHWFDNHV
bundt cakes, muffins, quick
breads on a Single Rack
%DNH 8VHVKLQ\FRRNZDUH
Layer cakes* on Multiple
Racks
%DNH DQG
(QVXUHDGHTXDWHDLUIORZ
VHHLOOXVWUDWLRQEHORZ
&KLIIRQFDNHVDQJHOIRRG %DNH 1 8VHVKLQ\FRRNZDUH
&RRNLHVELVFXLWVVFRQHVRQD
Single Rack
%DNH 8VHVKLQ\FRRNZDUH
&RRNLHVELVFXLWVVFRQHVRQ
Multiple Racks
%DNH
&RQYHFWLRQ%DNHLIDYDLODEOH
DQG
DQGUDFNUHFRPPHQGHG
RQO\IRU&RQYHFWLRQ%DNH
(QVXUHDGHTXDWHDLUIORZ
Beef & Pork
Hamburgers %URLO+L 6
8VHDEURLOSDQPRYHIRRGGRZQIRUPRUHGRQH-
QHVVOHVVVHDULQJ:DWFKIRRGFORVHO\ZKHQEURLOLQJ
For best performance center food below the broil
heating element
6WHDNV&KRSV %URLO+L 6
8VHDEURLOSDQPRYHIRRGGRZQIRUPRUHGRQH-
QHVVOHVVVHDULQJ:DWFKIRRGFORVHO\ZKHQEURLOLQJ
For best performance center food below the broil
heating element
Roasts %DNH RU
8VHDORZVLGHGSDQVXFKDVDEURLOSDQ3UHKHDWLQJ
is not necessary
Poultry
:KROHFKLFNHQ %DNH RU 8VHDORZVLGHGSDQVXFKDVDEURLOSDQ
%RQHLQFKLFNHQEUHDVWVOHJV
thighs
%URLO+L ,IEUHDGHGRUFRDWHGLQVDXFHDYRLG%URLO+LPRGHV
%URLOVNLQVLGHGRZQILUVW:DWFKIRRGFORVHO\ZKHQ
broiling. For best performance when broiling, center
food below the broil heating element.
%URLO/R
%DNH
RU
%RQHOHVVFKLFNHQEUHDVWV
%URLO/R
%DNH
RU
,IEUHDGHGRUFRDWHGLQVDXFHDYRLG%URLO+LPRGHV
%URLOVNLQVLGHGRZQILUVW:DWFKIRRGFORVHO\ZKHQ
broiling. For best performance when broiling, center
food below the broil heating element
:KROHWXUNH\ %DNH RU 8VHDORZVLGHGSDQVXFKDVDEURLOSDQ
7XUNH\%UHDVW %DNH RU 8VHDORZVLGHGSDQVXFKDVDEURLOSDQ
Fish %URLO/R
FP>@WKLFNRUOHVV
!FP>@
:DWFKIRRGFORVHO\ZKHQEURLOLQJ)RUEHVWSHUIRU-
mance center food below the broil heating element.
Casseroles %DNH
Frozen Convenience Foods
Pizza, french fries, tator tots,
chicken nuggets, appetizers
on a Single Rack
%DNH 8VHVKLQ\FRRNZDUH
Pizza, french fries, tator tots,
chicken nuggets, appetizers
on Multiple Racks
%DNH
&RQYHFWLRQ%DNHLIDYDLODEOH
DQG 8VHVKLQ\FRRNZDUH
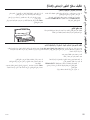
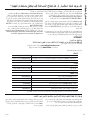
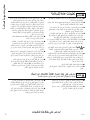
:KHQEDNLQJIRXUFDNHOD\HUVDWDWLPHXVHUDFNV
DQG. Place the pans as shown so that one pan is not
directly above another.
&RRNIRRGWKRURXJKO\WRKHOSSURWHFWDJDLQVWIRRG
borne illness. Minimum safe food temperature
recommendations for food safety can be found at
www.IsItDoneYet.gov. Make sure to use a food
thermometer to take food temperatures.
Rack position for baking 4 layer cakes.
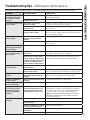
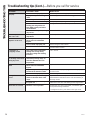
USING THE RANGE: Cooking Guide
Cooking Guide

18
49-80691-1
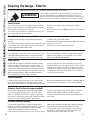
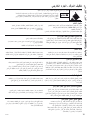
Cleaning the Range – Exterior
CARE AND CLEANING: Cleaning the Range – Exterior
If your range is removed for cleaning, servicing or any reason, be
sure the anti-tip device is reengaged properly when the range is
replaced. Failure to take this precaution could result in tipping of the
range and can result in death or serious burns to children or adults.
WARNING
%HVXUHDOOFRQWUROVDUHRIIDQGDOOVXUIDFHVDUHFRROEHIRUHFOHDQLQJDQ\SDUWRIWKHUDQJH
Control Knobs
The control knobs may be removed for easier cleaning.
Make sure the knobs are in the OFF positions and pull
them straight off the stems for cleaning.
The knobs can be cleaned in a dishwasher or they may
also be washed with soap and water.
Make sure the inside of the knobs are dry before
replacing.
Replace the knobs, in the OFF position to ensure proper
placement.
Control Lockout (on some models)
If desired, the touch pads may be deactivated before
cleaning.
6HH+RZWR/RFN2XWWKH&RQWUROVLQWKH8VLQJWKHFORFN
kitchen timer and control lockout section in this manual.
&OHDQXSVSODWWHUVZLWKDGDPSFORWK
<RXPD\DOVRXVHDJODVVFOHDQHU
5HPRYHKHDYLHUVRLOZLWKZDUPVRDS\ZDWHU'RQRWXVH
abrasives of any kind.
Reactivate the touch pads after cleaning.
Control Panel
It’s a good idea to wipe the control panel after each use.
&OHDQZLWKPLOGVRDSDQGZDWHURUYLQHJDUDQGZDWHU
rinse with clean water and polish dry with a soft cloth.
'RQRWXVHDEUDVLYHFOHDQVHUVVWURQJOLTXLGFOHDQVHUV
plastic scouring pads or oven cleaners on the control
SDQHO²WKH\ZLOOGDPDJHWKHILQLVK
Oven Exterior
'RQRWXVHRYHQFOHDQHUVDEUDVLYHFOHDQVHUVVWURQJ
liquid cleansers, steel wool, plastic scouring pads, or
cleaning powders on the interior or exterior of the oven.
&OHDQZLWKDPLOGVRDSDQGZDWHURUYLQHJDUDQGZDWHU
solution. Rinse with clean water and dry with a soft cloth.
:KHQFOHDQLQJVXUIDFHVPDNHVXUHWKDWWKH\DUHDW
room temperature and not in direct sunlight.
If stain on the door vent trim is persistent, use a mild
abrasive cleaner and a sponge-scrubber for best results.
Spillage of marinades, fruit juices, tomato sauces and
basting liquids containing acids may cause discoloration
and should be wiped up immediately. Let hot surfaces
cool, then clean and rinse.
Painted Surfaces
Painted surfaces include the sides of the range and the
GRRUWRSRIFRQWUROSDQHODQGWKHGUDZHUIURQW&OHDQ
these with soap and water or a vinegar and water solution.
'RQRWXVHFRPPHUFLDORYHQFOHDQHUVFOHDQLQJSRZGHUV
steel wool or harsh abrasives on any painted surface.
Stainless Steel Surfaces (on some models)
'RQRWXVHDVWHHOZRROSDGLWZLOOVFUDWFKWKHVXUIDFH
To clean the stainless steel surface, use warm sudsy
water or a stainless steel cleaner or polish. Always wipe
the surface in the direction of the grain. Follow the cleaner
instructions for cleaning the stainless steel surface.
To inquire about purchasing cleaning products including
stainless steel appliance cleaner or polish read the
Assistance and Accessories sections at the beginning of
this manual.
Porcelain Enamel Cooktop
The porcelain enamel finish is sturdy but breakable if
misused. This finish is acid-resistant. However, any acidic
IRRGVVSLOOHGVXFKDVIUXLWMXLFHVWRPDWRRUYLQHJDU
should not be permitted to remain on the finish.
If acids spill on the cooktop while it is hot, use a dry paper
WRZHORUFORWKWRZLSHLWXSULJKWDZD\:KHQWKHVXUIDFH
has cooled, wash with soap and water. Rinse well.
For other spills such as fat spatterings, wash with soap
and water or cleansing powders after the surface has
cooled. Rinse well. Polish with a dry cloth.

49-80691-1
19
%HVXUHWKHFRQWUROVDUHWXUQHGWR2))DQGWKHVXUIDFHXQLWVDUHFRROEHIRUHDWWHPSWLQJWRUHPRYHWKHP
CARE AND CLEANING: Cleaning the Range – Exterior
Cleaning the Range – Exterior (Cont.)
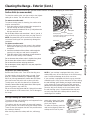
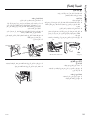
Surface Units (on some models)
To clean the surface units, turn the control to the highest
setting for a minute. The coils will burn off any soil.
To remove a surface unit:
To remove the drip pans for cleaning, the surface units
must be removed first.
1. Push the surface unit back toward the receptacle to
free the locking tab from the cooktop.
/LIWWKHVXUIDFHXQLWDERXWFPLQFKDERYHWKH
drip pan and pull it out.
'RQRWOLIWWKHVXUIDFHXQLWPRUHWKDQLQFK,I\RXGRLW
may not lie flat on the drip pan when you plug it back in.
NOTE: Repeated lifting of the surface unit more than 1
inch above the drip pan can permanently damage the
receptacle.
To replace a surface unit:
1. Replace the drip pan into the recess in the cooktop.
Make sure the opening in the pan lines up with the
receptacle.
,QVHUWWKHWHUPLQDOVRIWKHVXUIDFHXQLWWKURXJKWKH
opening in the drip pan and into the receptacle.
3XVKWKHVXUIDFHXQLWLQDQGGRZQWRORFNWKHWDELQ
place so it rests evenly in the cooktop.
'RQRWLPPHUVHWKHVXUIDFHXQLWVLQOLTXLGVRIDQ\NLQG
'RQRWFOHDQWKHVXUIDFHXQLWVLQDGLVKZDVKHU
'RQRWEHQGWKHVXUIDFHXQLWSOXJWHUPLQDOV
'RQRWDWWHPSWWRFOHDQDGMXVWRULQDQ\ZD\UHSDLUWKH
plug-in receptacle.
Drip Pans (on some models)
Remove the surface units. Then lift out the drip pans.
For best results, clean the drip pans by hand. Place
WKHPLQDFRYHUHGFRQWDLQHURUDSODVWLFEDJZLWK
PO»FXSDPPRQLDWRORRVHQWKHVRLO5LQVH
with clean water and polish with a clean soft cloth.
The drip pans may also be cleaned in a dishwasher.
&OHDQWKHDUHDXQGHUWKHGULSSDQVRIWHQ%XLOWXSVRLO
especially grease, may catch fire.
'RQRWFRYHUWKHGULSSDQVZLWKIRLO8VLQJIRLOVRFORVH
to the receptacle could cause shock, fire or damage to
the range.
NOTE: If your cooktop is equipped with shiny, silver-
colored drip pans, do not clean them in the self-cleaning
oven. Permanent damage to the finish can occur.
If your cooktop is equipped with black or gray porcelain-
coated drip pans, they can be cleaned in the oven during
WKHVHOIFOHDQLQJF\FOH%HIRUH\RXEHJLQDVHOIFOHDQLQJ
cycle, remove any heavy soil from the drip pans and
SODFHWKHPRQWKHSRUFHODLQFRDWHGRYHQUDFNV'RQRW
place the drip pans directly on the oven bottom. After
the self-cleaning cycle is completed and the drip pans
are cool, wipe them with a damp cloth to remove any
remaining ash or residue.
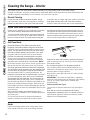
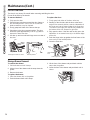
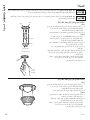
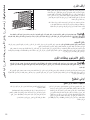
Lift-Up Cooktop (on some models)
The entire cooktop may be lifted up and supported in the
up position for easier cleaning.
The surface units do not need to be removed; however,
you may remove one to make raising the cooktop easier.
There are two side supports that lock into position when
the cooktop is lifted up.
After cleaning under the cooktop with hot, mild soapy
water and a clean cloth, lower
WKHFRRNWRS%HFDUHIXOQRWWR
pinch your fingers.
To lower the cooktop, push the
rods back and gently lower the
cooktop until it rests in place.
When properly seated, the locking tab
should lock onto the cooktop rim through
the notch in the drip pan.
Locking Tab
Cooktop Rim
Drip pan
Surface unit
Receptacle
Drip Pan
Locking
Tab
Surface Unit
Locking Tab
Be sure all surface units
are turned off before
raising the Cooktop.

20
49-80691-1
Cleaning the Range – Interior
CARE AND CLEANING: Cleaning the Range – Interior
Racks
Racks can be washed with warm, soapy water. Shiny
racks should not be left in the cavity during self clean.
7KHLQWHULRURI\RXUQHZRYHQFDQEHFOHDQHGPDQXDOO\RUE\XVLQJ6WHDP&OHDQRU6HOI&OHDQPRGHV
Spillage of marinades, fruit juices, tomato sauces and basting liquids containing acids may cause discoloration and
should be wiped up immediately. Let hot surfaces cool, then clean and rinse.
Manual Cleaning
'RQRWXVHRYHQFOHDQHUVDEUDVLYHFOHDQHUVVWURQJ
liquid cleansers, steel wool, scouring pads, or cleaning
SRZGHUVRQWKHLQWHULRURIWKHRYHQ&OHDQZLWKDPLOG
soap and water or vinegar and water solution. Rinse with
FOHDQZDWHUDQGGU\ZLWKDVRIWFORWK:KHQFOHDQLQJ
surfaces, make sure that they are at room temperature.
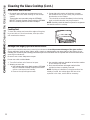
Steam Clean Mode (on some models)
Steam clean is intended to clean small spills using water
DQGDORZHUFOHDQLQJWHPSHUDWXUHWKDQ6HOI&OHDQ
7RXVHWKH6WHDP&OHDQIHDWXUHZLSHJUHDVHDQGVRLOV
from the oven. Pour one cup of water into the bottom of
WKHRYHQ&ORVHWKHGRRU3UHVVWKH6WHDP&OHDQSDG
DQGWKHQSUHVV6WDUW7KHRYHQGRRUZLOOORFN<RXFDQ
QRWRSHQWKHGRRUGXULQJWKHPLQXWHVWHDPFOHDQDV
this will decrease the steam clean performance. At the
HQGRIWKHVWHDPFOHDQF\FOHWKHGRRUZLOOXQORFN:LSH
out any excess water and any remaining soil.
Self Clean Mode
5HDG6HOI&OHDQLQJ2YHQ6DIHW\,QVWUXFWLRQVDWWKH
EHJLQQLQJRIWKLVPDQXDOEHIRUHXVLQJ6HOI&OHDQ0RGH
Self clean uses very high temperatures to clean the oven
LQWHULRU<RXZLOOQHHGWRORFNWKHRYHQGRRUZKHQXVLQJ
WKLVIHDWXUH%HIRUHRSHUDWLQJWKHVHOIFOHDQF\FOHZLSH
up grease and soils from the oven. Remove all items
IURPWKHRYHQRWKHUWKDQHQDPHOHGGDUNFRORUUDFNV
Shiny or silver racks and any cookware or other items
should all be removed from the oven before initiating a
VHOIFOHDQF\FOH&ORVHWKHGRRU/DWFKWKHGRRUNOTE:
Never force the latch. If the oven is too hot, you will not be
able to slide the latch. Allow the oven to cool. Press the
6HOI&OHDQSDGDQGDGHIDXOWVHOIFOHDQWLPHLVGLVSOD\HG
7KHFOHDQWLPHFDQEHFKDQJHGWRDQ\WLPHEHWZHHQ
DQGKRXUVE\XVLQJWKHSDGVWRHQWHUDGLIIHUHQW
time and pressing Start. For heavily soiled ovens, the
PD[LPXPKRXUFOHDQWLPHLVUHFRPPHQGHG,I\RXZLVK
to use the default time, press the Start pad immediately
DIWHUSUHVVLQJWKH6HOI&OHDQSDG7KHRYHQZLOOWXUQRII
automatically when the self-clean cycle is complete and
the self-clean light will be off. Slide the latch handle to the
left as far is it will go and open the door. Never force the
latch handle. Forcing the handle will damage the door lock
mechanism. After the oven has cooled down wipe any ash
out of the oven.
:HUHFRPPHQGYHQWLQJ\RXUNLWFKHQZLWKDQRSHQ
window or using a ventilation fan or hood during the first
self-clean cycle.
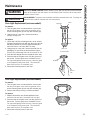
Soil on the front frame of the range and outside the
gasket on the door will need to be cleaned by hand.
&OHDQWKHVHDUHDVZLWKKRWZDWHUVRDSILOOHGVWHHOZRRO
pads or cleansers such as Soft Scrub
®
. Rinse well with
clean water and dry.
'RQRWFOHDQWKHJDVNHW7KHILEHUJODVVPDWHULDORI
the oven door gasket cannot withstand abrasion. It is
essential for the gasket to remain intact. If you notice it
becoming worn or frayed, replace it.
Make sure the oven light bulb cover is in place and the
oven light is off.
IMPORTANT: The health of some birds is extremely
sensitive to the fumes given off during the self-cleaning
cycle of any range. Move birds to another well-
ventilated room.
To Stop a Self-Clean Cycle
Turn knob to off position and wait for self clean light to
go off.
:DLWXQWLOWKHRYHQKDVFRROHGEHORZWKHORFNLQJ
WHPSHUDWXUHWRXQODWFKWKHGRRU<RXZLOOQRWEHDEOHWR
open the door right away unless the oven has cooled
below the locking temperature.
Page is loading ...
Page is loading ...
Page is loading ...
Page is loading ...
Page is loading ...
Page is loading ...
Page is loading ...
Page is loading ...
Page is loading ...
Page is loading ...
Page is loading ...
Page is loading ...
Page is loading ...
Page is loading ...
Page is loading ...
Page is loading ...
Page is loading ...
Page is loading ...
Page is loading ...
Page is loading ...
Page is loading ...
Page is loading ...
Page is loading ...
Page is loading ...
Page is loading ...
Page is loading ...
Page is loading ...
Page is loading ...
Page is loading ...
Page is loading ...
Page is loading ...
Page is loading ...
Page is loading ...
Page is loading ...
Page is loading ...
Page is loading ...
-
 1
1
-
 2
2
-
 3
3
-
 4
4
-
 5
5
-
 6
6
-
 7
7
-
 8
8
-
 9
9
-
 10
10
-
 11
11
-
 12
12
-
 13
13
-
 14
14
-
 15
15
-
 16
16
-
 17
17
-
 18
18
-
 19
19
-
 20
20
-
 21
21
-
 22
22
-
 23
23
-
 24
24
-
 25
25
-
 26
26
-
 27
27
-
 28
28
-
 29
29
-
 30
30
-
 31
31
-
 32
32
-
 33
33
-
 34
34
-
 35
35
-
 36
36
-
 37
37
-
 38
38
-
 39
39
-
 40
40
-
 41
41
-
 42
42
-
 43
43
-
 44
44
-
 45
45
-
 46
46
-
 47
47
-
 48
48
-
 49
49
-
 50
50
-
 51
51
-
 52
52
-
 53
53
-
 54
54
-
 55
55
-
 56
56


GE JB650 Owner's manual
- Type
- Owner's manual
Ask a question and I''ll find the answer in the document
Finding information in a document is now easier with AI
Related papers
Other documents
-
Yes GRS600AVDS User manual
-
 GE Capital JAP02 User manual
-
Whirlpool GGE388LXB User manual
-
 GE Monogram ZET1SHSS Owner's manual
-
-
 Cafe CES750P2MS1 Owner's manual
-
-
GE Profile PB911SJSS User guide
-
 Cafe CHS985SELSS User guide
-
Summit Appliance RE201W User guide


