Page is loading ...

Quick Start Guide
MVP-KS
Kickstand for MVP Touch Panels
For more detailed installation instructions refer to the MVP-7500 and
MVP-8400 Modero ViewPoint Touch Panels Instruction Manual, available
on-line at www.amx.com.
Overview
The MVP-KS Kickstand (FG5965-12) is compatible with both MVP touch panel
models: MVP-7500 and MVP-8400. This device provides the ability to easily rest
an MVP onto any flat level surface.
By connecting and securing the MVP-KS to the rear of the MVP, you are
now able to use the kickstand’s rubber grip to provide a "grip" on the
desired level surface.
The MVP-KS mounts easily to the rear of the MVP by using both a set of
alignment guide pins and a retractable latch to secure the kickstand to the MVP.
Specifications
Securing an MVP to the MVP-KS
1. Place a soft cloth onto a level surface.
2. Carefully place the MVP panel onto the cloth in order not to scratch
the panel during the installation process.
3. Locate the MVP-KS alignment guide pins (FIG. 3). These pins are
inserted into the respective MVP alignment guide insertion holes
(located along the underside of the MVP - at either sides of the
connector strip).
4. Carefully grasp both sides of the MVP-KS Kickstand and insert the KS
alignment guide pins into their respective insertion holes on the
bottom of the MVP (FIG. 3).
5. Maintain a kickstand connection to the bottom of the MVP panel
(FIG. 4).
6. Use downward pressure on the MVP-KS’ AMX logo to insert the
retractable latch into the opening just above the MVP metallic plate
(FIG. 4).
7. Verify a secure connection between the MVP and the kickstand.
Note: Upon proper connection, you should hear a "click" when the latch
securely "grabs" onto the metallic plate.
8. Extend the MVP-KS support arm (as seen in FIG. 1).
9. Carefully grab both sides of the MVP panel and rotate the entire unit
over back onto the level surface.
Note: The black rubber strip on the bottom of the support arm provides the
MVP/KS combo with added surface grip.
CAUTION: Be very careful when testing the proper connection of the MVP
to the MVP-KS. If the panel is not securely attached, the MVP could
suddenly become detached and be damaged.
FIG. 1
MVP-KS Kickstand for MVP Touch Panels (FG5965-12)
FIG. 2 MVP-KS components
MVP-KS Specifications
Dimensions (HWD): • Fully collapsed: 6.34" x 7.91" x 0.59" (16.10 cm x 20.10 cm x 1.50 cm)
• Fully extended: 6.34" x 7.91" x 4.17" (16.10 cm x 20.10 cm x 10.60 cm)
Weight: • 0.67 lbs (0.30 kg)
Components: • Retractable Latch: This latch grabs onto the metallic plate located on
the rear of the MVP and secures the MVP-KS to the panel.
• Release Lever: This lever is used to retract the MVP-KS lever and
release the secured MVP touch panel.
• Support Arm: This adjustable support arm is used to provide a level
surface support for any MVP attached to the MVP-KS.
Operating/Storage
Environments:
• Operating Temperature: 0° C (32° F) to 40° C (104° F)
• Operating Humidity: 20% - 85% RH
Included
Accessories:
• MVP-KS Kickstand for MVP Touch Panels Quick Start Guide
(93-5965-12)
Optional
Accessories:
• MVP-7500 7.5" Modero ViewPoint Touch Panel (FG5965-01)
• MVP-8400 8.4" Modero ViewPoint Touch Panel (FG5965-02)
MVP latch release lever
Retractable
Alignment
guide pins
latch
Support
arm (with
rubber grip)
FIG. 3 Aligning the MVP panel to the kickstand alignment guide pins
FIG. 4 Installing an MVP-KS onto the back of an MVP panel
Alignment
guide pin
MVP rear
Alignment
guide pin
metallic plate
(where the KS
latch secures
the panel)
MVP connector
strip
MVP battery
compartment
Alignment
guide
insertion
holes
KS connection site #1
KS connection site #2
(to alignment pins)
(latch secures to the
metallic plate on the
MVP)

AMX Corporation reserves the right to alter specifications without notice at any time.
For full warranty information, refer to the AMX Instruction Manual(s) associated with your Product(s).
036-004-2771 5/05 ©2005
AMX Corporation. All rights reserved. The AMX logo is a trademark of AMX Corporation.
3000 RESEARCH DRIVE, RICHARDSON, TX 75082 • 800.222.0193 • fax 469.624.7153 • technical support 800.932.6993 • www.amx.com
93-5965-12
REV: D
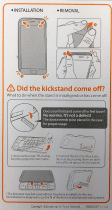
Unsecuring the MVP panel from the MVP-KS
1. Place a soft cloth onto a level surface.
2. Carefully place the MVP panel atop the cloth in order not to scratch
the panel during the removal process.
3. Pull upwards on the MVP latch release lever (located below the
kickstand’s AMX logo) to release the "grip" on the MVP’s metallic
plate (FIG. 5).
4. Pull off the MVP-KS from the back of the MVP panel.
5. Carefully grasp both sides of the MVP panel and rotate the entire unit
over back onto the level surface.
FIG. 5
Releasing the MVP from the MVP-KS
Rubber gripping
strip
MVP latch
release lever
/