
2222611-74
I N F O
INSTRUCTION BOOKLET
ER 6422 T
REFRIGERATOR

2
D
WARNINGS
It is most important that this instruction book should be retained with the appliance for future
reference.
Should the appliance be sold or transferred to another owner, or should you move house and leave
the appliance, always ensure that the book is supplied with the appliance in order that the new owner
can be acquainted with the functioning of the appliance and the relevant warnings.
These warnings are provided in the interest of safety. You must read them carefully before installing
or using the appliance.
General Safety
■
This appliance is designed to be operated by
adults. Children should not be allowed to
tamper with the controls or play with the
product.
■
It is dangerous to alter the specifications or
modify this product in any way.
■
Care must be taken to ensure that the
appliance does not stand on the electrical
supply cable.
■
Before any cleaning or maintenance work is
carried out, be sure to switch off and unplug
the appliance.
■
This appliance is heavy. Care should be
taken when moving it.
■
Ice lollies can cause frost burns if consumed
straight from the appliance.
Service / Repair
■
Any electrical work required to install this
appliance should be carried out by a
qualified electrician or competent person.
■
This appliance should be serviced by an
authorized Service Centre, and only genuine
spare parts should be used.
■
Under no circumstances should you attempt
to repair the appliance yourself. Repairs
carried out by inexperienced persons may
cause injury or more serious malfunctioning.
Refer to your local Service Centre, and
always insist on genuine spare parts.
Use
■
The domestic refrigerators and freezers are
designed to be used specifically for the
storage of edible foodstuffs only.
■
Frozen food must not be re-frozen once it
has been thawed out.
■
Manufacturers’ storage recommendations
should be strictly adhered to. Refer to
relevant instructions.
■
The inner lining of the appliance consists of
channels through which the refrigerant
passes. If these should be punctured this
would damage the appliance beyond repair
and cause food loss. DO NOT USE SHARP
INSTRUMENTS to scrape off frost or ice.
Frost may be removed by using the scraper
provided. Under no circumstances should
solid ice be forced off the liner. Solid ice
should be allowed to thaw when defrosting
the appliance. See defrost instructions.
■
Do not place carbonated or fizzy drinks in the
freezer as it creates pressure on the
container, which may cause it to explode,
resulting in damage to the appliance.
Installation
■
There are working parts in this product which
heat up. Always ensure that there is
adequate ventilation as a failure to do this
will result in component failure and possible
food loss. See installation instructions.
■
Parts which heat up should not be exposed.
Wherever possible the back of the product
should be against a wall.
■
If the appliance has been transported
horizontally, it is possible that the oil
contained in the compressor flows in the
refrigerant circuit. It is advisable to wait at
least two hours before connecting the
appliance to allow tlıe oil to flow back in the
compressor.
Environment Protection
■
This appliance does not contain gasses
which could damage the ozone layer, in
either its refrigerant circuit or insulation
materials. The appliance shall not be
discarded together with the urban refuse
and rubbish. Avoid damaging the cooling
unit, especially at the rear near the heat
exchanger. Information on your local
disposal sites may be obtained from your
municipal authorities. The materials used
on this appliance marked with the symbol
are recyclable.

3
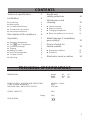
TECHNICAL SPECIFICATIONS
DIMENSIONS Height 85 cm
Width 49,5 cm
Depth 60 cm
POWER SUPPLY VOLTAGE AND FREQUENCY 220-240 V / 50 Hz
TOTAL POWER ABSORBED 90 W
AVERAGE DAILY UNITS ELECTRICITY 0,74 kWh
GROSS CAPACITY 140 l
Fridge 118 l
STAR RATING
Technical specification 3
Installation 4
n Positioning 4
n Before using 4
n For maximum efficiency 4
n The electrical connections 5
n Door reversal directions 6
Description of the appliance 6
Operation 7
n Setting the temperature 7
n The -star compartment 7
n Frozen food storage 7
n Thawing 8
n Making ice cubes 8
n Fresh food refrigeration 8
n The door shelves 9
n Defrosting 9
Health and
safety guidelines 10
Maintenance and
cleaning 11
n Internal cleaning 11
n External cleaning 11
n Changing the light bulb 11
n When the appliance is not in use 11
What happens if something
goes wrong? 12
Peace of mind for
twelve months 13
n Guarantee conditions 13
n Exclusions 13
Electrolux service centres 14
D
CONTENTS

INSTALLATION
4
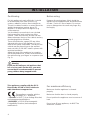
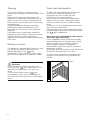
Positioning
For this appliance to work efficiently, it should
be located away from heat sources, e.g.
cookers, radiators, boilers, direct sunlight etc.
This also includes locations or rooms where the
ambient temperature reaches above 32
degrees C or drops below 10 degrees (e.g.
conservatories).
You should also ensure that air can circulate
freely around the back and the top of the
cabinet. There must also be at least 100 mm
distance beween the top of the cabinet and any
overhanging kitchen furniture.
There should also be a gap of 25 mm either
side and at the top of the appliance. Do not
obstruct the space underneath. The back of the
cabinet may be placed close to the wall but
must not touch it. DO NOT install in places with
restricted ventilation.
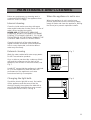
Adjust the level of the appliance by screwing
out the adjustable foot, or feet, at the bottom of
the cabinet using your fingers or a spanner (see
Fig. 1).
If you are discarding an old appliance that
has a lock or catch on the door, you must
ensure that it is made unusable to prevent
young children being trapped inside.
Warning
D200
Fig. 1
Before using
Remove all securing tapes. Wash inside the
appliance with lukewarm water and bicarbonate
of soda ( 5 ml to 0.5 litre of water). Do not use
soap or detergent as the smell may linger. Dry
thoroughly.
This appliance complies with the E.E.C.
Directive No. 87/308 of 2.6.87 relative to
radio interference suppression.
This appliance complies with the
following E.E.C. Directives:
- 73/23 EEC of 19.2.73 (Low Voltage Directive)
and subsequent modifications;
- 89/336 EEC of 3.5.89 (Electromagnetic
Compatibility Directive) and subsequent
modifications.
For maximum efficiency
Make sure that the appliance is cleaned
properly.
Make sure that the door is closed properly.
Do not position the appliance near to sources of
heat.
Do not over-fill your appliance, air MUST be
allowed to circulate.

The electrical connections
5
THIS APPLIANCE MUST BE EARTHED.
The manufacturer declines any liability
should this safety measure not be observed.
Warning
If the plug that is fitted to your appliance is not
suitable for your socket outlet, it must be cut off
and the appropriate plug fitted.
Remove the fuse from the cut off plug.
The cut off plug should then be disposed of to
prevent the hazard of shocks in case it should
be plugged into a 13amp socket in another part
of your home.
The wires in the mains lead are coloured in
accordance with the following code:
Green and Yellow - Earth
Blue - Neutral
Brown - Live
Important
If you fit your own plug, the colours of the wires
in the mains lead of your appliance ,ay not
correspond with the markings identifying the
terminals in your plug, proceed as follows:
- Connect the Green and the Yellow (earth) wire
to the terminal in the plug which is marked with
the letter «E» or the earth symbol , or
coloured green and yellow.
- Connect the blue (neutral) wire to the terminal
in the plug which is marked with the letter «N»
or coloured black.
- Connect the brown (live) wire to the terminal in
the plug which is marked with the letter «L» or
colured red.
The plug moulded onto the lead incorporates a
fuse. For replacement, use a 13amp BS1362
fuse. Only ASTA or BSI approved fuses should
be used.
The plug must not be used if the fuse
cover/carrier is lost. The cover/carrier is
indicated by the colured insert at the base of the
plug.
A replacement cover/carrier must be obtained
from your local Electrolux Service Centre whose
address is listed at the back of this instruction
manual.
D207
GREEN & YELLOW
13 AMP. FUSE
BROWN
CORD CLAMP
BLUE
13 AMP
Fig. 2

Door reversal directions
Before carring out the operations described
below, pull out the mains plug from the wall
socket.
To carry out this reversal go through the
following steps:
1. gently lay the appliance on its back with the
top held away from the floor by 5-8 cm (2-3
inces) of packing.
2. Remove the bottom door hinge (5).
3. Remove the door (4) by opening it and
pulling it gently downwards to remove it from
the top hinge pin (2).
4. Unscrew the top hinge pin (2) from the top
hinge (1) and replace it in the opposite hole on
the left hand side.
5. Unscrew the foot at the base (6) of the
appliance and refit it on the opposite side.
6. Refit the door and the bottom hinge to the left
hand side
7. Remove the door handle (3) and fit it on the
opposite side after having pierced the plastic
plugs with a punch. Cover the holes left open
with the plugs contained in the documentation
pack.
6
When the bottom hinge is screwed in, a
certain amount of force is exerted on the
screws.
It is therefore advisable to lubricate the
screw tips before starting this operation.
After completion of the door reversal operation,
verify that the door gasket is sealing onto the
cabinet.
Attention
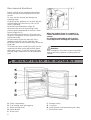
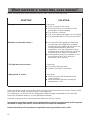
DESCRIPTION OF THE APPLIANCE
A - Dairy compartment
B - Can storage shelf with egg tray
C - Bottle storage shelf
D - Salad drawer
E - Glass shelf
Fig. 3
F - Storage shelve
G - Conveyor
H - Storing frozen food and making ice cubes
I - Thermostat control
i

7
Setting the temperature
The temperature inside the refrigerator and the
-star compartment is regulated by a
thermostat with 6 temperature positions and one
«OFF» (O) position.
Position 1 = minimum coldness
Position 6 = maximum coldness
Turn the thermostat dial to the required position;
the intermediate position is usually the most
suitable (3-4).
The thermostat setting can vary as the
temperature inside the refrigeration compartment
depends on the following factors:
- room temperature
- how often the door is opened
- how much food is stored
- position of the appliance
refrozen, it must be consumed within 24 hours.
Never exceed the storage times indicated.
Do not open the -star compartment door
too often and do not leave open longer than
The temperature inside the refrigerator and
-star compartment can be regulated by adjusting
the conveyor located under the - star
compartment.To obtain a lower temperature in
the -star compartment when frozen food is
stored inside and when the ambient temperature
is 25°C or lower slightly raise the conveyor (A)
and push it all the way in. When frozen food is
not stored in the -star compartment and
when the ambient temperature is higher than
25°C return the conveyor to its initial position.
This reduces the temperature in the refrigerator
compartment.
Important
D182
A
**
Fig. 5
The -star compartment
This compartment is suitable for the storage of
commercially frozen food and for ice cube
making.
Frozen food storage
Storing ready-frozen foods is quite
straightforward. The packs can be placed beside
each other or on top of each other.
You are strongly advised to place ready-frozen
food in the compartment as quickly as possible
after purchase and we therefore recommend that
you buy them last. Also ensure that the external
packaging is intact.
Packaging which is swollen or has traces of
refrozen water droplets on the pack could
indicate that the product has not been kept at a
suitable temperature and that it may have lost its
original quality. Partially thawed food must not be
In the event of a power cut the food in the -
star compartment will not be affected if the
power cut is short and if the compartment is full.
Do not open the door. Should the food begin to
thaw, it must be consumed quickly and must not
be re-frozen.
Caution
OPERATION
i

8
Thawing
Food can be thawed in a number of ways,
depending on the type of food and the size of the
packs.
Meat, fish and fruit should be thawed in the
refrigeration compartment and small pieces of
meat or poultry can even be cooked while still
frozen, but you must ensure that it is thoroughly
cooked through.
Vegetables should be directly immersed in
boiling water; ready-cooked dishes can be
placed directly in the oven in their aluminium
wrapping.
A microwave oven is particularly suitable for
thawing any type of frozen or deep-frozen food:
follow the oven instructions, particularly
regarding the placement of aluminium wrapping
in the oven.
Making ice cubes
The appliance is provided with a plastic ice cube
tray. Fill the tray 3/4 full to allow the ice to
expand and place it in the -star
compartment. To turn out the ice cubes simply
give the tray a slight twist to release the cubes.
Do not consume ice-lollies which have just
come out of the -star compartment. Their
extremely low temperature can cause frost
burns.
Do not remove items from the -star
compartment if your hands are damp/wet, as
this could cause skin abrasions or "frost/freezer
burns".
Important
Fresh food refrigeration
To obtain the best performance, do not store
warm food or evaporating liquids in the
refrigerator; do cover or wrap the food,
particularly if it has a strong flavour.
Do not cover the shelves with any protective
material, such as paper, cardboard or plastic,
which may obstruct the air circulation through
them.
To help you use your refrigerator correctly, here
are some more useful hints:
Raw meat (beef, pork, lamb & wild fowl): wrap
in
polythene bags and place on the first shelf under
the -star compartment.
Meat can only be stored safely in this way for
one or two days at the most.
Fruit & vegetables: these should be thoroughly
cleaned and placed in the bottom salad crisper.
Butter & cheese: these should be placed in
special airtight containers or wrapped in
aluminium foil or polythene bags to exclude as
much air as possible.
Milk bottles: these should have a cap and should
be stored in the bottle rack on the door.
The walls of the refrigerator are equipped with
runners so that shelves can be positioned as
desired.
D040
Fig. 6

9
The door shelves
For more thorough cleaning, the central door
shelf and the bottle shelf can be removed by
pushing them up slightly, then refitting them in
position.
Defrosting
While in operation the -star compartment
becomes progressively covered with frost.
This frost, which acts as an insulator and thus
prevents the cold from reaching the food should
be removed whenever the thickness of the frost
exceeds 1/4".
To carry out complete defrosting proceed as
follows:
- Push the conveyor completely in.
- Place a tray on the upper shelf of the
refrigerator under the drain hole of the conveyor.
- Remove any food from inside the -star
compartment, wrap it in several sheets of
newspaper and store in a cool dry place.
- Push the button at the centre of the thermostat
knob.
To accelerate defrosting, place a bowl of hot
water inside the compartment (with a piece of
cardboard underneath the bowl as protection).
- When defrosting is completed, dry thoroughly
and remove the water collected in the tray.
The refrigerator starts operating automatically
following defrosting.
After letting the appliance run for at least half an
hour, replace the previously removed food into
the -star compartment.
When defrosting it is not necessary to remove
the foods from the inner door and the refrigerator
compartment.
Important
A temperature rise of the frozen food packs
during defrosting may shorten their storage life.
Never use sharp metal tools to scrape off frost
from the evaporator as you could damage it
beyond repair.

HEALT AND SAFETY GUIDELINES
10
Because of consumer demand, preservatives have been removed from many pre-prepared food. This
together with the hanges in shopping habits to a once-a-week shop, mean that safe handling and
storage of food is even more important than ever.
The following tips should help you to ensure
that the food in your home is in as perfect
condition as possible.
n Keep the time between buying chilled food
and placing it in your fridge as short as
possible. Tests showed that the temperature
of 1 litre of orange juice rose to 22°C in an
hour between the supermarket and home. It
then took 11 hours to get down to 7°C in the
refrigerator.
n Keep the refrigerator door closed as much as
possible. Remember that warm air is flowing
in as you are deciding what to have for tea!
n Do not push food together too much, try to
allow air to circulate around each item.
n Cool cooked food as quickly as possible but
do NOT place in the refrigerator until cool.
(Leave food in a place as cool as possible in
order that it can then be placed in the
refrigerator as soon as possible).
n Do NOT mix raw and cooked meat, they must
be in separate containers. Take care not to let
the meat juices drip onto other food. If the
meat does drip, remove everything and clean
thoroughly.
n Do not store food uncovered.
n Remove suspect food from your refrigerator
and clean the interior with a solution of
bicarbonate of soda in warm water (5ml to 0.5
litre of water).
n Never allow spillages to dry and harden.
n Store eggs in the egg rack provided in the
refrigerator door. Discard any broken or
chipped eggs.
n Regularly check the refrigerator door seal to
ensure that it is clean and free from bits and
pieces.
n Always wash your hands with soapy water
and dry them with a clean towel before
handling food.
n Keep work surfaces clean and avoid cross
contamination by not using the same work
surface or knife, without washing them
thoroughly in between.
n Use kitchen roll wherever possible for
cleaning up food. If you use a dishcloth, be
sure to boil it frequently.
i

11
Before any maintenance or cleaning work is
carried out, DISCONNECT the appliance from
the ELECTRICITY supply.
Internal cleaning
Clean the inside and accessories with warm
water and bicarbonate of soda (5ml to 0.5 litre of
water). Rinse and dry thoroughly.
NEVER USE DETERGENTS, ABRASIVE
POWDERS, HIGHLY PERFUMED CLEANING
PRODUCTS OR WAX POLISHES, TO CLEAN
THE INTERIOR AS THESE WILL DAMAGE THE
SURFACE AND LEAVE A STRONG SMELL.
Clean the drain hole of the water trough at
regular intervals and make sure that the drain
hole is never obstructed, so that the defrost
water may flow freely.
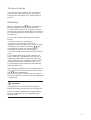
External cleaning
Wash the outer cabinet with warm soapy water.
Do NOT use abrasive products.
Once or twice a year dust the condenser (black
grill) and the compressor at the back of the
appliance, with a brush or vacuum cleaner, see
Fig. 7.
You MUST ensure that the appliance is switched
OFF. An accumulation of dust will affect the
performance of the appliance and cause
excessive electricity consumption.
Changing the light bulb
Should the interior light fail to work, first switch
off the appliance and disconnect from the
electricity supply, then replace the bulb with a
new 12 watt bulb (available from your nearest
Electrolux Service Centre). See fig. 8.
D358
CONDENSER
COMPRESSOR
Fig. 7
When the appliance is not in use
When the appliance is not in use for long
periods, disconnect from the electricity supply,
empty all foods and clean the appliance, leaving
the door ajar to prevent unpleasant smells.
D359
Fig. 8
MAINTENANCE AND CLEANING

12
D
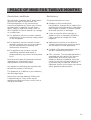
WHAT HAPPENS IF SOMETHING GOES WRONG?
Before contacting your local Electrolux Service Centre, check the following points:
SYMPTOM
SOLUTION
The appliance does not work ...
Check that:
n There is power at the socket.
n Ensure that there is not a power cut by
checking the household lights.
n The fuse has not blown.
n The air circulation passages are not covered.
n The thermostat dial is in the correct position.
Vibration or abnormal noises ...
n You may hear faint gurgling or bubbnling
sounds when the refrigerant is pumped
through the coils of tubing at the rear, to the
cooling plate/evaporator. When the
compressor is on, the refrigerant is being
pumped round, and you will hear a whirring
or pulsating noise from the compressor.
n A thermostat controls the compressor, and
you will hear a faint “click” when the
thermostat cuts in and out.
The light does not come on ...
Check that:
n The bulb is fitted correctly.
n Replace the bulb if it has blown.
Other points to check ...
Check that:
n Have you turned the thermostat to the
correct setting?
n Have door been left open causing the
temperature to rise?
If after the above checks, there is still a fault, call your local Electrolux Service Centre. Please, make
sure you give the model and serial number of the appliance.
This information can be found on the rating plate inside the fridge compartment on the left side
behind the vegetable drawer, or on the guarantee certificate.
Originale spare parts can be purchased from Electrolux Service Centres.
In-guarantee customers should ensure that the above checks have been made as the engineer
will make a charge if the fault is not a mechanical or electrical breakdown.
Please note that proof of purchase is required for any in-guarantee service calls.

13
D
Guarantee conditions
We, Electrolux, undertake that if, within twelve
months of the date of the purchase, this
Electrolux appliance or any part thereof is
proved to be defective by reason only of faulty
workmanshiop or materials, we will, at our
option, repair or replace the same FREE OF
ANY CHARGE for labour, materials or carriage
on condition that:
n The appliance has been correctly installed
and used only on the electricity supply stated
on the rating plate.
n The appliance has been used for normal
domestic purposes only, and in accordance
with the manufacturer’s operating and
maintenance instructions.
n The appliance has not been serviced,
maintained, repaired, taken apart or
tampered with by any person not authorised
by us.
All service work under this guarantee must be
undertaken by a Electrolux service
representative or authorised agent.
Any appliance or defective part replaced shall
become the property of Electrolux.
This guarantee is in addition to your statuotory
and other legal rights.
Home visits are made between 8.30am and
5.30pm Monday to Friday. Visits may be
available outside these hours in which case a
charge will be made.
Exclusions
This guarantee does not cover:
n Damage or calls resulting from
transportation, improper use or neglect, the
replacement of any light bulbs or removable
parts of glass or plastic, or vacuum cleaner
drive belts, burshes or dust bags.
n Costs incurred for calls to put right an
appliance which is improperly installed or
calls to appliances outside the United
Kingdom.
n Appliances found to be in use within a
commercial environment, plus those which
are the subject of rental agreements.
n Products of Electrolux manufacture which
are NOT marketed by Electrolux.
n EEC Countries - The standard guarantee is
applicable but mis subject to the owner’s
responsibility and cost to ensure the
appliance meets the standards set by the
country to which the product is taken. Proof
of purchase may be required. Electrolux
Aftersales Service in the country concerned,
will be pleased to advise further.
PEACE OF MIND FOR TWELVE MONTHS
-
 1
1
-
 2
2
-
 3
3
-
 4
4
-
 5
5
-
 6
6
-
 7
7
-
 8
8
-
 9
9
-
 10
10
-
 11
11
-
 12
12
-
 13
13


Ask a question and I''ll find the answer in the document
Finding information in a document is now easier with AI
Related papers
-
Electrolux ER1627T User manual
-
-
-
-
-
-
-
-
-
Electrolux ER1625T User manual
