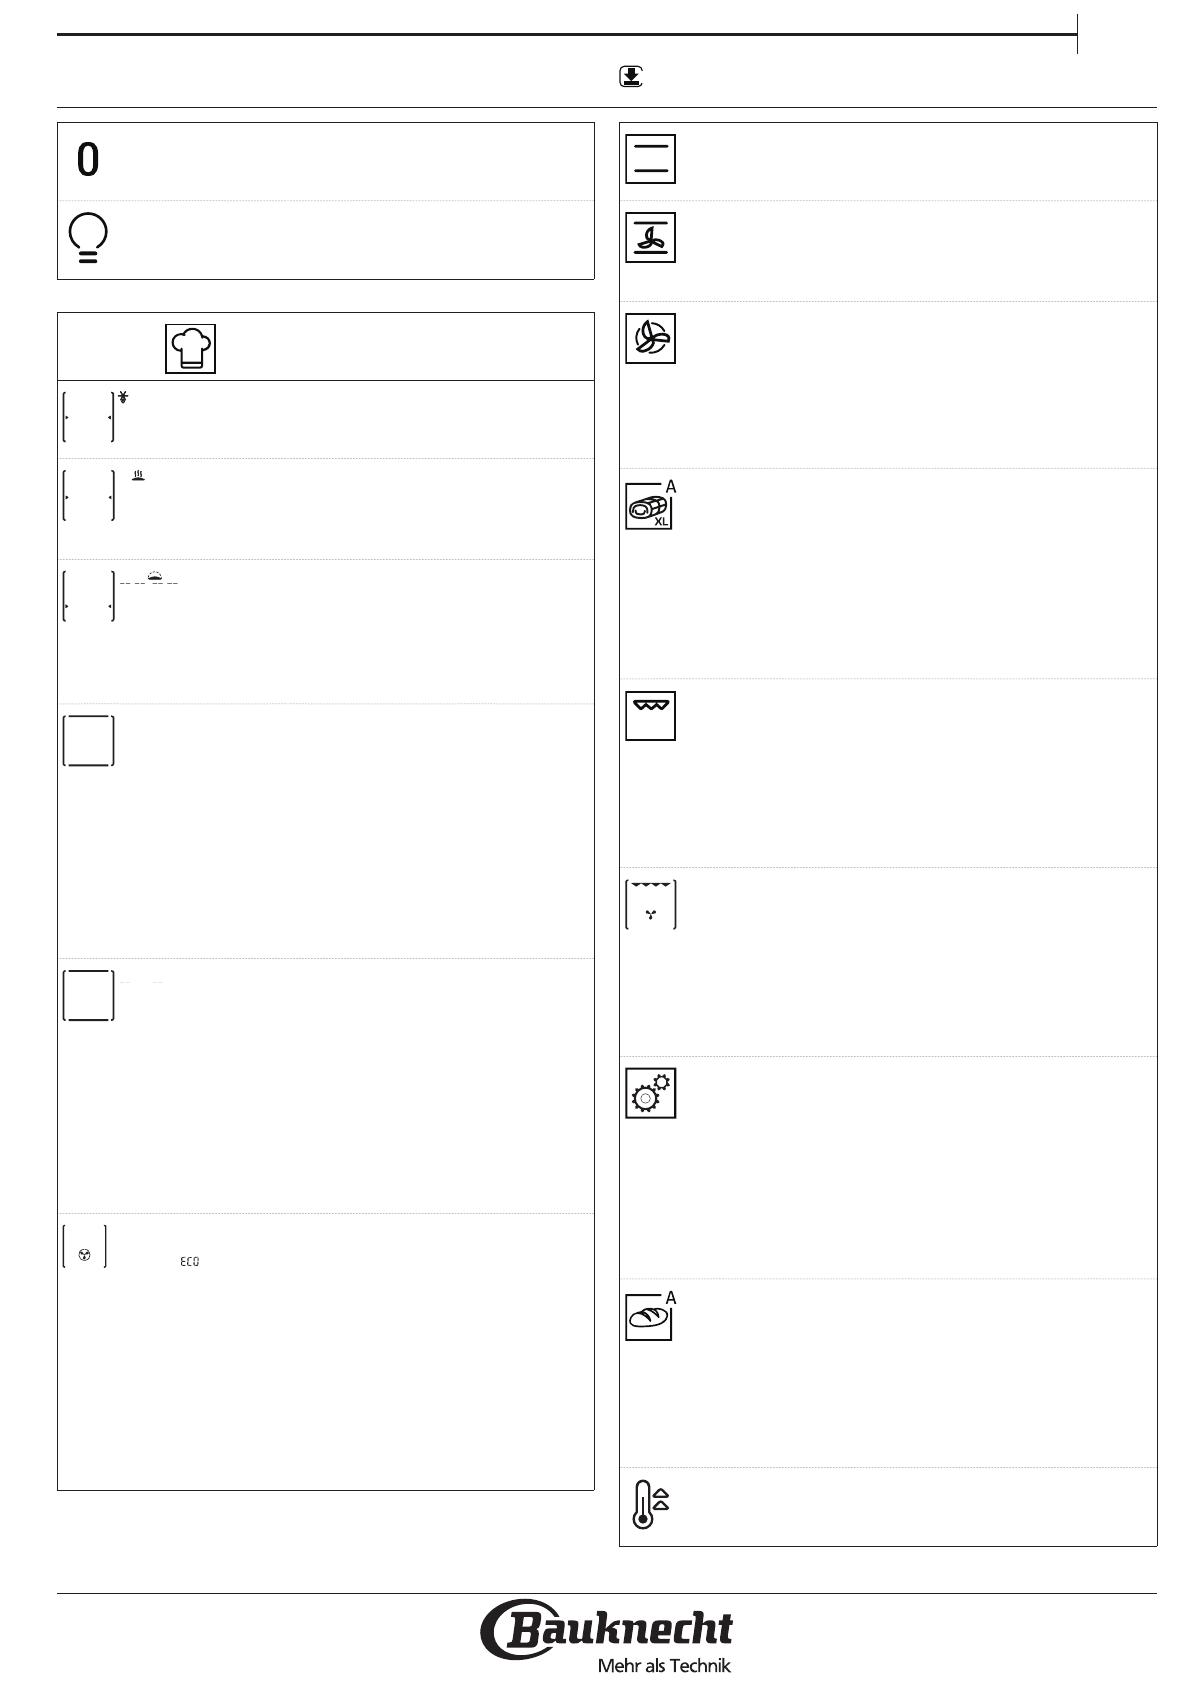
Bauknecht HIR4 EI8VS3 PT Owner's manual

Category
Ovens
Type
Owner's manual

This manual is also suitable for

EN
1
PRODUCT DESCRIPTION
CONTROL PANEL
1. Control panel
2. Fan
3. Circular heating element
(non-visible)
4. Shelf guides
(the level is indicated on the front
of the oven)
5. Door
6. Upper heating element/grill
7. Lamp
8. Identification plate
(do not remove)
9. Bottom heating element
(non-visible)
OVEN CONTROLS
1. SELECTION KNOB
For switching the oven on by
selecting a function. Turn to the
position to switch the oven off.
2. DISPLAY
3. SELECTION/CONFIRMATION
BUTTON
For confirming a selected function
or a set value.
Please note: the display shows for
indications regarding this button.
4. ADJUSTMENT KNOB
For scrolling through the menus
and applying or changing settings.
CONTROL KNOBS FOR
COOKTOP
A.
for front left hotplate.
B. for rear left hotplate.
C. for rear right hotplate.
D. for front right hotplate.
E. Cooktop “ON” indicator light
Please note: all the knobs are
retractable. Press the knobs in the
middle and they pop up.
4
3
2
1
4
3
2
1
1
2
3
4
5
8
9
7
6
DAILY REFERENCE
GUIDE
Before using the appliance carefully read the Health and Safety guide.
THANK YOU FOR PURCHASING A
BAUKNECHT PRODUCT
To receive more comprehensive help and
support, please register your product at
www. bauknecht. eu/ register
WWW
You can download the Safety Instructions
and the Use and Care Guide by visiting our
website docs. bauknecht. eu and following
the instructions on the back of this booklet.
A B 1 2 3 4 C D E
2
ACCESSORIES
Download the Use and Care Guide from
docs. bauknecht. eu for more information
WWW
WIRE SHELF DRIP TRAY BAKING TRAY
SLIDING RUNNERS
(IF PRESENT)
The number and the type of accessories may vary
depending on which model is purchased.
Other accessories that are not supplied can be purchased
separately from the After-sales Service.
INSERTING THE WIRE SHELF AND OTHER
ACCESSORIES
Insert the wire shelf horizontally by sliding it across
the shelf guides, making sure that the side with the
raised edge is facing upwards.
Other accessories, such as the drip tray and the
baking tray, are inserted horizontally in the same way
as the wire shelf.
FITTING THE SLIDING RUNNERS
ONLY IN SOME MODELS
Please note: The sliding runners can be already mounted on
the shelf guides: to remove them, pull outward, releasing rst
the lower clip.
Remove the shelf guides from the oven and remove
the protective plastic from the sliding runners.
Fasten the upper clip of the
runner to the shelf guide
and slide it along as far as it
will go. Lower the other clip
into position.
To secure the guide, press
the lower portion of the
clip firmly against the shelf
guide. Make sure that the
runners can move freely.
Repeat these steps on the
other shelf guide on the
same level.
Please note: The sliding runners can be tted on any level.
REMOVING AND REFITTING THE SHELF GUIDES
To remove the shelf guides, remove the fixing
screws (if present) on both sides with the aid of a
coin of a tool. Lift the guides up and pull the lower
parts out of their seatings: The shelf guides can now
be removed.
To refit the shelf guides, first fit them back into
their upper seating. Keeping them held up, slide them
into the cooking compartment, then lower them into
position in the lower seating. Refit the fixing screws.
EN
3
FUNCTIONS
Download the Use and Care Guide from
docs. bauknecht. eu for more information
WWW
CONVENTIONAL
For cooking any kind of dish on one shelf only.
CONVECTION BAKE
For cooking meat or baking cakes with liquid
centre on a single shelf.
FORCED AIR
For cooking different foods that require
the same cooking temperature on several shelves
(maximum three) at the same time. This function
can be used to cook different foods without odours
being transferred from one food to another.
MAXI COOKING
For cooking large joints of meat (above 2.5kg).
Use the 1st or 2nd shelves, depending on the size of
the joint. The oven does not have to be preheated.
We suggest turning the meat during cooking
to obtain uniform browning on both sides. It is
advisable to baste the meat every now and again so
that it does not become too dry.
GRILL
For grilling steaks, kebabs and sausages,
cooking vegetables au gratin or toasting bread.
When grilling meat, we recommend using a drip tray
to collect the cooking juices: Position the pan on any
of the levels below the wire shelf and add 500ml of
drinking water.
TURBO GRILL
For roasting large joints of meat (legs, roast
beef, chicken). We recommend using a drip tray to
collect the cooking juices: Position the pan on any
of the levels below the wire shelf and add 500ml of
drinking water. The turnspit (if provided) can be used
with this function.
SETTINGS
For changing the oven settings (time,
language, audible signal volume, brightness, ECO
mode).
Please note: When Eco mode is active, the brightness of the
display will be reduced and the light switches o to save
energy. They are reactivated temporarily whenever any of
the buttons are pressed.
BREAD / PIZZA
To bake different types and sizes of pizza
and bread. This function contains two programmes
with predefined settings. Simply indicate the values
required (temperature and time) and the oven will
manage the cooking cycle automatically. Place the
dough on the 2nd shelf after preheating the oven.
FAST PREHEATING
For preheating the oven quickly.
* Function used as reference for the energy eciency
declaration in accordance with Regulation (EU) No. 65/2014
OFF
For switching off the oven.
LIGHT
To switch the oven light on/off.
SPECIAL FUNCTIONS
DEFRO
DEFROST
To speed up defrosting of food.
WARM
WARM KEEPING
For keeping just-cooked food hot and
crisp.
RISIN
RISING
For optimal proving of sweet or
savoury dough. To maintain the quality of proving,
do not activate the function if the oven is still hot
following a cooking cycle.
SLOW
SLOW COOKING MEAT
For slow cooking of meat at 90°C.
This function offers slow cooking which ensures the
food remains tender and succulent. For roast joints,
brown in the pan first in order to seal in the meat’s
natural juices. Cooking times range from 4 hours for
1kg joints to 6-7 hours for 3kg joints. For optimum
results, avoid opening the oven door during cooking
and use a cooking thermometer to check the core
temperature of the meat.
SLOW
SLOW COOKING FISH
To cook fish gently at 85°C. This
function offers slow cooking which ensures the
food remains tender and succulent. Thanks to the
low temperature, the food does not brown on
the outside and the end result is similar to steam
cooking. Cooking times range from 2 hours for 300g
fish. To 4-5 hours for 3kg fish. For optimum results,
keep oven door openings to a minimum during
cooking in order to avoid heat dispersion.
ECO F
ECO FORCED AIR*
For cooking stuffed roasting
joints and fillets of meat on a single shelf. Food is
prevented from drying out excessively by gentle,
intermittent air circulation. When this function is in
use, the light will remain switched off throughout
cooking but can be switched back on temporarily by
pressing the confirm button.
To use the ECO cycle and therefore optimise power
consumption, the oven door should not be opened
until the food is completely cooked.
4
1. SELECT THE LANGUAGE
You will need to set the language and the time
when you switch on the appliance for the first
time. ENGLISH will scroll along the display. Turn the
adjustment knob to scroll through the list of available
languages and select the one you require.
Press the selection/confirmation button to confirm your
selection.
Please note: The language can subsequently be changed
from the “Settings” menu.
2. SET THE TIME
After selecting the language, you will need to set the
current time: The two digits for the hour will flash on
the display.
Turn the adjustment knob to set the correct hour and
press the selection/confirmation button: the minutes
will flash on the display.
Turn the adjustment knob to set the minutes and press
the selection/confirmation button to confirm.
Please note: You may need to set the time again following
lengthy power outages.
3. HEAT THE OVEN
A new oven may release odours that have been left
behind during manufacturing: This is completely
normal. Before starting to cook food, we therefore
recommend heating the oven with it empty in order
to remove any possible odours.
Remove any protective cardboard or transparent film
from the oven and remove any accessories from inside
it.
Heat the oven to 200°C for around one hour, ideally
using a function with air circulation (e.g. “Forced Air
or “Convection Bake”).
Follow the instructions for setting the function
correctly.
Please note: It is advisable to air the room after using the
appliance for the rst time.
FIRST TIME USE
EN
5
DAILY USE
1. SELECT A FUNCTION
Turn the selection knob to switch on the oven and
show the function you require on the display: The
display will show the icon for the function and its
basic settings.
CONVE
To select an item from the menu (the display will
show the first available item), turn the adjustment
knob until the item you require is shown.
TURBO
Press the selection/confirmation button to confirm
selection: the display will show the basic settings.
2. SET THE FUNCTION
After having selected the function you require, you
can change its settings.
The display will show the settings that can be
changed in sequence.
TEMPERATURE/GRILL LEVEL
When the value flashes on the display.
Turn the adjustment knob to change it, then press the
selection/confirmation button to confirm and continue
to alter the settings that follow (if possible).
Please note: Once the function has been activated, the
temperature can be changed using the adjustment knob.
DURATION
When the icon flashes on the display, use the
adjustment knob to set the cooking time you require
and then press the selection/confirmation button to
confirm.
You do not have TO set the cooking time if you want
to manage cooking manually: Press the selection/
confirmation button to confirm and start the function.
In this case, you cannot set the end cooking time by
programming a delayed start.
SETTING THE END COOKING TIME DELAYED START
In many functions, once you have set a cooking time
you can delay starting the function by programming
its end time.
The display shows the end time while the
icon
flashes.
Turn the adjustment knob to set the time you want
cooking to end, then press the selection/confirmation
button to confirm and start the function.
Place the food in the oven and close the door: The
function will start automatically after the period of
time that has been calculated in order for cooking to
finish at the time you have set.
Notes: Programming a delayed cooking start time will
disable the oven preheating phase: The oven will reach the
temperature your require gradually, meaning that cooking
times will be slightly longer than those listed in the cooking
table.
During the waiting time, you can use the adjustment knob to
amend the programmed end time.
3. ACTIVATE THE FUNCTION
Once you have applied the settings you require, press
the selection/confirmation button to confirm the time
that cooking will end and activate the function.
Please note: Once cooking has started, the display will
recommend the most suitable level for each function.
You can turn the selection knob to to pause the
function that has been activated at any time.
6
4. FAST PREHEATING
Turn the selection knob to the symbol to select the
fast preheating function and confirm by pressing the
selection/confirmation button: the settings are shown
on the display.
If the proposed temperature is that desired, press
the selection/confirmation button. To change the
temperature, proceed as described in previous
paragraphs.
PRE
Once this phase has finished, an audible signal will
sound and the display will indicate that the oven has
reached the set temperature.
At this point, open the door, place the food in the
oven, close the door and start cooking.
At the end of preheating, the oven automatically
selects the conventional function: If you wish to set a
different cooking function, turn the selection knob and
select the desired function.
Please note: Placing the food in the oven before preheating
has nished may have an adverse eect on the nal cooking
result. Opening the door during the preheating phase will
stop pause it.
The cooking time does not include a preheating phase.
You can always change the temperature you want the oven
to reach using the adjustment knob.
5. END OF COOKING
An audible signal will sound and the display will
indicate that cooking is complete.
Press the selection/confirmation button to continue
cooking in manual mode (without a programmed
cooking time) or turn the adjustment knob to extend
the cooking time by setting a new duration.
In both cases, the temperature or the grill level
settings will be retained.
BROWNING
Some functions of the oven enable you to brown
the surface of the food by activating the grill once
cooking is complete.
PRESS
When the display shows the relevant message, if
required press the selection/confirmation button to
start a five-minute browning cycle.
You can stop the function at any time by turning the
selection knob to
to switch the oven o.
. TIMER
When the oven is switched off, the display can be
used as a timer. To activate this function, make sure
that the oven is switched off and turn the adjustment
knob: The
icon will flash on the display.
Turn the adjustment knob to set the length of time
you require and then press the selection/confirmation
button to activate the timer. An audible signal will
sound and the display will indicate once the timer has
finished counting down the selected time.
Please note: The timer does not activate any of the cooking
cycles. Use the adjustment knob to change the time set on
the timer; turn the selection knob to to switch the timer
o at any time.
. COOKTOP OPERATION
(see the instructions supplied with the cooktop).
The oven control panel features 4 adjustable knobs
for cooktop operation.
The cooktop control knobs are marked with a
numerical scale corresponding to different power
settings.
Please note: The - symbol on the cooktop control knobs
indicates that there are no corresponding functions, and
therefore, in that position, the cooking zone switches o.
Turn the control knob of the relevant hotplate
clockwise to the desired power setting.
EN
7
HOW TO READ THE COOKING TABLE
The table lists the best function, accessories and level
to use to cook various different types of food.
Cooking times start from the moment food is placed
in the oven, excluding preheating (where required).
Cooking temperatures and times are approximate
and depend on the amount of food and the type
of accessory used. Use the lowest recommended
settings to begin with and, if the food is not cooked
enough, then switch to higher settings. Use the
accessories supplied and preferably dark-coloured
metal cake tins and baking plates. You can also use
Pyrex or stoneware pans and accessories, but bear in
mind that cooking times will be slightly longer.
COOKING DIFFERENT FOODS AT THE SAME TIME
Using the “Forced Air” function, you can cook
different foods which require the same cooking
temperature at the same time (for example: fish and
vegetables), using different shelves. Remove the food
which requires a shorter cooking time and leave the
food which requires a longer cooking time in the
oven.
MEAT
Use any kind of oven tray or pyrex dish suited to the
size of the piece of meat being cooked. For roast
joints, it is best to add some stock to the bottom of
the dish, basting the meat during cooking for added
flavour. Please note that steam will be generated
during this operation. When the roast is ready, let it
rest in the oven for another 10-15 minutes, or wrap it
in aluminium foil.
When you want to grill meat, choose cuts with an
even thickness all over in order to achieve uniform
cooking results. Very thick pieces of meat require
longer cooking times. To prevent the meat from
burning on the outside, lower the position of the wire
shelf, keeping the food farther away from the grill.
Turn the meat two thirds of the way through cooking.
To collect the cooking juices, we recommend placing
a dripping pan filled with half a litre of drinking water
directly underneath the wire shelf on which the food
is placed. Top-up when necessary.
DESSERTS
Cook delicate desserts with the conventional function
on one shelf only.
Use dark-coloured metal baking pans and always
place them on the wire shelf supplied. To cook on
more than one shelf, select the forced air function and
stagger the position of the cake tins on the shelves,
aiding optimum circulation of the hot air.
To check whether a leavened cake is cooked, insert a
wooden toothpick into the centre of the cake. If the
toothpick comes out clean, the cake is ready.
If using non-stick baking pans, do not butter the
edges as the cake may not rise evenly around the
edges.
If the item “swells” during baking, use a lower
temperature next time and consider reducing the
amount of liquid you add or stirring the mixture more
gently.
For desserts with moist fillings or toppings (such
as cheesecake or fruit tarts), use the “Convection
bake” function. If the base of the cake is soggy, lower
the shelf and sprinkle the bottom of the cake with
breadcrumbs or biscuit crumbs before adding the
filling.
PIZZA
Lightly grease the trays to ensure the pizza has a
crispy base. Scatter the mozzarella over the pizza two
thirds of the way through cooking.
USEFUL TIPS
Download the Use and Care Guide from
docs. bauknecht. eu for more information
WWW
8
COOKING TABLE
RECIPE FUNCTION PREHEAT.
TEMPERATURE
(°C)
COOK TIME
(Min.)
LEVEL
AND ACCESSORIES
Leavened cakes
Yes 160 - 180 30 - 90
2
Yes 160 - 180 30 - 90
3
1
Filled cakes
(cheesecake, strudel, apple pie)
Yes 160 - 200 30 - 85
2
Yes 160 - 200 35 - 90
3
1
Biscuits / Tartlets
Yes 170 - 180 15 - 45
3
Yes 160 - 170 20 - 45
3
1
Choux buns
Yes 180 - 200 30 - 40
2
Yes 180 - 190 35 - 45
3
1
Meringues
Yes 90 110 - 150
2
Yes 90 130 - 150
3
1
Bread / Pizza / Focaccia
Yes 190 - 250 15 - 50
2
Yes 190 - 250 25 - 50
3
1
Bread Yes 180 - 220 30 - 50
2
Pizza Yes 220 - 250 15 - 30
2
Frozen pizza
Yes 250 10 - 15
2
Yes 250 10 - 20
3
1
Savoury pies
(vegetable pie,quiche)
Yes 180 - 190 35 - 45
2
Yes 180 - 190 45 - 60
3
2
Vols-au-vent / Pu pastry crackers
Yes 190 - 200 20 - 30
2
Yes 180 - 190 20 - 40
3
1
Lasagne / Baked pasta / Cannelloni
/ Flans
Yes 190 - 200 45 - 65
2
Lamb / Veal / Beef / Pork 1kg Yes 190 - 200 70 - 100
2
Chicken / Rabbit / Duck 1kg Yes 200 - 230 50 - 100
2
Turkey / Goose 3kg Yes 190 - 200 80 - 130
1 / 2
Baked sh / en papillote
(llets, whole)
Yes 180 - 200 40 - 60
2
Stued vegetables
(tomatoes, courgettes, aubergines)
Yes 180 - 200 50 - 60
2
Toast - 3 (high) 2 - 5
4
Fish llets / Steaks - 2 (medium) 20 - 35
4
3
Sausages / Kebabs / Spare ribs /
Hamburgers
-
2-3 (medium-
high)
15 - 40
4
3
Roast chicken 1-1.3kg - 2 (medium) 50 - 65 *
2
1
Roast beef rare 1kg - 2 (medium) 35 - 45 *
2
EN
9
* Turn food halfway through cooking.
** Turn food two thirds of the way through cooking (if
necessary).
*** Estimated length of time: dishes can be removed
from the oven at dierent times depending on personal
preference.
WWW
Download the Use and Care Guide by visiting the
website docs. bauknecht. eu to consult the table of tested
recipes lled out for the assessment institutes in accordance
with the IEC60350 - 1 standard.
RECIPE FUNCTION PREHEAT.
TEMPERATURE
(°C)
COOK TIME
(Min.)
LEVEL
AND ACCESSORIES
Leg of lamb / Shanks - 2 (medium) 60 - 90 **
2
Roast potatoes - 2 (medium) 45 - 55**
2
Vegetable gratin - 3 (high) 10 - 15
2
Lasagna & Meat Yes 200 50 - 100 ***
3
1
Meat & Potatoes Yes 200 45 - 100 ***
3
1
Fish & Vegetebles Yes 180 30 - 50 ***
3
1
Stued roasts
ECO F
- 200 80 - 120 ***
3
Meat pieces (rabbit, chicken, lamb)
ECO F
- 200 50 - 100 ***
3
FUNCTIONS
ECO F
Conventional Grill Turbo Grill Forced Air Convection Bake Bread / Pizza Eco Forced Air
ACCESSORIES
Wire shelf Cake tin on wire shelf
Drip tray / baking tray
or cake tin on wire
shelf
Drip tray
Drip tray with
500 ml of water
Baking tray
10
EXTERIOR SURFACES
Clean the surfaces with a damp microfibre cloth.
If they are very dirty, add a few drops of pH-neutral
detergent. Finish off with a dry cloth.
Do not use corrosive or abrasive detergents. If any of
these products inadvertently comes into contact with
the surfaces of the appliance, clean immediately with
a damp microfibre cloth.
INTERIOR SURFACES
After every use, leave the oven to cool and then
clean it, preferably while it is still warm, to remove
any deposits or stains caused by food residues. To
dry any condensation that has formed as a result of
cooking foods with a high water content, leave the
oven to cool completely and then wipe it with a cloth
or sponge.
Clean the glass in the door with a suitable liquid
detergent.
The oven door can be removed to facilitate cleaning.
ACCESSORIES
Soak the accessories in a washing-up liquid solution
after use, handling them with oven gloves if they
are still hot. Food residues can be removed using a
washing-up brush or a sponge.
Make sure that the oven has
cooled down before carrying out
any maintenance or cleaning.
Do not use steam cleaners.
Do not use wire wool, abrasive
scourers or abrasive/corrosive
cleaning agents, as these could
damage the surfaces of the
appliance.
Wear protective gloves.
The oven must be disconnected
from the mains before carrying
out any kind of maintenance
work.
REPLACING THE LAMP
1. Disconnect the oven from the power supply.
2.. Unscrew the cover from the light, replace the bulb
and screw the cover back on the light.
3. Reconnect the oven to the power supply.
Please note: Only use 25-40W/230V type E-14, T300°C
incandescent lamps, or 20-40W/230 V type G9, T300°C
halogen lamps. The bulb used in the product is specically
designed for domestic appliances and is not suitable for
general room lighting within the home (EC Regulation
244/2009). Light bulbs are available from our After-sales
Service.
- If using halogen bulbs, do not handle them with your bare
hands as your ngerprints could cause damage. Do not use
the oven until the light cover has been retted.
MAINTENANCE
AND CLEANING
Download the Use and Care Guide from
docs. bauknecht. eu for more information
WWW
EN
11
REMOVING AND REFITTING THE DOOR
1. To remove the door, open it fully and lower the
catches until they are in the unlock position.
b
a
2. Close the door as much as you can.
Take a firm hold of the door with both hands – do not
hold it by the handle.
Simply remove the door by continuing to close it
while pulling it upwards at the same time until it is
released from its seating. Put the door to one side,
resting it on a soft surface.
a
b
~15°
3. Refit the door by moving it towards the oven,
aligning the hooks of the hinges with their seating
and securing the upper part onto its seating.
4. Lower the door and then open it fully.
Lower the catches into their original position: Make
sure that you lower them down completely.
b
a
Apply gentle pressure to check that the catches are in
the correct position.
“CLICK”
5. Try closing the door and check to make sure that it
lines up with the control panel. If it does not, repeat
the steps above: The door could become damaged if
it does not work properly.
12
400010915881
Printed in Italy
001
PRODUCT FICHE
WWW
The product fiche with energy data of this
appliance can be downloaded from the website
docs. bauknecht. eu
HOW TO OBTAIN THE USE AND CARE GUIDE
>
WWW
Download the Use and Care Guide
from our website (you can use this QR Code),
specifying the products commercial code.
> Alternatively, contact our Client After-sales
Service.
CONTACTING OUR AFTERSALES SERVICE
You can find our
contact details in the
warranty manual. When
contacting our Client
After-sales Service,
please state the codes
provided on your
product's identification
plate.
XXXXXX XXXXXX XXXXX XXXXXXX
Model: xxxXXXXxx
XX
X
X
X
XXX
X
X
X
X
X
X
X
X
X
X
X
XX
X
X
X
X
X
X
X
X
XX
X
X
X
XX
XX
X
X
X
X
X
X
XXX
XXX
X
X
X
X
X
X
X
X
X
XX
X
X
X
Problem Possible cause Solution
The oven is not working.
Power cut.
Disconnection from the
mains.
Check for the presence of mains electrical power
and whether the oven is connected to the
electricity supply.
Turn off the oven and restart it to see if the fault
persists.
The display shows the letter “F
followed by a number.
Software problem. Contact your nearest Client After-sales Service
Centre and state the number following the letter
F”.
TROUBLESHOOTING
Download the Use and Care Guide from
docs. bauknecht. eu for more information
WWW
  • Page 1 1
  • Page 2 2
  • Page 3 3
  • Page 4 4
  • Page 5 5
  • Page 6 6
  • Page 7 7
  • Page 8 8
  • Page 9 9
  • Page 10 10
  • Page 11 11
  • Page 12 12

Bauknecht HIR4 EI8VS3 PT Owner's manual

Category
Ovens
Type
Owner's manual
This manual is also suitable for

Ask a question and I''ll find the answer in the document

Finding information in a document is now easier with AI