Hotpoint AKM 479/IX User guide

Category
Hobs
Type
User guide

This manual is also suitable for

46
INSTRUCTIONS FOR USE
BEFORE USING
PRECAUTIONS AND GENERAL ADVICE
COOKING TIPS
ENERGY SAVING TIPS
CARE AND MAINTENANCE
TROUBLESHOOTING GUIDE
AFTER SALES SERVICE
INSTALLATION
ELECTRICAL CONNECTION
3gb66055.fm Page 46 Friday, February 6, 2004 11:51 AM
47
BEFORE USING
Keep the packaging material (plastic bags,
polystyrene parts, etc.) out of the reach of
children, as they are potentially dangerous.
The packaging material is entirely recyclable,
and is marked with the recycling symbol .
Make sure that the hob is not damaged, broken,
cracked or scratched.
Ensure that the installation and electrical
connections are performed by a qualified
technician, following the manufacturers
instructions and in compliance with current
local safety regulations.
PRECAUTIONS AND GENERAL ADVICE
Attention:
Before any maintenance on the appliance disconnect it from
the electrical power supply.
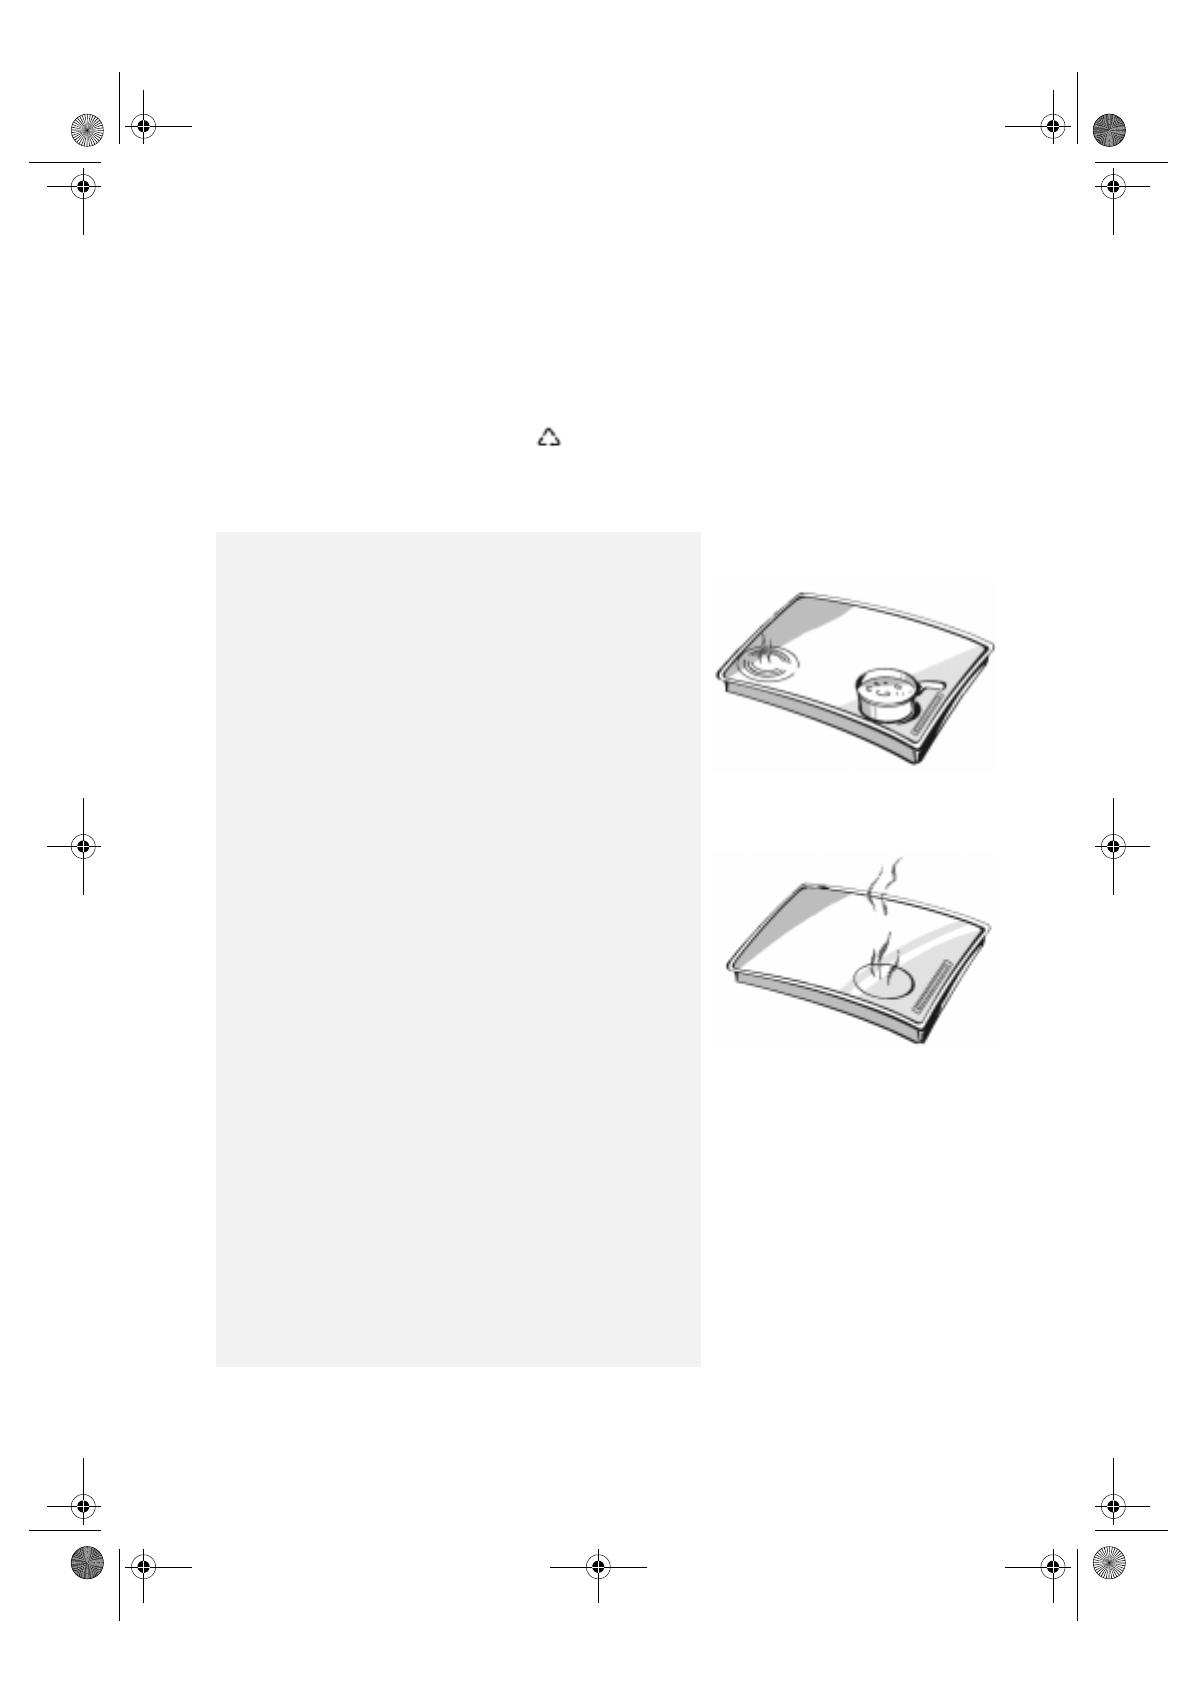
Do not place metal objects such as knives, forks, spoons or
lids on the surfaces of the hob as they can become hot.
The glass ceramic hob is mechanically resistant and can
withstand minor accidents, or improper use; however, if an
object falls on it and damages the surface, do not use the
hob. Disconnect it from the electrical power supply and call
the nearest After Sales Service.
Do not use the hob as a work surface.
When the hob is in use, the surfaces of the cooking zones may
heat up due to transfer of heat from foods being cooked to the
pot and subsequently to the glass.
To obtain the best cooking results, it is advisable to use flat-
bottomed metal pots and pans whose bottom diameter
corresponds to that of the induction cooking zones, so that
the magnetic sensor detects them. To check that pots and
pans are made of ferrous material, use a magnet. The
diameter of the pots and pans must correspond to the
diameter of the cooking zones.
When using pots and pans with a non-stick surface (such as
Teflon) without any oil or grease, pre-heat by setting to number
7
or
8
.
Do not ever heat canned foods without first having
opened the can: they can explode! This warning also
applies to all other types of cooking surfaces.
Do not use aluminium foil for cooking and do not place food
wrapped in aluminium foil on the glass ceramic hob. Do not
place metal utensils on the hob.
Keep children away from the appliances when they are in use
and when its has just been switched off.
The appliances must be repaired or adjusted exclusively by a
qualified technician.
Make sure that the electrical wires of other electrical appliances
near the cooktop do not come into contact with hot parts.
Do not switch on the hotplates/cooking zones when there
is no pan in position.
3gb66055.fm Page 47 Friday, February 6, 2004 11:51 AM
48
COOKING TIPS
Do not leave the appliance unattended when frying food -
risk of fire.
Do not drag pans across the glass-ceramic surface - risk of
scratches.
Avoid spilling sugar and similar substances on the cooktop.
If necessary, clean the cooktop immediately following the
care and maintenance instructions in this handbook.
If you have a cooktop with halogen cooking zones, avoid
looking straight at the lamps.
To avoid permanently damaging the glass-ceramic top, do
not use:
-pots whose bottom is not perfectly flat;
-metal pots with enamelled bottom.
-when cooking is terminated, press button
.
Note
: the induction cooking zones will not turn on if the pots
and pans are not of the correct dimensions or cannot be
magnetically detected.
If a pot or pan is removed from the cooking zone, it will go off
and a
U
will be displayed.
The cooking zone will remain off until another pot or pan is
placed on it.
TO OBTAIN THE BEST RESULTS:
Make sure to place the pot or pan in the centre of the cooking
zone outlined on the glass ceramic hob.
Position Suitable for the following type of cooking
5-9 To boil water, cook pasta, rice and soups.
7-8 To fry potatoes and meats (e.g. goulash).
7-8 To fry croquettes, fillet, sirloin, cordon bleu.
6-8 For beef steaks, chops, omelettes, meatballs, fish croquettes and
sautéing onions.
6-8 For grilled liver, eggs and pancakes.
5-7 For boiling potatoes and making stews.
4-7 For cooking vegetables and boiled meats.
4-7 To prepare rice pudding.
3-7 For boiling small amounts of potatoes and vegetables, for reheating
previously cooked foods.
2-4 For cream based omelettes, eggs, hollandaise sauce, keeping food
warm, melting butter, chocolate or jelly.
H The residual heat light goes on automatically when the cooking zone
is turned off (depending on the residual heat in the cooking zone).
3gb66055.fm Page 48 Friday, February 6, 2004 11:51 AM
49
ENERGY SAVING TIPS
CARE AND MAINTENANCE
Use pots and pans whose bottom diameter is equal to that of
the cooking zone.
Only use magnetic pots and pans with a flat bottom on the
two induction cooking zones.
If possible use a lid. This makes it possible to use a lower
setting and save energy.
Boil vegetables and potatoes with little water to save energy.
A pressure cooker makes it possible to save more energy and
time than traditional pots.
Safety
1.
After use, when a cooking zone or the entire hob is turned
off, a residual heat indicator goes on displaying an
H
(hot)
for each cooking zone used, indicating that the
corresponding cooking zone is still dangerously hot. The
H
stays on until the cooking zone has reached a safe level
(around 60 °C).
2.
An automatic switch off device activates if a cooking zone is
accidentally left on for a long time. It can be turned back on
immediately if necessary by using the controls.
3.
To prevent damage to the electronic circuits, the hob is
equipped with a sensor which constantly monitors the
temperature of these circuits. In cases of overheating, the
hob turns off automatically until a safe temperature is
reached.
4.
To prevent children and others from improperly using the
appliance and to protect you from accidentally turning on
the hob during cleaning operations, the hob is equipped
with a safety lock, the key button. By pressing this button
the hob is locked and the red LED turns on.
5. Attention!
if the surface is cracked, turn off the appliance
to prevent the risk of electrical shocks and call the After
Sales Service.
Clean the cooktop, when it is cool, after each use. This will
prevent the build-up of dirt and make cleaning easier.
Use a clean cloth, absorbent kitchen wipes and washing up
liquid or a specific glass ceramic cleaner.
Remove baked-on dirt with the supplied scraper tool and
specific cleaning products.
Food spills should be cleaned off before they bake onto the
glass-ceramic surface.
Remove any stains of foods with high sugar content (such
as toffees, fruit juices, jams, etc.) that boil over while
cooking or spatter sugar using a scraper.
Do not use abrasive products, bleach, oven-cleaner spray or
pan scourers.
The cooktop should be treated periodically with a proprietary
brand of protective wax for glass-ceramic hobs
NO!
3gb66055.fm Page 49 Friday, February 6, 2004 11:51 AM
50
TROUBLESHOOTING GUIDE
The glass ceramic induction hob is not working:
Have you pressed the control buttons following
the instructions in the section using the hob?
Is the power on?
Have you carefully dried the hob after cleaning it?
1.
If a cooking zone has been selected and an 
F
appears on the display contact the After Sales
Service and inform them.
2.
If one of the following codes is displayed when
the hob on button is pressed:
E -13 E-22 E-27 E-28 E-29
contact the After Sales Service and give them
the code.
3.
If the booster does not work, the temperature
inside the hob is too high.
Wait a few minutes until the cooking zone
cools off or continue cooking without the
booster (max. level 9).
Cooling fan
The hob is equipped with a cooling fan which runs
at two speeds, depending on the temperature in
the hob. If the hob reaches a level which exceeds
the power of all the hot plates, it is automatically
reduced, or if necessary, the entire hob is
deactivated. After a certain period of time, the hob
automatically returns to the selected temperature.
Important
!
If you are not able to turn the glass ceramic hob
off after using it, disconnect it immediately from
the power supply.
AFTER SALES SERVICE
Before contacting After Sales Service
1.
Try to solve the problem (see Troubleshooting
Guide).
2.
Turn off the appliance and restart it to see if
the fault is repeated.
If after the above checks the fault still occurs,
get in touch with the nearest After Sales
Service.
Please give:
a short description of the fault,
the exact type and model,
the service number (the number after the word
Service on the rating plate) is located on the
underside of the cooktop or on the Product
Description Sheet. the service number is also
indicated on the guarantee booklet,
your complete address and phone number.
If any repairs are required, please contact an
authorised After Sales Service
as indicated in
the warranty.
In the unlikely event that an operation or repair is
carried out by an
unauthorised technician
,
always request a certification of the job carried
out and insist on the use of
original spare parts
.
Failure to comply with these instructions may
compromise the safety and quality of the
product
.
3gb66055.fm Page 50 Friday, February 6, 2004 11:51 AM
51
INSTALLATION
Assembly
Cooktop
The cooktop must be set into a worktop between 20 mm
and 50 mm deep.
There must be nothing between the cooktop and the
oven (cross rails, brackets, etc.).
If the cooktop is to be installed next to a column unit,
leave a distance of at least 100 mm from the edge of the
cooktop.
Make an opening in the worktop of the dimensions shown
in the Product Description Sheet supplied separately.
Apply the supplied gasket to the cooktop (unless it has
already been fitted), after having cleaned its surface.
Important
In order to prevent the electronic circuits from overheating,
and therefore from being damaged, we recommend the
following:
Do not install the cooktop near the dishwasher or
washing machine, so that the electronic circuits are not
in contact with steam or moisture, which could damage
them.
Make sure that the oven (manufactured by us) has a cooling
fan
to protect electronic parts as much as possible
if the
cooktop is installed above it.
A.
If the worktop is made of wood use the supplied spring clips
and screws to assemble the hob.
Position the four clips (
A
) as shown and at the specified
dimensions.
Secure the clips using the 4 screws (
B
).
Fit the cooktop into the worktop (see figure).
B.
If the worktop is made out of marble or other material
(plastic compounds, ceramics, stone etc.) fit the hob using
brackets suitable for this type of installation.
Install the hob in the worktop.
Position the four brackets (
C
) as shown in the figure, in
accordance with the thickness of the worktop.
Secure the 4 screws (
E
) in holes (
D
).
Very important reminders for cooling the electronic module.
To avoid overheating the electronic module, which could
decrease the effectiveness of the hob, it is advisable to assemble
the new induction hob following the instructions below.
If there is a drawer under the hob distance 
F
 must be at least
5 mm.
If an oven is to be installed (which must be of our manufacture
and have a cooling system), distance 
F
 must be 20 mm.
If there is an oven installed under the induction cooktop, do
not use the cooktop when the oven is self-cleaning by pyrolysis.
CABINET
OVEN
3gb66055.fm Page 51 Friday, February 6, 2004 11:51 AM
52
DECLARATION OF CONFORMITY
This cooktop is suitable for contact with
foodstuffs, and complies with EEC Directive 89/
109.
These appliances are designed solely for use as
cooking appliances.
Any other use (such as heating rooms) is to be
considered improper and, as a consequence,
dangerous.
The appliances are designed, built and sold in
compliance with:
- safety requirements of EEC Directive Low
voltage 73/23;
- protection requirements of EEC ECM Directive
89/336;
- requirements of EEC Directive 93/68.
ELECTRICAL CONNECTION
To be done before connection to the electricity supply.
The appliance must be installed by a qualified technician who
is fully aware of current safety and installation regulations and
who will comply with these regulations.
Make sure that the voltage indicated on the rating plate
corresponds to the voltage in your home.
Regulations require that the appliance is earthed; for this
reason all conductors and earth conductor must be of the
appropriate size.
Make sure the earth connection is made correctly. The
manufacturer declines all liability for injury to persons and
animals or damage to property resulting from failure to observe
the above regulations.
For the electrical connection use the HO5RR-F type cable
supplied as indicated in the table below:
An all-pole disconnect switch with minimum contact gap
equal to or greater than 3 mm must be used to install the hob.
Attention: the power supply cable must be long enough to
allow the hob to be removed from the worktop and must be
positioned so as to avoid damage or overheating caused by
contact with the base.
Terminal block connections
Note: The earth wire (yellow/green) must be connected to the
terminal with the symbol and must be longer than the other wires.
-Connect the wires to the terminal block as indicated in the
diagram printed on the bottom of the hob.
-Secure the power supply cable (B) by means of the cable
clamp. Close the box lid (A).
After the initial electrical connection or whenever turning the
hob on/off, a symbol, (for example E-00,
E-01, E-02) will be displayed for a few seconds.
Power supply
voltage
Conductors
(number and size)
230 V
3 X 2.5 mm
2
min
3gb66055.fm Page 52 Friday, February 6, 2004 11:51 AM
  • Page 1 1
  • Page 2 2
  • Page 3 3
  • Page 4 4
  • Page 5 5
  • Page 6 6
  • Page 7 7

Hotpoint AKM 479/IX User guide

Category
Hobs
Type
User guide
This manual is also suitable for

Ask a question and I''ll find the answer in the document

Finding information in a document is now easier with AI