Majestic Appliances Washer MJ-9000V User manual

Category
Washing machines
Type
User manual

This manual is also suitable for

Majestic Appliances Washer MJ-9000V is a reliable and efficient washing machine that offers a range of features to make laundry tasks easier. With its simple controls, you can easily select the appropriate washing cycle for your laundry, ensuring optimal cleaning results. The machine's dispensers allow for precise detergent and fabric softener usage, ensuring effective cleaning without wastage.

Majestic Appliances Washer MJ-9000V is a reliable and efficient washing machine that offers a range of features to make laundry tasks easier. With its simple controls, you can easily select the appropriate washing cycle for your laundry, ensuring optimal cleaning results. The machine's dispensers allow for precise detergent and fabric softener usage, ensuring effective cleaning without wastage.

Manufacturers Supply Inc dba Majestic Appliances © 2004
Model MJ-9000V
Model MJ-9000VG (Greystoke Model)
Owners Manual
Website: http://www.MajesticAppliances.com
Very Important !
Read Installation Instructions On Page 5
Manufacturers Supply Inc dba Majestic Appliances © 2004
WARNING- To reduce the risk of re, electric shocks, or injury to
persons when using your appliance, follow the basic precautions,
including the following:
1. Read all instructions before using the appliance.
2. Do not wash articles that have been previously cleaned in, washed
in, or spotted with gasoline, dry-cleaning solvents, or other
ammable and explosive substances such as solvents. Do not
leave machine running and unattended.
3. Do NOT leave machine unattended when in use.
4. Do not add gasoline, dry-cleaning solvents or other ammable or
5. Under certain conditions, hydrogen gas may be produced in a hot water system that has
not been used for 2 weeks or more. If this is the case, before using your washing machine,
turn on all hot water faucets and let the water ow from each faucet for several minutes. This
will release any accumulated hydrogen has. Do not smoke or use an open ame during this
6. Do not allow children to play on or in the appliance. Close supervision of children is
necessary when the appliance is in use.
7. Before the appliance is removed from service or discarded, remove the door.
8. Do not reach into the appliance if the tub or agitator is moving.
9. Do not install or store this appliance where it will be exposed to the weather.
10. Do not tamper with controls.
11.Do not repair or replace any part of the appliance or attempt any servicing unless
specically recommended in the user-maintenance instructions or in published user-repair
manual. Also make sure that you understand the instructions completely and have the
skills to carry them out.
12. Do not use fabric softeners or products to eliminate static unless recommended by the
manufacturer of the fabric softener or product.
13.Do not use heat to dry articles containing foam, rubber or similarly textured rubber-like
materials.
14.Keep area around the exhaust opening and adjacent surrounding areas free from the
accumulation of lint, dust and dirt.
15. The interior of the appliance and exhaust duct should be cleaned periodically by qualied
service personnel.
16.Do not place items exposed to cooking oils in your dryer. Items contaminated with cooking
oils may contribute to a chemical reaction that could cause a load to catch re.
17. This appliance must be grounded. Refer to the INSTALLATION INSTRUCTIONS for
grounding details.
SAVE THESE INSTRUCTIONS
Important Safety
Instructions
Manufacturers Supply Inc dba Majestic Appliances © 2004
Welcome...
Congratulations.WelcometothegrowingfamilyofMajestic™Applianceowners.By
choosingaMajesticAppliancesmodelasyourlaundryapplianceyounotonlyfound
thebestinreliabletechnology,butaboveallyouhavefoundafaithfulanduntiring
convenienceappliance.
Yourmachineisstrong,reliableandlonglasting.Allthosequalitieswhichhave
madetheMajestic™trademarkfamoustheworldover.
Aboveall,Majesticproductsareeasytouse.Readthisowner’smanualcarefully
sinceitcontainsalltheinstructionforsafeinstallation,useandmaintenance.
Remembertokeepyourowner’smanualinasafeplacesothatyoucanrefertoit
wheneveryouneedto.
Foradditionalinformationandcontactwiththeourstaff,weinviteyoutovisitour
website.
http://www.MajesticAppliances.com
(PleaseRegisteryourappliance,onourwebsiteor byreturning
yourregistrationcardviamailandreceiveacomplimentary
sampleofapprovedMajesticLaundryDetergent.)
Weofferawiderangeofapplianceproducts,someofwhichmightsuityourneeds.
WealsoofferourrevolutionaryMajesticAppliances.TVweboption,whereyou
canvieworientationmoviesonthewebaswellascommentsfromotherusersand
frequentlyaskedquestions.WelcometoourFamily!
For Your Records
Thank you for purchasing our Majestic Appliances Product.
This manual will guide you in getting the most productive
use of your appliance purchase.
Remember to record you Model and Serial Number. They
are on a label on the back of the machine or inside the door.
Model Number
Serial Number
Date of Purchase
Staple your receipt to your manual. YOU WILL NEED IT TO OBTAIN WARRANTY SERVICE!
Manufacturers Supply Inc dba Majestic Appliances © 2004
Table of Contents
Instant help
Page 5 Getting things ready to install
your appliance
Unpacking, Inspecting, Electricity, Closets/
Alcoves, Plumbing, Venting
Page 8 For best results washing
Preparation, sorting, inspecting,
pre-wash treatments, helpful laundry hints,
simple controls, detergent disspensers
Page 11 Selecting dry cycles
Drying Controls, Cottons, Synthetics/Delicates,
Wool
Page 13 Troubleshooting
Washing, Drying, Vibration, Optimizing dry time,
wrinkles, draining
Page 14 Maintenance tips
Water,exterior, interior, winterizing, detergent,
pump, technical specica≠tions, Obtaining
Service
Page 16 Warranty Information
Registering your appliance via the in≠ternet,
Extended Warranty options, ordering
maintenance manuals
Manufacturers Supply Inc dba Majestic Appliances © 2004
Installing/Removing
Getting things ready to install
your appliance
Unpacking, Inspecting, Electricity, Closets/Alcoves,
Plumbing, Venting
Unpacking
•Check the packing box for external damage. It is your responsibility to
register any damage with the freight company delivering the product.
•Remove the strapping, then slide the cardboard surround off the
machine. Re≠move the foam protecting material and the plastic bag.
•Write down the serial number from the box or the back of the machine.
•Destroy the carton, plastic bags and foam parts after appliance has
been unpacked.
•Children should never be left alone or unattended in the area where
appliances being unpacked.
If you have any doubts, do not use the appliance and call on a qualied
tech- nician.
OWNER RESPONSIBLE
FOR DAMAGE RESULTING
FROM TIPPING MACHINE
AFTER REMOVING
SHIPPING BOLTS. AVOID
TIPPING MACHINE
FORWARD AFTER
SHIPPING BOLTS ARE
REMOVED
Inspecting WHEN TO REMOVE SHIPPING BOLTS!
WARNING!!! TIPPING THE MACHINE TO POSITION IT FOR USE
MUST BE DONE WITH THE SHIPPING BOLTS STILL IN THE
MACHINE!
TIPPING THE MACHINE WITHOUT SHIPPING BOLTS, CAN
CAUSE THE INNER DRUM TO IMPACT OTHER INTERNAL PARTS,
THUS DAMAGING THEM. POSITION THE MACHINE AS CLOSE
AS POSSIBLE TO IT’S FINAL POSITION AND THEN REMOVE
SHIPPING BOLTS.
Page 5
INSPECT CONTENTS
[ ] Owners Manual
Brass Pressure Regulators
[ ] (Must be installed on hot and
cold water inlet. Failure to do
so can damage the internal
components and cause water
damage for which the
installer/owner will be re-
sponsible!)
[ ] Warranty Registration Card
[ ] Majestic Literature
[ ] Drain Hose U-Clip (Optional)
[ ] Hoses have washers in both ends.
SHIPPING
BOLT
Brass Pressure
Regulators
installed on back
of appliance.
Manufacturers Supply Inc dba Majestic Appliances © 2004
Installing/Removing
Getting things ready to install
your appliance (continued)
Electricity
Make sure that the voltage and frequency available correspond with the values stated on the data plate located at
the back of the machine and that the electric system is dimensioned to withstand the maximum current shown on
the data plate. If the socket the machine is connected to does not correspond with the plug, replace the plug with
a suitable one and avoid using adapters or shunts since they could cause over heating and burn out.
Grounding
This appliance must be grounded. In the event of malfunction or breakdown, grounding will reduce the risk of
electric shock by providing a path of least resistance for electric current. This appliance is equipped with a cord
having and equipment-grounding conductor and a grounding plug. The plug must be plugged into an appropriate
outlet that is properly installed and grounded in accordance with all local codes and ordinances.
WARNING- Improper connection of the equipment-grounding conductor can result in a risk of electric shock.
Check with a qualied or service representative or personnel if you are in doubt as to whether the appliance is
properly grounded.
Do not modify the plug provided with the appliance: if it will not t the outlet, have a proper outlet installed by a
qualied electrician.
Electrical Specications:
Voltage/Amperage - 115V, 12 Amp, 60 Hz 3 Prong plug attached to the appliance in the factory
Circuit/Protection - 3 wires single phase, 120V, 60 Hz, AC separate 15 amp circuit or greater.
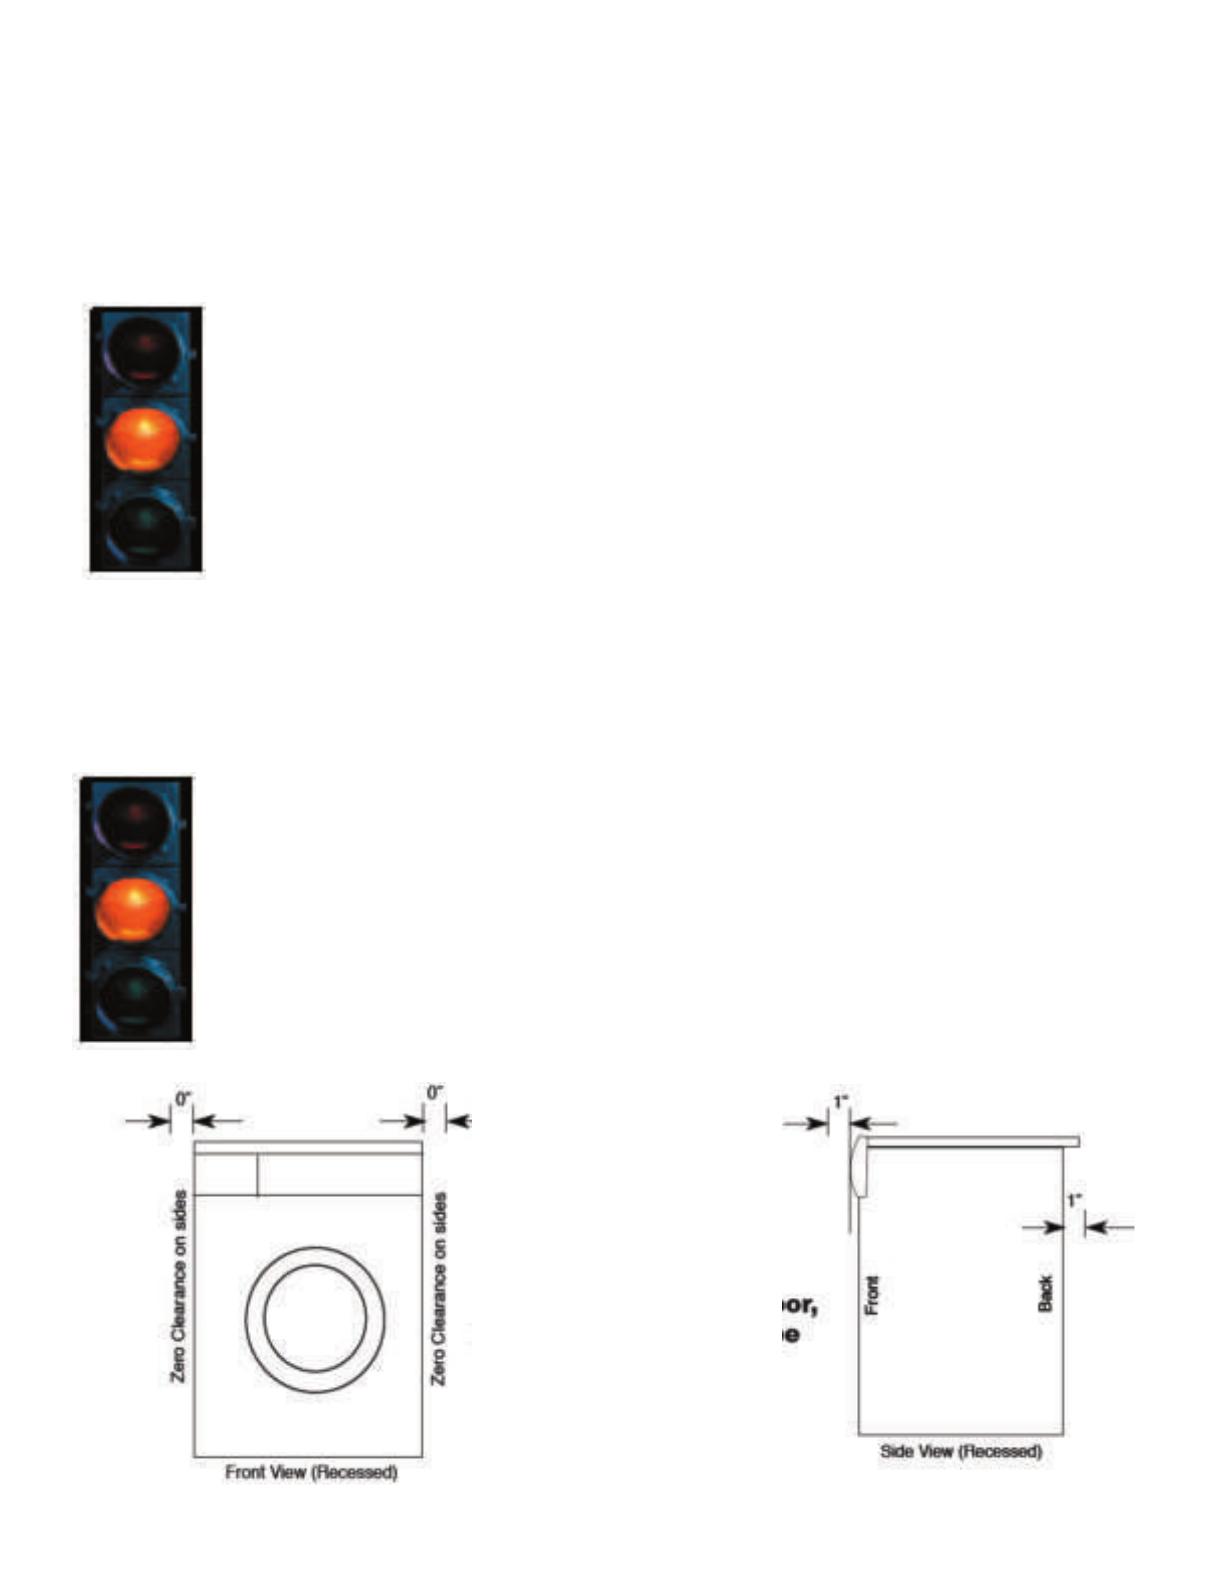
Recessed, Closet and Alcove Installations
This appliance may be installed in a recessed area, closet or alcove. All measurements are in inches.
• If the appliance is to be installed in a closet with zero clearance on the side of the appliance, a total of 12
square inches of free air space movement to the back of the unit must be allowed into the closet.
• If a door is to be installed that potentially encloses the unit while running, the door must allow for a minimum
of 20 square inches of free air movement. There must also be a 1” space from the front of the unit to the closed
door and 1” from the back of the unit to the wall. Additional spacing should be considered for easy installation,
servicing, removal and compliance with applicable local, state and federal codes.
• The oor must be able to support at least 280 lbs and a surface that is solid and level. If machine is to be
placed in cabinet, up off the oor, it may be necessry to secure the drun with a tether to prevent excessive drum
movement. Plese call Majestic Appliances for more information.
• Installations in RV’s or Marine pleasure craft suggest that the machine might best be installed midships in the
boat, or over the axles of the RV where movement is at a minimum.
Adequate blocking should prevent extreme movement when installed in an RV or Marine pleasure craft.
If the appliance is to
be installed in a closet,
the installation must be
completed by a quali≠ed
person or service
representative.
Additional clearances for
oor, wall or door moldings
Manufacturers Supply Inc dba Majestic Appliances © 2004
Installing/Removing
Getting things ready to install your
appliance (continued)
Plumbing - Water, Drains
WATER CONNECTION
1. This appliance can be used with either hot/cold or cold/cold connections.
2. The hoses supplied have either a straight end or an elbow end. The elbow
end is meant to connect to the washer. Be sure to connect the hot hose to
the hot side of the appliance itself, the cold side to the cold connection.
(See picture) The straight end to the 3/4” BSP standard hose bib thread.
3. MAKE SURE WASHERS ARE INSTALLED IN EACH END OF THE SUPPLY
HOSES.
4. Ensure that water connections are free from debris or sediment.
6. BRASS PRESSURE REDUCERS MUST BE INSTALLED TO PROTECT
COMPONENTS INSIDE THE APPLIANCE.IMPORTANT ! CHECK THREADS
ON THE MACHINE, THE BRASS PRESSUREREDUCERS AND THE SUPPLY
HOSES TO ENSURE THEY ARE CLEAN. DO NOTUSE EXCESSIVE FORCES.
TIGHTEN BY HAND. DO NOT USE POWER TOOLS.
Connection of the drain hose to standpipe
• Outlet end of drain hose (See gure 2) must be at least 20” above bottom of washer. Do NOT block top of standpipe closes with tape
or other materials. An air break must be provided at the standpipe to avoid siphoning.
• Connect the drain hose to a standpipe (with internal diameter of at least 3.2 cm or 1 1/4” min. diameter) with a minimum carry away
volume of 7 gallons. The top of the standpipe must be 20” minimum from the botton of the appliance. Place drain hose for drainage into
a sink tub or standpipe, ensuring that there are no kinks or bends. The free end must be at a height of 80 cm (31 1/2”) from the oor,
the hose must be xed in the appropriate hook on the upper part of the back panel (g.4)
DO NOT INSERT THE END IF THE DRAIN HOSE MORE THAN
6” INTO THE STANDPIPE. INSERTING MORE MAY CAUSE THE
APPLIANCES TO HAVE INSUFFICIENT DRAINAGE.
CORRECT LEVELING OF UNIT IS
ESSENTIAL
It is important for the machine to be
perfectly level. The angle of inclination on
the work surface must not be more than
2 degrees. For this reason the machine is
tted with adjustable feet used for leveling
the machine before use. In the case of
carpeted ooring, remember to check that
the ventilation in the support area is not
plugged.
Exhaust Duct Installation
• Check that all ducting is lint free. Secure ducting with clamps or metal
tape.
• The exhaust duct must end with an approved exhaust vent hood with
swing out dampers or appropriate louvers.
• Flex or rigid metalic ducting is recommended.
• Exhaust duct should be short and straight and slope downwards and
away from the appliance. Long exhaust duct runs can increase drying
time and collect lint.
IMPORTANT! THE EXHAUST DUCT SHOULD NOT BE INSERTED INTO A
CHIMNEY WALL, CEILING OR CONCEALED SPACE OF STRUCTURE.
Manufacturers Supply Inc dba Majestic Appliances © 2004
Washing
For best results washing
Preparation, sorting, inspecting, pre-wash treatments,
helpful laundry hints, simple controls, detergent dispensers
Preparation
Before you begin washing, taking a few simple steps will help you have a
better washing experience and save wear and tear on your clothing as well.
1) Read factory labels for washing instructions
2) Pre-treating heavily soiled areas will also improve washing results.
3) Obtain and use Majestic™ Low Suds Laundry Soap or any other
commer≠cial brand that keeps over sudsing in check. Use 1 to 2 ounces.
4) Your Majestic™ has over 13 different wash cycles that can last as long
as 120 minutes or as short as 35. Select the one that is right for the load.
Sorting
Separate laundry according to fabric type, color and how dirty things are.
Also consider separating clothing that generate lint from clothes that do
not typically generate much lint. Cottons, synthetics, and woolen fabrics
for starters. Color fast products vs. those that might bleed and fade on to
other clothing. What size load? A good rule of thumb is that clothes
should be visible in the window of the machine from 1/2 to 2/3’s full.
Inspecting
This goes without saying, but check pockets for loose change, and other hidden impediments.
Fas≠tening all zippers, hooks, and buttons will prevent damage to garments and to the machine.
Turning knit garments inside out will also protect the garment. Using a mesh laundry pouch for
delicate items such as tights and stockings,bras, shoulder pads and underwear can prevent tangling.
Also, if a gar≠ment is torn or damaged, washing and drying will only make it worse. Take a minute
and do a bit of mending. It will enhance fabric care in the long run.
Pre-Wash treatments
Your laundry appliance has a built in assistant to take care of your pre-wash feature. Besides
indi≠vidually treating garments as need arises, also consider using a longer wash cycle if necessary
that includes use of the pre-wash section of the detergent drawer. Often children’s play clothes and
men’s work clothes take a beating and can use some extra cycles to come clean.
Helpful laundry hints
Detergent - Because this is a front loading machine, your Majestic™ requires less of almost
every≠thing, from laundry detergent to fabric softener to bleach. LOW SUDS detergents are even
more convenient in a front loader, because of the efciency of clothes on clothes agitation. FABRIC
SOFT≠ENER can actually improve dry times, but NEVER USE SOFTENER SHEETS OR OVERUSE
SOFT≠NER. It could cause damage to your machine. And using bleach can whiten clothes when
nothing else will. Always dilute bleach before using. Too much bleach can damage fabrics.
Manufacturers Supply Inc dba Majestic Appliances © 2004
Washing
For best results washing (continued)
Preparation, sorting, inspecting, pre-wash treatments, helpful
laundry hints, simple controls, detergent dispensers
Selecting/setting the wash program.
Select your Dry Cycle.
Majestic™ controls offer a simple approach that Select the program you want to use, based on the
clothing you are planning to wash. Blue is for cotton loads, green for synthetics, and red for wool.
With the machine off, turn the selector knob clockwise until you have selected the wash cycle of your
choice. Use the chart on page 11 for more details.
After you select the wash cycle, the timer will rotate until the cycle is nished. You are done whenthe
timer has reached the at the end of the cycle. If you have set the machine for drying, the dry cycle
begins automatically when the wash timer rotates to the star. You can reduce the rinse cycle on any
of your selections by selecting the “Economic” button. On smaller loads the “economic button”
saves you from using excess water, a Majestic™ exclusive.
*
Use Majestic Laundry Detergent. Cost effective.
On the web at http://www.thehotdeal.com or call
us toll free at 1-800-678-8002.
Green is for
Wool
Blue is for Cotton
fabrics
Lite Blue is for
Synthetic
Fabrics
Blue is
for Cotton,
up to 120
minutes.
Green is for
Synthetic
fabrics, is a
cooler
temperature, up
to 90 minutes.
Note: Before manually rotating
the washer timer, please turn the
power off.
The power does not need to be
turned off to move the dry timer.
Manufacturers Supply Inc dba Majestic Appliances © 2004
Washing
For best results washing (continued)
Preparation, sorting, inspecting, pre-wash treatments,
helpful laundry hints, simple controls, detergent dispenser
Controls, detergent dispenser
Economic Button
This is a very useful but-
ton that will save you a lot
of money. It reduces water
consumption when rinsing.
If you have a small load use this but-
ton and reduce water consumption.
Soak Button
During the Synthetic Cycle, some
customers prefer to allow their
clothing to soak in softeners
before nal spin. Depressing this
button causes the timer to stop
at the SOAK location, until you
manualy advance the timer.
ON/OFF Button
This button supplies electrical
power to the appliance.
Washer Timer
This control turns clockwise
and allows you to select any
of 14 wash cycles for any
load. It is best to adjust this
with the power off. Blue is
for Cotton, light blue for syn-
thetics and green for wool.
Dryer Control
Turn this control to the blue
for Cotton. You can set up to
120 minutes for cotton dry-
ing, although the heat in this
cycle may not require this
much time. Up to 90 mionutes
in the Synthetic cycle, which
is a cooler temperture. You
can use this cycle for cottons
as well for cooler temps.
Detergent Drawer
The detergent dispenser is divided into
4 compartments marked 1,2, A and C.
1 Pre-wash detergent
2 Wash detergent
A Softeners, conditioners and
perfumes.
C Bleach
Manufacturers Supply Inc dba Majestic Appliances © 2004
Type of Fabric and
degree of soiledness
Detergent
for Pre-
wash
Detergent
for
wash
Softener Bleach Description of Wash Cycle
Water
Temp
Approx.
Wash Time
Pre-Wash: Heavily soiled
white laundry and color fast
fabrics * †
Yes Yes Yes Yes Prewash,wash, rinse,
extended spin. High water
level.
Hot 120 min
Heavy Duty: White and
color fast fabrics * †
No Yes Yes Heavy duty , rinses,
extended spin
Warm 90 min
Moderate:Mixed cotton,
synthetics and color fast
fabrics †
No Yes Yes Moderate, rinse, extended
spin
Warm 60 min
Normal: Colors and whites † No Yes Normal, rinse, extended spin Cold 45 min
Rinses No Yes Yes Rinses Cold
Softener No Yes Softener added Cold
Spin Cycle No Extended spin
Drying cycle for natural
bers
No Heavy fabric drying 60-90 min
Heavily soiled synthetic and
color fast fabrics †
No Yes Heavy duty, anti-crease
delicate spin
Warm 90 min
Normally soiled synthetic
and color fast fabrics †
No Yes Moderate, anti-crease
delicate spin
Warm 60 min
Synthetic fabrics with
delicate colors †
No Yes Normal, anti-crease delicate
spin
Cold 45 min
Rinses No Yes Rinses Cold
Softener/Ant Crease ** No Yes Softener added Cold
Spin Cycle No Draining, delicate spin
Drying cycle for natural
bers
No Delicate drying 60-90 min
Woolens † No Yes Delicate wash Cold 45 min
Rinses No Yes Rinses Cold
Softener/Ant Crease ** No Yes Softener added Cold
Spin Cycle No Yes Delicate Spin
* - TIP: You can reduce wash time by stopping at the end of selected cycle and advancing timer to rinse
cycle. For example: Prewash setting when timer stops at heavy duty setting advance to rinse, you will have
a 90 minute wash in hot water.
** - IMPORTANT: Timer is designed to stop at Anti-crease symbol to allow clothes to soak in fabric soft-
ener for as long as the customer feels necessary. You must advance the timer manually one click to nish the
rinse and spin cycle.
† - NOTE: BLEACH & SOFTENER: There will always be residual water in the bleach and softener tray. As
you add bleach or softener for a wash load any residual water will not adversely affect the bleach or softener.
Guide for Selecting Programs on your Majestic™ laundry appliance
Manufacturers Supply Inc dba Majestic Appliances © 2004
Drying
Selecting Dry Cycles
Drying Controls, Cottons, Synthetics/Delicates, Wool
Drying Controls
Washing and Drying AutomaticallyIf
you are washing cottons (blue) or
synthetics (Green), the machine will
automatically begin drying at the end
of the wash cycle. Remember that the
temperature for cottons (blue) is higher
than the temperature for synthetics
(green). It takes 15 minutes for the
machine to reach full temperature.
You are in control of the drying cycle
Generally, cottons require more drying time than synthetics. You will notice that the cotton dry cycle
offers up to 120 minutes of drying. Normally cotton shirts take less time than denim jeans. You will
have to experiment a little to determine what dry times work for you.
Size of drying load
With the correct load size, the Majestic™ washes and drys very efciently. If the wash load is made
up of heavy and dense fabrics, you may need to split the load into two loads. After the rst load is
complete, turn off the power, turn the wash timer to the appropriate time, load the machine and turn
the power button on again.
Caution:
For your safety, the door lock stays engaged for the duration of the dry cycle. If you want to open the
door, you may, but you must turn off the power. We suggest waiting 1 minute before opening the door.
Blue is for Cotton
fabrics. Up to 120
minutes
Green is for
Synthetics, is a
lower temperature
than cotton, up to
90 minutes.
Manufacturers Supply Inc dba Majestic Appliances © 2004
Stains
Tips on Stain RemovalBALLPOINT
INK
Hold stain against towel, spray closely from behind with aerosol hair spray. Ink should transfer to towel
BEVERAGES
Soak in cool water. Re-wash with stain remover. Launder using chlorine bleach (if safe for fabric) or oxygen bleach.
BLOOD
Immediately rinse with cool water. For dried stains, soak in warm water with a product containing enzymes. Launder.
CANDLE WAX
Scrape off as much as possible with dull side of knife, then iron between absorbent paper, changing paper until wax is absorbed.
CHOCOLATE
Pre-wash with product containing enzymes in warm water or treat with pre-wash stain remover. Launder.
COLLAR, CUFF SOIL
Pre-wash with stain remover, liquid laundry detergent or paste of granular detergent and water. Launder.
COSMETICS
Pre-wash with stain remover, liquid laundry detergent or paste of granular detergent and water or rub with bar of soap. Launder.
DAIRY PRODUCTS
Soak in a product containing enzymes for at least 30 minutes (hours for aged stains). Launder.
DEODORANTS & ANTI-PERSPIRANTS
Pre-treat with liquid laundry detergent. Launder. For heavy stains pre-treat with pre-wash stain remover. Allow to stand 5 to 10 minutes.
Launder using an oxygen bleach.
EGG
Soak in product containing enzymes. Launder.
FRUIT JUICE
Rinse with cool water.
GRASS
Soak in product containing enzymes. If stains persist, launder using a chlorine bleach (if safe for fabric) or oxygen bleach.
GREASE SPOTS, OIL
Pre-treat with pre-wash stain remover or liquid laundry detergent. For heavy stains, place stain face down on clean paper towels. Apply
cleaning agent to back of stain. Replace paper towels under stain frequently. Let dry, rinse and launder using hottest water safe for
fabric.
INK
Use ink eradicator on undyed, untreated linen.
LEMON, LIME JUICE, VINEGAR
Rinse immediately with cool water.
LIPSTICK
On pure linen, rub with a little salad oil to dissolve lipstick, then launder to remove oil.
MEAT JUICE
Rinse with cool, never hot, water.
MILDEW
Badly mildewed fabrics may be beyond repair. Launder stained item using chlorine bleach, (if safe for fabric). Or soak in oxygen bleach
and hot water. Then launder.
PERSPIRATION
Use pre-wash stain remover or rub with bar of soap. If color of fabric has changed, apply ammonia to fresh stains, white vinegar to old
stains and rinse. Launder using hottest water safe for fabric.
RED WINE
Cover with salt if stain is fresh, then rinse with cool water. If stain has dried, try club soda.
SCORCH
Treat same as for mildew (listed above).
TAR
Scrape residue from fabric. Place stain face down on paper towels. Sponge with cleaning uid. Replace towels frequently. Launder in
hottest water safe for fabric.
TOMATO
Rinse with cool water.
WHITE WINE
Use club soda.
Manufacturers Supply Inc dba Majestic Appliances © 2004
Troubleshooting tips
Read here, then call us
Even though your washer dryer has been carefully designed and constructed, something
may still go amiss with your machine. Before rushing to technician, please check that the
operations listed below have been carried out. In many cases you will save time, money
and a bother. Our statistics show that many calls made to our service representatives
could have been solved with a little more attentions to these basic operations.
The washer dryer won’t start
Check that:
• the plug is pushed right into the main socket
• the door is closed tight
• the ON/OFF button has been pressed
The washer dryer won’t ll with water
Check that:
• the tap is open and properly connected to the inlet pipe
• the inlet pipe is not bent
• the inlet pipe is placed at least 80cm/32in. above ground level
The washer dryer drains continuously
Check that:
• the drain hose is not blocked
• the drain hose is placed at least 80 cm/20 inches above ground level but not more than
1 meter/40 inches above ground level.
• the drain pump doesn’t work, the lter net of the drain pump is blocked
There is too much foam in the tub
Check that:
• the detergent being used is meant for automatic machines and not for washing by hand
that the amount used is correct as stated in this manual and not more
The washer dryer vibrates too much when spinning
Check that:
• the shipping bolts have been removed (see installation manual)
• the machine is level
• the washing load is according to the instructions given in this booklet
The washer dryer lls up with water and won’t drain.
Check that:
• The drain hose is only 6” into the stand pipe.
• The drain hose is not clogged
• Standpipe is correct specication
The washer dryer is not drying
Check that:
• the plug is tted rmly into the main socket
• the door is properly closed
• the wash program knob is in position *
• the drying time knob is not in position 0.
• Use the cotton (blue) hotter cycle with cotton fabrics, and use synthetic (red) cooler cycle for synthetic fabrics.
• the recommendations for the maximum loads and drying times have been followed
Wrinkling
Check that:
• avoid mixing heavy fabrics with light fabrics
• Load your dryer to allow for enough room for clothes to tumble
• Make sure you are not using the cotton drying cycle with synthetic clothes
• the recommendations for the maximum loads and drying times have been followed
Manufacturers Supply Inc dba Majestic Appliances © 2004
Owner Care
Maintenance Tips
Owner Care
Water,exterior, interior, winterizing, detergent, pump,
technical specications
Water Hoses
Periodically check both ends of the water supply hoses to ensure that the washers have no cracks or deterioration and
that the hoses themselves have no kinks, bulges or worn spots. Replacing inlet hoses from time to time can prevent hose
failure and water damage.
Exterior
Keeping the exterior of the unit clean will preserve the value of your investment. Use a soft cloth and liquid cleanser to
clean and maintain the exterior.
Interior
Do not use solvents either to clean the machine or to do the wash.Clean the detergent dispenser ever so often. This is
very simple and should be done with water. Detergent dispenser - Your machine has an extractable dispenser to make it
even easier. From time to time, using water and a damp clothes remove excess detergent, softener and any build up of
bleach that may have accumulated in the detergent drawer.
Winterizing
To winterize your appliance, follow these steps:
1) Turn the power off
2) Put 1/2 quart of R.V.type potable antifreeze in the machine and close the door
3) Turn the program selector knob to Spin. Turn the power on and let the appliance spin for 1-2 minutes
4) Turn the power off and unplug the washer.
5) Shut off water at both faucets and disconnect water inlet hoses from faucets and drain.
6) Put 1/2 quart R.V. type potable anti-freeze in machine. DONE!
To put the appliance back into service.
1) Make sure the RV Water supply is clear of antifreeze.
2) Hook up the power and water as before.
3) Run the water through the delicate cycle with 2/3 tablespoon of detergent to clean out appliance.
If you are putting antifreeze in the water lines of an RV or Boat, run the machine until you see pink water introduced into
the drum. Then turn the power off and advance the timer to spin. Turn the power back on and spin for 30 seconds to get
antifreeze into the entire system. Now turn the power off and continue steps 4 and 5 and 6 above.
Pump
Self Cleaning Pump - Your washer dryer is equipped with a self-cleaning pump. It is therefore
not necessary to carry out cleaning and maintenance operations. Some objects such as
buttons, coins, etc., may sometimes drop into the pump and must be removed. These items
become trapped in a special “anti-chamber” which can be reached through the front part of the
pump. Open cover to pump, turn couinter clockwise to acces pump chamger, and remove any
coins, buttons, etc. Pump chamber should be inspected every six months.
Note: Some water may spill out when removing the cover. Place towel onk oor to absorb water.
Manufacturers Supply Inc dba Majestic Appliances © 2004
MAJESTIC™ has hundreds of service agents all over the country. Call us
on our toll free hotline (1-800-678-8002) and we will serve your needs.
Remember that if your service call is the result of component failure we will
be happy to cover it under your warranty. If it is not, you will be charged for
the time and travel. Our service center is available Monday through Friday
from 8:00 am to 5:00 PM Pacic Time. You will nd our technicians helpful,
knowledgeable and friendly.
What if you need help on weekends? Majestic™ appliances has a web
site with tons of helpful information, including “Service knowledge on
demand™”. You can watch a movie that assists in trouble shooting your
problem and making the repair. No other company offers such complete
service.
Remote Locations
In certain cases, even the largest appliance manufacturers do not have service in remote
locations. Having product in a home is one thing. Having appliances in a home that moves all
the time is another. Majestic has taken serveral important steps to accommodate this difcult
situation. Service knowledge on demand™ is one such step that only Majestic offers. Often
applaince dealers who service traditional home appliances can view our training movies online
and make a repair where no other option would be available. But after all of these steps are
exhasuted Majestic Appliances may have to request that an RV drive to the nearest authorized
service dealer we can nd, to provide service.
Improper installations, by owners or dealers are the responsibility of the installer. Majestic is
happy to provide technical support in such cases. Service costs and travel expense will be the
responsibility of the installer.
Manufacturers Supply Inc dba Majestic Appliances © 2004
Owner Care
Warranty InformationYour
Majestic™ appliance is covered by this warranty under
normal personal, family, household or RV use in the US and
Canada
Warranty
Your Majestic™ Appliance is warranty for 1 full year from the original purchase on the
mechanical parts only when installed in accordance with the instructions in the manual.
It is the option of the fac≠tory to replace or repair any part which become defective in
workmanship or material under normal personal, family or household use.
During this one year, Majestic™ Appliance will provide all labor and parts necessary to repair
any defect as long as the appliance has been installed and operated in according with the
instructions provided. In the case of a tight installation, including RV’s or Marine pleasure
craft, providing ready access to the appliance is the responsibility of the owner.
In no event, shall Majestic™ Appliances or its parent company, be liable for incidental or
consequen≠tial damages or for damages resulting from external causes such as abuse,
misuse, incorrect voltage or acts of God. This warranty does not cover service calls which
do not involve defective workman≠ship, incorrect installation procedures or materials not
provided by Majestic™ appliances. Therefore, service calls, diagnosis, and repair costs
for a service call which does not involve defective work≠manship or materials will be the
responsibility of the consumer/owner. This might include but is not restricted to, improper
hookup or leveling, cleaning or air and/or water lters, replacing broken door handles, or
excessive movement caused by travel or recreation or installation.
Being fair, most work is covered. If the machine has malfunctioned Majestic™ covers it or if
the installer/consumer has omitted or done something to cause the machine to malfunction,
they cover it.
You can call us toll free at 1-800-678-8002 for service. Our address is
MSI/Majestic Appliances
3201 NW Lower River Rd. #9
Vancouver, WA 98660
Extended Warranty Information
Contact us at our ofce for up-to-date information on extended warranty costs. You can
obtain an additional
warranty for 1, 3 or 5 years through our exclusive warranty agreement. To be eligible
for this warranty you must use the machine for personal use, not in a commercial
application, purchase the coverage, register the contract and received your contract
number or certicate. The unit must be registered with our warranty agency and have a
contract number issued within the rst year of ownership,
to the original owner, or this offer is void.
Manufacturers Supply Inc dba Majestic Appliances © 2004
  • Page 1 1
  • Page 2 2
  • Page 3 3
  • Page 4 4
  • Page 5 5
  • Page 6 6
  • Page 7 7
  • Page 8 8
  • Page 9 9
  • Page 10 10
  • Page 11 11
  • Page 12 12
  • Page 13 13
  • Page 14 14
  • Page 15 15
  • Page 16 16
  • Page 17 17
  • Page 18 18

Majestic Appliances Washer MJ-9000V User manual

Category
Washing machines
Type
User manual
This manual is also suitable for

Majestic Appliances Washer MJ-9000V is a reliable and efficient washing machine that offers a range of features to make laundry tasks easier. With its simple controls, you can easily select the appropriate washing cycle for your laundry, ensuring optimal cleaning results. The machine's dispensers allow for precise detergent and fabric softener usage, ensuring effective cleaning without wastage.

Ask a question and I''ll find the answer in the document

Finding information in a document is now easier with AI