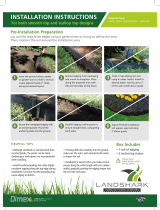
Avyna Pro-Line is a 12 or 14-foot in-ground trampoline designed for safe and enjoyable jumping for the whole family. The trampoline is made with a durable steel frame and a UV-resistant jumping mat. It is easy to assemble and can be installed in just a few hours. The Avyna Pro-Line comes with a variety of features that make it a great choice for families with children of all ages. These features include:
- A safety net that surrounds the jumping area to prevent falls
- A padded frame that covers the springs and prevents injuries
- A ladder that makes it easy to get on and off the trampoline
- A weather-resistant cover that protects the trampoline from the elements


-
 1
1
-
 2
2
-
 3
3


Avyna Pro-Line is a 12 or 14-foot in-ground trampoline designed for safe and enjoyable jumping for the whole family. The trampoline is made with a durable steel frame and a UV-resistant jumping mat. It is easy to assemble and can be installed in just a few hours. The Avyna Pro-Line comes with a variety of features that make it a great choice for families with children of all ages. These features include:
- A safety net that surrounds the jumping area to prevent falls
- A padded frame that covers the springs and prevents injuries
- A ladder that makes it easy to get on and off the trampoline
- A weather-resistant cover that protects the trampoline from the elements
Ask a question and I''ll find the answer in the document
Finding information in a document is now easier with AI
Other documents
-
Propel Trampolines P7BB-YB Owner's manual
-
-
-
 Propel 10×14 Rectangle Trampoline User manual
-
 Propel 12×8 Trampoline User manual
-
 LandShark 3510-20C Installation guide
-
 Superfly SUPERX15 User manual
-
 Skybound ANCHOR KIT Assembly And Installation Manual
-
Jumpking JKRC1015BYC3 Owner's manual
-


