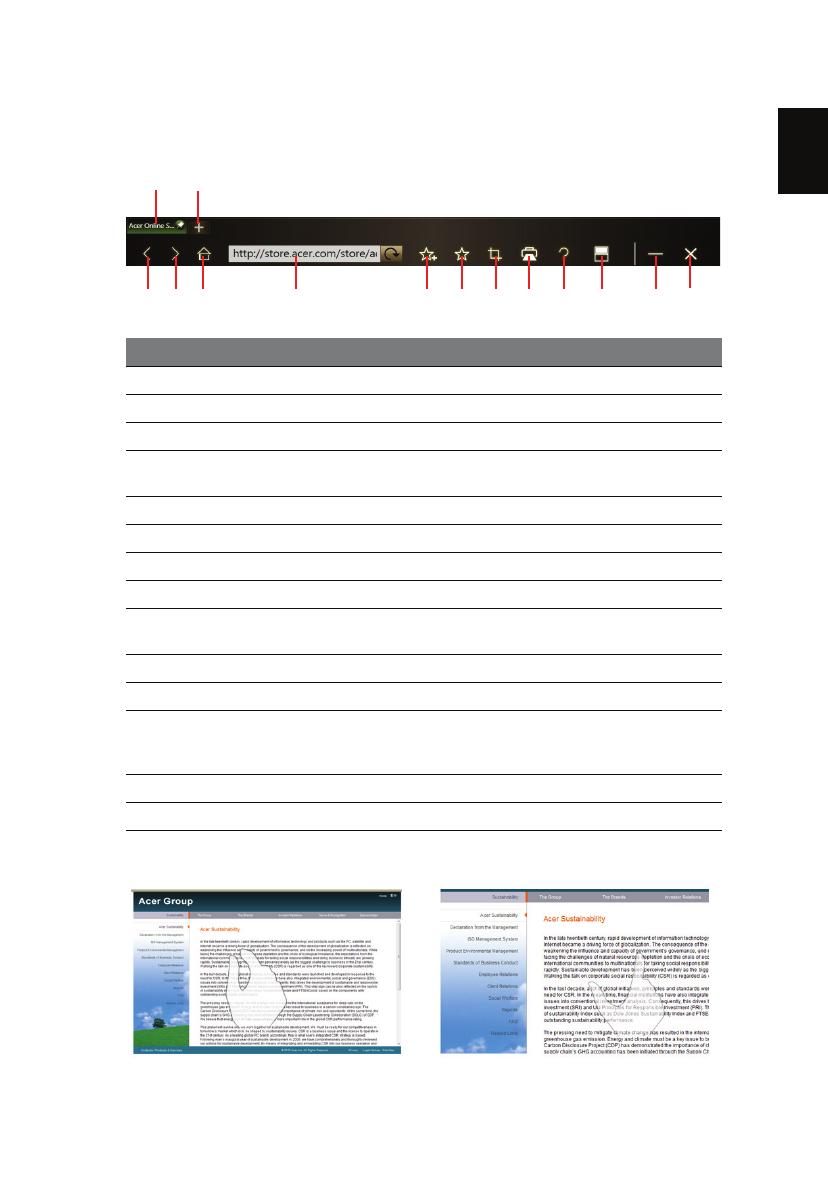
Acer ICONIA Quick start guide

Type
Quick start guide
Acer ICONIA
Quick Guide
Acer recommends...
Productivity Software
Work Great with Microsoft
®
Office 2010
- Express your ideas, solve problems and simplify everyday projects
with Office 2010.
Photo editing
- Easily edit and print your photos with Windows Live Photo Gallery. Then share them on
Facebook, YouTube or Windows Live.
Search & Decide with Bing
-- Find and organize the answers you need using Bing
, so you can make faster,
more informed decisions.
Model number: __________________________________
Serial number: ___________________________________
Date of purchase: ________________________________
Place of purchase: ________________________________
© 2010 All Rights Reserved.
Acer ICONIA Quick Guide
Original Issue: 11/2010
Your Acer Touchbook tour 1
Top view 2
Closed front view 3
Left view 4
Right view 4
Environment 5
Enabling wireless devices 6
Acer Ring 7
Gesture Editor 9
TouchBrowser 13
Adding a page to your Favorites 16
My Journal 17
Editing pages 18
Web Clip 19
Scrapbook 22
Capture tool 24
Managing images in Scrapbook 27
Exporting Scrapbook pages 28
Device Control 30
Multimedia 31
TouchVideo 31
TouchPhoto 34
TouchMusic 38
SocialJogger 41
Sharing content 43
Settings 44
Virtual Keyboard 45
XT9 predictive text 46
Keyboard toolbars 47
The keyboard button 47
When operating under Windows 48
Before Windows boots 48
Other ways of entering information 48
Handwritten input 49
Keyboard settings 54
Window Manager 56
Closing Window Manager 60
Adjusting display settings 61
Using the Intel Graphics and Media Control Panel 61
Contents
English
1
Your Acer Touchbook tour
After setting up your computer as illustrated in the setup poster, let us show
you around your new Acer computer.
Your new computer is equipped with two multi-touch screens that are used to
control the computer and enter data. The first thing you will notice is that there
is no traditional keyboard or touchpad. These are replaced with a virtual
keyboard and touchpad, so performing tasks will be different from the way you
use a traditional notebook. This User Guide will help you to familiarize yourself
with these unique functions.
After you have turned on your computer, you will see a standard Windows
desktop on the upper screen and a virtual keyboard on the lower screen.
Your Acer Touchbook tour 2
English
Top view
No. Icon Item Description
1 Acer Crystal Eye
webcam
Web camera for video communication.
2 Upper display
screen
Also called Liquid-Crystal Display (LCD),
displays computer output.
3Lower display
screen
Also called Liquid-Crystal Display (LCD),
displays computer output.
Shown with Virtual Keyboard open.
Please refer to Virtual Keyboard on page
45.
4 Microphone Internal microphone for sound recording.
1
2
3
4
English
Closed front view
3
Closed front view
No. Icon Item Description
1 Power indicator Indicates the computer's power status.
Battery indicator Indicates the computer's battery status.
1. Charging: The light shows amber when
the battery is charging.
2. Fully charged: The light shows blue
when in AC mode.
HDD indicator Indicates when the hard disk drive is
active.
1
Your Acer Touchbook tour 4
English
Left view
Right view
No. Icon Item Description
1 Keyboard button Press to call up Virtual Keyboard or
perform other functions (please refer to
The keyboard button on page 47).
2 DC-in jack Connects to an AC adapter.
3 HDMI port Supports high-definition digital video
connections.
4 USB 2.0 ports Connect to USB 2.0 devices (e.g., USB
mouse, USB camera).
No. Icon Item Description
1
Microphone jack
Accepts inputs from external
microphones.
Headphones/
speaker/line-out
jack
Connects to audio line-out devices
(e.g., speakers, headphones).
2 USB 3.0 port Connect to USB devices.
Supports the USB 3.0 (SuperSpeed
USB) specification.
2134
213456
English
Environment
5
WARNING: Do not remove the base cover. Doing so may lead to
injury or damage to your computer, and void your warranty.
Note: To upgrade your computer, please contact an authorized
Acer service center.
Environment
3 Kensington lock slot Connects to a Kensington-compatible
computer security lock.
Note: Wrap the computer security
lock cable around an immovable
object and insert the lock into the
notch; turn the key to secure the lock.
4 External display
(VGA) port
Connects to a display device (e.g.,
external monitor, LCD projector).
5 Ethernet (RJ-45)
port
Connects to an Ethernet 10/100/1000-
based network.
6 Power button Turns the computer on and off.
Temperature:
Operating: 5 °C to 35 °C
Non-operating: -20 °C to 65 °C
Humidity (non-condensing):
Operating: 20% to 80%
Non-operating: 20% to 80%
No. Icon Item Description
Enabling wireless devices 6
English
Enabling wireless devices
Device Control allows you to enable and disable the various wireless
connectivity devices on your computer.
Open Device Control from Acer Ring or press <Fn> + < > (the <F3> button)
to open Device Control.
A red button indicates the device is off.
Tap ON to turn the device on.
A blue button indicates the device is on.
Tap OFF to turn the device off.
Tap the device name to open the Windows Control Panel to adjust the
advanced settings for each device.
English
7
Acer Ring
Acer Ring incorporates a number of
useful functions and tools in one easy-
to-use interface. Tap the lower display
screen with all five fingers at once to
display Acer Ring.
You need to close Virtual Keyboard if
it’s open before trying to open Acer
Ring.
Icon Item Description
Capture Capture a part of the screen to Scrapbook, to
the clipboard or as an image.
Web Clip Select a part of a web page to paste in
Scrapbook or My Journal.
Device Control Adjust settings for your computer (please
refer to Device Control on page 30).
Gesture Editor Open the Gesture editor (please refer to
Gesture Editor on page 9).
Keyboard Open Virtual Keyboard (please refer to Virtual
Keyboard on page 45).
Window Manager Open Window Manager (please refer to
Window Manager on page 56).
Acer Ring 8
English
On one side of Acer Ring you can see a selection of AppCards. You can scroll
through the applications and tap on a card to open the application.
The AppCards are as follows:
TouchVideo
TouchPhoto
TouchMusic
TouchBrowser (this is the AppCard that is shown when you open Acer
Ring.)
Scrapbook
My Journal
SocialJogger
Starting from the area marked Draw a gesture here draw a gesture you have
defined to perform the associated function. Please refer to Gesture Editor on
page 9 for information on defining your own gestures.
Note: As long as the gesture starts within the central ring, you can
extend the gesture beyond the boundaries of the central ring.
Larger gestures increase recognition accuracy.
English
9
Gesture Editor
You can set personalized gestures to perform functions or launch programs.
Tap Gesture Editor on Acer Ring to see the pre-defined gestures.
Tap either of the pre-defined gestures to practice the gesture.
Gesture Editor 10
English
Tap User Defined to define your own gestures. Tap Add New Gesture to add
new gestures.
Select the action you’d like to perform from the drop-down menu on the left-
hand side of the screen. Draw the gesture in the area on the right-hand side of
the screen. When prompted, enter the gesture again.
English
11
Once you have defined the gesture, you can practice, edit or delete the gesture.
Tap the gesture to select it, then tap the appropriate button.
Tap Edit to edit a gesture. You can change the action from the drop-down
menu in the upper left-hand corner of the edit window. You can edit URLs and
applications directly in the text area.
Gesture Editor 12
English
You can also adjust the stroke style from the Settings page. Tap the settings
icon to open the settings page.
English
13
TouchBrowser
TouchBrowser is specifically designed to offer you a more comfortable web
surfing experience when using touch input. Open Acer Ring and tap the
TouchBrowser AppCard to launch the browser.
TouchBrowser 14
English
The web content will be displayed across both screens. The toolbar at the
bottom of the screens gives you easy control over the open pages.
English
15
To enter a website address, tap the URL bar. A keyboard icon will display,
allowing you to open a virtual keyboard and enter text, or use handwriting to
enter the URL.
You can use a pinch action to zoom in to content on the page.
No. Item Description
1 Tabs Shows the pages currently open.
2 Open new tab Tap to open a new tab.
3 Back Go back one page.
4 Forward Go forward to the next page in the browsing
history.
5 Home Open the defined home page.
6 URL bar Shows the address of the current page.
7 Add to favorites Add the current page to your favorites.
8 Favorites Open the list of your favorites / history.
9 Web Clip Crop a part of the web page for use in My
Journal or Scrapbook.
10 Print Print the page.
11 Help View the Help file.
12 Switch mode Switch to browsing on a single screen. If you’re
in single-screen browsing, tap to return to
browsing on both screens.
13 Minimize Minimizes the browser.
14 Close Closes the browser.
1
2
3
4
5
6
78
9
10
12 13
14
11
TouchBrowser 16
English
Adding a page to your Favorites
To add a page to your Favorites, tap the Add to Favorites icon, give the page a
name (the page title will be used by default) and select a folder to save the URL
to.
  • Page 1 1
  • Page 2 2
  • Page 3 3
  • Page 4 4
  • Page 5 5
  • Page 6 6
  • Page 7 7
  • Page 8 8
  • Page 9 9
  • Page 10 10
  • Page 11 11
  • Page 12 12
  • Page 13 13
  • Page 14 14
  • Page 15 15
  • Page 16 16
  • Page 17 17
  • Page 18 18
  • Page 19 19
  • Page 20 20
  • Page 21 21
  • Page 22 22
  • Page 23 23
  • Page 24 24
  • Page 25 25
  • Page 26 26
  • Page 27 27
  • Page 28 28
  • Page 29 29
  • Page 30 30
  • Page 31 31
  • Page 32 32
  • Page 33 33
  • Page 34 34
  • Page 35 35
  • Page 36 36
  • Page 37 37
  • Page 38 38
  • Page 39 39
  • Page 40 40
  • Page 41 41
  • Page 42 42
  • Page 43 43
  • Page 44 44
  • Page 45 45
  • Page 46 46
  • Page 47 47
  • Page 48 48
  • Page 49 49
  • Page 50 50
  • Page 51 51
  • Page 52 52
  • Page 53 53
  • Page 54 54
  • Page 55 55
  • Page 56 56
  • Page 57 57
  • Page 58 58
  • Page 59 59
  • Page 60 60
  • Page 61 61
  • Page 62 62
  • Page 63 63
  • Page 64 64
  • Page 65 65
  • Page 66 66

Acer ICONIA Quick start guide

Type
Quick start guide

Ask a question and I''ll find the answer in the document

Finding information in a document is now easier with AI