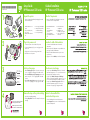
HP Photosmart 320 Printer series Installation guide
- Type
- Installation guide
HP Photosmart 320 Printer series is a versatile and user-friendly photo printer designed to deliver high-quality prints and easy connectivity options. With its compact size, it's perfect for home or office use, enabling you to print photos, documents, and more with ease. The printer features a built-in memory card reader, allowing you to directly print photos from your memory cards without a computer. Additionally, it offers a range of connectivity options, including Hi-Speed USB 2.0 for fast data transfer and PictBridge for direct printing from compatible cameras.
HP Photosmart 320 Printer series is a versatile and user-friendly photo printer designed to deliver high-quality prints and easy connectivity options. With its compact size, it's perfect for home or office use, enabling you to print photos, documents, and more with ease. The printer features a built-in memory card reader, allowing you to directly print photos from your memory cards without a computer. Additionally, it offers a range of connectivity options, including Hi-Speed USB 2.0 for fast data transfer and PictBridge for direct printing from compatible cameras.


-
 1
1
-
 2
2


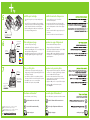
HP Photosmart 320 Printer series Installation guide
- Type
- Installation guide
HP Photosmart 320 Printer series is a versatile and user-friendly photo printer designed to deliver high-quality prints and easy connectivity options. With its compact size, it's perfect for home or office use, enabling you to print photos, documents, and more with ease. The printer features a built-in memory card reader, allowing you to directly print photos from your memory cards without a computer. Additionally, it offers a range of connectivity options, including Hi-Speed USB 2.0 for fast data transfer and PictBridge for direct printing from compatible cameras.
Ask a question and I''ll find the answer in the document
Finding information in a document is now easier with AI
in other languages
Related papers
-
HP Photosmart 370 Printer series Installation guide
-
HP Photosmart 320 Printer series Installation guide
-
Compaq PHOTOSMART A436 User manual
-
-
-
-
HP PhotoSmart A532 Owner's manual
-
HP A530 User manual
-
HP PhotoSmart A526 User manual
-
HP Photosmart A630 Printer series User guide