Page is loading ...


Norton
Commando
Owners
Workshop
Manual
by
Jeff
Clew
(with
an
additional
chapter
on
the
electric
start
models by
Stewart
Wilkins)
Models Covered:
Commando.
745cc.
February
1968
to
March
1969
Commando
Fastback. 745cc. March
1969
to
March
1973
Commando Roadster. 745cc. March
1970
to
October
1973
Commando
Hi-Rider.
745cc.
May
1971
to
October
1973
Commando Interstate. 745cc. January
1972
to
October
1973
Commando
8~0
Roadster. 828cc.
April
1973
to
October
1977
Commando
850
Hi-Rider. 828cc. April
1973
to
February
1975
Commando
850
Interstate. 828cc.
April
1973
to
October
1977
ISBN
0 85696 125 6
© Haynes Publishing Group
1990
All
rights reserved. No
part
of
this
book
may
be
reproduced
or
transmitted
in
any
form
or
by
any
means,
electronic
or
mechanical,
including
photocop~ing.
recording
or
by
any
information
storage
or
retrieval system,
without
permission
in writing
from
the
copyright
holder.
Printed
in
England. (125 -6P9)
Haynes
Publishing
Group
Sparkford
Nr
Yeovil
Somerset
BA22
7JJ
England
Haynes
Publications,
Inc
861
lawrence
Drive
Newbury
Park
California
91320
USA
ABCOE
FGHU
KlMNO
PQR
..
2·

Acknowledgements
Our
grateful
thanks
are
due
to
Norton-Villiers Limited
for
technical assistance given
and
permission
to
use
many
of
their
illustrations. Brian Horsfall gave necessary assistance
with
the
overhaul
and
devised ingenio\ls
methods
for
overcoming
the
lack
of
service tools. Les Brazier
took
the
photographs
that
accompany
the
text.
Tim
Parker
edited
the
text.
Our
thanks
are also
due
to
Steve
Challis
who
kindly loaned us
the
750
cc
Commando
model
on
which
this manual is based
and
to
Arthur
Vincent
of
Vincent
and
Jerrom,
the
Norton-Villiers
dealer
in
Taunton,
who
provided
much
in-depth servicing
and
modification
information.
We
are also grateful
to
Fran
About
this manual
The
author
of
this
manual
has
the
conviction
that
the
only
way
in
which a meaningful
and
easy
to
follow
text
can
be
written
is
first
to
do
the
work
himself,
under
conditions
similar
to
those
found
in
the
average household. As a result,
the
hands
seen
in
the
photographs
are
those
of
the
author.
Even
the
machines are
not
new;
examples
that
have covered a
considerable
mileage were selected,
so
that
the
conditions
encountered
would
be
typical
of
those
found
by
the
average
owner/rider.
Unless
specially
mentioned
and
therefore
considered essential,
Norton-
Villiers service
tools
have
not
been
used.
There
is invariably
alternative
means of loosening
or
slackening
some
vital
component,
when service
tools
are
not
available
and
risk
of
damage
is
to
be
avoided
at
all costs.
Each
of
the
chapters
is
divided
into
numbered
sections.
Within
the
sections are
numbered
paragraphs. Cross-reference
throughout
this manual is
quite
straightforward
and
logical.
When
reference
is
made,
'See
section
6.10',
it
means
section
6,
paragraph
lOin
the
same
chapter.
If
another
chapter
were
meant
Ridewood
and
Co,
of
Wells,
who
provided
the
Mark
3 Electric
Start
model used
for
the
photographic
sequences
in
Chapter
9,
and
to
Chris
Rogers
who
provided
the
850
Roadster
featured
on
the
front
cover
of
this
manual.
Finally, we
would
also like
to
acknowledge
the
help
of
the
Avon
Rubber
Company
who
kindly
supplied
illustrations
and
advice
about
tyre
fitting,
of
Amal Limited
for
the
use
of
their
carburettor
illustrations,
and
of
Automotive
Products
Limited
who
provided illustrations
and
advice
about
their
hydraulic disc
brakes.
it would say,
'See
Chapter
2, Section
6.10'.
All
photographs
are
captioned
with
a
section/paragraph
number
to
which
they
refer, and
are
always
relevant
to
the
chapter
text
adjacent.
Figure
numbers
(usually line illustrations)
appear
in
numerical
order,
within
a given
chapter.
'Fig
1.1'
therefore
refers
to
the
first figure in
chapter
1.
Left
hand
and
right
hand
descriptions
of
the
machines
and
their
components
refer
to
the
left
and
right
of
a given machine
when normally seated.
Motorcycle
manufacturers
continually
make
changes
to
specifications
and
recommendations,
and
these,
when
notified,
are
incorporated
into
our
manuals
at
the
earliest
opportunity.
Whilst every
care
is
taken
to
ensure
that
the
information
in
this
manual is
correct
no liability can
be
accepted
by
the
authors
or
publishers
for
loss, damage
or
injury caused
by
any
errors
in
or
omissions
from
the
information
given.

Contents
Chapter
Introductory
pages
l/Engine
2/Gearbox
3/Clutch
and
primary
transmission
4/Carburation
and
lubrication
5/lgnition
system
6/Frame
and
forks
7/Wheels.
brakes
and
tyres
BlElectrical
system
Metric conversion
table
Index
Section
I
ntroduction
to
the
Norton
Commando
Ordering spare
parts
Routine
maintenance
Recommended
lubricants
Safety
first!
English/American
terminology
Specifications
Dismantling
Examination
and
renovation
Reassembly
Fault
diagnosis
Specifications
Dismantling
Examination
and
renovation
Reassembly
Fault
diagnosis
Specifications
Adjusting
clutch
Examining
clutch
plate
and
springs
Examining
clutch
inner
and
outer
drums
Fault
diagnosis
Specifications
Dismantling
Examination
Balancing
carburettors
Exhaust
system
Lubrication
Fault
diagnosis
Specifications
Ignition timing
Plugs
Fault
diagnosis
Specifications
Front
fork
Swinging arm
Speedometer
and
tachometer
Cleaning
Fault
diagnosis
Specifications
Front
wheel
and
brakes
Master cylinder
Rear
wheel
and
brakes
Rear
chain
Tyres
Fault
diagnosis
Specifications
Battery
Lights
Ignition
Page
5
6
7
8
9
10
11
13
23
31
52
53
64
58
60
66
67
67
67
67
68
71
72
74
74
75
75
76
77
79
80
82
83
84
89
97
97
98
99
100
101
106
73
110
112
113
114
115
118
123
143

4
Model
dimensions:
Fastback Roadster
Interstate
Hi-Rider
850ee
Height:
40.75
in
40.75
in
40.75
in
50.25
in
40.75
in
(103.5 em)
(103.5
em)
(103.5
em)
(127.6
em) (103.5 em)
Length:
87.5
in
87.5
in
87.5
in
87.5
in
88.0
in
(222 em) (222 em)
(222
em) (222 em) \223.7 em)
Width:
26.0
in
26.0
in
26.0
in
26.0
in
26.0
in
(66 em) (66 em) (66
em)
(66 em) (66 em)
Ground
6.0
in
6.0
in
6.0
in
6.0
in
6.0
in
clearance: (15 em) (15 em)
(15em)
(15 em) (15 em)
Wheelbase: 56.75
in
56.75
in
56.75
in
56.75
in
58.0
in
(144 em) (144 em)
(144
em) (144 em) (147em)
Weight
(dry):
395.4lb
395.41b
410lb
N/A
418
-430
Ib*
(197.3 kg) (179.3 kg)
(186
kg) (190 -
196
kg) *
* Depending
on
specification

Introduction to the Norton Commando
In
the
immediate
post-war years, British
motor
cycle
manufacturers began
to
appreciate
the
advantages
of
a vertical
twin
engine, acknowledging
the
success of
one
manufacturer
who
had
succeeded
in marketing a highly
attractive
design as far
back
as
1937.
The
first
Norton
twin
was unveiled
at
the
1949
Earl's
Court
Show.
Of
497
cc
capacity it was
marketed
as
the
Model 7.
The
specification
included a
cast
iron engine with
splayed
exhaust
ports
and
push rods located in cast-in tunnels
at
the
front
of
the
cylinder
block.
The
magneto
and
camshaft
were driven by
separate
chains
that
formed
part
of
the
timing
gear assembly
and
were fully enclosed
within
a conventional
timing cover.
Norton
Roadholder
forks
looked
after
the
front
suspension;
at
the
rear
end
a 'garden
gate'
frame
layout
employed
plunger units characteristic
of
that
era.
As
time
progressed,
the
Norton
twins assumed
the
name
Dominator
and
the overall
specification
was changed
to
include alloy engine
components,
the
famous
Norton
'Featherbed'
frame
with
swinging
arm
rear suspension
and
shortened
Roadholder
forks.
Machines
fitted
with
the
'Featherbed'
frame were redesignated
the
Model
88
and
during
1956
a
596
cc
version,
known
as
the
Model
99,
was
added
to
the
range.
Sports
versions
of
both
models were
introduced
during
1962
and
a
646
cc
machine
to
the
same basic
specification
that
was available in
both
standard
and
sports
trim.
Financial
problems
necessitated
Norton
Motors becoming
part
of
the
Associated
Motor
Cycles
Group
and
in
1962
the
old
Bracebridge
Street
works in Birmingham,
the
traditional
home
of
the
Norton,
finally closed when all
production
was moved
to
Woolwich.
Although
the
Norton
range of
motor
cycles was
continued,
some
hybrids
were
marketed
comprising in several
instances
Norton
engines
fitted
into
AMC cycle
parts.
The
twins
were, however,
the
least
affected,
apart
from
some
export
only
versions. It was
about
this
time
that
the
Norton
Atlas came
into
being,
fitted
with
an
enlarged
twin
cylinder
engine
of
745
cc.
It
too
ultimately
acquired
an
AMC
frame.
By
now
the
Bdtish
motor
cycle
industry
in general was faced
with
financial
problems, mainly
on
account
of
the
Japanese invasion
of
their
traditional markets_ Associated Motor Cycles were
one
of
several
manufacturers
to
collapse
under
the
strain
and
towards
the
end
of
1966
a
satisfactory
arrangement
was
completed
for
their
assets
to
be
acquired
by Manganese Bronze Holdings
Limited,
of
which Villiers Engineering was a subsidiary_ A
new
company
was born -Norton-Villiers Limited
and
work
com-
menced
on
a design
project
under
the
direction
of
Dr
Stefan
Bauer
at
the
Villiers premises in Wolverhampton. Meanwhile,
Norton
production
was again
on
the
move,this
time
to
new
premises
on
one
of
the
trading
estates
at
Andover_ The move
was
completed
during
1969.
The
outcome
of Dr Bauer's
project
was
the
Norton
Commando,
a
750
cc
vertical twin using
an
inclined version
of
the
original
Dominator
engine
suspended
in
an
entirely
new
frame
by
means
of
Isolastic stlspension
mountings,
a
patented
Norton-Villiers inventlon_
Although
initially dismissed by
the
sceptics as merely a revamped Atlas,
the
Commando
soon
found
favour
with
all who were privileged
to
have a
test
ride.
The
Isolastic suspension eliminated
the
high
frequency
vibration normally associated
with
the
vertical
twin
engine
and
gave a
hitherto
unknown
smooth
ride_
From
this
moment
the
Commando
became a success,
as
underlined
by
the
presentation
of
the
'Motor
Cycle
of
the
Year'
award
on
no
less
than
five consecutive years as
the
result
of
a reader
contest
organised
by
Motor Cycle News.
Six
versions
of
the
Commando
have
been
marketed,
the
Interstate,
designed
for
long distance
riding,
the
Roadster
for
normal
road
use,
the
Fastback,
virtually
the
original version,
the
Hi-rider,
built
in semi-chopper
style,
the
750
cc
Production
racer
and
the
Interpol,
a fully-equipped police
model used
by
many
police forces
throughout
the
world.
Only
the
Fastback
is no longer
in
production.
Further
permutations
are available
from
the
use
of
the
standard
or
the
Combat
engine,
the
latter
being a specially-tuned version
that
develops
65
bhp
at
7000
rpm
- 5
bhp
more
than
the
standard
engine_
During March
1973
an
850
cc
model
was
added
to
the
range,
fitted
with
a modified
form
of
the
750
cc
engine
that
has
the
same
power
output
but
imposes less stress on
the
more
vulnerable
components_
This
too
is
currently
available
in
five versions,
one
of
which
is
specially
equipped
to
give a significant
reduction
in noise level.
Perhaps
the
greatest success
of
the
Commando
was
Peter
Williams' Isle
of
Man
TT
win in
the
1973
Formula
750
race,
when a British
manufacturer
showed
that
a British
motor
cycle
could
still
offer
a serious challenge
and
emerge victorious.
The
Norton
Commando
is
indeed a superbi
ke
and
it
is
particularly
fitting
that
this descriptive
attribute
was
applied
to
the
Commando
when
interest
in large
capacity
high-performance
models
heightened
several years ago.
Modifications
to
the
Norton Commando range
When
the
Norton
Commando
was
announced
towards
the
end
of
1967,
it
was
greeted
with a certain
amount
of
scepticism
because
on
first
sight
it
appeared
to
comprise
of
the
old
Norton
Dominator
twin
cylinder
engine
mounted
at
an
inclined
angle in
a
set
of
new
cycle
parts.
It
was
not
realised
that
the
new
Isolastic
method
of
engine suspension
damped
out
all engine vibration
and
produced
a
machine
which
had
an
uncanny
smoothness
for
a vertical
twin.
In
due
course
the
critics were
silenced
and
the
Commando
had
the
distinction
of
being
regarded
as
the
first
of
today's
so-called
'Superbi
kes'.
There can be little
doubt
that
the
original design
concept
has
proved
correct,
since comparatively
few
modifications
of any
real
consequence
have been made since
production
commenced
during
1968.
Mostly
they
relate
to
styling
and
the
introduction
of
'slim line'
front
forks.
In
March
1973
the
750
cc
range
was
supplemented
by
the
introduction
of
an
850
cc
model,
the
engine
of
which embodies several design modifications
to
enable
the
same
power
output
as
that
of
the
750
cc
Combat
engine
to
be Obtained, with less stress
on
the
engine
components.
Today,
five variations of
the
basic
750
cc
model are available,
together
with five versions
of
the
850
cc
model. These include
the
Interpol
model which
is
used
by
police forces
throughout
the
world.
Some
of
the
engine
and
gearbox
data
contained
in
this
manual can
be
applied
to
the
earlier
Dominator
twins
of
497
cc
and
597
cc, also
to
the
646
cc
twins
and
the
745
cc
Atlas
model.
It
is mainly
the
cycle
parts
of these
latter
models
which
differ.

Ordering spare parts
When wishing
to
purchase
spare
parts
for
the
Norton
Commando
it
is
best
to
deal
direct
with
an
accredited
Norton-
Villiers agent. Parts
cannot
be
obtained
direct
from
Norton-
Villiers Limited; all orders
must
be
routed
through
an
approved
agent, even
if
the
agent
does
not
hold
the
parts
required
in
stock.
When ordering parts, always
quote
the
frame
and
engine
numbers
in full,
without
omitting
any
prefixes
or
suffixes.
It
is
also advisable
to
include
note
of
the
colour
scheme
of
the
machine
if
the
parts
ordered
are
required
to
match
in.
The
engine
number
is
stamped
on
the
left
hand
side
of
the
crankcase
immediately
below
the
base
of
the
cylinder
barrel.
The
frame
number
is
stamped
on
an
identification
plate
rivetted
to
the
steeri
ng
head.
Frame
number
location
Always
fit
parts
of
genuine Norton-Villiers
manufacture.
Pattem
parts
may
be available sometimes
at
lower
cost,
but
they
do
not
necessarily
make
a
satisfactory
replacement
for
the
originals.
There
are cases where
reduced
life
or
sudden
failure
has occurred,
to
the
overall
detriment
of
performance
and
perhaps
ri
der
safety.
'
Some
of
the
more
expendable
parts
such as spark plugs,
bulbs, tyres, oils
and
greases
etc.,
can
be
obtained
from
accessory
shops
and
motor
factors,
who
have
convenient
opening
hours,
charge
lower
prices
and
can
often
be
found
not
far
from
home.
It
is also possible
to
obtain
parts
on
a Mail
Order
basis
from
a
number
of
specialists
who
advertise regularly in
the
motor
cycle
magazines.
Engine
number
location

Routine maintenance
Periodic routine
maintenance
is
a
continuous
process
that
commences
immediately
the
machine
is
used.
It
must
be carried
out
at
specified mileage recordings
or
on
a calendar basis if
the
machine
is
not
used
frequently,
whichever falls
soonest.
Main-
tenance
should
be regarded as
an
insurance policy,
to
help
keep
the
machine in
the
peak
of
condition
and
to
ensure
long,
trouble-free
service. It has
the
additional
benefit
of
giving early
waming
of
any faults
that
may
develop
and
will
act
as a regular
safety
check,
to
the
obvious advantage
of
both
rider
and
machine alike.
The
various
maintenance
tasks are described
under
their
respective mileage
and
calendar
headings. Accompanying diagrams
are
provided, where necessary.
It
should
be
remembered
that
the
interval betvveen
the
various
maintenance
tasks serves
only
as a guide. As
the
machine gets
older
or
is
used
under
particularly
adverse
conditions,
it
would
be
advisable
to
reduce
the
period
betvveen
each
check.
Some
of
the
tasks are
described
in detail, where
they
are
not
mentioned
fully
as
a
routine
maintenance
item
in
the
text.
If
a
specific
item
is
mentioned
but
not
described in detail,
it
will be
covered
fully
in
the
appropriate
Chapter.
No special
tools
are
required
for
the
normal
routine
maintenance
tasks.
The
tools
contained
in
the
kit
supplied
with
every
new
machine will prove
adequate
for
each
task
or
if
they
are
not
available,
the
tools
found
in
the
average
household.
Weekly
or
every
250
miles
Check
oil
tank
level
and
replenish if necessary
with
engine oil
of
the
recommended
grade.
Grease brake pedal
pivot
and
cable, oil all
other
exposed
control
cables
and
joints.
Check
the
battery
electrolyte
level, chain
adjustments
and
tyre
pressures.
Monthly
or
every
1000
miles
Complete
the
maintenance
tasks listed
under
the
preceding
vveekly heading,
then
the
fOllowing additional items:
Check
and,
if
necessary,
adjust
both
brakes (disc brake
is
self-adjusting). Make
sure
disc brake fluid level is
correct
in
reservoir. Examine
the
disc
brake
pads
for
vvear.
Check primary chaincase oil level
and
top
up if necessary.
Check
nuts
and
bolts
for
tightness.
Three
monthly
or
every
2500
miles
Complete
all
the
checks listed
under
the
vveekly
and
monthly
headings,
then
the
following
items:
Drain
the
oil
tank
whilst
the
oil
is
warm
and
remove
and
clean
the
filters
before
refilling with
new
oil
of
the
correct
viscosity.
Remove
and
replace
the
oil filter
element
(fitted
to
all
models,
1972
onwards).
Check
the
gearbox
oil level
and
top
up if necessary.
Remove
and
clean
both
spark
plugs
and
reset
the
gaps.
Check
the
ignition
timing
after
adjusting
the
contact
breaker
gaps. It
is
preferable
to
use a
stroboscope
for
this
check.
Remove
and
lubricate
the
final drive
chain;
change
the
primary
chaincase oil.
Check
the
primary chain
adjustment
and
the
clutch
adjustment.
Finally,
check
the
Isolastic engine mountings
for
excess play.
Six
monthly
or
every
5000
miles
Again,
complete
all
the
maintenance tasks listed previously,
then
complete
the
following additional tasks:
Change
the
gearbox
oil,
and
also
the
oil in
the
front
forks.
Check
and
adjust
the
camshaft
chain.
Clean
the
contact
breaker
points
and
lubricate
the
contact
breaker
cam
and
the
auto-advance unit.
Grease
the
brake
operating
arm
pivots (grease sparingly
to
prevent grease reaching
the
brake linings).
Check
and,
if
necessary, adjust
the
valve clearances.
Fit
a
new
air
filter
element;
dismantle
and
clean
both
carburettors.
Check
that
they
are
synchronised
correctly.
Check
the
swinging
arm
bushes
for
play
and
fill
the
pivot
housing with oil.
Yearly
or
every
10,000
miles
After
completing
the
vveekly,
monthly,
three-monthly
and
six-monthly taSks,
continue
with
the
following additional items:
Remove
and
repack
the
wheel bearings
with
grease,
not
omitting
the
bearing in
the
centre
of
the
final drive
sprocket.
Check
the
primary
and
secondary
chains
and
sprockets
for
vvear,
al~o
both
carburettors.
If performance has fallen
off,
decarbonise
the
engine
and
regrind
the
valves.
It
should
be
noted
that
no
special
mention
has been made
relating
to
the
lighting
equipment,
horn
and
speedometer,
which
must
be in
good
working
order
if
the
statutory
requirements
of
the
UK
are
to
be
met.
RegUlations also
apply
to
the
minimum
depth
of
tyre
tread
and
the
overall
condition
of
the
tyres.
It
is
assumed
that
every
owner/rider
will keep a
watchful
eye
on
these additional
points,
especially since
they
have a
direct
bearing
on
rider
safety.
Remember
there
is
no
stage
at
any
point
in
the
life
of
the
machine
when a routine
maintenance
task
can be
ignored
or
safety
checks
neglected.

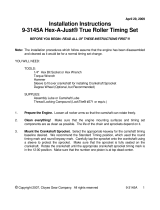
8
RM.1.
Lubrication
points
1 Engine oil
tank
2
Gearbox
3 Primary chaincase
4
Control
cables
5 Telescopic
fork
6 Swinging
arm
7 Wheel
hubs
8 Brake
cams
9 Brake pedal
pivot
Footnote: o
o Denotes lube
points
on
left
side
of
motorcycle
Recommended lubricants
Specification
Engine
and
primary
chaincase
20W/50
Gearbox
90
EP
Swinging
arm
bushes
140
EP
Hubs
and
cycle
parts
Front
forks
10W/30
Rear
chain
Hydraulic disc
brake
Denotes lube
points
on
right
side
of
motorcycle
Castrol
Product
Castrol GTX
Castrol Hypoy
Castrol Hi·Press
Castrol
LM
Grease
Castrolite
Castrol
Graphited
Grease
Castrol Girling Universal Brake
and
Clutch
Fluid
Routine maintenance and capacities data
Oil
tank
Gearbox
Primary chaincase
Front
forks
Contact
breaker
gap
Spark
plug gap
Tappet
clearances (engine
cold)
5 Imp pints (6
US
pints/2.8
litres)
0.75
Imp
pints
(0.9
US
pints/OA2Iitres)
7
fl
oz
(200 ee)
5
fl
oz
(150
ee)
0.014
·0.016
in
(0.35
-
0.04
mm)
0.023
-
0.028
in
(0.59
-
0.72
mm)
0.006
in (0.15
mm)
inlet
(Commando)
0.008
in (0.20
mm)
inlet
(Combat)
0.008
in
(0.20
mm)
exhaust
(Commando)
0.010
in (0.25
mm)
exhaust
(Combat)

Safety
first!
Professional
motor
mechanics
are
trained
in
safe
working
procedures.
However
enthusiastic
you
may
be
about
getting
on
with
the
job
in
hand,
do
take
the
time
to
ensure
that
your
safety
is
not
put
at
risk. A
moment's
lack
of
attention
can
result
in
an
accident,
as can
failure
to
observe
certain
elementary
precautions.
There
will
always
be
new
ways
of
having
accidents,
and
the
following
points
do
not
pretend
to
be
a
comprehensive
list
of
all
dangers;
they
are
intended
rather
to
make
you
aware
of
the
risks
and
to
encourage
a
safety-conscious
approach
to
all
work
you
carry
out
on
your
vehicle.
Essential
DOs
and
DON'Ts
DON'T
start
the
engine
without
first
ascertaining
that
the
transmission
is
in
neutral.
DON'T
suddenly
remove
the
filler
cap
from
a
hot
cooling
system
-
cover
it
with
a
cloth
and
release
the
pressure
gradually
first,
or
you
may
get
scalded
by
escaping
coolant.
DON'T
attempt
to
drain
oil
until
you
are sure
it
has
cooled
sufficiently
to
avoid
scalding
you.
DON'T
grasp
any
part
of
the
engine,
exhaust
or
silencer
without
first
ascertaining
that
it
is
sufficiently
cool
to
avoid
burning
you.
DON'T
allow
brake
fluid
or
antifreeze
to
contact
the
machine's
paintwork
or
plastic
components.
DON'T
syphon
toxic
liquids
such
as fuel,
brake
fluid
or
antifreeze
by
mouth,
or
allow
them
to
remain
on
your
skin.
DON'T
inhale
dust
-
it
may
be
injurious
to
health
(see
Asbestos
heading).
DON'T
allow
any
spilt
oil
or
grease
to
remain
on
the
floor
-
wipe
it
up
straight
away,
before
someone
slips
on
it.
DON'T
use
ill-fitting
spanners
or
other
tools
which
may
slip
and
cause
injury.
DON'T
attempt
to
lift
a
heavy
component
which
may
be
beyond
your
capability
-
get
assistance.
DON'T
rush
to
finish
a'job,
or
take
unverified
short
cuts.
DON'T
allow
children
or
animals
in
or
around
an
unattended
vehicle.
DON'T
inflate
a
tyre
to
a
pressure
above
the
recommended
maximum.
Apart
from
overstressing
the
carcase
and
wheel
rim,
in
extreme
cases
the
tyre
may
blow
off
forcibly.
DO
ensure
that
the
machine
is
supported
securely
at
all
times.
This
is
especially
important
when
the
machine
is
blocked
up
to
aid
wheel
or
fork
removal.
DO
take
care
when
attempting
to
slacken
a
stubborn
nut
or
bolt.
It
is
generally
better
to
pull
on
a spanner,
rather
than
push,
so
that
if
slippage
occurs
you
fall
away
from
the
machine
rather
than
on
to
it.
DO
wear
eye
protection
when
using
power
tools
such
as
drill,
sander,
bench
grinqer
etc.
DO
use a
barrier
cream
on
your
hands
prior
to
undertaking
dirty
jobs
-
it
will
protect
your
skin
from
infection
as
well
as
making
the
dirt
easier
to
remove
afterwards;
but
make
sure
your
hands
aren't
left
slippery.
Note
that
long-term
contact
with
used
engine
oil
can
be a
health
hazard.
DO
keep
loose
clothing
(cuffs,
tie
etc)
and
long
hair
well
out
of
the
way
of
moving
mechanical
parts.
DO
remove
rings,
wristwatch
etc,
before
working
on
the
vehicle
-
especially
the
electrical
system.
DO
keep
your
work
area
tidy
-
it
is
only
too
easy
to
fall
over
articles
left
lying
around.
DO
exercise
caution
when
compressing
springs
for
removal
or
installation.
Ensure
that
the
tension
is
applied
and
released
in
a
controlled
manner,
using
suitable
tools
which
preclude
the
possibility
of
the
spring
escaping
violently.
DO
ensure
that
any
lifting
tackle
used
has
a safe
working
load
rating
adequate
for
the
job.
DO
get
someone
to
check
periodically
that
all
is
well,
when
working
alone
on
the
vehicle,
DO
carry
out
work
in
a
logical
sequence
and
check
that
everything
is
correctly
assembled
and
tightened
afterwards.
DO
remember
that
your
vehicle's
safety
affects
that
of
yourself
and
others.
If
in
doubt
on
any
point,
get
specialist
advice.
IF.
in
spite
of
following
these
precautions,
you
are
unfortunate
enough
to
injure
yourself,
seek
medical
attention
as
soon
as
possible.
Asbestos
Certain
friction,
insulating,
sealing,
and
other
products
-
such
as
brake
linings,
clutch
linings,
gaskets,
etc
-
contain
asbestos.
Extreme
care
must
be
taken
to
avoid
inhalation
of
dust
from
such
products
since
it
is
hazardous
to
health.
If
in
doubt,
assume
that
they
do
contain
asbestos.
Fire
Remember
at
all
times
that
petrol
(gasoline)
is
highly
flammable.
Never
smoke,
or
have any
kind
of
naked
flame
around,
when
working
on
the
vehicle.
But
the
risk
does
not
end
there
- a
spark
caused
by
an
electrical
short-circuit,
by
two
metal
surfaces
contacting
each
other,
by
careless
use
of
tools
..
or
even
by
static
electricity
built
up
in
your
body
under
certain
conditions,
can
ignite
petrol
VapOIJr,
which
in
a
confined
space
is
highly
explosive.
Always
disconnect
the
battery
earth
(ground)
terminal
before
working
on
any
part
of
the
fuel
or
electrical
system,
and
never
risk
spilling
fuel
on
to
a
hot
engine
or
exhaust.
It
is
recommended
that
a fire
extinguisher
of
a
type
suitable
for
fuel
and
electrical
fires
is
kept
handy
in
the
garage
or
workplace
at
all
times.
Never
try
to
extinguish
a
fuel
or
electrical
fire
with
water.
Note:
Any
reference
to
a
'torch'
appearing
in
this
manual
should
always
be
taken
to
mean
a
hand-held
battery-operated
electric
lamp
or
flashlight.
It
does
not
mean
a
welding/gas
torch
or
blowlamp.
Fumes
Certain
fumes
are
highly
toxic
and
can
quickly
cause
unconsciousness
and
even
death
if
inhaled
to
any
extent.
Petrol
(gasoline)
vapour
comes
into
this
category,
as
do
the
vapours
from
certain
solvents
such
as
trichloroethylene.
Any
draining
or
pouring
of
such
volatile
fiuids
should
be
done
in
a
well
ventilated
area.
When
using
cleaning
fluids
and
solvents,
read
the
instruc-
tions
carefully.
Never
use
materials
from
unmarked
containers-
they
may
give
off
poisonous
vapours.
Never
run
the
'engine
of
a
motor
vehicle
in
an
enclosed
space
such
as a
garage.
Exhaust
fumes
contain
carbon
mon-
oxide
which
is
extremely
poisonous;
if
you
need
to
run
the
engine,
always
do
so
in
the
open
air
or
at
least
have
the
rear
of
.
the
vehicle
outside
the
workplace.
The
battery
Never
cause
a spark,
or
allow
a
naked
light,
near
the
vehicle's
battery.
It
will
normally
be
giving
off
a
certain
amount
of
hydrogen
gas,
which
is
highly
explosive.
Always
disconnect
the
battery
earth
(ground)
terminal
before
working
on
the
fuel
or
electrical
systems.
If
possible,
loosen
the
filler
plugs
or
cover
when
charging
the
battery
from
an
external
source.
Do
not
charge
at
an
excessive
rate
or
the
battery
may
burst.
Take
care
when
topping
up
and
when
carrying
the
battery.
The
acid
electrolyte,
even
when
diluted,
is
very
corrosive
and
should
not
be
allowed
to
contact
the
eyes
or
skin.
If
you
ever
need
to
prepare
electrolyte
yourself,
always
add
the· acid
slowly
to
the
water,
and
never
the
other
way
round.
Protect
against
splashes
by
wearing
rubber
gloves
and
goggles.
Mains electricity
and
electrical
equipment
When
using
an
electric
power
tool,
inspection
light
etc,
always
ensure
that
the
appliance
is
correctly
connected
to
its
plug
and
that,
where
necessary,
it
is
properly
earthed
(grounded).
Do
not
use
such
appliances
in
damp
conditions
and, again,
beware
of
creating
a
spark
or
applying
excessive
heat
in
the
vicinity
of
fuel
or
fuel
vapour.
Also
ensure
that
the
appliances
meet
the
relevant
national
safety
standards.
Ignition
HT
voltage
A severe
electric
shock
can
result
from
touching
certain
parts
of
the
ignition
system,
such
as
the
HT
leads,
when
the
engine
is
running
or
being
cranked,
particularly
if
components
are
damp
or
the
insulation
is
defective.
Where
an
electronic
ignition
system
is
fitted,
the
HT
voltage
is
much
higher
and
could
prove
fatal.

English/American
terminology
Because
this
book
has
been
written
in England,
British
English
component
names,
phrases and
spellings
have been used
throughout.
American
English usage is
quite
often
different
and
whereas
normally
no
confusion
should
occur,
a
list
of
equivalent
terminology
is
given
below.
English
American
English American
Air
filter
Air
cleaner
Number
plate License
plate
Alignment
(headlamp)
Aim
Output
or
layshaft
Countershaft
Allen
screw/key
Socket
screw/wrench
Panniers Side cases
Anticlockwise
Counterclockwise
Paraffin Kerosene
Bottom/top
gear
Low/high
gear
Petrol Gasoline
Bottom/top
yoke
Bottom/top
triple
clamp
Petrol/fuel
tank
Gas
tank
Bush
Bushing
Pinking Pinging
Carburettor
Carburetor
Rear suspension
unit
Rear
shock
absorber
Catch
Latch
Rocker cover Valve
cover
Circlip
Snap
ring
Selector
Shifter
Clutch
drum
Clutch
housing
Self-locking
pliers
Vise-grips
Dip
switch
Dimmer
switch
Side
or
parking
lamp
Parking
or
auxiliary
light
Disulphide
Disulfide
Side
or
prop
stand
Kick
stand
Dynamo
DC
generator
Silencer
Muffler
Earth
Ground
Spanner
Wrench
End
float
End
play
Split
pin
Cotter
pin
Engineer's blue
Machinist's
dye
Stanchion
Tube
Exhaust pipe
Header
Sulphuric
Sulfuric
Fault
diagnosis
Trouble
shooting
Sump
Oil pan
Float
chamber
Float
bowl
Swingin~
arm
Swingarm
Footrest
Footpeg
Tab
washer
Lock
washer
Fuel/petrol
tap
Petcock
Top
box
Trunk
Gaiter
Boot
Torch
Flashlight
Gearbox
Transmission
Two/four
stroke
Two/four
cycle
Gearchange
Shift
Tyre Tire
Gudgeon
pin
Wrist/piston
pin Valve
collar
Valve
retainer
Indicator
Turn
signal
Valve
collets
Valve
cotters
Inlet
Intake
Vice
Vise
I
nput
shaft
or
mainshaft
Mainshaft
Wheel
spindle Axle
Kickstart
Kickstarter
White
spirit
Stoddard
solvent
Lower
leg
Slider
Windscreen
Windshield
Mudguard
Fender

Chapter 1
Engine
Contents
General
description
..............
.
Operations
with
engine in
frame
Operations
with
engine removed .. .
Method
of
engine removal
........
.
Dismantling
the
engine -removing
the
petrol
tank
Dismantling
the
engine -removing
the
cylinder
head
...
Dismantling
the
engine -removing
the
cylinder
barrels
and
pistons
........................
'"
...
'"
.. .
Dismantling
the
engine
-removing
the
alternator,
clutch
and
primary
chaincase
.....................
'"
...
'"
Dismantling
the
engine·
removing
the
crankcase
assembly
from
the
frame
... ... ... ... ... ... ...
'"
...
'"
...
Dismantling
the
engine
-removing
the
contact
breaker
and
auto-advance
assembly...
... ...
'"
...
'"
...
Dismantling
the
engine -removing
the
timing
cover, oil
pump
and
timing
chain
............
'"
........
.
Dismantling
the
engine -removing
the
crankshaft
pinion
and
separating
the
crankcases
......
'"
...
'"
.. .
Examination
and
renovation -general
...
'"
........
.
Crankshaft, big
end
and
engine bearings -
examination
and
renovation .,
...................
'"
.....
.
Timing
pinions,
timing
chain
and
chain
tensioner-
examination
and
renovation
..............
.
Timing
cover
oil seals -examination
and
renewal
Cylinder barrel -
examination
and
renovation
Specifications
Engine
Type
...........
.
Cylinder
head
Valve
seat
angles ...
Cylinder barrel
Bore
750
cc
850
cc
Stroke
750
cc
and
850
cc
Capacity (actual)
750cc
850
cc
Compression
ratio
Standard
750
cc
...
750
cc
Combat
850
cc
Bhp
Standard
750
cc
...
750
cc
Combat
engine
850
cc
.. ,
.....
, ...
1
2
3
4
5
6
7
8
9
10
11
12
13
14
15
16
17
Pistons, piston rings
and
small ends -
examination
and
renovation
........
,
'"
...
'"
........
, ... ... ...
18
Valves, valve springs
and
valve guides -
examination
and
renovation ...
'"
...
'"
...
'" '"
'"
.......
,.
19
Cylinder
head
-
examination
and
renovation
20
Rocker
arms
and
rocker spindles -
examination
and
renovation ...
'"
...
'"
... ... ... ... ... ... ...
21
Camshaft
and
push rods -
examination
and
renovation
22
Engine reassembly -general ...
'"
... ... ... ... ... ...
23
Engine reassembly -rebuilding
the
crankshaft
assembly...
24
Engine reassembly -refitting
the
connecting
rods ...
25
Engine reassembly -reassembling
the
crankcases .. ,
26
Engine reassembly -
completing
reassembly
of
the
timing
side
.......
,.
'"
...
'"
... ... ... ...
27
Refitting
the
pistons
and
piston rings
28
Replacing
the
crankcase assembly in
the
frame
29
Engine reassembly -refitting
the
cylinder
barrel
30
Engine reassembly -reassembling
the
cylinder
head
31
Engine reassembly -refitting
the
cylinder
head
32
Engine reassembly -reassembling
the
primary
transmission ...
33
Engine reassembly -
completion
'"
... ... ...
34
Checking
and
resetting
the
valve clearances
35
Starting
and
running
the
rebuilt
engine
36
Increasing engine
performance
37
Fault
diagnosis
'"
'"
...
'"
...
'"
...
38
Twin
cylinder
four
stroke,
with
pushrod
operated
overhead
valves
Aluminium
alloy (RR 53B)
45
0
inlet
and
exhaust
Cast iron
73
mm
(2.875
in)
77
mm
(3.04 in)
89
mm
(3.503 in)
745
cc
828
cc
9:
1
10:
1
8.5:
1
60@6800rpm
65@6500rpm
60@5900rpm

12
Pistons
Diameter
at
bottom
of
skirt
Piston rings
Number
End
gaps
Valves
Material
Head diameter
Stem diameter
Valve sprihgs
Number
Free length
Valve guides
Internal diameter
External diameter
Heat resisting washer
Material
Thickness
........
.
Valve
timing
(measured
at
0.013
in
(0.3302
mm)
cam
lift!
Inlet
opens
BTDC
•..
Inlet
closes
ABDC
...
Exhaust opens
BBDC
Exhaust closes A
TDC
Ignition
timing
Main
bearings
Make
Type
Drive side ...
Timing
side
Size
Cylinder
head gaskets
(750
cc
only)
Norton
Villiers
part
number
Type
..•.....•...
Thickness (inches)
Use
.••••..•••••
850
cc models
use
Part
No
065051
Torque
wrench settings
Cylinder
head nuts
and
bolts
(3/8
in)
Cylinder
head bolts (5116
in)
•.......•
Cylinder
base
nuts
(3/8
in)
and
cylinder
through
bolts
(850
cc
only)
Cylinder
base
nuts (5116
in)
Connecting
rod
nuts
Crankshaft nuts
........
.
Engine
mounting
bolts
..
.
Rotor
nut
(alternator)
Alternator
stud
nuts ...
Clutch
centre
nut
Gearbox
sprocket
nut
Rear suspension
unit
mounting
nuts ...
Disc brake caliper
fork
leg
mounting
bolts ...
Disc brake caliper
end
plug
Oil
pressure release valve ... ...
...
... ... . ..
Chapter 1/Engine
2.8713
-
2.8703
in
(72.931
-72.906
mm)
-
750
cc
Two
compression, one
oil
control
per
piston
0.010
-
0.012
in
(0.245
-0.305
mm)
-
top
ring (chrome)
0.008
-
0.012
in
(0.203 -
0.305
mm)
-
2nd
ring
(taper)
EN52
-
inlet
KE965
-exhaust
1.500
in
(38.1
mm)
inlet
-
750
cc
1.312
in
(33.325
mm)
exhaust -
750
cc
0.3115
-
0.3105
in
(7.912
-7.886
mm)
inlet
and exhaust valves
-750cc
Two
per valve
1.618
in
(41.097
mm)
-
outer
spring
1.482
in
(37.642
mm)
-
inner
spring
0.3145
-
0.3135
in
(7.988 -7.962
mm)
0.5015
-
0.50
in
(12.738
-12.725
mm)
Tufnol
ASP
0.062
in
(1.574
mm)
Standard
50
0
740
82
0
42
0
750
cc engines
28°
fully
advanced
FAG
NJ306E
Ransome & Maries
6MRJA30
Combat
59
0
8go
880
60
0
Existing
bearings
must
be
replaced
with
either
of
these types
Single
lipped
roller
(pre-1972)
Special
roller
(single
lipped)
1972
onwards
Single
row
ball (pre-1972)
Special
roller
(single lipped)
1972
onwards
30
mm
x
72
mm
x
19
mm
(all)
063844
064071
064072
Eyeletted Copper
Alloy
0.030
0.040 0.080
750cc
750
750
High octane Reduced Discontinued
fuel compression used
for
low
ratio
octane fuel
only
ft
Ib
>
Kgm
30
4.15
20
2.75
25
3.45
20
2.75
25
3.45
25
3.45
25
3.45
80
11.06
15
2.07
70
9.68
80
11.06
30
4.15
30
4.15
26
3.60
25
3.45

Chapter 1/Engine 13
General
description
The engine
fitted
to
the
Norton
750
cc
and
850
cc
Commando
models
is
a vertical
twin
cylinder,
in which
both
pistons are
arranged
to
rise
and
fall
in
unison.
The
engine
is
mounted
in an
inclined
position,
using
what
is
known as
the
Isolastic suspension
system
to
damp
out
the
unwanted
effects
of
high
frequency
engine vibration
associated
with this
type
of
engine
design. An
overhead
valve
layout
is
used, which
is
actuated
by
push
rods
that
pass
through
cast-in
tunnels
at
the
front
of
the
cylinder
barrel.
Lubrication
is
effected
on
the
dry
sump
principle,
in which
oil
is
fed
by
gravity
to
a gear-type
pump
and
distributed
to
the
various parts of
the
engine.
A
separate
scavenge
pump
which
forms
part
of
the
oil
pump
assembly ensures oil
which
. drains
back
into
the
crankcase
is
returned
to
the
oil
tank.
The
crankshaft
assembly comprises a wide
centre
flywheel,
with
two
outer
bob
weights
one
on each side.
The
big
end
bearings are
of
the
shell
type,
fitted
to
split,
light alloy
connecting
rods.
The
cylinder
barrel
is
of
cast
iron
and
the
cylinder
head
of
aluminium
alloy,
both
taking
the
form
of
monobloc
castings.
The
Combat
engine
is
normally
identified
by
the
additional
matt
black
finish given
to
the
exterior
cooling surfaces of
the
cylinder
barrel.
Ignition is
provided
by
twin coils
and
a
twin
contact
breaker
assembly driven
off
the
end
of
the
camshaft,
the
latter
incorporating
an
automatic
advance
and
retard
nut.
Twin
carburettors
are
specified,
fitted
with a large
capacity
air
cleaner.
The
engine has
twin
exhaust
pipes
and
silencers
of
the
downswept
type
with
special
rubber
mountings.
Only
the
'5'
model has an
upswept
system
on
the
left
hand
side
of
the
machine.
The lubrication
system
is
protected
by
a gauze
filter
within
the
oil
tank
and
a
magnetic
drain plug in
the
crankcase
and
a
pressure relief valve.
Post-1972
models have
an
additional
car-
type
oil filter, with a renewable cartridge
element,
fitted
within
the
rear engine
plates,
in close
proximity
to
the
rear wheel.
Provided
the
machine
is
maintained
regularly in
an
intelligent
manner,
the
lubrication
system
is
unlikely
to
give
trouble
during
normal
service.
2
Operations
with engine in
frame
It
is
not
necessary
to
remove
the
engine
from
the
frame
unless
the
crankshaft
assembly,
the
big
ends
or
the
camshaft
require
attention.
Most
operations
can be
accomplished
with
the
engine in
the
frame,
such
as:
a) Removal
and
replacement
of
the
cylinder
head.
b) Removal
and
replacement
of
the
cylinder
barrel
and
pistons.
c) Removal
and
replacement
of
the
clutch
and
primary
drive.
d) Removal
of
the
timing
sprockets
and
oil
pump.
e) Removal of
the
contact
breaker
and
automatic
advance
assembly.
2 When several
operations
have
to
be
undertaken
simultaneously,
such
as
during
an
extensive
rebuild
or
overhaul,
it
is
often
advantageous
to
remove
the
engine
from
the
frame
after
some
preliminary dismantling. This will give
the
advantage
of
better
access
and
more
working
space,
especially if
the
engine is
attached
to
a
bench-mounted
stand.
3
Operations
with
the
engine removed
1 Removal
and
replacement
of
the
main bearings.
2 Removal
and
replacement
of
the
crankshaft
assembly.
3 Removal
and
replacement
of
the
camshaft.
4
Method
of
engine removal
The engine
is
heavy, even
for
two
mechanics.
In
consequence,
it is
preferable
to
partially
strip
the
engine
before
it
is
released
from
the
frame,
in
order
to
shed
some
of
the
heavier
components
such
as
the
cast
iron
cylinder
barrel
and
to
give greater
freedom
of
movement.
2
The
engine
and
gearbox
are
separate
units which means
that
the
engine
can
be removed
without
disturbing
the
gearbox
apart
from
the
need
to
dismantle
the
primary
transmission.
5 Dismantling
the
engine -removing
the
petrol
tank
Place
the
machine
on
the
centre
stand
and
ensure
that
it
is
standing
firmly
on
level
ground.
2
Turn
off
both
petrol
taps
and
disconnect
the
petrol
pipes
by
unscrewing
the
unions where
they
join
the
base
of
each
tap.
3
Remove
the
dual
seat.
This is released
by
unscrewing
the
two
large
diameter
milled knobs
at
the
top
of
each
rear suspension
unit.
The
seat
will lift
straight
up
in
the
case
of
the
Fastback
models;
on
other
models
it
is
necessary
to
lift upwards,
then
pull
towards
the
rear
of
the
machine.
4
To
obviate
the
risk
of
fire, remove
the
fuse
from
its
holder
in
the
battery
negative lead. This will isolate
the
electrical
system.
5
The
petrol
tank
is
secured
at
the
front
by
self-locking
nuts
attached
to
studs
which
protrude
from
the
underside
of
the
tank.
Remove
the
nuts
and any
rubber
washers
below
the
tank
mounting
lugs.
5
The
rear
of
the
tank
will
be
secured
by
either
a
rubber
strap
or
a cross
strap
beneath
the
main
tube
of
the
frame
which
is
held
by
nuts
and
washers.
The
method
of
mounting
used will
depend
on
the
model. When
the
front
and
rear fixings have been
removed,
the
tank
can be lifted away
from
the
frame.
6 Since
there
is
no
necessity
to
drain
the
tank
prior
to
these
operations,
it
can
represent
a dangerous fire
hazard.
Make
sure
it
is
placed
well away
from
the
machine
and
any
naked
flames
or
other
sources where
involuntary
ignition
may
occur.
7
Note
the
position
of
the
rUbber
support
pads
over
the
main
frame
tube
so
that
they
are
located
accurately
when
the
tank
is
eventually
replaced.
6 Dismantling
the
engine·
removing
the
cylinder
head
Most
models
are
fitted
with a
downswept
exhaust
system.
This
is
removed
by
bending
back
the
tab
washer
on
each
exhaust
locking ring
and
then
unscrewing
each
ring
to
free
the
exhaust
pipe
from
the
cylinder
head.
Norton
Villiers service tool
063968
is
recommended
for
this
purpose
as
the
rings are locked
tight.
If
the
service
tool
is
not
available,
the
rings can be
slackened
by
careful application
of
a
flat
nosed
punch
and
hammer.
The
850
cc
models
have a balance
pipe,
the
-clips
of
which
must
be
slackened.
2
To
release
the
silencers,
unscrew
the
nuts
which secure
the
mounting
plates
to
the
two
rubber
mountings.
The
exhaust
pipes
and
silencers
can
then
be
lifted
away
as a
complete
unit.
3 A
somewhat
similar
procedure
is
recommended
for
the
upswept
exhaust
system
fitted'
to
the
'5'
models.
In
this
instance,
the
silencer has
only
one
point
of
attachment,
on
a
bracket
adjacent
to
the
rear suspension
unit.
4
Note
there
is a
copper/asbestos
sealing ring in 'each
exhaust
port,
which
should
be removed
and
discarded.
It
is
customary
to
fit
new
replacements when
the
exhaust
system
is eventually
refitted
in
order
to
preserve a
leaktight
joint.
5
Remove
both
carburettors
complete
with spacers
by
unscrew-
ing
the
four
socket
screws
which
retain
the
assembly
to
the'
cylinder
head.
Access is made easier
by
using a
short
socket
key
in
order
to
provide clearance
with
the
frame
tube.
Disengage
the
air
cleaner
hoses
from
each
carburettor
intake
and
lift
the
carburettors
away.
If desired,
the
carburettors
can
be
separated
by
disconnecting
the
balance
pipe
which joins
them
and
by
removing
each
carburettor
top,
retained
by
two
crosshead screws.
This will
enable
the
slide
and
needle assembly,
comple~h
control
cables,
to
be lifted
out
of
each
mixing
chamber.
6 Whichever
method
is
used
for
the
removal of
the
carburettor,

5.2
Disconnect petrol pipes
at
petrol
tap
unions
6.2
Swinging
arm
prevents removal
of
mounting
bolt
...
6.5
.Remove
carburettors
complete
with spacers
-----
6.1 Use a
'C'
spanner
to
slacken
exhaust
locking rings
6.2a
..•
disconnect
at
rubber
mountings
as
alternative
6.6
Separate
air
cleaner
after
removing
two
retaining
bolts

6.7
Twin coil assembly bolts
to
mounting
on
frame
tube
...
6.8
Head steady assembly
comprises
two
short
plates
and
...
6.12
Push rods
must
be
fed
into
cylinder
head
to
aid
removal
6.7a
.•. place
out
of
harms way;
no
necessity
to
detach
com-
pletely
6.8a ..• base plate
attached
to
head
by
socket
screws
7.1
Support
pistons as
they
emerge
from
bores
to
prevent
dam-
age

16

FIG.
1.1.
CYLINDER
BARREL
AND
CYLINDER
HEAD
1
Cylinder
barrel-
850
cc
models
2
Cylinder
barrel
-
750
cc
models
3
Cylinder
head
gasket
(eyeletted)
-
850
cc
models
4
Cylinder
head
gasket
(eyeletted)
-
750
cc
models
5
Cylinder
head
-
850
cc
models
6
Cylinder
head
-
750
cc
models
{3D
mm,
low
compression
-
marked
RHtJ
6a
Cylinder
head
-
750
cc
models
(32
mm,
high
compression
-
marked
RH6)
6b
Cylinder
head
-
750
cc
models
(32
mm,
low
compression
-
marked
RH5)
7
Rocker
cover
stud
-
front
8
Rocker
cover
stud
-
rear
9
Rocker
cover
dowel
10
Rockercover-
front
2
off
11
Rocker
cover
gasket
-
front
2
off
12
Rocker
cover
nut
-
front
4
off
13
Rocker
cover
-
rear
14
Rocker
cover
gasket
-
rear
15
Rocker
cover
stud
washer
16
Rocker
cover
stud
nut
-
rear
17
Cylinder
through
bolt
(850
cc
models
only)
4
off
18
Washer
for
through
bolt
(850
cc
models
only)
4
off
19
Cylinder
barrel
stud
2
off
20
Cylinder
head
stud
3
off
21
Cylinder
head
sleeve
nut
2
off
22
Cylinder
head
nut
2
off
23
Cylinder
head
nut
24
Cylinder
head
washer
2
off
25
Cylinder
head
bolt
4
off
26
Cylinder
head
bolt
(short)
27
Cylinder
head
washer
5
off
17

18
Chapter 1/Engine
ensure
the
parts
involved are
taped
out
of
harms
way.
They
are
very easily
damaged
if mishandled. Lift
away
the
air cleaner
assembly by
withdrawing
the
two
long bolts which
hold
the
case
together.
7
Unbolt
the
twin
ignition coil assembly
from
its
mounting
above
the
cylinder
head
and
disconnect
both
caps
from
the
spark
plugs.
The
coil assembly
need
not
be
removed
completely;
it
can be
tied
to
the
handlebars
so
that
it
does
not
impede
removal
of
the
cylinder
head.
Only
the
electrical
connections
from
the
coils
to
the
contact
breakers
need
be removed.
8 Remove
the
cylinder
head
steady.
This
takes
the
form
of
two
short
plates which
interconnect
a
plate
bolted
to
the
cylinder head
with
two
rubber
mountings,
one
on
each
side of
the
tube
below
the
main
frame
tube.
Remove
the
nuts
from
the
rubber
mountings
first in
order
to
prevent
the
mountings
from
rotating. When
the
two
mounting
plates have been removed,
remove also
the
head
steady
from
the
cylinder
head
by
with-
drawing
the
three
socket
screws which retain
it.
9 Remove
both
spark
plugs
and
remove
the
rocker
oil feed
pipes
from
both
sides of
the
cylinder
head
casting. Special care
is
needed
when
unscrewing
the
banjo
union
bolts
to
prevent
the
thin
copper
pipe
from
twisting
or
necking. Detach
the
copper
sealing washers
from
either
side
of
each
union
but
leave
the
feed
pipe
attached
to
the
timing
cover.
10 Slacken
and
remove nine of
the
cylinder
head
retaining
bolts, leaving
only
the
front
centre
bolt
in
position.
This
and
the
two
bolts,
one
on
either
side, are recessed
into
the
cylinder
head
and
will require a slim
socket
or
box
spanner
for
their
release.
Two
nuts
are
found
on
the
underside
of
the
cylinder
head,
at
the
front,
and
another
single
nut
on
the
underside,
at
the
rear.
The
four
remaining bolts are easily accessible
from
the
top
of
the
cylinder
head,
making a
total
of
ten
bolts.
850
cc
models
include
four
through
bolts in
the
cylinder
barrel.
11
When
the
front
cylinder
head
bolt
is
removed
last
of
all,
the
cylinder head will
tilt
a little against
the
spring
pressure
of
the
valve
which
is
open.
This will aid breaking
the
cylinder
head
joint.
12 Before
the
cylinder
head
can
be lifted
away,
it
is
necessary
to
feed
each
of
the
four
push
rods
into
the
cylinder
head
as
far
as
possible,
after
detaching
them
from
the
ends
of
the
rocker
arms.
This
can
be
accomplished
by
tilting
the
cylinder
head
towards
the
rear, whilst
holding
the
cylinder
head
with
one
hand
and
the
push rods
with
the
other.
Do
not
use
force
and
make
sure
the
push rods are
clear
of
the
cylinder
barrel
as
the
head
is being
removed. Failure
to
observe this
precaution
may
cause damage
to
the
light
alloy
pushrods,
necessitating
their
renewal.
13
The
cylinder
head
gasket will
adhere
to
either
the
cylinder
barrel
or
cylinder
head
and
should
not
be re·used unless
it
is
completely
undamaged.
7 Dismantling
the
engine·
removing
the
cylinder
barrel
and
pistons
1
The
c.ylinder barrel
is
retained
to
the
crankcase
by nine
studs
(and
four
through
bolts,
850
cc
models
only).
Remove
the
nine holding
down
nuts
(and
the
through
bolts,
850
cc
models)
and
ease
the
cylinder
barrel upwards,
taking
care
to
support
the
pistons as
they
emerge
from
the
cylinder
bores.
If
broken
piston
rings
or
other
piston
damage is
suspected,
it
is advisable
to
pad
the
mouth
of
the
crankcase with clean rag
immediately
the
cylinder barrel
is
raised
to
prevent
displaced
particles
from
falling in.
2 Remove
and
discard
the
circlips
from
each
piston,
then
remove
both
gudgeon pins, taking care
to
support
the
piston
and
connecting
rod
as
they
are
tapped
out
of
position.
If
the
pins
are a
tight
fit,
the
pistons
should
be
warmed
first
by
placing a
rag
soaked
in
hot
water
on
each
crown.
This will
expand
the
alloy
of
the
piston
and
release
the
grip
of
the
gudgeon pin boss. On
no
account
use
force,
or
the
light alloy
connecting
rods may
be
damaged
permanently.
3 Mark each
piston
INSIDE
the
skirt
to
ensure
it
is
replaced in
its original
position.
The
pistons are individually
marked
on
the
crown
to
this
effect,
but
the
marks
may
have
been
erased if
the
crown was badly
scratched
during
a previous
decoke.
Although
the
valve
cutaways
are
the
same
size in
the
crown
of
the
standard
ratio
pistons,
the
cutaway
for
the
exhaust
valve
is
positioned
much
nearer
to
the
edge. This makes
the
correct
location
of
the
pistons
vital.
8 Dismantling
the
engine -removing
the
alternator,
clutch
and
primary
chaincase
Remove
the
three
nuts
and
washers which secure
the
left
hand
footrest
and
rear brake pedal
to
the
light alloy
mounting
plate.
In
order
to
clear
the
primary
chaincase cover,
the
footrest
assembly can be left hanging
from
the
brake
cable;
the
alternative
is
to
remove
the
electrical
snap
connector
from
the
stop
lamp
switch
on
the
brake pedal
and
the
brake cable
from
the
rear
brake
operating
arm
so
that
the
complete
assembly
can
be
detached
and
lifted
away.
2 Place a large
tray
immediately
below
the
underside
of
the
chaincase jOint.
The
chaincase has
no
drain plug
and
in
consequence
the
full oil
content
will be released
immediately
the
two
halves are
separated.
3 Remove
the
centre
sleeve
nut
which retains
the
two
chaincase halves
together
and
rock
the
chaincase slightly
to
clear
the
two
locating dowels,
one
at
the
top
and
one
at
the
bottom.
Immediately
the
seal breaks,
the
oil
content
will
be
released
into
the
tray.
Remove
the
outer
cover
completely,
taking
care
that
the
rubber
seal
around
the
jointing
face
or
rear
half
of
the
chaincase is
not
displaced
and
damaged.
4 Place a
stout
metal
rod
through
the
small
end
of
both
connecting
rods
and
rotate
the
engine in an anticlockwise (drive)
position
until
the
rod rests across
the
crankcase
mouth.
This will
lock
the
engine in position
so
that
the
nut
of
the
alternator
rotor
can
be
slackened
and
removed. Use a
Yo
inch
Whitworth
socket
wrench
and
tum
in an anticlockwise
direction;
the
nut
has a
normal
right
hand
thread.
Do
not
misplace
the
washer
which
seats
below
the
nut.
5 Remove
the
alternator
stator
which
is
secured
by
three
nuts
and
washers. Draw
the
stator
assembly
off
the
studs,
after
detaching
the
lead wire
at
the
snap
connectors
in
the
vicinity
of
the
air
cleaner
housing.
The
lead wire will pull
through
the
small
rubber
grommet
in
the
centre
of
the
rear'chaincase.
6
The
alternator
rotor
is
keyed
onto
the
crankshaft
and
has a
parallel
fit.
In
consequence,
it
is
not
difficult
to
remove. Light
pressure
with
a pair of
tyre
levers
positioned
at
the
rear
of
the
rotor
should
provide
sufficient
leverage. Remove
the
rotor
key,
the
packing
collar
and
any
shims
on
the
crankshaft.
Detach
the
three
spacers
from
the
stator
mounting
sutds
and
place
them
in a
safe
position
for
reassembly.
7·
Whilst
the
engine
is
still
locked
in position, slacken
the
clutch
push
rod
adjuster
nut
in
the
centre
of
the
clutch
assembly
and
remove
both
the
adjuster
and
the
nut.
S
The
clutch
cannot
be
dismantled
without
the
compressor
which is necessary
for
the
diaphragm
spring.
Norton
Villiers
service
tool
060999
is
recommended
for
this
purpose.
DO
NOT
AlTEMPT
TO
DISMANTLE
THE
CLUTCH
WITHOUT
A
COMPRESSOR. IF
THE
TENSION
OF
THE
DIAPHRAGM
SPRING
IS
RELEASED
SUDDENLY
WITHOUT
PROTECTION,
SERIOUS
INJURY MAY
RESULT.
Do
not
unscrew
the
com-
pressor
from
the
diaphragm
or
the
latter
will
be
released
with
considerable
force.
9
Screw
the
centre
bolt
of
the
compressor
into
the
hole
previously
occupied
by
the
clutch
pushrod
adjuster
and
check
that
at
least
Yo
inch
of
the
bolt
has engaged
with
the
internal
thread.
Tum
the
out
in
a clockwise direction
until
the
diaphragm
spring
is
flat
and
free
to
rotate.
This will enable
the
retaining
circlip
to
be prised
from
its groove inside
the
periphery
of
the
clutch
body
by
a screwdriver
blade.
Lift
the
first
end
clear
of
the
groove,
then
peel
the
circlip
out
of
position.
The
compressor
and
diaphragm
can
then
be
lifted
away
together;
there
is
no
necessity
to
detach
the
compressor
until
after
the
clutch
is
reassembled. NEVER peel
out
the
circlip
without
first using a
compressor
to
compress
the
diaphragm.
10
Lift
out
the
clutch
plates, using
two
pieces
of
stout
wire

7.2
Never re·use circlips.
Old
circlips
must
be
discarded
7.2a
Warm
pistons
if
gudgeon pins are a
tight
fit
3.5
Alternator
stator
is
secured
by
three
nuts
8.5a
Lead
wire will pull
through
grommet
in
chaincase
8.6
Alternator
rotor
is
keyed
on
to
crankshaft
8.7
Slacken
push
rod
adjuster
whilst
engine
is
locked
/