Page is loading ...

WWW.AVPROEDGE.COM • 2222 EAST 52nd STREET NORTH • SIOUX FALLS, SD 57104 • +1-605-274-6055 1
Installation
Once the AC-DANTE-D is powered on and connected to the network switch, it will automatically be discovered on
the network using the Dante™ Controller software.
Connecting the Devices
1 Connect the provided USB-A to USB-C cable between the 5V 1A power supply and the AC-DANTE-D
decoder’s DC/5V port. Then plug the power supply into a suitable power outlet.
Both the POWER and MUTE LEDs on the front panel will illuminate solid for 6 seconds, after which the MUTE
LED will shut off and the POWER LED will stay on, indicating the AC-DANTE-D is powered on.
2 Connect the audio source device to the AUDIO IN port with a stereo RCA cable. Ensure the audio source
device is powered on.
3 Connect a CAT5e (or better) cable between a computer running the Dante™ Controller software and the
network switch.
4 Connect a CAT5e (or better) cable between the DANTE port on the AC-DANTE-D and the network switch. The
AC-DANTE-D will be automatically discovered and routed using the Dante™ Controller software.
Note:
The AC-DANTE-D does not support PoE and must be powered locally using the provided 5V 1A
power supply and USB-A to USB-C cable.
Note:
The computer running Dante™ Controller and the AC-DANTE-D must both have a physical
connection to the Dante™ network in order for the AC-DANTE-D to be discovered by Dante™
Controller.
Quick Start Guide
AC-DANTE-D
2-Channel Analog Audio Output Dante™ Encoder

WWW.AVPROEDGE.COM • 2222 EAST 52nd STREET NORTH • SIOUX FALLS, SD 57104 • +1-605-274-6055 2
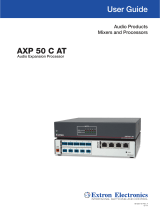
Audio Output Wiring
The audio output port on the AC-DANTE-D outputs 2-channel balanced audio, ideal for 2-channel systems and
zoned audio systems (does not downmix). This balanced analog output can be used in a balanced audio system but
can also be converted to a traditional 2-channel unbalanced (L/R) audio output by preparing a cable as shown
below.
Pre-made 5-Pin to RCA cables are also available for
purchase separately (SKU: AC-CABLE-5PIN-2CH)
Dante Port Wiring
The DANTE audio output port on the encoder utilizes the standard RJ-45 connection. For maximum performance,
the recommended cabling is CAT5e (or better) based on TIA/EIA T568A or T568B standards for the wiring of the
twisted pair cables.
The DANTE audio output port features two status indicator LEDs to show active connections while troubleshooting.
Right LED (Amber) – Link Status
Indicates there is data present between the AC-DANTE-D and the receiving end (typically a network
switch). Steady blinking amber indicates normal operations.
Left LED (Green) – Link/Activity
Indicates there is an active link between the AC-DANTE-D and the receiving end. Solid green indicates
the AC-DANTE-E and the receiving end device have been identified and are communicating with one
another.
If either LED is not illuminating, check the following:
• Ensure the AC-DANTE-D is powered on from the DC/5V port.
• Verify cable length is within the maximum distance of 100 meters (328 feet).
• Connect the AC-DANTE-D directly to the network switch, bypassing all patch panels and punch-
down blocks.
• Re-terminate connector ends. Use standard RJ-45 connectors and avoid using push-through or
“EZ” type ends as these have exposed copper wiring at the tips that can cause signal
interference.
T568A T568B

WWW.AVPROEDGE.COM • 2222 EAST 52nd STREET NORTH • SIOUX FALLS, SD 57104 • +1-605-274-6055 3
Device Configuration
Configuring the AC-DANTE-D requires installing Audinate’s Dante Controller software on a computer sharing the
same network as Dante devices, such as the AC-DANTE-D. Dante Controller is a powerful tool used to configure
network settings, signal latency, audio encoding parameters, Dante flow subscriptions, and AES67 audio support.
The latest version of Dante Controller can be found here along with additional supplementary instructions that can
be obtained via the online help support tool located under the Help tab in the Dante Controller.
Basic Navigation and Dante Flow Subscription
Dante Controller will open to the routing tab by default where discovered Dante devices are organized
according to transmitter or receiver status. Signal routing from Dante encoders (transmitters) to Dante
decoders (receivers) can be achieved by clicking the box located at the intersection of the desired transmit and
receive channels. Successful subscription is denoted by a green check mark icon.
1
Transmitters
• Discovered Dante encoders
2
Receivers
• Discovered Dante decoders
3
+/
-
•
Select the (+) to expand or (-) to collapse view
4
Device Name
•
Displays the name assigned to the Dante device
• Device name is customizable in Device View
• Double-click to open Device View
5
Channel Name
•
Displays the name of the Dante audio channel
• Channel name customizable in Device View
• Double click associated Device Name to open Device View
6
Subscription
Window
•
Click the box to create a unicast subscription between the overlapping
Subscription in process
Subscription successful
Subscription error
Subscription warning
Device part way through setting up a subscription
Tip:
Hovering the mouse over the
subscription indicator symbol
will provide further details
about the subscription and can
be useful in troubleshooting
For more In-Depth
Device Configurations
and IP Settings, see
the User Manual for
the AC-DANTE-D.
/