
G-Floor Shed Installation Instructions
This installation guide is intended to aid in the installation of G-Floor® Shed Flooring. In
addition to this guide, always follow recommendations supplied on the adhesive or by
the adhesive manufacturers. We have provided the following which demonstrates
common installation instructions.
Preparation:
The substrate on which the flooring is going to be laid should be smooth, clean and dry.
If it is wooden, any seams should be sanded smoothly, evenly and should be level. This
will prevent the seam from being visible when the flooring is installed.
The roll of flooring should be acclimated in a temperature-controlled area prior to being
installed in the shed.
Installation:
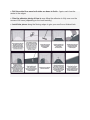
Unroll material in shed - Make sure it is laid in straight and trim off any
Trim to fit the layout of the floor - Carefully remove any excess material to fit the
angles of the floor in the shed so that it lays flat
Lift material on one side lengthwise (from side to side, not front to back) and
fold it in half back on itself- Expose the substrate so adhesive can be
Apply adhesive to the uncovered half of the shed floor- Use the appropriate kind
of adhesive for the substrate with which you are working. For the best results, Shed
flooring should not be free floating, as it will result in rippling or even creases in the
material, as well as expansion and contraction of the material due to changes in
temperature.
Carefully roll the floor back onto the adhesive covered part of the shed
floor - do not flop material back in place! -The spunbound backing helps the
adhesive bond the flooring more securely to the substrate, but when set back into place
haphazardly, it could lead to air trapped under the flooring, resulting in more work during
the remaining steps of the installation
Using a hundred pound roller, work any air pockets out and ensure the
adhesive is evenly distributed - Work from the center of the floor out to the edge near
the wall. This helps push out any trapped air and evenly spread out the adhesive under
the
Repeat the above steps for the remaining half of the floor

Roll the entire floor once both sides are done to finish - Again, work from the
center to the edges.
Give the adhesive plenty of time to cure-Allow the adhesive to fully cure over the
course of 24 hours (depending on the local humidity).
Install trim pieces along the flooring edges to give your new floor a finished look.
-
 1
1
-
 2
2


G-Floor SFW75DT8020MB Installation guide
- Type
- Installation guide
- This manual is also suitable for
Ask a question and I''ll find the answer in the document
Finding information in a document is now easier with AI
Other documents
-
GCP Applied Technologies 5003093 User manual
-
ROPPE 2D60964P639 Installation guide
-
 STAINMASTER LSS4307BPS Installation guide
-
Mohawk HCE54-72 User guide
-
-
Shaw HD80100240 Installation guide
-
Home Decorators Collection HL636S Installation guide
-
-
 Raskin Industries ELEV20-701 Installation guide
-
 HOMELEGEND HL16P Installation guide


