Page is loading ...

DO NOT DISCARD THESE WARNINGS AND INSTRUCTIONS | NE PAS JETER CES AVERTISSEMENTS ET INSTRUCTIONS
NO DESECHE ESTAS ADVERTENCIAS E INSTRUCCIONES | NÃO DESCARTE ESTES AVISOS E INSTRUÇÕES
08/19/16
200 Old Wilson Bridge Road | Columbus, OH USA 43085
(866) 928-2657 | worthingtoncylinders.com | bernzomatic.com
INSTRUCTION MANUAL
Trigger-Start Torches
Models: ST2200
DANGER
ENGLISH | ANGLAIS | INGLÉS | INGLÊS
This torch is used with a flammable product. Failure to comply with these
warnings and instructions may result in an explosion or fire that may cause
property damage, serious personal injury or death.
Read and comply with the instructions and warnings in this manual and familiarize
yourself with the torch before lighting and using. Review instructions and warnings
periodically to maintain awareness. Do not try to operate before reading instructions.
WARNING
• Keep torch out of reach of children and anyone who has not read instructions. Do not point torch towards face, other
persons or flammable objects. Never attempt to use torch as a cigarette lighter
• Always wear eye protection and gloves when lighting and using the torch.
• To avoid risk of damage to torch, always protect torch from impact and never allow torch to drop onto floor or hard
surfaces. Never use a torch that appears to be damaged.
• Heating a surface may cause heat to be conducted to adjoining surfaces that may be combustible or become
pressurized when heated. Always check to make sure no unintended parts or materials are being heated.
• Do not use a leaking, damaged or malfunctioning torch. If torch is leaking, contact manufacturer or retailer.
• Work only in well ventilated areas. Avoid the fumes from fluxes, lead-based paint, and all metal heating operations.
Be careful to avoid fumes from cadmium plating and galvanized metal- remove these coatings in the area to be
heated by filing or sanding prior to heating.
• Ignite torch away from face, hands, clothing, or other flammable material.
Materials used in the construction of this device may contain brass (which may contain lead), a chemical known to the
State of California to cause birth defects or other reproductive harm.
Combustion by-products produced when using this device contain chemicals known to the State of California to cause
cancer, birth defects, or other reproductive harm.
When used for soldering and similar applications, this product contains or produces chemicals known to the State of
California to cause cancer and birth defects or other reproductive harm.
ENG
FRA
SPA
POR
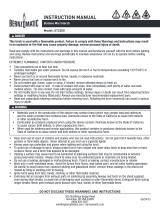
DANGER
DANGER
PELIGRO
PERIGO
INCENDIE
INCENDE
INCENDIO
INCÊNDIO
EXPLOSION
EXPLOSION
EXPLOSIÓN
EXPLOSÃO
FUMES
VAPEURS
VAPORES
VAPORES
1
1
2
1
3
1
4
5
1
6
1
8
7

DO NOT DISCARD THESE WARNINGS AND INSTRUCTIONS | NE PAS JETER CES AVERTISSEMENTS ET INSTRUCTIONS
NO DESECHE ESTAS ADVERTENCIAS E INSTRUCCIONES | NÃO DESCARTE ESTES AVISOS E INSTRUÇÕES
08/19/16
200 Old Wilson Bridge Road | Columbus, OH USA 43085
(866) 928-2657 | worthingtoncylinders.com | bernzomatic.com
• Extremely hot air escapes from exhaust ports on soldering tip assembly. Always rest torch on the stand supplied, even
during short breaks, to avoid risk of damaging work surfaces or other flammable items. Extinguish torch during longer
breaks. Never point exhaust ports toward eyes, face, hands, or other flammable items.
• Use caution when operating the torch outdoors on sunny or windy days. Bright sun makes it impossible to see the
torch’s flame. Wind may carry the torch’s heat back towards you or other areas not intended to be heated. Windy
conditions may also cause sparks to be blown into other areas with combustible materials.
• Burner nozzle and tip assembly become extremely hot during use and remain hot after extinguishing the torch. Take
precautions not to touch torch tip until torch has cooled.
• Never use the torch on or near combustibles (fuels, rags, towels, paper products, etc.). Be careful around motor
vehicles or any gasoline-fired products and beware of hidden fuel lines and tanks.
• Always make certain the torch is resting on level surface to reduce the risk of accidental tip over. Be sure the torch is
not pointed in a direction which could cause nearby objects to ignite when the torch is set down.
• Never leave the torch unattended when lit.
• Never attempt to repair or heat a gasoline tank, a chemical drum an aerosol can, a compressed gas container that held
flammable liquid or gas or any other chemical. Heating these is extremely dangerous, especially after they have been “emptied”.
• Department of Transportation Hazardous Materials Regulations forbids the carriage of butane or other flammable gas
products on passenger aircraft. Do not pack this item or any other flammable gas item in any checked or carry-on baggage.
• Make sure torch is completely extinguished after use.
• Ensure that torch is completely cool before storing.
EXTREMELY FLAMMABLE. CONTENTS UNDER PRESSURE.
• Take precautions not to heat fuel tank.
• Contains flammable gas under pressure. Do not expose the torch or fuel to temperatures exceeding 120°F/49°C or
prolonged sunlight.
• Never use torch in or around flammable fumes, liquids, or explosive materials.
• Never pierce fuel tank or expose torch to fire.
• Do not breathe gas, fumes, vapor or spray. If inhaled, remove affected person to fresh air.
• Avoid contact with eyes or skin. In case of contact with eyes, rinse immediately with plenty of water and seek medical
advice. For skin contact, flush with large amounts of water.
• Do not modify torch in any way. Do not alter factory settings. Serious injury or death can result from adjusting factory
settings or modifying factory fitted parts. Always use manufacturer recommended replacement parts.
• Read and understand refueling instruction before refueling torch. Refueling the torch incorrectly can result in serious
injury or death.

DO NOT DISCARD THESE WARNINGS AND INSTRUCTIONS | NE PAS JETER CES AVERTISSEMENTS ET INSTRUCTIONS
NO DESECHE ESTAS ADVERTENCIAS E INSTRUCCIONES | NÃO DESCARTE ESTES AVISOS E INSTRUÇÕES
08/19/16
200 Old Wilson Bridge Road | Columbus, OH USA 43085
(866) 928-2657 | worthingtoncylinders.com | bernzomatic.com
REFILLING OPERATION
1. Use only Bernzomatic Butane fuel when refilling torch.
2. Ensure that the torch is extinguished before refilling.
3. Allow sufficient time for torch to cool to room temperature before refilling the torch with fuel.
4. Refill torch in a well ventilated area free of fire or other sources of ignition and away from people.
5. Never smoke while refilling the torch.
6. Hold the torch with the FILL VALVE (1) up.
7. Invert fuel canister and insert the fuel canister tip into the FILL VALVE (1).
8. Push the fuel canister and torch together to allow fuel to flow into the torch fuel tank. Torch should be
filled in about 10 seconds.
9. Stop refilling once the fuel begins to overflow.
10. Wait 3 minutes to allow fuel gas to stabilize before igniting the torch.
LIGHTING AND OPERATION
Exercise caution when using this device not to breathe vapors. Depending on the task being conducted with device
(wood burning, melting plastic, etc.) toxic or nauseating vapors may exist.
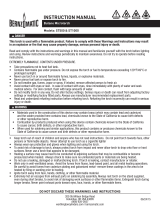
INTERMITTENT USE MODE
1. Turn FLAME ADJUSTMENT KNOB (5) approximately halfway
between – and + position.
2. Slide the SAFETY LOCK (2) down until it clicks and locks in
the ignition position.
3. Press and hold down the IGNITION BUTTON (3).
4. Repeat step 2 and step 3 if torch does not ignite.
5. Release IGNITION BUTTON (3) to extinguish torch.
ST2200 ST200 ST500 - 1000
1
2
ST2200 ST200 ST500 - 1000
1
2

DO NOT DISCARD THESE WARNINGS AND INSTRUCTIONS | NE PAS JETER CES AVERTISSEMENTS ET INSTRUCTIONS
NO DESECHE ESTAS ADVERTENCIAS E INSTRUCCIONES | NÃO DESCARTE ESTES AVISOS E INSTRUÇÕES
08/19/16
200 Old Wilson Bridge Road | Columbus, OH USA 43085
(866) 928-2657 | worthingtoncylinders.com | bernzomatic.com
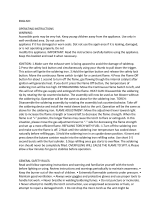
CONTINUOUS USE MODE
1. Turn FLAME ADJUSTMENT KNOB (5) approximately halfway between – and + position.
2. Slide the SAFETY LOCK (2) down until it clicks and locks in the ignition position.
3. Press and hold down the IGNITION BUTTON (3).
4. Repeat step 2 and step 3 if torch does not ignite.
5. Press the CONTINUOUS FLAME LOCK (4) in to lock the IGNITION BUTTON (3) in the on position.
6. Release IGNITION BUTTON (3).
7. To extinguish flame, press the IGNITION BUTTON (3) until the CONTINUOUS FLAME LOCK (4) resets and releases.
ADJUST FLAME
1. Slide FLAME ADJUSTMENT KNOB (5) to – for small flame.
2. Slide FLAME ADJUSTMENT KNOB (5) to + for large flame.
USE AS A GAS TORCH
(This is an open flame. Do not use with combustibles in the area. Read warning sections of instruction)
1. Torch is factory set for use as a gas torch and can be used immediately; after refilling.
2. Ignite torch as shown above.
USE AS SOLDERING IRON
Note: A small amount of smoke and/or odor may be noticeable during the initial use of the soldering tip, this is normal.
1. Ensure that the GAS TORCH TIP (6) is cool before installing the SOLDERING TIP ASSEMBLY (7)
2. Loosen soldering tip locking screw by turning it counterclockwise.
3. Install SOLDERING TIP ASSEMBLY (7) onto the GAS TORCH TIP (6).
4. Lightly tighten the soldering tip locking screw by turning it clockwise.
5. Ignite torch as shown above.
6. Allow torch to burn for about 10 seconds until the heating element begins to glow red.
7. Slide the AIR ADJUSTMENT BUTTON (8) forward. This should extinguish the flame and leave only the heating
element glowing red.
8. Torch is now ready for use as a soldering iron.
Note: For best performance, make sure that the tip is tightly installed onto the SOLDERING TIP ASSEMBLY (7).
Do not use tools to tighten tip.

DO NOT DISCARD THESE WARNINGS AND INSTRUCTIONS | NE PAS JETER CES AVERTISSEMENTS ET INSTRUCTIONS
NO DESECHE ESTAS ADVERTENCIAS E INSTRUCCIONES | NÃO DESCARTE ESTES AVISOS E INSTRUÇÕES
08/19/16
200 Old Wilson Bridge Road | Columbus, OH USA 43085
(866) 928-2657 | worthingtoncylinders.com | bernzomatic.com
USE AS A HOT AIR BLOWER
1. Assemble for use as soldering iron (see above).
2. Remove the tip from the SOLDERING TIP ASSEMBLY (7) by rotating it counterclockwise.
Note: Tip may be difficult to remove if the solder tip has never been used. Allow torch to heat up in the soldering iron
configuration (see above) for 3 minutes, then allow the tip to cool.
3. Torch is now ready for hot air blower operation.
4. Ignite torch as shown above.
ADDITIONAL WARNINGS
• Before using as soldering iron or hot air blower ensure that soldering tip locking screwis securely tightened.
• Before each use and after refilling, listen for leaking. Never use a flame to check for leaks. Always use torch in a
well-ventilated and spark-free area and where there are no open flames.
• In cold weather size of flame will be smaller. To produce larger flame, pre-warm torch to room temperature prior to use.
STORAGE
1. Ensure that IGNITION SWITCH (3) is in the “OFF” position.
2. Allow several minutes for torch to cool. Never leave torch unattended.
3. When torch is cool, store torch out of reach of children.
4. Do not expose torch to temperatures in excess of 120°F/49°C
5. Store torch in well ventilated areas.
THREE-YEAR LIMITED WARRANTY
Bernzomatic warrants to the original purchaser that this product is free from defects in material and workmanship for three years
from the date of purchase. This warranty is valid for all purchases of this product on or after June 1, 2016. This warranty does not
apply to product that has been damaged as a result of improper maintenance, accident or other misuse, or which fails to operate due
to normal wear and tear. This warranty is void if the product is repaired or modified in any way by anyone other than Bernzomatic.
Bernzomatic will repair the product if it proves to be defective in materials or workmanship. At the choice of Bernzomatic, a
replacement product may be provided instead of repairing a defective product. The sole obligation of Bernzomatic and your
exclusive remedy under this warranty are limited to such repair or replacement.
To make a claim under this Limited Three Year Warranty, contact any Bernzomatic retailer or contact Bernzomatic directly at
1-800-359-9678. A service representative will assist you. Please provide proof of date of purchase when making a claim.
Bernzomatic makes no other warranties concerning the product, and limits any implied warranties to the length of this Limited
Three Year Warranty. In no event shall Bernzomatic be liable for incidental or consequential damages. Some states do not allow
limitations on how long an implied warranty lasts or the exclusion or limitation of incidental or consequential damages, so the above
limitation or exclusion may not apply.
This warranty gives you specific legal rights, and you may also have other rights which vary from state to state.
/