Page is loading ...

1Wall-Hung Vanity with Vessel Sink Installation Instructions
WALL-HUNG VANITY WITH VESSEL SINK
GETTING STARTED
TOOLS AND MATERIALS:
BEFORE YOU BEGIN
We recommend consulting a professional if you are
unfamiliar with installing bathroom fixtures and
plumbing. Signature Hardware accepts no liability for any
damage to the floor, walls, plumbing, vanity cabinet, sink,
counter top, or personal injury during installation.
Observe all local plumbing and building codes.
Unpack and inspect the vanity for damage. If any
damage is found, contact our Customer Relations team
at 1-866-855-2284.
*not included
Ensure that you have gathered all the required
materials that are needed for the installation.
Ensure that your bathroom floor is adequately
supported, and the finished floor is level.
Ensure that there is adequate support behind the
bathroom wall before installation.
PLANNING
Use the vanity’s PDF specification sheet as a reference
when planning your layout. The specification sheet can
be found and downloaded from the product page on
our website.
Because the vanity specification measurements are
approximate and slight variations may occur, we highly
recommend performing any rough-in procedures with
the vanity on site.
Tape Measure*Marker*
Drill*
Screwdriver*
Stud Finder
Level
Neutral Cure
Silicone Sealant
Damp Cloth
NEVER LIFT THE VANITY TOP FLAT NEVER CARRY THE VANITY TOP FLAT
Lag Bolts*

2
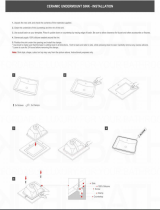
INSTALLATION
STEP 1: CABINET INSTALLATION
1. Determine the location where you would like to
install your vanity.
2. With the assistance of others, hold the vanity against
the wall in its mounting location. Maneuver the vanity
until it is level. Once positioned, mark the location of
each of the vanity’s mounting holes on your bathroom
wall.
Important: If the studs in your bathroom do not line up
to the mounting location for your vanity, wood blocking
can be installed between the studs using standard
2 x 4’s. If the wood blocking needs to be installed behind
the finished wall, we recommend consulting a
professional if you are unfamiliar with this type of
installation.
3. Set the vanity aside, and drill pilot holes into the
marked mounting locations on your wall.
4. With the assistance of others, hold the vanity against
the wall and line it up with the pilot holes drilled in step 3.
Secure the vanity to the wall using lag bolts.
WALL-HUNG VANITY WITH VESSEL SINK
Wall-Hung Vanity with Vessel Sink Installation Instructions

3
1. Apply a bead of silicone sealant around the top edge
of the vanity cabinet.
2. With assistance from another perosn, slowly and
carefully set the sink onto the vanity cabinet. Once
positioned, press firmly into place. Wipe away an excess
sealant using a damp cloth.
Important: The sink is fragile. Take caution when
handling, and have someone assist if needed.
STEP 2:
COUNTER TOP INSTALLATION
3. If you are installing a side-splash and/or back-splash,
place a generous amount of silicone sealant on the
back of it and press it into place against your bathroom
wall. Fill any gaps that are left with silicone sealant.
Wipe away an excess sealant with a damp cloth.
4. Allow the silicone sealant to dry, which could take
up to 24 hours.
WALL-HUNG VANITY WITH VESSEL SINK
Wall-Hung Vanity with Vessel Sink Installation Instructions
24 hr

4
2. Turn the sink right-side-up and position over the 2”
drain hole.
1. Carefully place your vessel sink upside down on the
counter top. Apply a generous amount of silicone
sealant to the base of the sink where it will rest on the
counter.
Step 3: Sink Installation
WALL-HUNG VANITY WITH VESSEL SINK
Wall-Hung Vanity with Vessel Sink Installation Instructions
5. For stone tops, such as marble and granite, it is
recommended that you apply a high-quality sealer to
protect from staining and discoloration. Stone sealer
should be reapplied once or twice per year, depending
upon usage.
Stone Sealer

5
3. If desired, apply a continuous bead of silicone
sealant around the perimeter of the sink base for
additional stability.
4. Remove any excess sealant to complete the sink
installation.
5. If you are installing a double sink vanity, repeat steps
1-4 for installing the second sink.
6. Let the assembled vanity sit for 24 hours to allow all
the silicone sealant to fully dry. Once dry, proceed to
the installation of your faucet and drain.
Note: In some situations, it may be necessary to cut
the inner cabinet shelf to allow space for your drain’s
P-trap.
WALL-HUNG VANITY WITH VESSEL SINK
Wall-Hung Vanity with Vessel Sink Installation Instructions
24 hr
/