Korg nanoKONTROL2 Owner's manual

Type
Owner's manual
Precautions
Location
Using the unit in the following locations can result in a malfunction.
• In direct sunlight
• Locations of extreme temperature or humidity
• Excessively dusty or dirty locations
• Locations of excessive vibration
• Close to magnetic fields
Handling
To avoid breakage, do not apply excessive force to the switches or controls.
Care
If the exterior becomes dirty, wipe it with a clean, dry cloth. Do not use liquid clean-
ers such as benzene or thinner, or cleaning compounds or flammable polishes.
Keep this manual
After reading this manual, please keep it for later reference.
Keeping foreign matter out of your equipment
Never set any container with liquid in it near this equipment. If liquid gets into the
equipment, it could cause a breakdown, fire, or electrical shock. Be careful not to
let metal objects get into the equipment.
DECLARATION OF CONFORMITY (for USA)
Responsible Party : KORG USA INC.
Address : 316 SOUTH SERVICE ROAD, MELVILLE, NY
Telephone : 1-631-390-6500
Equipment Type : Slim-Line USB Controller
Model : nanoKONTROL2
This device complies with Part 15 of FCC Rules. Operation is subject to the
following two conditions: (1) This device may not cause harmful interference,and
(2) this device must accept any interference received, including interference
that may cause undesired operation.
THE FCC REGULATION WARNING (for USA)
NOTE: This equipment has been tested and found to comply with the limits for
a Class B digital device, pursuant to Part 15 of the FCC Rules. These limits are
designed to provide reasonable protection against harmful interference in a
residential installation. This equipment generates, uses, and can radiate radio
frequency energy and, if not installed and used in accordance with the instr uc-
tions, may cause harmful interference to radio communications. However, there
is no guarantee that interference will not occur in a particular installation. If this
equipment does cause harmful interference to radio or television reception, which
can be determined by turning the equipment off and on, the user is encouraged
to try to correct the interference by one or more of the following measures:
• Reorient or relocate the receiving antenna.
• Increase the separation between the equipment and receiver.
• Connect the equipment into an outlet on a circuit different from that to which
the receiver is connected.
• Consult the dealer or an experienced radio/TV technician for help.
If items such as cables are included with this equipment, you must use those
included items.
Unauthorized changes or modification to this system can void the user’s au-
thority to operate this equipment.
Notice regarding disposal (EU only)
When this “crossed-out wheeled bin” symbol is displayed on the prod-
uct, owner’s manual, battery, or battery package, it signifies that when
you wish to dispose of this product, manual, package or battery you
must do so in an approved manner. Do not discard this product, manual,
package or battery along with ordinary household waste. Disposing in
the correct manner will prevent harm to human health and potential dam-
age to the environment. Since the correct method of disposal will de-
pend on the applicable laws and regulations in your locality, please con-
tact your local administrative body for details. If the battery contains heavy
metals in excess of the regulated amount, a chemical symbol is displayed be-
low the “crossed-out wheeled bin” symbol on the battery or battery package.
IMPORTANT NOTICE TO CONSUMERS
This product has been manufactured according to strict specifications and
voltage requirements that are applicable in the country in which it is intended
that this product should be used. If you have purchased this product via the
internet, through mail order, and/or via a telephone sale, you must verify that
this product is intended to be used in the country in which you reside.
WARNING: Use of this product in any country other than that for which it is
intended could be dangerous and could invalidate the manufacturer’s or
distributor’s warranty.
Please also retain your receipt as proof of purchase otherwise your product
may be disqualified from the manufacturer’s or distributor’s warranty.
- Mac, Mac logo and Mac OS are trademarks of Apple Inc., registered in the U.S.
and other countries.
- Windows XP, Windows Vista, Windows 7 and Windows 8 are trademarks of
Microsoft Corporation in the U.S. and other countries.
- All product names and company names are the trademarks or registered trade-
marks of their respective owners.
Introduction
Thank you for purchasing the Korg nanoKONTROL2 slim-line USB
controller. To help you get the most out of your new instrument, please
read this manual carefully.
In order to properly use this product, you’ll need to adjust some
of the settings in the application that you are using. Adjust the
settings as described in the “Settings for using the unit with DAW
software” section in this manual, and in the owner’s manual for
your application.
The Korg Kontrol Editor software allows you to edit MIDI
messages transmitted via each controller on the nanoKONTROL2.
You can download the Parameter Guide and the Korg Kontrol
Editor software from the Korg website.
http://www.korg.co.jp/English/Distributors/ or http://www.korg.com
Getting ready
Connections and power
Computer
USB connector
USB cable
nanoKONTROL2
1. Use a USB cable to connect the nanoKONTROL2 to a USB port on
your computer. The power to the nanoKONTROL2 will turn on
and the power LED will light up.
Never use any USB cable other than the one that’s included.
The nanoKONTROL2 starts in the operation mode that was
selected when the unit was last used. At this time, the transport
button that corresponds to the current operation mode will flash.
(--> “Operation mode”)
When you first connect the nanoKONTROL2 to a computer
running Windows XP/Vista/7/8, the standard USB-MIDI driver
for your operating system will be installed automatically.
Turning off the power
1. Disconnect the USB cable that’s connected to the nanoKONTROL2
and the computer. The power to the nanoKONTROL2 will turn off
and the power LED will go dark.
Settings for using the unit with DAW software
This section describes various settings for several DAW software
programs. For more information, please refer to the Parameter Guide.
For information on detailed settings and operation of various DAW
software, please refer to the corresponding user's guide.
Cubase
1.
While pressing and holding down the SET MARKER and REW
buttons, connect the USB cable from your computer to the
nanoKONTROL2.
2.
Open the “Device setting” window in Cubase, and add “Mackie
Control.”
3.
Select nanoKONTROL2 for the MIDI In/Out ports used by “Mackie
Control.”
Digital Performer
1.
While pressing and holding down the SET MARKER and FF
buttons, connect the USB cable from your computer to the
nanoKONTROL2.
Settings for “Audio MIDI settings”
•From “Audio MIDI setup,” open “MIDI
Device” or “MIDI Studio,” then select
“Add Device.”
Name the added device. (e.g.,
nanoKONTROL2 DP)
Connect the added device with the
nanoKONTROL2 as shown on the left.
2.
Open the “Control Surface” window in Digital Performer, then
select “Mackie Control” for “Driver” and “Unit.”
3.
Select the nanoKONTROL2 ports for “MIDI.”
GarageBand/Logic
Download the nanoKONTROL2 Control Surface plug-in for
GarageBand/Logic from the Korg website, and follow the instructions
in the included document to specify the settings.
http://www.korg.co.jp/English/Distributors/ or http://www.korg.com
Live
1.
While pressing and holding down the SET MARKER and STOP
buttons, connect the USB cable from your computer to the
nanoKONTROL2.
2.
Open the “Preferences” window in Live, then select “Mackie
Control” for “Control Surface.”
3.
Select nanoKONTROL2 for the MIDI In/Out ports used by “Mackie
Control.”
Pro Tools
1.
While pressing and holding down the SET MARKER and PLAY
buttons, connect the USB cable from your computer to the
nanoKONTROL2.
2.
Open the “Peripheral” window in ProTools, then select “HUI” for
“Type.”
3.
Select nanoKONTROL2 as the source and destination for “HUI.”
SONAR
1.
While pressing and holding down the SET MARKER and REC
buttons, connect the USB cable from your computer to the
nanoKONTROL2.
2.
Open the “MIDI device” window in SONAR, then select
nanoKONTROL2 for “Input” and “Output.”
3.
Open the “Controllers/Surfaces” window, then select “Mackie
Control” for “Control Surface.”
4.
Select nanoKONTROL2 for the MIDI In/Out ports used.
Other DAW software
1.
While pressing and holding down the SET MARKER and CYCLE
buttons, connect the USB cable from your computer to the
nanoKONTROL2 and engage CC mode.
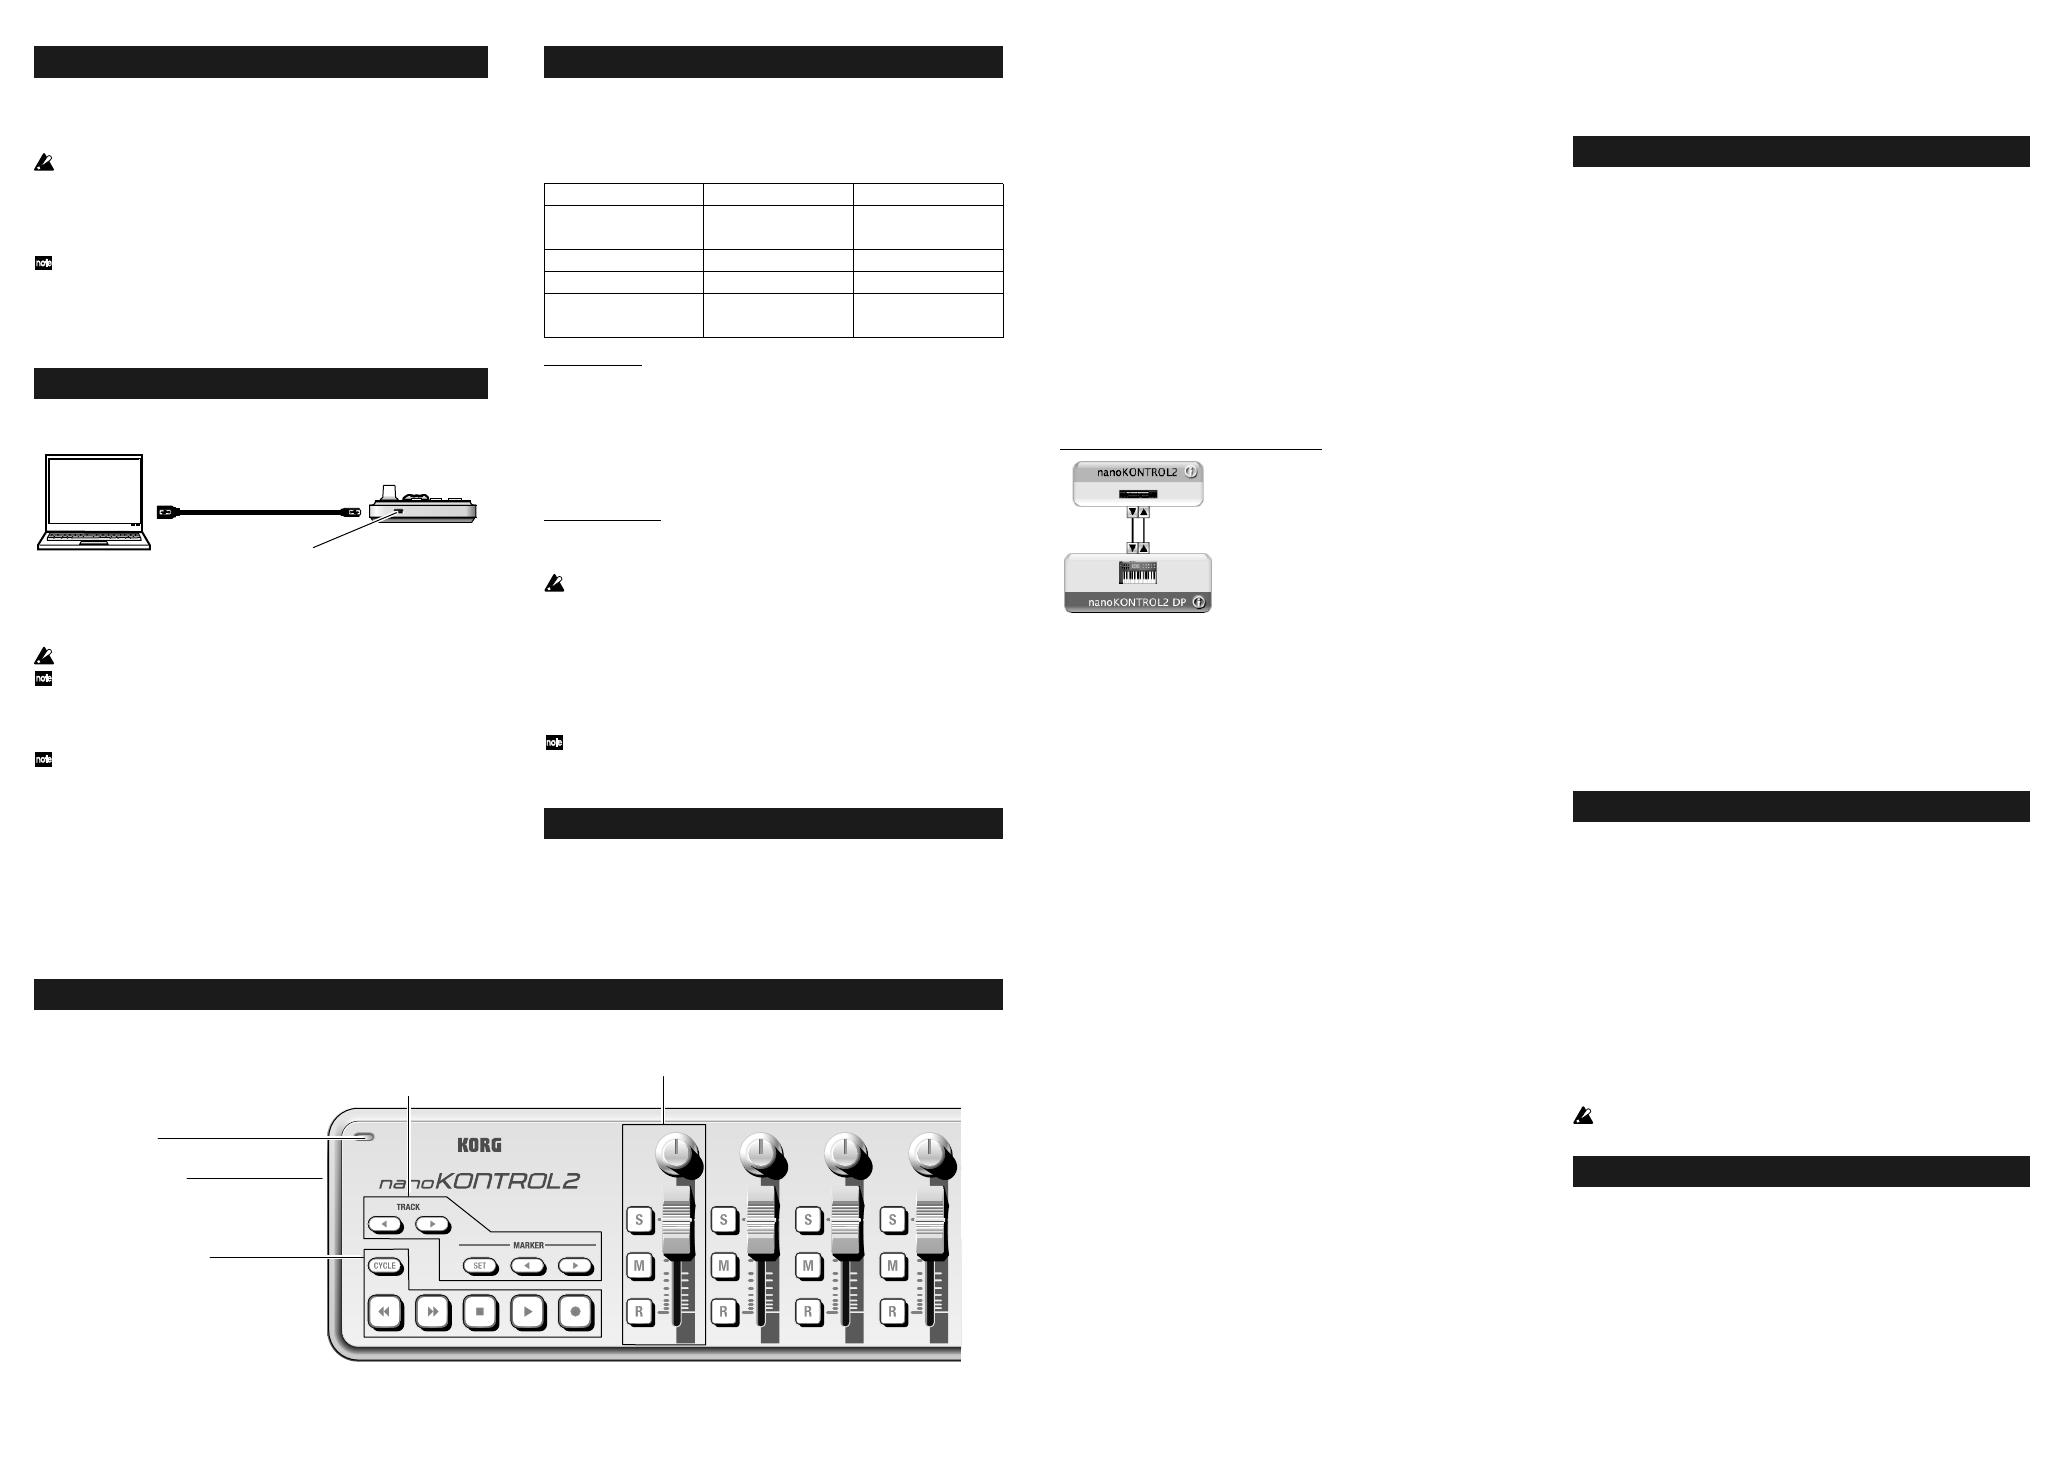
Parts and their functions
Power LED
Function buttons
Five function buttons feature the PREV TRACK, NEXT TRACK,
SET MARKER, PREV MARKER, and NEXT MARKER functions.
Parameter controls
These controls adjust the DAW software parameters.
Transport buttons
Six transport buttons feature the
CYCLE, REW, FF, STOP, PLAY
and REC functions.
USB connector
Use a USB cable to connect the
unit to a computer.
nanoKONTROL2 and driver ports
Driver ports
As shown in the following table, the name of the ports will depend on
which operating system you’re using, and whether or not you’ve
installed the Korg USB-MIDI driver.
OS MIDI IN MIDI OUT
Mac OS X nanoKONTROL2
nanoKONTROL2 CTRL
SLIDER/KNOB
Windows XP USB audio device USB audio device
Windows Vista/7/8 nanoKONTROL2 nanoKONTROL2
Windows XP/Vista/7/8+
nanoKONTROL2 1
nanoKONTROL2 1 CTRL
KORG USB-MIDI Driver SLIDER/KNOB
MIDI IN port
This is where MIDI messages from the nanoKONTROL2’s various
controllers are received. If you want to use the nanoKONTROL2 to
control an application on your computer, then select this port in the
MIDI input settings of your application.
This is also used by the Korg Kontrol Editor to control the
nanoKONTROL2.
MIDI OUT port
This port is used by the DAW software or the Korg Kontrol Editor to
control the nanoKONTROL2.
If you are using Windows XP/Vista/7/8, the standard USB-MIDI
driver that is automatically installed will not allow you to use the
nanoKONTROL2 with multiple applications simultaneously.
If you want to use the nanoKONTROL2 with multiple applications
simultaneously, you must install the Korg USB-MIDI driver.
You can download the Korg USB-MIDI driver from the Korg
website, and install it as described in the included documentation.
http://www.korg.co.jp/English/Distributors/ or http://www.korg.com
Even if you don't need to use the nanoKONTROL2 with multiple
applications simultaneously, we recommend that you install the
Korg USB-MIDI driver for more stable operation.
Operation mode
The nanoKONTROL2 features two operation modes: DAW mode, in
which each controller is set up for a specific DAW controller; and CC
mode, in which Control Change messages are assigned to the unit's
controllers. To engage the desired mode, turn on the unit while
pressing and holding down the button that corresponds to that mode.
2.
Set up the application so that it can be controlled by the Control
Change messages transmitted from the nanoKONTROL2. For
information on setting up the application, please refer to the user's
manual for the application.
Troubleshooting
Power does not turn on
If you’re using a passive (non-powered) USB hub, the
nanoKONTROL2 may fail to power-on because it’s not getting
enough power. If this is so, please connect the nanoKONTROL2 to
a powered USB hub or directly to your computer.
Software does not respond
Make sure that the nanoKONTROL2 has been detected by the
connected computer.
If you are using Windows XP, go to the Control Panel, open “Sounds,
Speech, and Audio Devices” -> “Sounds and Audio Devices,” and check
the “Hardware” tab page to see if the nanoKONTROL2 is connected.
If you are using Windows Vista/7/8, go to the Control Panel, open
“Hardware and Sounds” -> “Device Manager,” and check the
“Sound, Video, and Game Controllers” tab to see if the
nanoKONTROL2 is connected.
If you are using Mac OS X, open “Applications” -> “Utilities,” then
start “Audio MIDI Setup.”
On Mac OS X 10.5 or earlier, check the “MIDI Devices” tab.
On Mac OS X 10.6 or later, open and check the “MIDI Studio” window
by selecting “Show MIDI Window” from the “Window” menu.
Make sure that the nanoKONTROL2 is selected in the MIDI port
settings of the application that you’re using.
The application that you’re using might not support certain
functions. Please check the owner’s manual of your host application.
In order to use some of the functions of this product, you’ll need to
adjust some of the settings in the host application that you’re using.
Adjust settings as described in the “Settings for using the unit with
DAW software” section in this manual, and in the owner’s manual
for your application.
Operating requirements
Windows
Computer: Any computer that has a USB port and satisfies
the requirements for running Microsoft
Windows XP/Vista/7/8 (a USB chipset made by
the Intel Corporation is recommended)
Operating system: Microsoft Windows XP SP3 (32bit) or later,
Microsoft Windows Vista SP2 (32bit, 64bit),
Windows 7 (32bit, 64bit) or Windows 8 (32bit,
64bit)
Mac OS X
Computer: Apple Macintosh computer with an Intel or
PowerPC processor that has a USB port
Operating system: Mac OS X 10.4 or later
nanoKONTROL2 operation is not guaranteed with all computers
that satisfy these system requirements.
Specifications
Connectors: USB connector (mini B type)
Power supply: USB bus power mode
Current consumption: 100 mA or less
Dimensions (W x D x H): 12.80 x 3.27 x 1.18 inches / 325 x 83 x 30 mm
Weight: 10.34 oz / 293 g
Included items: USB cable, Owner’s manual
* Specifications and appearance are subject to change without notice
for improvement.
nanoKONTROL2
1.
2.
1.
2.
1.
2.
3.
1.
2.
3.
Live
1.
2.
3.
Pro Tools
1.
2.
3.
SONAR
1.
2.
3.
4.
Mac OS X nanoKONTROL2
nanoKONTROL2 CTRL
SLIDER/KNOB
Windows XP USB audio device USB audio device
Windows Vista/7/8 nanoKONTROL2 nanoKONTROL2
Windows XP/Vista/7/8+ nanoKONTROL2 1 n
anoKONTROL2 1 CTRL
KORG USB-MIDI Driver SLIDER/KNOB
1.
2.
如下表所
端口的名字取决于你所使用的操作系
以及你是
否安装了Korg USB-MIDI驱动程序
这个部分描述使用几个DAW软件的不同设
可参阅“Param-
eter Guide”(参数指引)
更详细的设定及不同的DAW软件操
作信息,可参阅相应的用户手册
按定SET MARKER及CYCLE键的同时
用USB线把电脑和
nanoKONTROL2连接起来并锁定CC模式
设定好应用程序使其可被Control Change控制
信号从
nanoKONTROL2输出
有关应用程序的设置
请参阅应用程
序的用户手册
选择nanoKONTROL2 作为“Mackie Control”所使用的MIDI
In/Out 端口
如你使用的是被动式USB集线器(本身不供电)
nanoKONTROL2可能会因供电不足而无法启动
这种情况下
应把nanoKONTROL2连接到供电的USB集线器
或直接连接到
电脑上
请确认nanoKONTROL2已被电脑检测到
如你使用的是
Windows XP
前往Control Panel(控制面板)
打开
“Sounds, Speech, and Audio Devices”(声音、语音及音
频设备)及检查“Hardware”(硬件)看nanoKONTROL2是
否已接上
确认 nanoKONTROL2在你正使用的应用程序的MIDI端口设定
已被选定
如你正使用的应用程序不支持某个功能
请查阅你的电脑应用
程序的用户手册
如使用的是Windows Vista/7/8,打开 Control Panel(控制面板),
“Hardware and Sounds”(硬件及声音) -> “Device
Manager”(设备管理) 检查“Sound, Video, and Game
Controllers”(声音,视频及游戏控制) 看nanoKONTROL2 是否
已连接上
如使用的是Mac OS X, 打开 “Applications”(应用) ->
“Utilities”(使用)然后开始 “Audio MIDI Setup ”(音频MIDI
设置)
如使用的是Mac OS X 10.5 或更早版本
请检查 “MIDI
Devices” (MIDI设备)
如使用Mac OS X 10.6或更早版本
通过“Window”(窗口)
菜单选择“Show MIDI Window”(显示MIDI窗口)
检查
“MIDI Studio” 窗口
为了能使用nanoKONTROL2的一些功能
你需要调整你正使
用的终端的一些设置
调整设置的方法按本说明书的
“Settings for using the unit with DAW software”
(nanoKONTROL2使用DAW软件的设置)及用户手册里的应
用程序部分所述
按定SET MARKER及FF键的同时
用USB线把电脑和
nanoKONTROL2连接起来
KORG上下载nanoKONTROL2 Control Surface件程
照产品所附带的文件的行设
SET MARKERSTOP键的同时
USB线把电脑
nanoKONTROL2连接起
Live软件打Preferences”)窗
选定
Mackie Control”为“Control Surface”(控制界
nanoKONTROL2 Mackie Control使的MIDI
In/Out
SET MARKERPLAY键的同
USB线把电脑
nanoKONTROL2连接起
ProTools件打“Peripheral”(周边设备)
选择
HUI”为“Type”(类型)
nanoKONTROL2作HUI”的来源及目的地
SET MARKERREC键的同
USB线把电脑
nanoKONTROL2连接起
SONAR软开“MIDI deviceMIDI设备
后选
nanoKONTROL2为Input”()及Output输出
开“Controllers/Surfaces”制器/界面
后选
Mackie Control”为Control Surface(控面)
择nanoKONTROL2所使MIDI In/Out/输端口
nanoKONTROL2为MIDI端
Control Surface”(控)窗口
Mackie
Control”(Mackie)为Driver”(驱动程序)及“Unit(硬)
- Audio MIDI setup”(音频MIDI
MIDI Device”MIDI)或MIDI Studio”(
MIDI
Add Device”(
- 如:nanoKONTROL2DP
-
nanoKONTROL2连
Audio MIDI 设置
GarageBand/Logic
在Cubase软件打开“Device setting”(设备设置)窗口
加“Mackie Control”
按定SET MARKER及REW键的同时
用USB线把电脑和
nanoKONTROL2连接起来
这是nanoKONTROL2各个控制器的MIDI信号被接收到的地
如想nanoKONTROL2控制电里的一个应用
请于
用程序的MIDI输入设定中选定这个端口
同样
你也可以通过Korg Kontrol Editor编辑软件控制
nanoKONTROL2
使W in do ws XP /V is ta /7/8
U S B - M I D I
nanoKO NT ROL2使
nanoKONTROL2使
Korg
USB-MIDI驱动程序
可上KORG官网下载Korg USB-MIDI驱
动程序
并按照附带文件所述进行安装
nanoKONTROL2配备两种操作模式:DAW模式 - 这个模式下
每个控制器都被设定为指定的DAW控制器;CC模式 - 这个模式下
Control Change(控制转换)信息被配送至nanoKONTROL2
nanoKONTROL2的电源键
即使你不需把nanoKONTROL2与多个应用程序同时使用
们也建议你安装Korg USB-MIDI驱动程序
使操作更加稳定
这个端口是DAW软件或Korg Kontrol Editor用来控制
nanoKONTROL2的
感谢你购买Korg nanoKontrol2修长设计USB控制器
为了让你
更能深入了解这台全新的乐器
请仔细阅读本说明书
用一根USB线把nanoKONTROL2接到电脑的USB接口
当电源接上后
nanoKONTROL2会启动
并且LED电源指示
灯会亮起
nanoKONTROL2电源启动默认的操作模为上一次关机
前所选用的模式
这一
对应当前操作模式的传输键会闪
烁(→ “操作模式”)
n a n o KO N T R O L 2 使 W i n d o w s
XP/Vista/7/8的电脑时
对应于你的操作系统的标准USB-MIDI
驱动程序会被自动安装
拔除连接nanoKONTROL2与电脑之间的USB线
nanoKONTROL2的电源会关闭
LED电源指示灯会熄灭
个功分别 PREV TRACK(轨), NEXT TRACK(一轨)
SET
MARKER(设定)
PREV MARKER(一标)
NEXT MARKER
(下一)功
用USB线把nanoKONTROL2
电脑起来
个传分别CYCLE(循环)
REW(后退)
FF()
STOP(停)
PLAY (播)及 REC(制)
些控可调DAW软件
请勿使用本品外的其他USB线连接
为了能把本品所有的功能都达到最佳使用状态
你需要在所
使用的应用程序上进行一些调整
请按本说明书及用户手册
内的“nanoKONTROL2使用DAW软件操作设置”所述
整应用程序的设置
Korg Kontrol Editor软件可让你编辑经由nanoKONTROL2
的每一个控制器所传送出来的MIDI信号
你可从KORG官网上下载Parameter Guide(参数指引)及
Korg Kontrol Editor编辑软件
http://www.korg.co.jp/English/Distributors/
http://www.korg.com
nanoKONTROL2及驱动端口
疑难解决
操作模式
部件及其功能
产品介绍
准备工作
驱动端口
nanoKONTROL2使用DAW软件的设置
其他DAW软件
无法接通电源
软件无反应
Cubase
Digital Performer
MIDI IN 输入端口
MIDI OUT 输出端口
连接与电源
关闭电源
功能键
LED电源指示灯
电脑
USB线
USB接口
OS(操作系统) MIDI IN(输入) MIDI OUT(输出)
U S B 口 及 能 够 足 运 M i c r o s o f t
Windows XP/Vista/7/8的要求的电脑 (建议使用
由Intel Corporation制造的USB芯片)
使 电 脑 满 足 了 以 上 的 系 统 要
不 能 完 全 保 证
nanoKONTROL2绝对运作正常
*产品规格及外观可能会在不作另行通知的情况下作出改良变更
IntelPowerPC
USB
Apple Macintosh 电脑
连接 :
电源 :
耗电量 :
尺寸 (宽x深x高) :
重量 :
所带附件 :
USB连接(迷你
类B)
USB 电源模式
100 mA 或更少
325 x 83 x 30 mm
293 克
USB 线
用户手册
Mac OS X 10.4 或更高版本
Microsoft Windows XP SP3(32bit)或更高版本
Microsoft Windows Vista SP2(32bit, 64bit),
Windows 7(32bit, 64bit)Windows 8(32bit, 64bit)
电脑 :
操作系统 :
操作系统 :
电脑 :
操作要求
产品规格
Mac OS X
Windows
参数控制
传输键
USB接口
http://www.korg.co.jp/English/Distributors/ http://www.korg.com
http://www.korg.co.jp/English/Distributors/
http://www.korg.com
  • Page 1 1
  • Page 2 2
  • Page 3 3
  • Page 4 4
  • Page 5 5
  • Page 6 6
  • Page 7 7
  • Page 8 8

Korg nanoKONTROL2 Owner's manual

Type
Owner's manual

Ask a question and I''ll find the answer in the document

Finding information in a document is now easier with AI