Page is loading ...


Lumento C
http://www.zennio.com Technical Support: http://support.zennio.com
2
CONTENTS
Contents ........................................................................................................................................ 2
Document updates ........................................................................................................................ 3
1 Introduction .......................................................................................................................... 4
Lumento C3 / Lumento C4 ............................................................................................ 4 1.1
Installation ..................................................................................................................... 5 1.2
RGB or RGBW Loads ...................................................................................................... 7 1.3
2 Configuration ........................................................................................................................ 8
General Configuration ................................................................................................. 10 2.1
Channel........................................................................................................................ 16 2.2
2.2.1 Main Configuration ............................................................................................. 16
2.2.2 Switch On/Off ..................................................................................................... 20
2.2.3 Dimming .............................................................................................................. 21
2.2.4 Status Objects ..................................................................................................... 23
2.2.5 Colour Selection Objects (Only RGB / RGBW channels) ..................................... 25
2.2.6 Custom On/Off .................................................................................................... 28
2.2.7 Timers ................................................................................................................. 29
2.2.8 Scenes/Sequences .............................................................................................. 34
2.2.9 Lock ..................................................................................................................... 41
2.2.10 Custom Initialisation ........................................................................................... 42
Annex I. Communication Objects ................................................................................................ 44


Lumento C
http://www.zennio.com Technical Support: http://support.zennio.com
4
1 INTRODUCTION
LUMENTO C3 / LUMENTO C4 1.1
Lumento C3 and Lumento C4 constitute the Zennio solution for light regulation in
constant current LED luminaires (in contrast to the constant voltage LED luminaires
controlled by Lumento X3 and Lumento X4).
They provide, respectively, three and four independent output channels (up to 1000 mA
each) and may be parameterised to work with different output configurations, according
to the LED module type:
Individual channels: allows an independent control over the different output
channels.
RGBW (Lumento C4) or RGB (Lumento C3): allows a joint control over one
four-colour (Lumento C4) or one three-colour (Lumento C3) LED module, i.e.,
the output channel will be formed by the colour components (R, G, B or W,
which stand for Red, Green, Blue and White respectively) of one single
module, being all of them controlled jointly, but in a different proportion each.
RGB+W (only Lumento C4): permits controlling a three-colour constant
current LED module, plus an independent white channel (i.e., an RGB
channel plus an individual channel for the connection of a white LED
module).
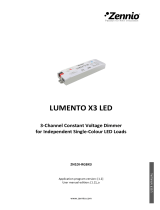
Figure 1. Lumento C4 Dimmer
IMPORTANT NOTE: Lumento C3 does not incorporate a fourth channel (typically, W).
Hereafter this manual may refer to such channel, but please keep in mind that it does
not apply to the C3 model.

Lumento C
http://www.zennio.com Technical Support: http://support.zennio.com
5
INSTALLATION 1.2
Figure 2. Connection scheme
The device connects to the KNX bus via the incorporated terminal (1), which provides
the device with bus power. On the other hand, an additional power supply (12 to 30
VDC) is required for powering the LEDs. The external power supply is connected to the
device through the corresponding screw terminal block included in the original
packaging (8). The polarity of the external supply must be respected: the positive pole
of the external power supply corresponds to the positive pole (+) of the terminal block,
and analogously for the negative pole (-). If, for whatever reason, the connection of the
power supply is carried out in the inverse way, Lumento C will report this inverse
polarity through the Test indicator (5), which will turn orange.
Also provided with the device is a second screw terminal block, where the LED
modules must be connected (6) respecting the polarity.
Note:
The output terminal block may be wired before it is inserted into the device.
Only constant-current LED loads can be connected to Lumento C.
Very important: please respect the wiring schema shown on the output
terminal block. Misconnecting the cables may damage the loads or Lumento
C itself.
1
2
3
4
5
6
8
7
1 KNX bus connection
2 Programming button
3 Programming LED
4 Test button
5 Test LED
6 Output channels
7 Current selector
8 Power input
+
-
+
-
+
-
+
-
+
-

Lumento C
http://www.zennio.com Technical Support: http://support.zennio.com
6
Once the device is provided with bus power, both the physical address and the
application programme can be downloaded, even if no external power is being
provided. The absence of external power is notified by the test LED (5) by flashing in
orange.
The functionality of the main elements of the device is described below:
Programming button: a short press on this button (2) sets the device into
the programming mode, making the associated indicator (3) turns red. If this
button is held while plugging the device into the KNX bus, the device will
enter the safe mode, making the indicator blink in red.
Test button: a long press on this button (4), of at least 3 seconds (until the
associated indicator (5) lights in white) activates the Test Mode of the device,
which allows verifying the correct connection of the LED modules.
Once the Test Mode is activated, further short presses on the button will
make the indicator change (Red-Green-Blue-White-Red...) and the
output channels switch successively (1-2-3-4-1...). To leave the Test
Mode, just press the Test button at least for 3 seconds (until the associated
indicator switches off).
Note: while the Test Mode is active, any order received from the KNX bus will be
ignored until the deactivation of the mode.
To obtain detailed information about the technical features of Lumento C3 and
Lumento C4 as well as on security and on the installation process, please refer to the
Datasheet, bundled within the original packaging of the device and also available at:
http://www.zennio.com.

Lumento C
http://www.zennio.com Technical Support: http://support.zennio.com
7
RGB OR RGBW LOADS 1.3
Lumento C3 and Lumento C4 are able to regulate the colour and the luminosity level
of an RGB or RGBW diode module (the latter, only in Lumento C4).
In fact, both the colour and the luminosity are controlled by adjusting the level of the
light emitted by the component colours (i.e., a change in the global luminosity is
actually a joint adjustment of the luminosity of the component colours), however
luminosity changes are performed by maintaining the proportion between the
components, so in practice it is not the colour itself, but the light intensity, what is
perceived to be changing.
LED modules are made of different colour components: Red, Green, Blue (RGB) and
White (RGBW). The result of mixing the three first colours in the same proportion is, as
well, the White colour, as shown in Figure 3. Other intermediate colours are obtained
by combining the three main colours (R, G, B) or the four colours (R, G, B, W) in
different proportions. The existence of a specific white component is normally intended
to make these combinations easier and, generally, offers a higher fidelity when the
white colour is shown.
Figure 3. Combination of the Red, Green and Blue colour components
As stated, luminosity (or brightness) refers to the amount of light that the LED strip is
emitting at a given time. The general (or overall) brightness of the set of diodes has
been defined as the brightness of the component that is emitting with the highest
intensity. On the other hand, the regulation of the general brightness is carried out so
the visible colour is perceived as constant, by increasing or decreasing the brightness
of the three colour components together, without losing their proportions.
Note: the colour that is visually perceived (the colour actually obtained) may vary
depending on the LED module and the colour diffuser being used.

Lumento C
http://www.zennio.com Technical Support: http://support.zennio.com
8
2 CONFIGURATION
Lumento C allows, as stated in the previous section, controlling the colour and the
luminosity level of:
Up to four monochrome LED modules (three in Lumento C3), or
A four-channel RGBW LED module (a three-channel RGB LED module in
Lumento C3), or
A three-channel RGB LED module plus an individual channel for
controlling the white colour independently (only in Lumento C4).
Some features and functions offered by this device are listed below:
Constant-current (220 / 300 / 350 / 500 / 550 / 630 / 700 / 750 / 900 / 1000
mA, depending on the configuration) LED load control.
12V to 30V input voltage for the LED load control.
Wide range of alternatives for the LED module colour control, both for a
general control and for a per-channel (R, G, B, W) control:
1-bit objects for a general and per-channel switch-on / switch-off.
4-bit objects for general and per-channel step dimming.
1-byte objects for general and per-channel absolute dimming (in
percentage).
3-byte object for an RGB absolute dimming (in percentage).
1-byte scene object, with a number of pre-set colours.
1-bit object for colour scanning and selection.
Four dimming times for each mode/channel: At once, Dimming Time 1 /
Dimming Time 2 / Dimming Time 3 (smooth dimming with configurable
time).
Restriction of the maximum allowed light level.

Lumento C
http://www.zennio.com Technical Support: http://support.zennio.com
9
Custom ON/OFF: possibility of enabling up to four different ON/OFF controls
(or four per channel, in case of an independent channel control), with a
specific colour, luminosity and dimming type for each case.
Simple Timer and Flashing: timed ON/OFF sequences of the LED module.
Scenes/Sequences: possibility of enabling from five to ten different
scenes/sequences (depending on the mode), which can consist in a single
luminosity change or a custom sequence (up to 5 customisable steps).
Lock: object to lock/unlock the control over the LED module through bus
orders.
Customisable Start-up: possibility of performing a custom start-up (after a
bus failure or an ETS download/reset) of the LED module connected to the
device, as well as of sending the status objects to the KNX bus (immediately
or after a delay).
Error identification: detection of anomalous situations affecting the correct
behaviour of the device:
External voltage errors.
Overheating errors.
Current selection error.

Lumento C
http://www.zennio.com Technical Support: http://support.zennio.com
10
GENERAL CONFIGURATION 2.1
In the first place, it is necessary to define the nominal current of by the LED loads to
be controlled, as reported by the manufacturer. To prevent issues, this must be set
both physically (through the on-board hardware selector) and also in parameters,
making both selections match and comply with the manufacturer specification.
The correspondence between the position of the hardware selector and the associated
nominal current is shown in the table below:
Position selector
Nominal current (mA)
0
220
1
300
2
350
3
500
4
550
5
630
6
700
7
750
8
900
9
1000
Table 1 Correspondence between the position selector and the nominal current.
Also within the general configuration, the integrator may enable the objects for
reporting errors and set the load type to be controlled:
Individual channels: three / four monochrome LED modules (one per output
channel), which can be enabled, configured and controlled individually.
RGBW: possibility of controlling jointly or individually the four components (R,
G, B, W) of an RGBW module (in Lumento C4) or the three components (R,
G, B) of an RGB module (in Lumento C3).
RGB+W (only Lumento C4): similar to the above case, however the white
channel here is always controlled independently.

Lumento C
http://www.zennio.com Technical Support: http://support.zennio.com
11
ETS PARAMETERISATION
After importing the corresponding database in ETS and adding the device into the
topology of the desired project, the configuration process begins by right-clicking into
the device name and selecting Edit parameters.
Lumento C incorporates a set of functionalities, disabled by default, which can be
selectively enabled depending on the installation requirements.
Figure 4 ETS Parameterisation. General.
Next, all the available functions are described, as well as their behaviour:
Current selection: sets the nominal current of the LED loads connected to
the output channels (see Table 1). The default value is “220 mA”, which
corresponds to the position “0” of the current selector.
The value of this parameter must match that of the current selector
located on the top of the device. Otherwise, the device will not regulate the
loads, and the Test indicator will blink in white colour.
Error objects: enables the following communication objects:
“Error: Overheating”: binary object that will report situations of an
excessive system temperature (higher than 75ºC) by sending the value
"1" every 30 seconds. In such case, the light level of the output channels
will be decreased and the Test indicator will start blinking in red colour.
If the system reaches 80ºC, the outputs will be turned off and the Test
indicator will remain turned on in red colour.

Lumento C
http://www.zennio.com Technical Support: http://support.zennio.com
12
Once the temperature drops below 70ºC, the value "0" will be sent through
this object, although the outputs will remain off for safety reasons
(however, they will respond to dimming orders).
Note: even if the error notification objects have not been enabled in
parameters, the overheating protection remains always enabled.
“Error: Current Selector Mismatch”: binary object through which the
value “1” will be sent (every 30 seconds) in case the value of parameter
Current Selection differs from that of the hardware selector. Once the
mismatch is over, the device will send the value “0” through this object,
although the outputs will remain off for safety reasons (however, they will
respond to dimming orders).
"Error: External Voltage": binary object that will notify (by sending the
value “1” every thirty seconds) an unexpected external power supply, due
to any of these events:
• Too low voltage.
• Absence of power (disconnected source), which will make the Test
indicator flash in orange colour.
• Polarity inversion in the power supply, which will make the test indicator
light in orange colour.
Once the situation is over, the value "0" will be sent, and the outputs will
recover their previous states.
Table 2 shows a summary of the different error types and how the test
LED indicator shows them.
Error
Colour LED state
Current selection White Flashing
No external power supply Orange Flashing
Inversion in the polarity of the power supply Orange On
Overheating (75ºC) Red Flashing
Overheating (80ºC) Red On
Table 2. Error notification.

Lumento C
http://www.zennio.com Technical Support: http://support.zennio.com
13
Outputs Configuration: this device can be parameterized to control current
LED loads of the following types: “Individual Channels” (by default), “RGBW”
and “RGB+W”. In case of opting for the first option, it will be possible to
selectively enable or disable each of the individual channels through the
specific checkboxes (see Figure 4).
Depending on the option selected, one or more new tabs will be incorporated
to the tab menu on the left, containing the configuration for the specific
functions of each output channel.
Individual Channels
Figure 5. Channel configuration. Individual channels.
RGBW (Lumento C4) / RGB (Lumento C3)
Figure 6. Channel configuration. RGBW.

Lumento C
http://www.zennio.com Technical Support: http://support.zennio.com
14
RGB+W (only Lumento C4)
Figure 7. Channel configuration. RGB+W.
Note: hereafter, the prefix “[Ch]” will note objects referring to an output channel,
although depending on the channel type the actual name will begin with “[1]”, “[2]”, “[3]”,
“[4])”, “[RGBW]”,”[RGB]”, “[W]”, “[R]”, “[G]”, or “[B]”.
With independence of the channel type, three control objects per channel will be
included in the project topology after the channel activation:
“[Ch] Switch On/Off”: 1-bit object destined to perform a general switch-on
(“1”) or switch-off (“0”) of the LED strip.
“[Ch] Relative Dimming”: 4-bit object destined to step-dimming the general
brightness (luminosity) level. Steps (upwards or downwards) of 1%, 3%, 6%,
12%, 25%, 50% and 100% are possible.
“[Ch] Absolute Dimming”: one-byte object destined to specify a particular
light level (by setting the target percentage value) over the general brightness
level.
In the case of an RGBW, RGB or RGB+W control, an additional parameter
(Independent Control Objects) will be provided to allow enabling specific control
objects per each colour component in addition to the joint control objects for the whole
channel.

Lumento C
http://www.zennio.com Technical Support: http://support.zennio.com
15
Example
Assume that the outputs configuration is RGBW and the LED module colour at a given
time is lime green [25%, 50%, 0%, 3%].
A regulation order of ‘70%’ is received through the object “[RGBW] Absolute
Dimming”. The component with the highest illumination level will be set to 70%,
while the others will vary proportionally (70 / 50 = 1.4). Therefore, the output will
become [35%, 70%, 0%, 4.2%].
A regulation order to decrement the light level by 25% is received through the
object “[RGBW] Relative Dimming”. The component with the highest illumination
level (G, with 70%) will decrease its value by 25% (becoming 45%), while the
others will vary proportionally (45 / 70 = 0.64). Therefore, the output will become
[35%, 70%, 0%, 4.2%].
The next sections detail the options contained by the channel-specific parameter tabs.

Lumento C
http://www.zennio.com Technical Support: http://support.zennio.com
16
CHANNEL 2.2
Although it is possible to perform a per-component, or an RGBW / RGB, or an RGB+W
control of the outputs, the functionality is analogous in all cases. The following sections
describe this functionality, highlighting the details that differ from one case to another.
2.2.1 MAIN CONFIGURATION
The main configuration of the output channel covers the following options:
Economical Mode: defines the maximum dimming value (in percentage from
50% to 100%) that can be applied to the channels through a dimming order. If
this parameter is set to a value other than 100%, a proportional reduction of
the luminosity will be applied. However, Lumento C4 will always send to the
KNX bus luminosity values between 0% and 100%.
Example:
A value of 80% is assigned to this parameter. In such case, dimming orders
for a luminosity of 100% will actually set a luminosity of 80%, although the
status object will show the value 100%. Analogously, orders for a luminosity
of 50% will actually set it at 40%, although the status object will show 50%.
Dimming times: the dimming time is the length of the transition between off
(0%) and the maximum luminosity level (100%), and therefore determines the
speed of the regulation. Up to three different dimming times can be applied
to the different orders or actions, and their values may be changed through
three communication objects (one per each dimming time).
Note: since the dimming time refers to the transition from the minimum
luminosity level (off) to the maximum luminosity level, enabling the
economical mode will increase the dimming speed, as the maximum
luminosity level becomes lower but must be reached in the same
(parameterised) time.

Lumento C
http://www.zennio.com Technical Support: http://support.zennio.com
17
Independent Control Objects (RGBW / RGB / RGB+W only): brings the
option to control each of the colour components individually (in addition to the
joint control) analogously as in the individual channel output configuration.
Functions: it is possible to configure a set of custom functions per channel:
Enable / Disable Status Objects: shows or hides the status objects
associated to the channel (On/Off status and dimming status). See section
2.2.4.
Colour Selection Objects (RGBW / RGB / RGB+W only): enables or
disables the objects for the selection and control of the resulting colour,
either through a direct selection, or by assigning values to the colour
components or through a colour shift sequence. See section 2.2.5.
Custom On/Off: allows enabling up to four custom On/Off controls, with
different dimming values and times. See section 2.2.6.
Timers: defines timed or delayed on/off switches. See section 2.2.7.
Scenes and sequences: enables the configuration of custom dimming
sequences and scenes. See section 2.2.8.
Lock: allows locking the output channel, i.e., disable the control. See
section 2.2.9.
Custom initialisation: customises the initial state of the loads connected
to the output. See section 2.2.10.
ETS PARAMETERISATION
After setting the output control type, one or more channel tabs will be displayed, as
shown in Figure 8. The two highlighted parameters are only available under an RGB,
RGBW or RGB+W output control.

Lumento C
http://www.zennio.com Technical Support: http://support.zennio.com
18
Figure 8. Channel X. Configuration.
This screen includes the following parameters:
Economical Mode: this parameter can be “Enabled” or “Disabled” (by
default). When enabled a new parameter shows up:
Maximum Light Level: sets the maximum percentage dimming value that
the channel can reach. Allowed values from “50%” to “100%” (by default).
Figure 9. Channel X. Configuration. Economical Mode.
Dimming Times: length of the transition between luminosity levels “0%” and
“100%”. Three dimming times may be parameterised, through the following
parameters:

Lumento C
http://www.zennio.com Technical Support: http://support.zennio.com
19
Dimming Time [n]: sets the dimming time n (1-3) duration. Allowed values
are 1 to 100 (tenths of a second, seconds or minutes).
Dimming Time Objects: enables three two-byte objects, named “[Ch]
Dimming Time n”, which allow changing the dimming times
parameterised (up to 6000 seconds). This parameter is disabled by
default.
Independent Control Objects (RGBW / RGB / RGB+W only): enables
additional communication objects per colour components, analogous to those
in an individual channel control. These objects are:
“[X] Switch On/Off”: one-bit object for a switch-on (“1”) or a switch-off (“0”)
of component X.
“[X] Relative dimming”: four-bit object destined to step-dimming the
luminosity level of component X. Steps upwards or downwards (of 1%,
3%, 6%, 12%, 25%, 50% or 100%) are possible.
“[X] Absolute dimming”: one-byte object destined to specify a particular
light level (by setting the target percentage value) over the brightness level
of component X.
Note: [X] notes [R], [G], [B] or [W].
Functions: checkboxes to enable or disable certain functionalities of the
channel (when enabled, new tabs or objects are added to the project):
Status Objects: see section 2.2.4.
Colour Selection Objects: see section 2.2.5.
Custom On/Off: see section 2.2.6.
Timers: see section 2.2.7.
Scenes / Sequences: see section 2.2.8.
Lock: see section 2.2.9.
Custom initialization: see section 2.2.10.

Lumento C
http://www.zennio.com Technical Support: http://support.zennio.com
20
2.2.2 SWITCH ON/OFF
Lumento C lets configuring the general On/Off switch control, so that these actions are
performed immediately or through a smooth regulation (according to one of the three
configurable dimming times; see section 2.1).
Furthermore, it is possible to specify the illumination level that the channel will adopt
when a general switch-on order is executed: either a fixed value (configurable in
parameters) or the last value prior to the switch off (i.e., a memory switch-on).
Note that, in RGB / RGBW channels, the colour will always be preserved when the
channel is switched off and afterwards on. Configuring a specific illumination level only
affects to the light intensity, not to the ratio of the different colour components.
ETS PARAMETERISATION
The “Switch On/Off” window, available from the start, contains the following
parameters.
Figure 10. Switch On/Off
On/Off Dimming Time: “At Once”, “Dimming Time 1”, “Dimming Time 2”,
“Dimming Time 3”. See section 2.2.1.
Switch On Value: allows selecting the general illumination level that will be
adopted by the channel when the value “1” is received through “[Ch] Switch
On/Off”: “Last On Value” (default option) or “Defined Value”. The latter brings
an additional parameter:
Defined Value: sets the desired illumination level, between 0% and 100%.
The default option is 100%.
1/50