To set the alarm as iPhone
1
Perform steps 1 to 8 in “To set the alarm.”
2 Press ALARM A or B to select alarm mode for
“iPhone.”
The volume level flashes in the display.
3 Press ALARM TIME SET + or – to adjust the
volume.
4 Press ALARM A or B.
The setting is entered. “A” or “B” appears in the display
indicating that the alarm has been activated.
The iPhone will sound at the set time.
Notes
To wake up to music stored in an iPhone, connect the iPhone
to the unit before the alarm sounds.
Even if the alarm setting for iPhone is complete, if you turn the
iPhone power off after setting the iPhone on the unit, the
alarm will be the buzzer.
To set the radio alarm
1
Perform steps 1 to 8 in “To set the alarm.”
2 Press ALARM A or B to select radio band (“FM”
or “AM”).
Preset number flashes in the display.
3 Press ALARM TIME SET + or – to select the
desired preset number or “– –” of the
corresponding band.
“– –” is the last station you listened to before the alarm
sounds.
4 Press ALARM A or B.
The volume level flashes in the display.
5 Press ALARM TIME SET + or – to adjust the
volume.
6 Press ALARM A or B.
The setting is entered. “A” or “B” appears in the display
indicating that the alarm has been activated.
The radio will turn on at the set time.
To set the buzzer alarm
1
Perform steps 1 to 8 in “To set the alarm.”
2 Press ALARM A or B to select “BUZZER” alarm
mode.
The setting is entered. “A” or “B” appears in the display
indicating that the alarm has been activated.
The buzzer will sound at the set time.
Note
The volume of the buzzer is not adjustable.
To confirm an alarm time setting
Press ALARM TIME SET + or –. The setting will be displayed for
about 4 seconds.
To change an alarm setting
Press and hold ALARM TIME SET + for at least 2 seconds to
move the alarm time forwards. Press and hold ALARM TIME SET
– for at least 2 seconds to move the alarm time back.
When you release the button, the changed time will flash for
about 2 seconds. To change the alarm time again, press ALARM
TIME SET + or – within these 2 seconds, otherwise the setting
change will be set as displayed.
Tips
“A” or “B” appears in the display indicating that the alarm time
has been changed and activated.
Even if the alarm has been set to off, the alarm will be
switched on when you change the alarm setting.
To doze for a few more minutes
Press SNOOZE/BRIGHTNESS.
The sound turns off but will automatically come on again after
about 10 minutes.
You can change the snooze time by pressing SNOOZE/
BRIGHTNESS repeatedly within 4 seconds.
The maximum length of the snooze time is 60 minutes.
To stop the snooze timer, press OFF.
To stop the alarm
Press OFF to turn off the alarm.
Press , FM/AM, or AUDIO IN to stop the alarm and activate
the corresponding function at the same time.
The alarm will sound again at the same time the next day.
To deactivate the alarm
Press ALARM A or B to turn off the alarm A or B indicator in the
display.
To activate the alarm
Press ALARM A or B to turn on the alarm A or B indicator in the
display.
Notes
When alarm is set as iPhone, only the buzzer alarm will sound
if there is no iPhone on the Dock connector, music is not
stored in the iPhone, or the iPhone is turned off.
The alarm function works as usual on the first and last day of
daylight saving time (summer time). As a result, if the Auto
DST/summer time adjustment is set and the alarm is set at a
time skipped when the daylight saving time begins, the alarm
will sound; if the alarm is set to a time that overlaps when
daylight saving time ends, the alarm will sound twice.
If the same alarm time is set for both alarm A and B, alarm A
takes priority.
If no operation is performed while the alarm is sounding, the
alarm will stop after about 60 minutes.
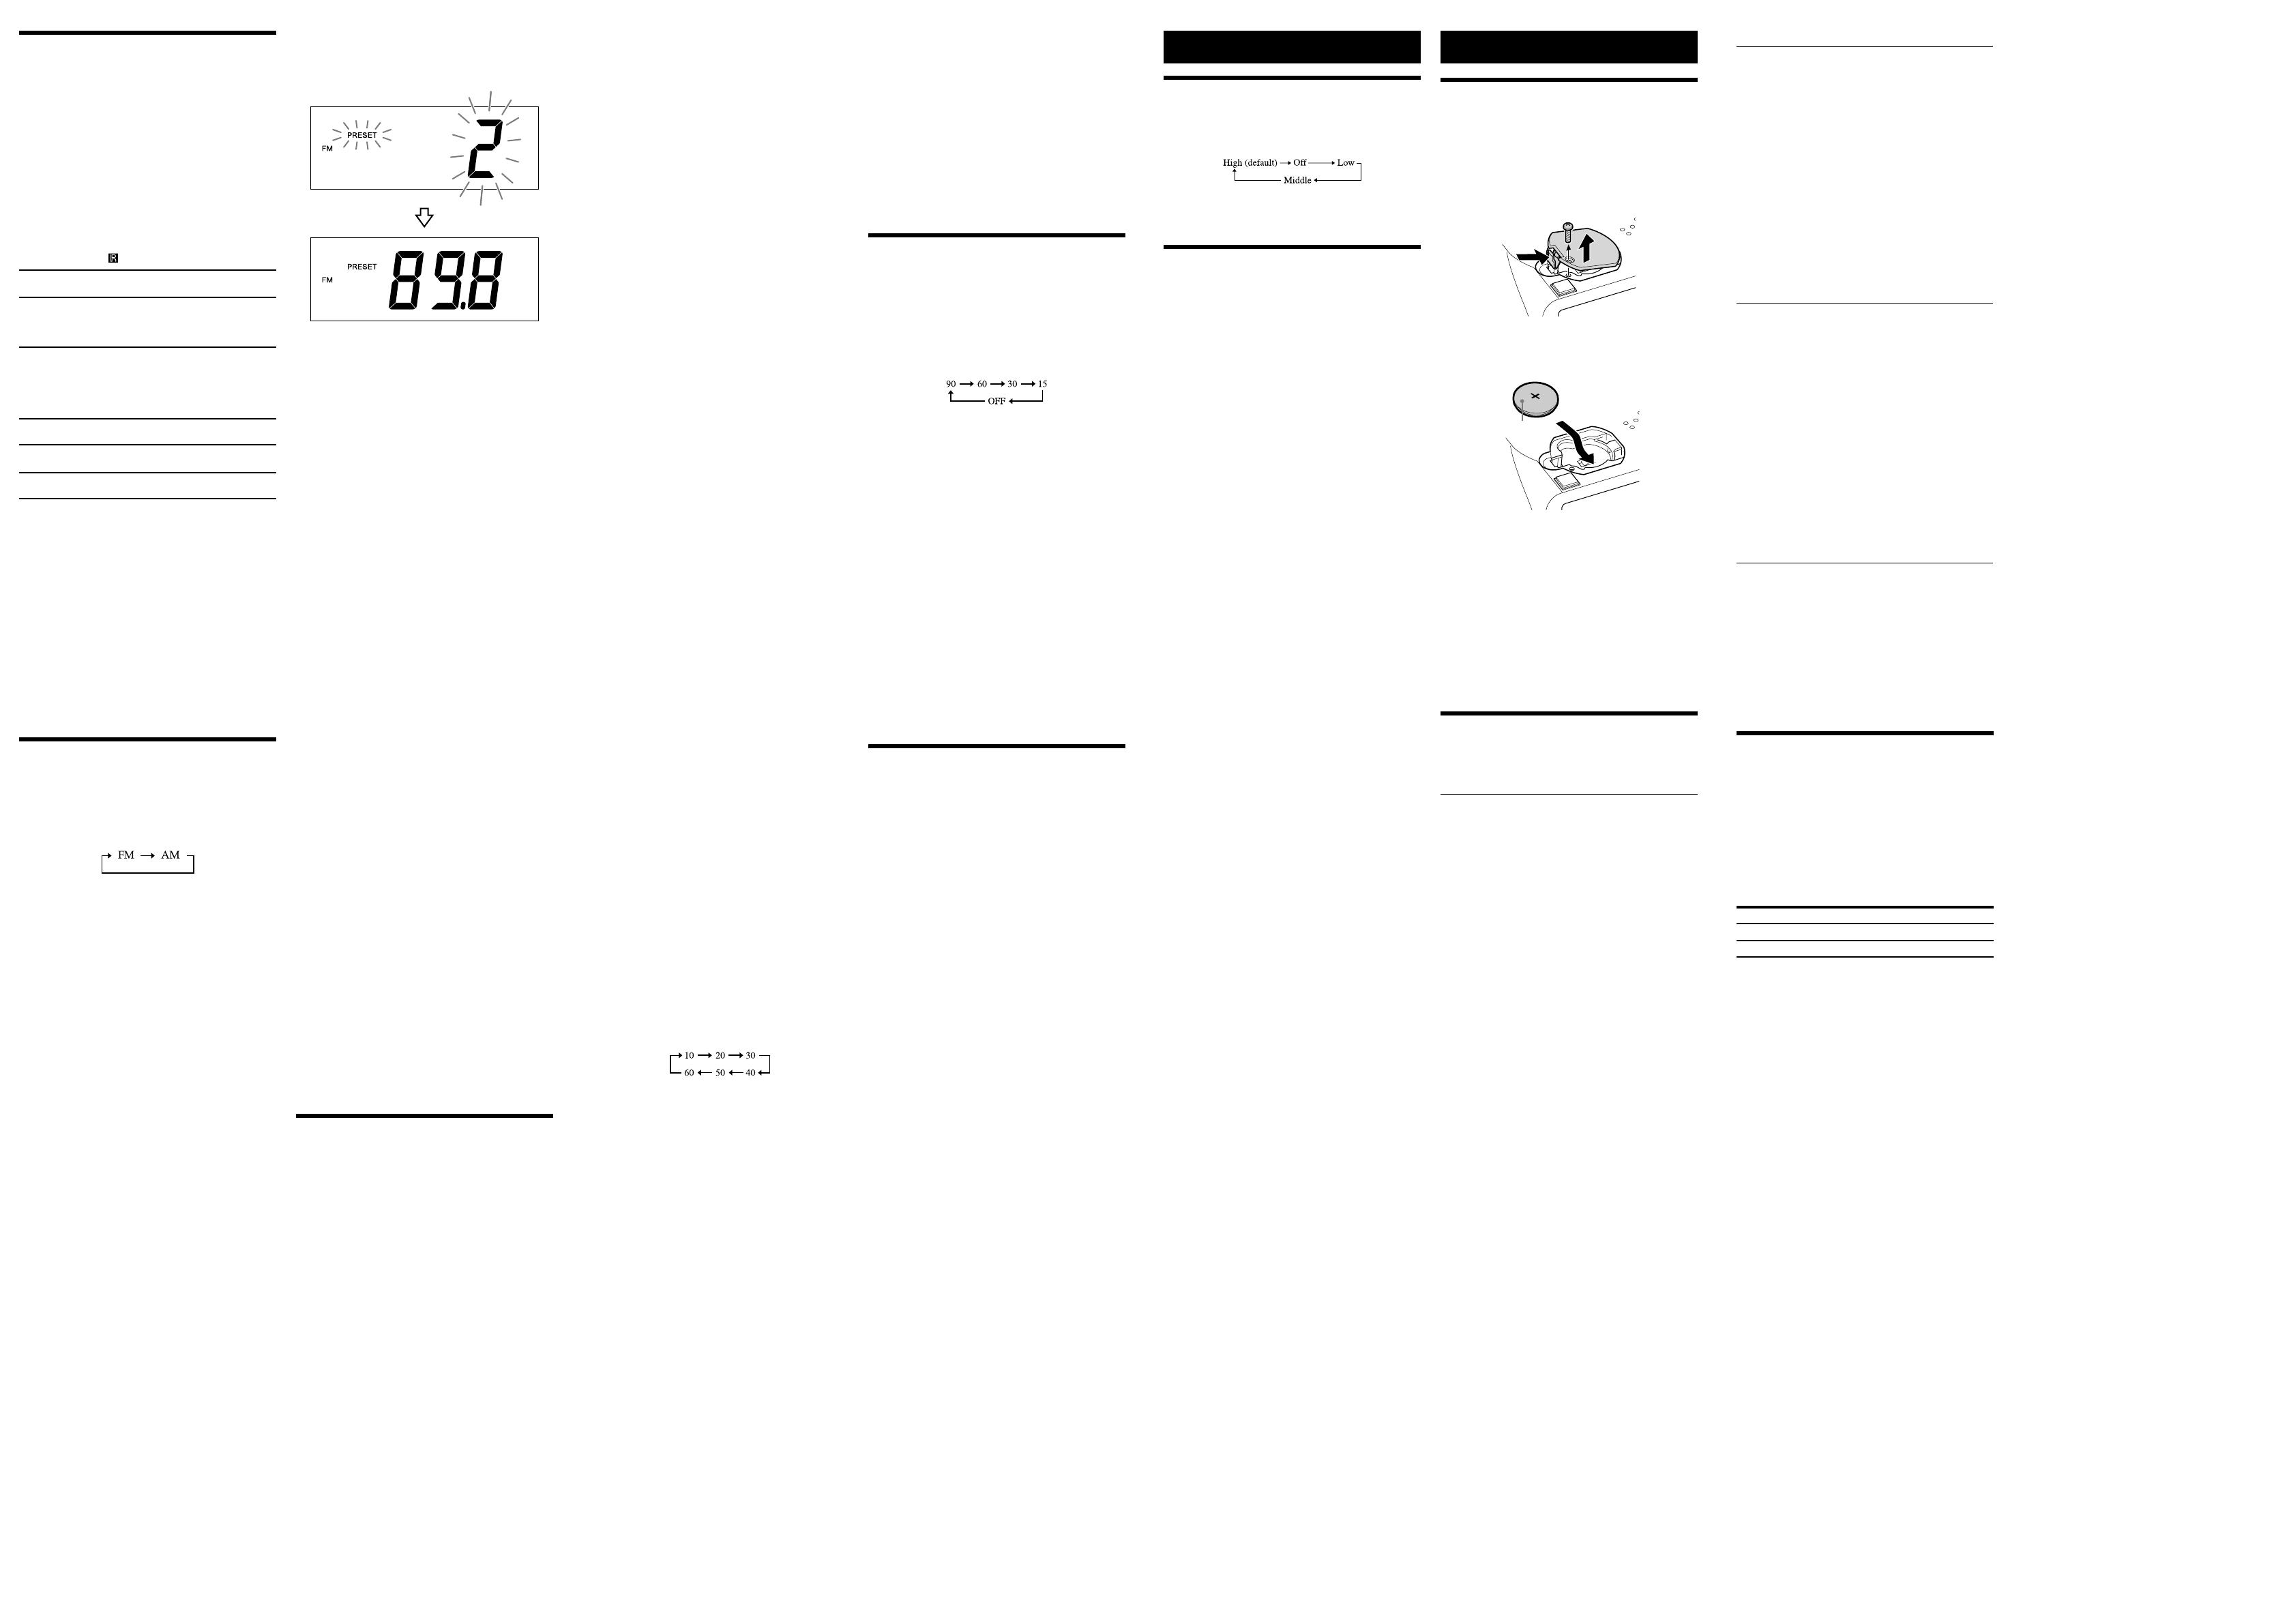
3 Press PRESET + or – to select the preset number,
then press DISPLAY/MEMORY.
Example: The following displays appear when you preset FM
89.8 MHz to preset number 2 for FM.
The display shows the frequency for about
10 seconds, then returns to the current time.
Tips
To preset another station, repeat these steps.
To cancel the preset number setting, press OFF instead of
DISPLAY/MEMORY in step 3.
Note
If you store another station with the same preset number, the
previously stored station will be replaced.
To tune in to a preset station
1 Follow steps 1 to 2 in “Manual tuning” and
select the AM or FM band.
2 Press CLOCK/MODE repeatedly to select
“PRESET.”
When using the remote to operate the unit, you can skip this
step, and directly operate step 3.
3 Press PRESET + or – to select the desired
preset number.
4 Adjust the volume using VOL + or –.
–Auto preset tuning
1 Follow steps 1 to 2 in “Manual tuning” and
select the AM or FM band.
2 Press and hold FM/AM until “AP” flashes in the
display.
3 Press DISPLAY/MEMORY.
The unit automatically presets the available stations in order.
Tip
To stop auto preset tuning, press FM/AM.
To switch the display when listening to
radio
When listening to radio, press DISPLAY/MEMORY repeatedly to
show the preset number, the frequency of the current station,
the date and month, then the year. The display then returns to
the current time.
Note
When listening to a station which has not been preset, no
preset number will be displayed.
To improve reception
FM: Extend the FM wire aerial fully to increase reception
sensitivity.
AM: Connect the supplied AM loop aerial to the unit. Rotate the
aerial horizontally for optimum reception.
Notes on radio reception
Do not place the AM loop aerial near the unit, power supply or
other AV equipment during use, as noise may result.
Keep digital music players or mobile phones away from the
AM loop aerial or the FM aerial, as this may lead to reception
interference.
When you are listening to the radio with an iPhone connected
to the unit, interference with radio reception may occur.
When you are listening to the radio while charging an iPhone,
interference with radio reception may occur.
Setting the alarm
This unit is equipped with 3 alarm modes—iPhone, radio and
buzzer. Set the clock to the current time before setting the alarm,
so that the alarm will sound at the correct time. (See “To set the
clock for the first time.”)
To set the alarm
1 Press and hold ALARM A or B.
“WAKE UP” appears and the hour flashes in the display.
2 Press ALARM TIME SET + or – repeatedly until
the desired hour appears.
To cycle the hour rapidly, press and hold ALARM TIME SET
+ or –.
3 Press ALARM A or B.
The minute flashes.
4 Repeat step 2 to set the minute.
5 Press ALARM A or B.
The days of the week flash.
6 Repeat step 2 to set the days of the week.
You can select the days from the following three options by
pressing ALARM TIME SET + or –:
Week day: MON TUE WED THU FRI
Weekend: SAT SUN
Every day: MON TUE WED THU FRI SAT SUN
7 Press ALARM A or B.
The alarm mode setting is entered.
8 Press ALARM TIME SET + or – repeatedly until
the desired alarm mode flashes.
You can choose one of 4 settings: “iPhone,” “FM,” “AM” or
“BUZZER.” Set the alarm mode as follows:
– iPhone: see “ To set the alarm as iPhone.”
– FM or AM: see “
To set the radio alarm.”
– BUZZER: see “ To set the buzzer alarm.”
Notes on the alarm in the event of a power
interruption
In the event of a power interruption, the buzzer alarm will last
about 5 minutes if the battery is not weak. However, certain
functions will be affected as follows:
The backlight will not light up.
If the alarm mode is set to iPhone or radio, it will change to
buzzer automatically.
If OFF on the unit is not pressed, the alarm will sound for
about 5 minutes.
If “” appears in the display, the alarm will not sound in the
event of a power interruption. Replace the battery if “”
appears.
The snooze function cannot be set during a power
interruption.
During a power interruption, each alarm will sound at the set
time only once.
Setting the sleep timer
You can fall asleep to music, etc. using the sleep timer. The unit
stops playback or radio automatically after a preset duration.
1 Press SLEEP while playing music or listening to
radio.
“SLEEP” appears and the sleep time flashes in the display.
2 Press SLEEP to set the sleep timer duration.
Each time you press SLEEP, the duration (in minutes)
changes as follows:
The display returns to the current time for about
4 seconds after you have finished the duration setting and
released SLEEP, then the sleep timer starts.
The unit plays for the duration you set, then stops.
Note
Any currently-playing optional component connected to the
AUDIO IN jack will continue playing back, although its sound
will be muted.
To stop listening before the
preset time
Press OFF.
To change the sleep timer setting
You can press SLEEP repeatedly to select the desired sleep timer
setting, even after the sleep timer has been activated.
To deactivate the sleep timer
Press SLEEP repeatedly to set the sleep timer to “OFF” in step 2.
Note
When the alarm time is set during the sleep timer duration,
the sleep timer will be deactivated automatically when the
alarm sounds.
Connecting optional
components
To listen to sound
You can enjoy sound from an optional component, such as a
portable digital music player, through the speaker of this unit. Be
sure to turn off the power of all components before making any
connections.
1 Firmly connect the line output jack of a
portable digital music player (or other
component) to the AUDIO IN jack on the rear
of the unit, using a suitable audio connecting
cable (not supplied).
2 Press AUDIO IN to activate the Audio-in
function.
“AUDIO IN” appears in the display.
3 Turn the connected component on.
4
Play the connected component.
Sound from the connected component is output from the
speaker of this unit.
5 Adjust the volume using VOL + or –.
To return to the radio
Press FM/AM.
The preset number followed by the frequency of the last station
appears in the display.
To return to the iPhone
Press .
To stop listening
Press OFF, and stop playback on the connected component.
Notes
The necessary type of audio connecting cable depends on the
optional component. Be sure to use the correct type of cable.
If the volume level is low, adjust the volume of the unit first. If
the volume is still too low, adjust the volume of the connected
component.
When you are watching TV or listening to the radio with an
optional component connected to the unit, the reception may
be poor.
Disconnect the audio connecting cable from the unit when it
is not in use.
When you listen to the radio with an optional component
connected, turn off the connected component to prevent
noise. If noise occurs, even when the component is turned off,
disconnect and place the optional component away from the
unit.
Operating an iPhone
1 Set the iPhone on the Dock connector.
The Dock connector can be tilted slightly.
For details, see “Using an iPhone with the unit.”
2 Press .
“iPhone” appears in the display.
The iPhone begins to play back.
If the iPhone does not start playing back, operate directly on
the iPhone.
You can operate the connected iPhone via this unit or the
iPhone itself.
3 Adjust the volume using VOL + or –.
To operate from a remote
control
Aim the remote at the (Remote sensor) of the unit.
(Play/Pause)
Start playing the iPhone. Press again to pause/resume playback.
(Forward)
Go to the next track.
Press and hold while listening to the sound to locate a
desired point.
(Backward)
Go back to the previous track. During playback, this
operation returns to the beginning of the current track. To
go back to the previous track, press twice.
Press and hold while listening to the sound to locate a
desired point.
MENU
Go back to the previous menu.
(Up)/ (Down)
Select a menu item or track for playback.
ENTER
Execute the selected menu item or begin playback.
Notes
If a pop-up message appears in the display of the iPod touch
or iPhone, see “About App.”
Some operations may differ or may not be available on some
models of iPhone.
If the iPhone is already playing when set on the unit, the
sound from the iPhone will be output from the unit speaker,
even if the unit was playing sound from another function.
If the battery of the iPhone is extremely low, charge it for a
while before operation.
Sony cannot accept responsibility in the event that data
recorded to an iPhone is lost or damaged when using the
iPhone connected to this unit.
For details of environmental conditions for operating an
iPhone, check the website of Apple Inc.
MENU, (Up), (Down), and ENTER button on the main unit
and/or on the supplied remote control will only work with the
Apple devices (iPhone/iPod touch) installed up to iOS 6. It will
not work with iOS 7 or later. In such case, please operate on
the screen of Apple devices directly.
O
perating the radio
–Manual tuning
1
Press FM/AM to turn on the radio.
2
Press FM/AM repeatedly to select the desired band.
Each time you press the button, the radio band toggles
between AM and FM as follows:
3
Press CLOCK/MODE repeatedly to select “TUNING.”
When using the remote to operate the unit, you can skip this
step, and directly operate step 4.
4 Press TUNE + or – repeatedly to tune to the
desired station.
5 Adjust the volume using VOL + or –.
To turn off the radio, press OFF.
Note
When the FM frequency step is 0.05 MHz, the frequency
display is accurate to within 0.1 MHz. For example, 88.00 MHz
or 88.05 MHz will be displayed as “88.0 MHz.” In this case, press
TUNE + or - once to change the frequency step, twice to
change the frequency display.
–Scan tuning
The unit automatically scans for AM or FM stations.
1 Follow steps 1 to 3 in “Manual tuning.”
2 Press and hold TUNE + or –.
+ : scans upward through the frequency bands.
–
:
scans downwards through the frequency bands.
Scanning starts from the currently-tuned frequency. When a
station is received, scanning stops.
3 Adjust the volume using VOL + or –.
–Preset tuning
You can preset up to 20 FM stations and 10 AM stations.
To preset a station
1
Follow steps 1 to 5 in “Manual tuning” and
manually tune into the station you wish to preset.
2 Press and hold DISPLAY/MEMORY for at least
2 seconds.
Other useful functions
Setting the brightness of
the display
Four levels of brightness are available by pressing SNOOZE/
BRIGHTNESS.
Even if brightness level is set to Off, it will change to Low while
the alarm is sounding.
Press and hold SNOOZE/BRIGHTNESS to turn off the display
directly.
About App
A dedicated Dock App for iPod touch/iPhone available at Apple
App Store.
Search for “D-Sappli” and download the free App to find out
more about the functions.
Features
D-Sappli includes various timer functions: Music Play Timer
and Sleep Timer.
Music Play Timer allows you to play/pause desired music at a
desired time. Sleep Timer allows you to specify a time at which
to stop music playback.
Music Play Timer and Sleep Timer are available only when D-
Sappli is activated.
D-Sappli can display a list of Radio Preset Stations
programmed in this unit.
You can rename the Radio Preset Stations, and change their
preset numbers on the D-Sappli. Preset numbers and order
will also be changed accordingly in the unit.
D-Sappli also includes a clock display enlarge feature.
You can synchronize time and date from the iPhone by simply
setting it on the Dock connector when D-Sappli is activated.
Notes
If the App to link with this unit is not downloaded to your iPod
touch/iPhone, a pop-up message prompting you to download
D-Sappli may appear repeatedly.
Deactivate the App’s link function to stop the pop-up
message.
To deactivate the App’s link function: Remove your iPod
touch/iPhone from the Dock connector. Press (to enter
the function for iPhone). Press and hold then OFF on the
unit at the same time for at least 2 seconds. (“OFF” appears in
the display to show that the App’s link function has been
deactivated.)
To re-activate the App’s link function, repeat the above steps.
(“On” appears in the display to show that the App’s link
function has been activated.)
General information
Replacing the battery of
the unit
1 Keep the AC adaptor connected to the wall
outlet and unit, then remove the screw of the
battery compartment on the bottom of the
unit, then open the battery compartment lid.
2 Remove the old battery and insert a new one
in the battery compartment with the side
facing up.
CR2032
3 Replace the battery compartment lid and
tighten the screw.
4 Press , FM/AM, AUDIO IN or SNOOZE/
BRIGHTNESS on the unit to turn “” off in the
display.
Notes
When you replace the battery, do not disconnect the plug
from the AC outlet. Otherwise, the current date, current time,
alarm and station presets will be erased.
If you are not going to use the remote for a long time, remove
the battery to avoid any damage that may be caused by
leakage or corrosion.
Troubleshooting
Should any problem persist after you have made the following
checks, consult your nearest Sony dealer.
General
The power does not turn on when the AC
adaptor is connected.
Make sure the AC adaptor is connected to the wall outlet
firmly.
There is no sound.
Make sure that the unit is connected to the AC power, and the
optional component is turned on.
Adjust the volume using VOL + or –.
Make sure that the optional component is correctly connected
to the unit.
The sound is low.
Adjust the volume using VOL + or –.
The sound is distorted.
Deactivate the equalizer function of the connected optional
component.
Lower the volume of the unit.
Sound skips or noise is heard.
Make sure that the optional component is correctly connected
to the unit.
Make sure that the optional component is not near a
television.
When the optional component is not in use with the unit,
disconnect the audio connecting cable from the AUDIO IN
jack.
The radio function of a connected optional
component does not work.
When an optional component equipped with radio or one
segment tuner is connected to the unit, its reception
sensitivity may be poor, resulting in no radio function.
Noise is heard.
Ensure that the unit is not near in-use portable phones, etc.
Disconnect the audio connecting cable from the AUDIO IN
jack when not in use.
The clock flashes “0:00” or “AM 12:00” due to
a power interruption.
The battery is low. Replace the battery. Remove the old
battery and install a new one.
The alarm of radio, iPhone or buzzer does
not sound at the preset alarm time.
Check that alarm “A” or alarm “B” is properly displayed.
The alarm of radio or iPhone is activated but
no sound comes on at the preset alarm time.
Check the alarm volume setting.
When daylight saving time (summer time)
begins, the clock does not employ the
daylight saving time (summer time)
automatically.
Make sure the clock is set correctly.
Press and hold OFF and DISPLAY/MEMORY on the unit
simultaneously for at least 2 seconds to activate the Auto DST/
summer time function.
When using an iPhone
There is no sound.
Make sure the iPhone is connected firmly.
Make sure that the connected iPhone is playing music.
Make sure that the function for iPhone is activated.
Check that the iPhone is compatible with this unit. (See
“Compatible iPod/iPhone models.”)
Operation is not performed.
Make sure the iPhone is connected firmly.
Check that the iPhone is compatible with this unit. (See
“Compatible iPod/iPhone models.”)
The iPhone does not charge.
Make sure the iPhone is connected firmly.
Make sure the AC adaptor is connected firmly.
Check that the iPhone is compatible with this unit. (See
“Compatible iPod/iPhone models.”)
Audio-in
There is no sound.
Make sure the audio connecting cable is connected firmly.
Make sure that the connected optional component is in
playback mode.
Increase the volume of the optional component without
causing sound distortion. To adjust the volume of the optional
component, refer to its user guide.
Make sure that the Audio-in function is activated.
The sound is low.
Check the volume of the connected optional component.
Increase the volume of the optional component without
causing sound distortion. To adjust the volume of the optional
component, refer to its user guide.
The sound is distorted.
Lower the volume of the optional component till the
distortion is not heard. To adjust the volume of the optional
component, refer to its user guide.
Remote control
The remote does not function.
Replace the battery in the remote with a new one if it is weak.
Make sure that you are pointing the remote at the remote
sensor on the unit.
Do not cover or place any objects directly in front of the
remote sensor.
Remove any obstacles in the path between the remote and
the unit.
Make sure the remote sensor is not exposed to strong light,
such as direct sunlight or fluorescent lamp light.
If the problem persists, consult your nearest Sony dealer.
Specifications
Time display
Switching between 24-hour system (default) and 12-hour
system.
iPhone
DC out: 5 V
MAX: 1 A
Radio
Frequency range
Band Frequency Frequency step
FM 87.5 MHz - 108 MHz 0.05 MHz
AM 531 kHz - 1,602 kHz 9 kHz
General
Speaker
Approx. 40 mm dia.
Input
AUDIO IN jack (ø 3.5 mm stereo minijack)
Power output
Mono 0.8 W (at 10% harmonic distortion)
Power source
DC IN 6V (with supplied AC adaptor (AC 230 V, 50 Hz))
For clock back up: 3 V DC, CR2032 battery (1)
Dimensions
Approx. 126 mm × 92 mm × 100 mm (w/h/d)
including projecting parts and controls
Mass
Approx. 482 g
Supplied accessories
Remote control (with a lithium battery) (1)
AC adaptor (1)
AM loop aerial (1)
Startup Guide (1)
Reference Guide (this document) (1)
Compatible iPod/iPhone models
The compatible iPod/iPhone models are as follows.
Update the software of the iPod/iPhone to the latest version
before using it with this unit.
iPhone 5s
iPhone 5c
iPhone 5
iPod touch (5th generation)
iPod nano (7th generation)
*
*
The remote command of “MENU,” “,” “,” and “ENTER” will
only work with iPhone and iPod touch.
Design and specifications are subject to change without notice.


