Page is loading ...

TECHNICAL DATA
AND
SERVICE MANUAL
IMPACT WRENCH
WR 14VB
SPECIFICATIONS AND PARTS ARE SUBJECT TO CHANGE FOR IMPROVEMENT
LIST No. E706 Feb. 2005
W
MODEL
WR 14VB
Hitachi
Power Tools

REMARK:
Throughout this TECHNICAL DATA AND SERVICE MANUAL, a symbol is
used in the place of company name and model name of our competitor.
The symbol utilized here is as follows:
Symbol Utilized
Competitor
Company Name
Model Name
C MAKITA
TW0200

Page
CONTENTS
1. PRODUCT NAME ........................................................................................................................... 1
2. MARKETING OBJECTIVE ............................................................................................................. 1
3. APPLICATIONS .............................................................................................................................. 1
4. SELLING POINTS .......................................................................................................................... 1
4-1. Selling Point Descriptions ............................................................................................................... 2
5. SPECIFICATIONS .......................................................................................................................... 4
5-1. Specifications .................................................................................................................................. 4
5-2. Optional Accessories ...................................................................................................................... 5
6. COMPARISONS WITH SIMILAR PRODUCTS .............................................................................. 7
6-1. Specification Comparisons ............................................................................................................. 7
6-2. Tightening Torque ........................................................................................................................... 8
6-3. Appropriate Tightening Torque for Bolts .......................................................................................... 9
6-4. Tightening Torque Characteristics when Using An Extension Cord .............................................. 10
7. PRECAUTIONS IN SALES PROMOTION ................................................................................... 10
7-1. Safety Instructions ........................................................................................................................ 10
7-2. Tightening Torque Inspection Prior to Operation ........................................................................... 11
7-3. Tightening Torque Variation ........................................................................................................... 11
7-4. Temperature Rise ........................................................................................................................ 12
8. OTHER PRECAUTIONS .............................................................................................................. 12
9. REPAIR GUIDE ............................................................................................................................ 13
9-1. Disassembly ................................................................................................................................. 13
9-2. Reassembly .................................................................................................................................. 16
9-3. Insulation Tests ............................................................................................................................. 18
9-4. No-load Current Value .................................................................................................................. 19
10. STANDARD REPAIR TIME (UNIT) SCHEDULES ..................................................................... 20
Assembly Diagram for WR 14VB

--- 1 ---
1. PRODUCT NAME
Hitachi Impact Wrench, Model WR 14VB
2. MARKETING OBJECTIVE
Twenty years have passed since the sales start of the conventional Model WH 14 and the demand has been
reduced. The new impact wrench Model WR 14VB is the upgraded version of the Model WH 14, featuring the
class-top tightening torque by the computer-analyzed optimum impacting operation, compact body, and durability
in order to enter the market of wood fastening tools. The Model WR 14VB is powerful and novel thanks to the 3-D
CAD engineering as well as the double-layer molding and improved handle grip to plainly differentiate it from the
competitors. Please expand our market share with this Model WR 14VB.
3. APPLICATIONS
Tightening/loosening of bolts, nuts, etc.
Tightening anchor nuts
[Applicable markets]
Wooden construction industry: Tightening of bolts, anchor nuts, etc.
Construction industry: Assembly of scaffolding, tightening/loosening of formwork bolts
Manufacturing industry: Tightening/loosening of bolts for automobiles, rolling stock, shipbuilding, agricultural
machinery and tools, construction machinery, etc.
Utility industry: Assembly and installation of electric equipment, plumbing facilities, air conditioning (duct
assembly etc.), sanitary fixtures and various other facilities
Others: Tightening of bolts for lightweight steel construction such as prefabricated houses
4. SELLING POINTS
Stronger screw connection
thanks to the cylindrical housing
containing an insert screw
Housing is covered with
elastomer entirely.
Powerful motor
Higher durability thanks to
the metallic bearing bushing
Class-top tightening torque
Slip-resistant and comfortable
soft grip handle
Speed change lever is
selectable between high or
low speed according to the
operation.
Forward/reverse
changeover pushing
button
Steplessly variable speed
trigger switch
Grip end is shaped like a
finger stopper for portability

--- 2 ---
4-1. Selling Point Descriptions
(1) Class-top tightening torque
With the powerful motor and the computer analysis, the Model WR 14VB gives optimum impact at
tightening screws and the tightening torque is the highest level in this class.
(2) While the conventional Model WH 14 has the resin housing directly secured with screws, the Model WR
14VB has the housing containing a brass insert screw for secure screw connection with the aluminum
hammer case (the screw tightening torque is 2 times greater than the Model WH 14). Thus the Model
WR 14VB has higher durability.
Hammer case
(aluminum)
Screw (M5 bolt)
WR 14VB
WH 14
Screw (M5 bolt)
Housing (resin)
Insert screw (brass)
Inner cover
(aluminum)
Hammer case
(aluminum)
Inner cover
(aluminum)
Housing (resin)

--- 3 ---
(3) Higher durability thanks to the metallic bearing bushing
A metallic bearing bushing is built in and the outside is covered with resin tail cover for higher durability.
The resin tail cover secures the bearing bushing and also prevents the CB cap from loosening.
Bearing bushing (metal)
(4) Slip-resistant and comfortable soft grip handle
The grip of the Model WR 14VB is soft, slip-resistant and comfortable thanks to the soft material (elastomer
resin) covered on the handle. The Model WR 14VB gives minimum fatigue to the operator's hand even if it is
operated for a long time.
(5) Housing is covered with elastomer entirely
The Model WR 14VB gives no scratch on the floor etc. where it is placed because the housing is covered with
elastomer entirely. In addition, the elastomer-covered housing prevents the Model WR 14VB from slipping on
a slanted surface such as a roof.
(6) Steplessly variable speed trigger switch and speed change lever
The speed can be controlled by varying the amount that the trigger switch is pulled from 0 to 2,300 rpm
steplessly. In addition, the speed change lever is selectable between high or low speed for the tightening
torque suitable for the operation. (Refer to "6-2. Tightening Torque".)
(7) Grip end is shaped like a finger stopper for portability
The grip end is thickened to make it as a finger stopper for portability.
CB cap Tail cover (resin)

--- 4 ---
Standard accessory
5. SPECIFICATIONS
5-1. Specifications
Model
WR 14VB
Capacity
Item
Ordinary bolt M10 (3/8") to M18 (23/32")
High-strength bolt M8 (5/16") to M14 (9/16")
Tightening torque
250 N
•
m 2,550 kgf
•
cm (2,210 in-lbs.)
Tip condition
12.7 mm (1/2") (Width across flat of the socket mounting portion)
Type of motor
Single phase AC commutator motor
Enclosure
Polycarbonate resin + Elastomer ...................................................... Housing
Polycarbonate resin .......................................................................... Handle cover
Polyamide resin ................................................................................ Tail cover
Aluminum die casting ........................................................................ Hammer case
Rubber .............................................................................................. Bumper
Type of switch
Trigger switch with forward reverse changeover pushing button
Power consumption
420 W
Full-load current
4.4 A
Impact rate
Low speed: 0 to 2,100 min
-1
High speed: 0 to 2,800 min
-1
Main body
2.2 kg (4.8 lbs.) (Excludes cord and socket)
Packaged
4.5 kg (9.9 lbs.)
Overall length x height
248 mm x 231 mm (9-49/64" x 9-3/32")
Center height
35 mm (1-3/8")
Package
Cord
Side handle (Excludes U.S.A. and Canada)
Plastic case (For certain areas)
Weight
Handle configuration
T-type
No-load rotation speed
Low speed: 0 to 1,800 min
-1
(0 to 1,800 revolutions/minute)
High speed: 0 to 2,300 min
-1
(0 to 2,300 revolutions/minute)
Type
Nominal cross-
sectional area
Outside diameter
Length
Corrugated fiberboard box
Plastic case (For certain areas)
2-core cabtire cable
0.75 mm
2
7.4 mm
5 m
Insulation method Double insulation
Carbon brush
Mounted outside

--- 5 ---
Shape B Shape C Shape D
5-2. Optional Accessories
(1) Each dimension and applicable bolt for each hexagon socket
(2) Each dimension and applicable bolt for each long hexagon socket
Shape B Shape C
Shape D
955139
955140
955141
955149
955142
955150
955143
955151
991480
955144
955146
955147
M 8
M 10
M 10
M 12
M 12
M 14
M 16
M 10
M 12
M 12
M 14
M 14
M 16
M 18
13
14
17
17
19
19
21
21
21
22
24
27
W 3/8"
W 3/8"
W 7/16"
W 7/16"
W 1/2"
W 1/2"
W 1/2"
W 5/8"
L
1
20
20
24
24
24
24
24
24
24
24
25
25
52
52
52
75
52
75
52
75
125
52
52
75
13 mm
14 mm
17 mm
17 mm
19 mm
19 mm
21 mm
21 mm
21 mm
22 mm
24 mm
26 mm
B
B
B
B
B
B
D
D
D
D
D
D
M 8
M 12
Hexagon socket
12.7
Square
drive
dimension
Sq (mm)
Part
name
Code
No.
Nominal diameter of applicable bolts
Dihedral
width
H (mm)
Shape
Socket primary dimensions
(mm)
L
ISO
(Ordinary)
ISO
(Small type)
Inch
screw
High-tension
L
2
34
34
34
57
34
57
34
57
107
34
34
57
12.7
Square
drive
dimension
Sq (mm)
Part name
Code
No.
Nominal diameter of applicable bolts
Dihedral
width
H (mm)
Shape
Socket primary
dimensions (mm)
ISO
(Ordinary)
ISO
(Small
type)
Inch
screw
High-
tension
14
17
19
21
22
23
24
26
27
9
8
9
10
14
15
15
15
16
40
32
34
36
40
40
40
40
40
14 mm
17 mm
19 mm
21 mm
22 mm
23 mm
24 mm
26 mm
27 mm
B
C
C
D
D
D
D
D
D
W 3/8"
W 7/16"
W 1/2"
W 9/16"
W 5/8"
M 12
M 16
873540
873536
873624
873626
873627
873628
873629
873630
985195
Hexagon socket
M 10
M 12
M 14
M 16
M 18
M 10
M 12
M 14
M 16
M 18
M 20
L
1L

--- 6 ---
(3) Extension bar (Code No. 873633)
(4) Corner attachment (EW-14R)
(5) Universal joint (Code No. 986062)
(6) Holster (Code No. 307824)

--- 7 ---
Maker
•
Model
Item
Capacity
Ordinary bolt
High-tension bolt
Max. tightening
torque
6. COMPARISONS WITH SIMILAR PRODUCTS
6-1. Specification Comparisons
N
.
m
kgf
.
cm
in
.
lbs
High speed
Note 1) The cord, socket and side handle are excluded.
Square drive dimension
min
-1
No-load rotation
speed
Impact rate
Center height
min
-1
Main body weight Note 1)
mm
mm
kg
Lock torque
Rated current
Max. efficiency
Soft handle
m
Type of switch
Insulation method
Carbon brush
Cord length
Overall length x height
Motor specifications
No-load rotation speed
Maximum output
Motor
characteristics
mm
N
.
m
min
-1
W
A
%
N
.
m
kgf
.
cm
in
.
lbs
Low speed
High speed
Low speed
High speed
Low speed min
-1
min
-1
M 10 to M 16
M 12 to M 16
196
2,000
1,730
12.7 (1/2")
2,100
2,600
HITACHI
WH 14
270 x 209
(10-5/8" x 8-15/64")
Tumbler switch with
forward/reverse
changeover pushing
button
21,600
360
7.0
3.8
33.6
35 (1-3/8")
2.3 (5.1 lbs.)
Single phase AC
commutator motor
Double insulation
Mounted outside
2.5 (8.2 ft)
Not provided
M 10 to M 18
M 8 to M 14
250
2,550
2,210
185
1,880
1,640
12.7 (1/2")
0 to 2,300
0 to 1,800
0 to 2,800
0 to 2,200
HITACHI
WR 14VB
248 x 231
(9-49/64" x 9-3/32")
Steplessly variable
speed trigger switch
with forward/reverse
changeover pushing
button and speed
change lever
25,000
420
9.3
4.4
44.0
35 (1-3/8")
2.2 (4.8 lbs.)
Single phase AC
commutator motor
Double insulation
Mounted outside
5 (16.4 ft)
Provided
M 10 to M 16
M 8 to M 12
200
2,040
1,770
150
1,530
1,330
12.7 (1/2")
0 to 2,200
0 to 1,700
0 to 2,200
0 to 1,600
C
250 x 219
(9-27/32" x 8-5/8")
Steplessly variable
speed trigger switch
with forward/reverse
changeover pushing
button and speed
change lever
24,500
380
4.0
35 (1-3/8")
2.1 (4.6 lbs.)
Single phase AC
commutator motor
Double insulation
Mounted outside
5 (16.4 ft)
Provided
<Table 1>

--- 8 ---
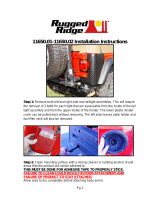
6-2. Tightening Torque
Figure 1 shows a comparison of tightening torque with the conventional Model WH 14 and C.
Bolt: M16 x 55 high tension bolt
Steel plate: SS34P, 25 mm in thickness
Tightening time (S)
Fig. 1 Comparison of tightening torque when tightening M16 high tension bolts
WR 14VB (Low speed)
The Model WR 14VB provides higher tightening torque than C
thanks to the operation with the optimum impact timing.
WH14
C
3500
(3035 in-lbs.)
kgf
.
cm
2000
(1734 in-lbs.)
2500
(2168 in-lbs.)
3000
(2602 in-lbs.)
1500
(1301 in-lbs.)
WR 14VB (High speed)
1000
(867 in-lbs.)
500
(434 in-lbs.)
0
N
.
m

--- 9 ---
115
230
400
640
994
1370
316
625
1090
1735
2700
3720
•
Diameter and effective sectional areas of bolts
6-3. Appropriate Tightening Torque for Bolts
Generally speaking, the appropriate tightening torque for a bolt can be determined by the strength grade of the
bolt and the material tightened. Tables 2, 3 and 4 below list data relative to the strength grade of various bolts and
the appropriate tightening torque. For further reference, appropriate tightening torque is calculated with the
following formula. Study and use this formula for accurate selection of tightening torque.
T = k
•
d
•
p
T: Appropriate tightening torque (kgf
.
cm)
d: Nominal diameter for the bolt (cm)
p: Recommended axial tightening force to be applied to the bolt (kg)
p = Rated axial stress (kg
.
mm
2
) x 0.8 x Effective sectional area of the bolt (mm
2
)
k: Torque coefficient (0.17)
Strength grade
Rated axial stress (kgf
.
mm
2
)
Material
Heat treatment
4.8 8.8 10.9 12.9
29.1 58.2 79.2 95
Carbon steel such as SS and SC
Special alloy steel such as SNC, SCM and SNCM
Not treated Treated
....
Hard material
Nominal diameter of bolt
Effective sectional area
of bolt (mm
2
)
M8 x 1.25
36.6
M10 x 1.5
58.0
M12 x 1.75
84.3
M14 x 2.0
115.0
M16 x 2.0
157.0
M18 x 2.5
192
•
Tightening torque according to strength grade of bolts
<Table 2>
•
Strength grade and rated axial stress of bolts
<Table 3>
Nominal
diameter of bolt
Strength grade
M8 x 1.25
M10 x 1.5
M12 x 1.75
M14 x 2.0
M16 x 2.0
M18 x 2.5
4.8 6.8 8.8 10.9
<Table 4>
12.9
174
345
600
960
1493
2054
230
460
800
1280
1990
2740
380
750
1310
2075
3240
4455
6.8
43.7

--- 10 ---
6-4. Tightening Torque Characteristics when Using An Extension Cord
Figure 2 shows relationship between time and tightening torque in high-speed mode when using an extension
cord. While the data are useful for handy reference, actual tightening torque will vary depending on tightening
conditions.
Fig. 2 Tightening torque characteristics when using an extension cord
When using a 60-m
extension cord
Bolt: M16 x 55 high tension bolt
Steel plate: SS34P, 25 mm in thickness
Tightening time (S)
When using a 30-m
extension cord
When using no
extension cord
7. PRECAUTIONS IN SALES PROMOTION
7-1. Safety Instructions
In the interest of promoting the safest and most efficient use of the Model WR 14VB by all our customers, it is very
important that at the time of sale the salesperson carefully ensures that the buyer seriously recognizes the
importance of the contents of the Handling Instructions, and fully understands the meaning of the precautions
listed on the Caution Plate and Name Plate attached to each tool.
7-1-1. Handling Instructions
Salespersons must be thoroughly familiar with the contents of the Handling Instructions in order to give pertinent
advice to the customer.
7-1-2. Caution Plates
(1) The following precautions are listed on the Name Plate or Caution Plate attached to the main body of each tool.
For Singapore
3500
(3035 in-lbs.)
kgf
.
cm
2000
(1734 in-lbs.)
2500
(2168 in-lbs.)
3000
(2602 in-lbs.)
1500
(1307 in-lbs.)
500
(434 in-lbs.)
1000
(867 in-lbs.)
0
N
.
m

--- 11 ---
7-2. Tightening Torque Inspection Prior to Operation
The output tightening torque of the Model WR 14VB is higher than the rated tightening torque of certain bolts.
Accordingly, if the tightening time is prolonged for such bolts, it could cause damage to their threads or, in the
worst case, cause them to be sheared off. (This phenomenon is common to all existing impact wrenches.)
The customer should be advised to carry out several bolt tightening operations and adjust the tightening time as
necessary by measuring the tightening torque before commencing continuous operation.
7-3. Tightening Torque Variation
The tightening torque of an impact wrench may vary slightly in accordance with the factors described below.
Salespersons are requested to advise the customer to confirm that appropriate tightening torque is obtained by
measuring the torque at the beginning of the tightening operations, and as necessary during tightening
operations. In addition, the torque values shown in Para. 6-2, 6-3 and 6-4 above are useful as a handy reference,
and may be utilized as tentative standards.
(1) Voltage
The tightening torque of an impact wrench is influenced by voltage. For example, the tightening torque will be
reduced to about 90% if the Model WR 14VB is operated with 90% of the rated voltage. The line voltage may
be reduced by the use of a long extension cord depending on the work sites. Take the following
countermeasures against voltage reduction caused by the resistance of an extension cord and the load
current.
Decrease the resistance of an extension cord.
Use an extension cord which is as short as possible and has a thick core.
Compensate for reduction of the voltage by using a step up transformer.
At this time, prevent the plug voltage of the main body from exceeding the rated voltage.
Advise the customer to use an extension cord which is as thick as possible (cross sectional area of the core of
the extension cord: 1.25 mm
2
or larger) if it is unavoidable to use a long extension cord on a building site. In
addition, recommend the customer to use a step up transformer to step up the voltage by the amount of
reduction previously.
(2) Effects of low ambient temperatures
The tightening torque required may be reduced at low ambient temperatures or under the influence of grease
and different torque coefficients (dependent on manufacturing and finishing processes, and specified by bolt
manufacturers).
(3) Different bolt diameter
Differences in bolt diameter will cause variation of the required levels of tightening torque. Generally speaking,
higher tightening torque is required for large diameter bolts.
(4) Different materials being tightened
When a bolt is tightened into a soft material such as aluminum, plastic, wood, etc., the tightening torque is
considerably less than when the bolt is tightened into a hard material such as steel.

--- 12 ---
(5) Different tightening conditions
The tightening torque may vary in accordance with bolt torque coefficient (dependent on manufacturing and
finishing processes, and specified by bolt manufacturers), bolt grade and bolt length, even though the
dimensions of the bolts are the same. Tightening torque may also vary depending on the surface finishing
state of tightening materials (steel, aluminum, etc.) and materials to be tightened. In addition, if there is a seal
packing or a clearance between tightening materials, the tightening torque is decreased.
(6) Wear and looseness of the socket
With extended use, the hexagonal portion of the socket which is fitted to the head of the bolt and the
hexagonal portion which is fitted onto the anvil in the main body will become worn and loose. Wear and
looseness will cause a proportionate loss of tightening torque. In addition, use of an incorrect size socket will
also result in decreased torque.
(7) Bolt and nut rotate together
Tightening torque that can be achieved will be considerably decreased if the bolt and the nut rotate together
during the tightening operation. The customer should be advised to carefully observe the operation and
ensure this does not occur.
7-4. Temperature Rise
If the Model WR 14VB is used for tightening bolts which require long time to be tightened continuously, it will
cause temperature rise of the motor and burnout subsequently. Advise the customer to perform no-load operation
for several minutes to cool the motor if the outside of the main body becomes hot.
8. OTHER PRECAUTIONS
(1) Check for cracks or other damage on the socket
Cracks or any other faults on the socket are very hazardous and decrease the tightening torque. Advise the
customer to ensure that there are no abnormalities on the socket before operation.
(2) Socket dimensions
Without fail, utilize an appropriate socket which matches the bolt dimensions. If the clearance between the
socket and the nut is large, it will not only cause insufficient tightening torque but could also easily cause
damage to the socket. Please refer to Para. 5-2 for appropriate socket dimensions.
(3) Hammering section lubrication
Grease (Doubrex 251, optional accessory) is utilized in the hammering section.
Frequent or continuous use of the tool will cause excessive temperature rise of the hammering section,
resulting in depletion of the grease and subsequent increased wear of components which will, in turn, cause
loss of tightening efficiency. Accordingly, it is necessary to periodically replenish the grease in the hammering
section to ensure proper lubrication of moving and sliding components.

--- 13 ---
9. REPAIR GUIDE
The procedures and the precautions in disassembly and reassembly are described below.
The [bold] numbers correspond to the item numbers in the Parts List and the exploded assembly diagram of the
Model WR 14VB.
9-1. Disassembly
(1) Removal of the hammer case assembly
(a) Removal of the Hammer Case Ass'y [3]
Remove the four Seal Lock Hex. Socket Hd. Bolts M5 x 40 [2]. Supporting the Hammer Case Ass'y [3], tap
the tip of the Anvil [6] with a wooden hammer to remove the Hammer Case Ass'y [3]. Remove Gasket (A)
[20] from between the Hammer Case Ass'y [3] and the Inner Cover [21].
(b) Removal of the Anvil [6]
Remove the Hammer Case Ass'y [3]. Then the Anvil [6] can be removed from the bearing portion of the
Hammer Case Ass'y [3].
(c) Removal of the Ring Gear [18]
Tap the end surface of the Hammer Case Ass'y [3] with a wooden hammer to remove the Ring Gear [18].
If the Ring Gear [18] cannot be removed, warm up the Hammer Case Ass'y [3] then tap it with a wooden
hammer to remove the Ring Gear [18].
(2) Removal of the Spring [11]
Push the click of the Hammer [8] with a hand press and keep it at the position where the Spring [11] is
compressed fully. Remove the two Steel Balls D6.35 [7] from the steel ball guide at the cam portion of the
Spindle [16] and the Hammer [8] with a flat-blade screwdriver. Then release the hand press and remove the
Hammer [8] from the Spindle [16] to remove the Spring [11]. Be careful not to lose the twenty-nine Steel Balls
D3.97 [9] and Washer (B) [10] mounted between the Hammer [8] and the Spring [11] during disassembly.
Fig. 3
Fig. 4
[1]
[3]
[6]
[18]
[20]
[21]
[2]
Hammer click
Steel ball guide
Steel ball
Spindle cam top
Hammer
Spindle

--- 14 ---
(3) Removal of the Armature [25]
Remove the Tapping Screw (W/Flange) D4 x 20 (Black) [47] from the Tail Cover [46] to remove the Tail Cover
[46]. Remove the Brush Cap [55] and the Carbon Brushes [56]. Then the Armature [25] can be removed
together with the Inner Cover [21] from the Housing Ass'y [58]. At this time, be careful not to lose the Rubber
Washer [44] mounted between Bearing Bushing (B) [45] (press-fitted into the Housing Ass'y [58]) and the ball
bearing (at the commutator side of the Armature [25]). Be careful not to lose the Felt Packing [22] and the
Packing Washer [23] when removing the Armature [25] from the Inner Cover [21].
(4) Removal of the Switch [36] and the Cord [52]
Remove the Tapping Screw (W/Flange) D4 x 35 (Black) [33] from the Handle Cover [34] to remove the Handle
Cover [34] and Pushing Button (A) [35]. Remove the internal wires of the Choke Coil (White) [30] or the
Internal Wire (White) [29], Choke Coil (Black) [32] or the Internal Wire (Black) [31], Noise Suppressor Ass'y
[38], Diode Switch [48] and Stator [28] from the Switch [36] by inserting the pin of the special jig (Model J-86)
into each mounting hole of the internal wires and warping the leaf spring of the Switch [36] until each internal
wire is removed. Loosen the screw mounted to the Switch [36] with a small flat-blade screwdriver and remove
the internal wire of the Cord [52]. Then the Switch [36] can be removed. Remove the two Tapping Screws
(W/Flange) D4 x 16 [49], Cord Clip [50] and Cord Armor [51]. Then the Cord [52] can be removed.
Fig. 5
Fig. 6
[21]
[23]
[24]
[25]
[58]
[47]
[22]
[7]
[9]
[10]
[12]
[16]
[8]
[45]
[44]
[46]
[55]
[56]
[17]
[15]
[11]

--- 15 ---
Fig. 7
[33]
[35]
[36]
[34]
[37]
[52]
[38]
[48]
[50]
[51]
[49]
[31]
[32]
[28]
[30]
[29]
Fig. 8
[NOTE] If the leaf spring is warped excessively, it may be deformed permanently and the contact pressure with
the internal wires may be decreased. If the clearance shown in Fig. 9 is more than 0.5, replace the leaf
spring with new one.
Fig. 9

--- 16 ---
9-2. Reassembly
Reassembly can be accomplished by following the disassembly procedures in reverse. However, special
attention should be given to the following items.
(1) Reassembly of the housing assembly
(a) Mounting the switch
Pay attention to the relationship between the terminal numbers of the Switch [36] and the colors of the
internal wires.
Fig. 11 Wiring diagram
Fig. 10
With noise suppressor type
DIODE SWITCH: BLACK
REVERSING UNIT
OTHER TYPE
REVERSING UNIT

--- 17 ---
(b) Mounting the diode switch
The Diode Switch [48] is equipped with a high-speed/low-speed switch and a diode. Mount the Diode
Switch [48] to the specified position of the Housing Ass'y [58] as shown in Fig. 12. At this time, position the
high-speed/low-speed switch in the same direction of "H" indicated on the Housing Ass'y [58].
Fig. 13
[21]
[23]
[25]
[22]
Diode
Housing
High-speed/low-
speed switch
Fig. 12
(2) Reassembly of the hammer case assembly
Reassembly of the hammer
(a) Put the twenty-nine Steel Balls D3.97 [9] in between the Hammer [8] and Washer (B) [10].
(b) Mount the Spring [11] and Washer (A) [12] to the Hammer [8] then insert the Spindle [16] into it. Push the
click of the Hammer [8] with a hand press and keep it at the position where the Spring [11] is compressed
fully. At this time, push the Hammer [8] so that the Spindle [16] cam top is aligned with the steel ball guide
at the Hammer [8].
(c) Put the two Steel Balls D6.35 [7] in the steel ball guide. Check that these Steel Balls D6.35 [7] are in the
cam groove. Then release the hand press.
(3) Mounting direction of the packing washer
Insert the Packing Washer [23] into the Inner Cover [21] in the proper direction together with the Felt Packing
[22] when mounting the Armature [25] to the Inner Cover [21].
/