American Standard 4433.350.002 Installation guide

Category
Sanitary ware
Type
Installation guide

This manual is also suitable for

Installation
Instructions
Certified to comply with ANSI A112.18.1M
4433.350
4433.350F15
CAUTION
1
Turn off hot and cold water
supplies before beginning.
Plumbers' Putty or Caulking
Adjustable Wrench
Phillips Screwdriver
Channel Locks
Recommended Tools
Thank you for selecting American-Standard...the benchmark
of fine quality for over 100 years.
To ensure that your installation proceeds smoothly--please
read these instructions carefully before you begin.
SINGLE LEVER
SEMI-PROFESSIONAL
KITCHEN FAUCET
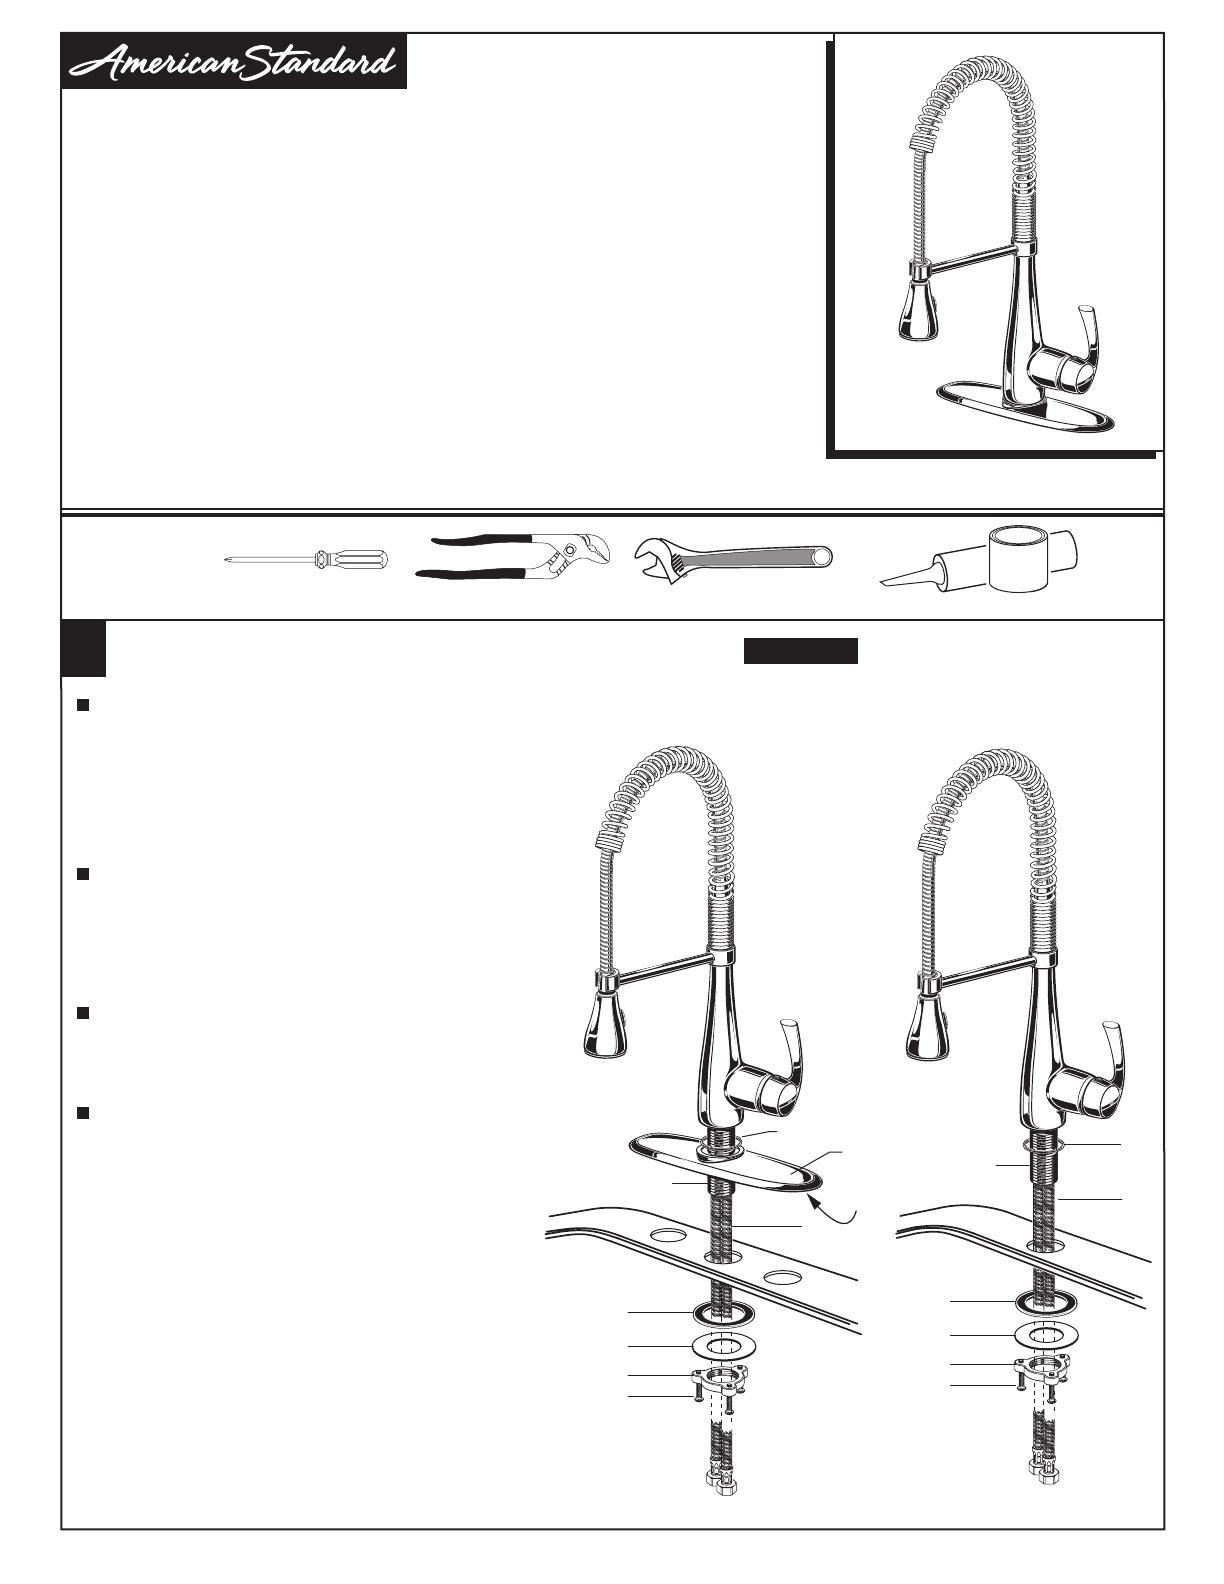
INSTALL FAUCET WITH OR WITHOUT DECK ESCUTCHEON
QUINCE™
M965242 REV. 1.5
3
A
B
2
1
2
3
4
4
5
6
7
8
5
6
7
8
(A) Installation with ESCUTCHEON (1). Apply a
bead of putty to bottom edge of ESCUTCHEON with
PUTTY PLATE (1). Make certain the SEAL (2) is
properly seated in recess of faucet body. Insert
SUPPLY HOSES (3) and SHANK (4) through hole of
ESCUTCHEON with PUTTY PLATE (1) and mounting
surface. Follow mounting instructions below to
secure faucet to mounting surface.
(B) Installation less ESCUTCHEON (1). Discard
ESCUTCHEON with PUTTY PLATE (1). Make certain
the SEAL (2) is properly seated in recess of faucet
body. Insert supply HOSES (3) and SHANK (4)
through mounting hole and seat SPOUT BASE onto
sink or mounting surface. Do not use putty.
Assemble RUBBER WASHER (4), METAL WASHER
(6) and threaded LOCKNUT (7) onto SHANK (3)
from underside of sink or mounting surface. Hand
tighten LOCKNUT (7).
Use a screwdriver to tighten SCREWS (8) on
LOCKNUT (7). Work your way around LOCKNUT (7),
tightening the screws slightly each time until all
are snug to ensure even pressure.
PUTTY
RED
STRIPE
BLUE
STRIPE
2
MAKE WATER SUPPLY CONNECTIONS
Turn off hot and cold water supplies before beginning.
Connect FLEXIBLE SUPPLIES (1, 2) directly to wall supplies. Connection
on fitting supplies are 3/8" compression. Connect left supply
(Marked with a Red Stripe) to Hot and right supply (Marked with
Blue Stripe) to Cold wall supply. Use adjustable wrench to
tighten connections. Do not over tighten.
Faucet supplies are 27-1/2" long from faucet base.
Note: If additional supply length
is required, installer must
purchase additional parts
separately.
Important: If SUPPLY HOSES
(1, 2) are too long, loop as
illustrated to avoid kinking.
1
2
COLD
HOT
3
3
TEST INSTALLED FAUCET
3
4
3
HOT & COLD SUPPLIES
Unthread SPRAY END (2) from HOSE END (3).
Turn on water supplies and check connections for leaks
.
Operate HANDLE (1) on and off, hot and cold to flush water
lines thoroughly. Replace SPRAY END (2).
Check all drain connections for leaks.
Move HANDLE (1) to "off" position.
Move HANDLE (1) into "off" position.
M965242 REV. 1.5
SPRAY OPERATION
With FAUCET on press TOGGLE BUTTON (1)
on SPRAY (2) to switch from stream to spray.
Press and hold PAUSE BUTTON (3) to temporarily
stop flow from SPRAY (2). Release PAUSE
BUTTON (3) to resume flow from SPRAY (2).
STREAM (AERATOR)
SPRAY
3
2
1
2
1
REMOVE
SERVICE
6
SERVICE
If SPOUT (3) leaks at swivel point the O-RINGS (2) need
to be replaced. To remove SPOUT (3):
Loosen the SPOUT SET SCREW (1) with a 3mm Hex wrench.
Rotate the SPOUT (3) side to side while pulling upward to
remove SPOUT (3) from faucet body.
Replace the defective parts, grease O-RINGS then push
SPOUT (3) back into position. Tighten SET SCREW (1).
Check that SPOUT (3) rotates freely and does not leak
at the swivel point.
5
7
CARE INSTRUCTIONS:
DO: SIMPLY RINSE THE PRODUCT CLEAN WITH CLEAR WATER. DRY WITH A SOFT COTTON FLANNEL CLOTH.
DO NOT: DO NOT CLEAN THE PRODUCT WITH SOAPS, ACID, POLISH, ABRASIVES, HARSH CLEANERS, OR A
CLOTH WITH A COARSE SURFACE.
1
2
Clogged CARTRIDGE outlets or inlets may cause
reduced flow. To clean, first turn off water supply then:
If faucet drips, operate HANDLE several times from "off"
to "on." Do not apply excessive force.
Remove INDEX BUTTON (1), loosen HANDLE
SCREW (2) and remove HANDLE (3).
Lift CARTRIDGE (6) off MANIFOLD (7) and remove
CARTRIDGE SEALS (8).
Place SEALS (8) into CARTRIDGE PORTS (6a).
Replace ESCUTCHEON CAP (4), HANDLE (3), tighten
HANDLE SCREW (1) and install INDEX BUTTON (2).
Clean MANIFOLD (7), CARTRIDGE (6) ports and
SEALS (8).
Place CARTRIDGE (6) onto MANIFOLD (7) and tighten
MOUNTING SCREWS (5) alternately.
Unthread the ESCUTCHEON CAP (4). Unthread three
MOUNTING SCREWS (5).
M965242 REV. 1.5
1
2
4
5
6
8
6a
3
7
REMOVE
INSTALL
3mm HEX
WRENCH
M918506-0070A
CARTRIDGE SCREWS
M964176-YYY0A
HANDLE KIT
A951470-0070A
CARTRIDGE
M907306-YYY0A
ESCUTCHEON CAP
M962294-0070A
BUTTON AND
SCREW KIT
M965242 REV. 1.5
4433.350
4433.350F15
QUINCE™
MODEL NUMBER
M962146-0070A
MOUNTING KIT
CHROME
STAINLESS STEEL
OIL RUBBED BRONZE
002
075
224
Replace the YYY with
Appropriate finish code
For toll-free information and answers to your questions, call:
1-800-442-1902
Weekdays 8:00 a.m. to 6:00 p.m. EST
IN CANADA 1-800-387-0369 (TORONTO 1-905-306-1093)
Weekdays 8:00 a.m. to 7:00 p.m. EST
IN MEXICO 01-800-839-1200
Product names listed herein are trademarks of American Standard Inc.
© AS America, Inc. 2012
HOT LINE FOR HELP
M964175-0070A
SPOUT BUSHING &
O-RING KIT
M917147-YYY0A
SPOUT SET SCREW
M964289-0020A
SPRAY HOSE
AND SEALS
A911836-0070A
SEAL
M903757-YYY0A
SPOUT PIPE
M964177-YYY0A
SPRAY ARM
M914600-0070A
SPRAY ARM BUSHING
SINGLE LEVER
SEMI-PROFESSIONAL
KITCHEN FAUCET
M915628-YYY0A
SPOUT SPRING
M950322-YYY220A
(2.2 GPM)
PULL-DOWN SPRAY
M950322-YYY150A
(1.5 GPM)
PULL-DOWN SPRAY
M962806-YYY0A
ESCUTCHEON AND
PUTTY PLATE
  • Page 1 1
  • Page 2 2
  • Page 3 3
  • Page 4 4

American Standard 4433.350.002 Installation guide

Category
Sanitary ware
Type
Installation guide
This manual is also suitable for

Ask a question and I''ll find the answer in the document

Finding information in a document is now easier with AI