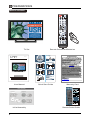
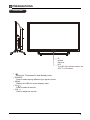
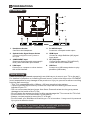
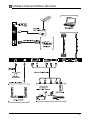
Element ELEFW248 is a 24-inch DLED HD Television with various connectivity options and user-friendly features that enhance your entertainment experience. It supports multiple video inputs, including HDMI, VGA, and component, allowing you to connect various devices such as DVD players, gaming consoles, and computers. Additionally, the built-in USB port enables you to effortlessly play multimedia content from USB storage devices.
Element ELEFW248 is a 24-inch DLED HD Television with various connectivity options and user-friendly features that enhance your entertainment experience. It supports multiple video inputs, including HDMI, VGA, and component, allowing you to connect various devices such as DVD players, gaming consoles, and computers. Additionally, the built-in USB port enables you to effortlessly play multimedia content from USB storage devices.


-
 1
1
-
 2
2
-
 3
3
-
 4
4
-
 5
5
-
 6
6
-
 7
7
-
 8
8
-
 9
9
-
 10
10
-
 11
11
-
 12
12
-
 13
13
-
 14
14
-
 15
15
-
 16
16
-
 17
17
-
 18
18
-
 19
19
-
 20
20
-
 21
21
-
 22
22
-
 23
23
-
 24
24
-
 25
25
-
 26
26
-
 27
27
-
 28
28


Element ELEFW248 User manual
- Category
- LCD TVs
- Type
- User manual
Element ELEFW248 is a 24-inch DLED HD Television with various connectivity options and user-friendly features that enhance your entertainment experience. It supports multiple video inputs, including HDMI, VGA, and component, allowing you to connect various devices such as DVD players, gaming consoles, and computers. Additionally, the built-in USB port enables you to effortlessly play multimedia content from USB storage devices.
Ask a question and I''ll find the answer in the document
Finding information in a document is now easier with AI
Related papers
Other documents
-
 Kenmore Elite 34871397610 Owner's manual
-
Element Electronics ELEFW401A User manual
-
Seiki SE20HY User manual
-
Seiki SE39HC User manual
-
-
-
-
-
-
Fluid FLD2600 User manual
