
Xerox 4590 Enterprise Printing System
Xerox 4110 Enterprise Printing System
Getting
Started
Version 3.2, January 2008
701P46281

Xerox Corporation
Global Knowledge & Language Services
800 Phillips Road
Building 218
Webster, New York 14580
©Copyright 2008 by Xerox Corporation. All Rights Reserved.
Copyright protection claimed includes all forms and matters of copyrighted material and information now allowed by statutory or judicial law or
hereinafter granted, including without limitation, material generated from the software programs that are displayed on the screen such as styles,
templates, icons, screen displays, looks, etc.
Xerox® and all Xerox product names and product numbers mentioned in this publication are trademarks of XEROX CORPORATION. Other
company brands and product names may be trademarks or registered trademarks of the respective companies and are also acknowledged.
Microsoft, MS-DOS, Windows, Windows NT, Microsoft Network, and Windows Server are either trademarks or registered trademarks of Microsoft
Corporation in the United States and/or other countries. Novell, NetWare, IntranetWare and NDS are registered trademarks of Novell, Inc. in the
United States and other countries. Adobe, Acrobat, PostScript, PostScript3, and PostScript Logo are trademarks of Adobe Systems
Incorporated. Apple, AppleTalk, EtherTalk, LocalTalk, Macintosh, MacOS and TrueType are trademarks of Apple Computer, Inc., registered in the
U.S. and other countries. HP, HPGL, HPGL/2, and HP-UX are registered trademarks of Hewlett-Packard Corporation.
All product/brand names are trademarks or registered trademarks of the respective holders.
Printed in the U.S.A.

Xerox 4590 EPS/4110 EPS Getting Started
i
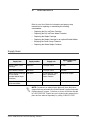
Table of contents
Overview 1-1
Machine components . . . . . . . . . . . . . . . . . . . . . . . . . . . . . . . . . . . . . . . . .1-1
User Interface (UI) . . . . . . . . . . . . . . . . . . . . . . . . . . . . . . . . . . . . . . . . . . .1-7
Power on/off . . . . . . . . . . . . . . . . . . . . . . . . . . . . . . . . . . . . . . . . . . . . . . . .1-9
About the circuit breaker . . . . . . . . . . . . . . . . . . . . . . . . . . . . . . . . . . . . .1-10
Power Saver mode . . . . . . . . . . . . . . . . . . . . . . . . . . . . . . . . . . . . . . . . . . 1-11
Related information sources. . . . . . . . . . . . . . . . . . . . . . . . . . . . . . . . . . .1-12
Customer documentation updates . . . . . . . . . . . . . . . . . . . . . . . . . . . . . .1-12
Basic operation 2-1
Printing . . . . . . . . . . . . . . . . . . . . . . . . . . . . . . . . . . . . . . . . . . . . . . . . . . . .2-1
Canceling a print job. . . . . . . . . . . . . . . . . . . . . . . . . . . . . . . . . . . . . . . . . .2-3
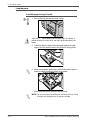
Loading paper 3-1
About paper . . . . . . . . . . . . . . . . . . . . . . . . . . . . . . . . . . . . . . . . . . . . . . . .3-1
Loading paper in trays 1 and 2. . . . . . . . . . . . . . . . . . . . . . . . . . . . . . . . . .3-2
Loading paper in trays 3 and 4. . . . . . . . . . . . . . . . . . . . . . . . . . . . . . . . . .3-3
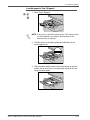
Loading paper in tray 5 (Bypass) . . . . . . . . . . . . . . . . . . . . . . . . . . . . . . . .3-4
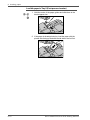
Loading paper in optional trays 6 and 7 . . . . . . . . . . . . . . . . . . . . . . . . . . .3-5
Load paper in the optional Oversized High Capacity Feeder (Tray 6) . . . .3-6
Loading paper in Tray 8 (post-process inserter). . . . . . . . . . . . . . . . . . . . .3-8
Loading tab stock into Trays 3, 4, 5, and 8. . . . . . . . . . . . . . . . . . . . . . . . .3-9
Loading tab stock into Tray 5 (Bypass) . . . . . . . . . . . . . . . . . . . . . . . . . . .3-9
Maintenance 4-1
Supply items. . . . . . . . . . . . . . . . . . . . . . . . . . . . . . . . . . . . . . . . . . . . . . . .4-1
Customer replaceable units (CRUs). . . . . . . . . . . . . . . . . . . . . . . . . . . . . .4-2
Problem solving 5-1
Fault clearance. . . . . . . . . . . . . . . . . . . . . . . . . . . . . . . . . . . . . . . . . . . . . .5-1

Xerox 4590 EPS/4110 EPS Getting Started
ii
Image quality problems . . . . . . . . . . . . . . . . . . . . . . . . . . . . . . . . . . . . . . .5-1
Paper jams . . . . . . . . . . . . . . . . . . . . . . . . . . . . . . . . . . . . . . . . . . . . . . . . .5-2
Safety and Notices 6-1
Safety notices. . . . . . . . . . . . . . . . . . . . . . . . . . . . . . . . . . . . . . . . . . . . . . .6-2
Laser safety . . . . . . . . . . . . . . . . . . . . . . . . . . . . . . . . . . . . . . . . . . . . . . . .6-4
Safety standards. . . . . . . . . . . . . . . . . . . . . . . . . . . . . . . . . . . . . . . . . . . . .6-6
Maintenance safety . . . . . . . . . . . . . . . . . . . . . . . . . . . . . . . . . . . . . . . . . .6-6
Operational safety . . . . . . . . . . . . . . . . . . . . . . . . . . . . . . . . . . . . . . . . . . .6-7
Ozone safety . . . . . . . . . . . . . . . . . . . . . . . . . . . . . . . . . . . . . . . . . . . . . . .6-8
Notices . . . . . . . . . . . . . . . . . . . . . . . . . . . . . . . . . . . . . . . . . . . . . . . . . . . .6-8
Safety extra low voltage approval. . . . . . . . . . . . . . . . . . . . . . . . . . . . . . . .6-9
Certifications in Europe . . . . . . . . . . . . . . . . . . . . . . . . . . . . . . . . . . . . . .6-10
It’s illegal... . . . . . . . . . . . . . . . . . . . . . . . . . . . . . . . . . . . . . . . . . . . . . . . . 6-11
Environmental notices for the USA. . . . . . . . . . . . . . . . . . . . . . . . . . . . . .6-14
Product recycling and disposal. . . . . . . . . . . . . . . . . . . . . . . . . . . . . . . . .6-15

Xerox 4110 EPS/4590 EPS Getting Started
1-1
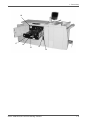
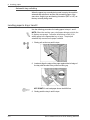
1. Overview
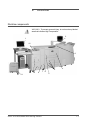
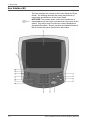
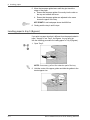
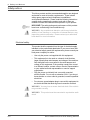
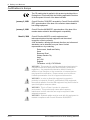
Machine components
WARNING: To prevent personal injury, do not touch any labeled
area that indicates High Temperature.
1
2
3
4
5
6
7
8
9
10
12
11

Xerox 4590 EPS/4110 EPS Getting Started
1-2
1. Overview
No. Component Function
1 DocuSP Controller The DocuSP Print Services software that provides a graphical user interface
(GUI) to the printer for
setting up and printing jobs, setting up the printer,
controlling system-level preferences, and managing fonts, security,
accounting, and many other activities.
2 User Interface The User Interface (UI) is attached to the machine and consists of the Control
Panel and the Touch Screen. Refer to “User Interface (UI)” in this chapter.
3 Power switch Switches on/off the machine power.
4 Front cover Open this cover to clear paper jams and to replace the waste toner bottles.
5 Left cover Open this cover to replace the toner cartridge.
6 Tray 1, 2, 3, 4 Contains the media used for print output.
7 Locking casters Locks the wheels of the machine. Lock these casters after moving the machine
to its installation site.
8 Bottom left cover Open this cover to remove paper jams.
9 Front cover for the
optional Trays 6, 7
Open this cover to access the bottom left cover. This cover and Trays 6 and 7
are part of the optional High Capacity Feeder (HCF).
10 HCF (Trays 6, 7) Optional High Capacity Feeder contains 2,000 sheets per tray for print output.
11 OHCF (Tray 6) Alternative to the 2-drawer HCF, the optional Oversized High Capacity Feeder
feeds oversized stock up to 13 x 19 in/SRA3 paper.
12 Tray 5 (Bypass) Load nonstandard paper (heavy stock or other special media) that cannot be
loaded in trays 1-4. It can be folded away when not in use and extended to
support longer length stock.

Xerox 4590 EPS/4110 EPS Getting Started
1-3
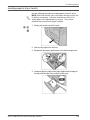
1. Overview
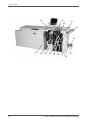
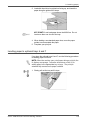
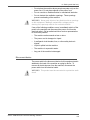
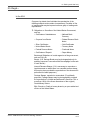
13
14
16
15
17
18

Xerox 4590 EPS/4110 EPS Getting Started
1-4
1. Overview
No. Component Function
13 Waste toner
container cover
Open this cover when removing the waste toner bottle.
14 Waste toner
container
Collects used toner.
15 Lever Use in order to pull out the transfer module.
16 Fuser Fuses the printed image on the paper.
WARNING: The fuser is extremely hot and will cause injury if jam
clearing instructions are not followed.
17 Transfer module Copies the image from the drum to the paper. Open this to remove paper jams.
18 Toner cartridge Provides toner for laying down the image on the paper.

Xerox 4590 EPS/4110 EPS Getting Started
1-5
1. Overview
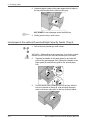
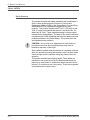
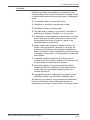
20
21
22
23
24
32
19
25
26
28
27
29
31
30

Xerox 4590 EPS/4110 EPS Getting Started
1-6
1. Overview
NOTE: Throughout this guide, Finisher D2 and Booklet Finisher
may be referred to simply as the finisher.
No. Component Function
19 Post-process inserter
(Tray 8)
Loads and inserts offset and color documents, preprinted tabs, covers, or
transparency separators.
20 Decurl button For lighter weight paper especially, press this button to decurl the output.
21 Output tray Prints are delivered here when specific output features are selected, such as
Automatic sorting, Collated, Uncollated or Normal.
22 Finisher tray Receives prints when you select Stapled, Punched and Z-folded.
23 Booklet output tray Receives prints when you select Bi-Fold or Bi-Fold + Stapling.
24 Booklet output tray
button
Press this button to deliver and retrieve booklets from the output area.
25 Right cover Open to clear paper jams, replace staples, clear jammed staples or remove
the scraps from the puncher.
26 Staple cartridges for
booklet
There are two staple cartridges for booklets. Remove this cartridge to replace
staples and clear staple jams.
27 Staple cartridge Contains staples. Remove this cartridge to replace staples and clear staple
jams.
28 Staple waste
container
Collects the staple wire cuttings from the 4 staple cartridges. Open to remove
and replace the waste container.
29 Punch scrap
container
Collects the scraps from the puncher. Open to remove the scraps.
30 Tri-Fold output tray
(optional)
Receives prints when you select Tri-Fold In or Tri-Fold Out.
31 Left cover Open this cover to access the machine and to clear paper jams.
32 Tri-Fold output tray
button
Press this button to open the Tri-Fold output tray.

Xerox 4590 EPS/4110 EPS Getting Started
1-7
1. Overview
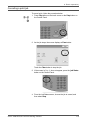
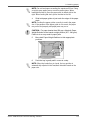
User Interface (UI)
The User Interface (UI) consists of the Control Panel and Touch
Screen. The following describes the names and functions of
components and indicators on the Control Panel.
KEY POINT: The screens shown on the User Interface are a
representation only of the type of screens that may be seen on the
system. They may or may not reflect the screens displayed on
your particular system. Also the functions and features shown on
the UI screens may not be functional for this product.

Xerox 4590 EPS/4110 EPS Getting Started
1-8
1. Overview
No. Component Function
1 Control panel Allows keypad selection of features.
2 Touch Screen Allows selections to be made simply by touching a button on
the screen.
3
Power Saver
Lights when the machine is in the Power Saver mode. To
cancel the Power Saver mode, press this button.
4
Clear All
Not applicable to this product.
5
Interrupt
Not applicable to this product.
6
Stop
Press this button to stop the current print job or
communications.
7
Start
Press this button to start the printing process.
8
Numeric keypad
Press these buttons to enter the passwords and other
numerical values.
9
Clear
Press this button if you have entered the wrong numerical
value or if instructed by the UI.
10
Log In/Out
This button is used by the System Administrator to log into
the System Administration mode.
11
Machine Status
Press this button to check the machine status, meters, and
the state of consumables and print reports.
12
Review
Not applicable to this product.
13
Job Status
Press this button to confirm or cancel currently running or
completed jobs.
14
Brightness dial
Adjusts the brightness of the touch screen.
15
Job in Memory indicator
Not applicable to this product.
16
Online indicator
This indicator lights when data is transmitting from this
machine or is receiving data from a client.

Xerox 4590 EPS/4110 EPS Getting Started
1-9
1. Overview
Power on/off
Switch on the power before operating the machine. The machine
warms up in approximately five minutes after which you can
print. Switch off the machine at the end of the day or when it is not
in use for a long period of time. Use the Power Saver feature to
reduce the power consumption of the machine.
For information about the power saving feature, refer to “Power
Saver mode”.
Power on
Perform the following to power on the machine:
1. Open the power switch cover.
2. Press the power switch to the On position [
|].
NOTE: The "Please wait..." message on the UI indicates that the
machine is warming up. The machine cannot be used while it is
warming up.

Xerox 4590 EPS/4110 EPS Getting Started
1-10
1. Overview
Power off
Perform the following to power off the machine:
1. Before switching off the power ensure that all print jobs have
completely finished. Furthermore, ensure that the <Online>
indicator is not lit.
CAUTION: Switching off the power before print jobs are
complete loses any data that is being processed.
CAUTION: Never switch off the power while data is being
received and/or jobs are being printed.
2. Press the power switch to the Off position [ ].
CAUTION: The power off process continues internally after the
power switch is turned off. Therefore, do not immediately unplug
the power cord from the power outlet.
NOTE: If you have switched off the power, wait ten seconds
before switching on the power again.
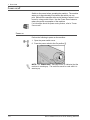
About the circuit breaker
This product is equipped with a circuit breaker. The circuit breaker
is normally set to the On (“l”) position as shown in the following
figure.
If power to the machine is interrupted, the circuit breaker trips and
the switch is set to the Off (“O”) position.
NOTE: If the breaker is in the Off (“O”) position, contact your
Customer Support Center as there might be some unusual
conditions.

Xerox 4590 EPS/4110 EPS Getting Started
1-11
1. Overview
Power Saver mode
The machine is equipped with a Power Saver feature that
automatically reduces power consumption after a period of
inactivity. The Power Saver feature has two modes: a Low Power
mode and Sleep mode.
The machine enters the Low Power mode after the machine
remains inactive for a preset time period. Once activated, the
machine remains in the Low Power mode until activity occurs or
until it a second period of time elapses. If the machine continues
to remain inactive for another preset time period, it then enters the
Sleep mode.
To exit the Power Saver mode, press the Power Saver
button. The light on the Power Saver button switches off and the
Control Panel displays the initial power on screen.
KEY POINT: The time required by the machine to warm-up from
either Low Power Mode or Sleep Mode is approximately 45
seconds.

Xerox 4590 EPS/4110 EPS Getting Started
1-12
1. Overview
Related information sources
This section describes the guides provided with this machine.
• User Guide: This guide describes all the necessary steps for
print jobs, clearing paper jams, daily care, and safety
information.
• System Administration Guide: System Administrators use
this guide to set up the machine defaults/settings and the
network environment.
• DocuSP Customer Documentation set: The DocuSP
customer documentation in the DocuSP Media Kit provides
information related to the use and installation of the DocuSP
Controller.
Customer documentation updates
You can get the latest customer documentation and information for
your product by going to www.xerox.com
and doing one of the
following:
• Enter your product number (e.g., 4110, 4595) in the Search
field and select Search.
• Select the Support & Drivers
link and then use the search
options to locate your specific printer.
Be sure to periodically check www.xerox.com
for the latest
information for your product.

Xerox 4590 EPS/4110 EPS Getting Started
2-1
2. Basic operation
Printing
There are three ways to submit print jobs to the DocuSP
Controller:
• Sending a job from a client workstation using PCL and
PostScript printer drivers from within an application
• Using the web browser and web interface to send a print-ready
job over the internet
• Importing jobs at the DocuSP Controller
The DocuSP printer drivers (PS and PCL) enable the following
types of jobs to print:
• Normal print - submit and print the job
• Save - saves the job on the controller and does not print
• Create Background Forms - create a pre-printed form file
Use the following procedure when printing from your client
workstation.
NOTE: The printing steps and screens may vary depending on the
application software you are using. For specific information, refer
to the documentation provided with each application.

Xerox 4590 EPS/4110 EPS Getting Started
2-2
2. Basic operation
1. Select File and Print from the application’s menu bar.
2. Confirm the Printer Name and click Properties, if necessary.
3. Configure the properties, if necessary.
4. Click OK.
5. Click OK in the Print dialog box after you have made all your
selections in the Properties window. The job is sent to the
DocuSP Controller where it can be printed immediately, saved
or held.
6. At the DocuSP Controller, you can select the property settings
to apply to the job and manage its release for printing.

Xerox 4590 EPS/4110 EPS Getting Started
2-3
2. Basic operation
Canceling a print job
To cancel a job, follow the procedure below.
1. Press Stop either on the touch screen or the Stop button on
the Control Panel.
2. As the job stops, the screen displays a Clear button.
Touch the Clear button to stop the job.
3. If the screen in Step 2. does not appear, press the Job Status
button on the Control Panel.
4. From the Job Status screen, choose the job to cancel, and
then select Stop.

Xerox 4590 EPS/4110 EPS Getting Started
2-4
2. Basic operation
Page is loading ...
Page is loading ...
Page is loading ...
Page is loading ...
Page is loading ...
Page is loading ...
Page is loading ...
Page is loading ...
Page is loading ...
Page is loading ...
Page is loading ...
Page is loading ...
Page is loading ...
Page is loading ...
Page is loading ...
Page is loading ...
Page is loading ...
Page is loading ...
Page is loading ...
Page is loading ...
Page is loading ...
Page is loading ...
Page is loading ...
Page is loading ...
Page is loading ...
Page is loading ...
Page is loading ...
Page is loading ...
Page is loading ...
Page is loading ...
Page is loading ...
Page is loading ...
Page is loading ...
Page is loading ...
-
 1
1
-
 2
2
-
 3
3
-
 4
4
-
 5
5
-
 6
6
-
 7
7
-
 8
8
-
 9
9
-
 10
10
-
 11
11
-
 12
12
-
 13
13
-
 14
14
-
 15
15
-
 16
16
-
 17
17
-
 18
18
-
 19
19
-
 20
20
-
 21
21
-
 22
22
-
 23
23
-
 24
24
-
 25
25
-
 26
26
-
 27
27
-
 28
28
-
 29
29
-
 30
30
-
 31
31
-
 32
32
-
 33
33
-
 34
34
-
 35
35
-
 36
36
-
 37
37
-
 38
38
-
 39
39
-
 40
40
-
 41
41
-
 42
42
-
 43
43
-
 44
44
-
 45
45
-
 46
46
-
 47
47
-
 48
48
-
 49
49
-
 50
50
-
 51
51
-
 52
52
-
 53
53
-
 54
54


Ask a question and I''ll find the answer in the document
Finding information in a document is now easier with AI

