American Standard 6310 Series Installation guide

Category
Sanitary ware
Type
Installation guide

This manual is also suitable for

SINGLE CONTROL
KITCHEN PULL-OUT FAUCET
Installation
Instructions
Certified to comply with ANSI A112.18.1M
1
INSTALL FAUCET WITH OR WITHOUT DECK ESCUTCHEON
0
1
2
3
4
5
6
1
3
7
A
B
PUTTY
SPOUT BASE
SINK OR
MOUNTING
SURFACE
2
3
2
7
Assemble RUBBER WASHER (4), BRASS WASHER (5), and threaded LOCKNUT (6) onto SHANK (3) from underside
of sink or mounting surface. Hand tighten LOCKNUT (6) and check that rotation of HANDLE (7) from HOT to COLD
is centered.
Use a screwdriver to tighten SCREWS (8) on LOCKNUT (6). Work your way around LOCKNUT (6), tightening
the screws slightly each time until all are snug to ensure even pressure.
(A) Installation with ESCUTCHEON (1). Apply a bead of putty to bottom edge of ESCUTCHEON with PUTTY PLATE (1).
Insert supply HOSES (2) and SHANK (3) through hole of ESCUTCHEON with PUTTY PLATE (1) and mounting surface.
Follow mounting instructions below to secure faucet to mounting surface.
(B) Installation less ESCUTCHEON (1). Discard ESCUTCHEON with PUTTY PLATE (1). Insert supply HOSES (2) and
SHANK (3) through mounting hole and seat SPOUT BASE onto sink or mounting surface. Do not use putty.
Plumbers' Putty or Caulking
Adjustable Wrench
Phillips Screwdriver
RECOMMENDED TOOLS
Regular Screwdriver
M968474 Rev. 1.9
4
5
8
6
4
5
8
6
Insert HOSES (2) through RUBBER WASHER (4), BRASS WASHER (5), and threaded LOCKNUT (6).
EasyTouch FAUCET
Thank you for selecting American-Standard...
the benchmark of fine quality for over 100 years.
To ensure that your installation proceeds smoothly--
please read these instructions carefully before you begin.
Turn off water at
main supply.
CAUTION
6310 Series
2
MAKE WATER SUPPLY CONNECTIONS
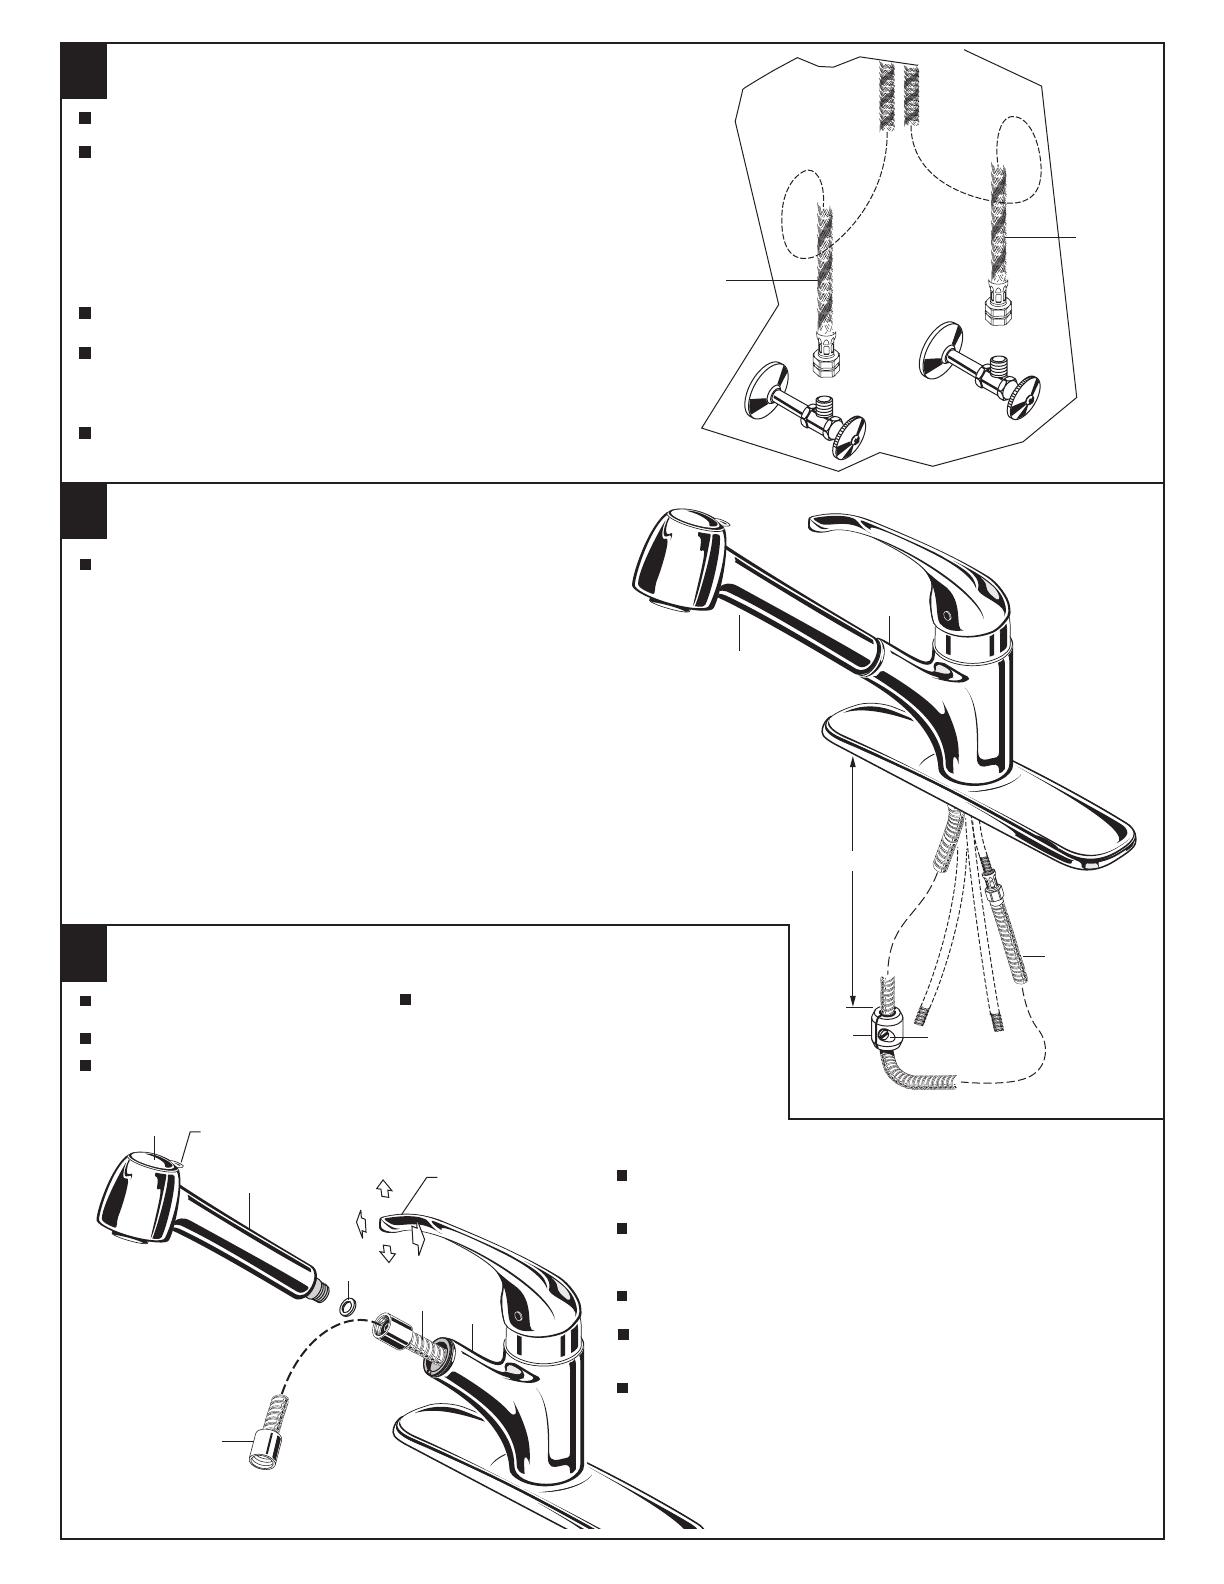
4
TEST INSTALLED FAUCET
3
INSTALL WEIGHTS
Move HANDLE (1) down into
"off" position.
With HANDLE (1) down in "off" position,
Turn on water supplies.
Operate handle up and down, in COLD and HOT positions,
to flush water lines thoroughly.
Place WASHER (7) into HOSE END (4) and
connect HAND SPRAY (2) to HOSE END (4).
Place HAND SPRAY (2) back into faucet.
pull HAND SPRAY (2) from FAUCET (5)
and disconnect HAND SPRAY (2). Be
careful not to lose WASHER (7). Pull
HOSE (3) (HOSE should pull approximately
2 feet) and direct open HOSE END (4)
into sink.
Check HAND SPRAY (2) operation:
With faucet on push BUTTON (6) for a broad cleansing
spray. BUTTON (6) will lock into this position.
With HAND SPRAY (1) seated in FAUCET (2),
install WEIGHTS (4) onto HOSE (3) using two
SCREWS (5). Locate the WEIGHTS (4) two feet (2')
from the underside of the sink deck.
Tighten SCREWS (5) firmly.
0
1
2
3
4
5
6
Check connections for leaks.
(See Section 5)
1
3
5
2
6
4
7
M968474 Rev. 1.9
1
2
COLD
HOT
Turn off hot and cold water supplies before beginning.
Connect FLEXIBLE SUPPLIES (1, 2) directly
to wall supplies. Connection on fitting
supplies are 3/8" compression. Connect
left supply (Marked with a Red Stripe) to Hot
and right supply (Marked with Blue Stripe) to
Cold wall supply. Use adjustable wrench to
tighten connections. Do not over tighten.
Faucet supplies are 21" long from faucet base.
Note: If additional supply length is
required, installer must purchase
additional parts separately.
Important: If SUPPLY HOSES (1, 2) are
too long, loop as illustrated to avoid kinking.
To unlock BUTTON (6), rotate BUTTON (6) left or right
using the TAB (8). Faucet will return to standard spray.
8
3
4
5
1
2
24"
  • Page 1 1
  • Page 2 2

American Standard 6310 Series Installation guide

Category
Sanitary ware
Type
Installation guide
This manual is also suitable for

Ask a question and I''ll find the answer in the document

Finding information in a document is now easier with AI