Planar UR8450 Touch Quick start guide

Type
Quick start guide

This manual is also suitable for

008-0161-00A 1
Introduction
Once the UltraRes display has been installed and mounted, there are several
important steps that you need to take in order to get the display up and running. This
document is intended to give you a quick overview of the steps needed to connect
cables, turn on your display and attach sources. For more in-depth information, see
the Installation Guide that is on the USB drive in your accessory kit box.
1 Using the supplied AC power cord, connect one end to a grounded outlet and the
other to the AC power input next to the I/O panel the bottom of the UltraRes
display.
2 The IR module has and LED status and an IR receiver on the same module. In
order for the remote control to work, you need to connect the wired IR module to
the display, also on the bottom of the I/O panel. Then place the IR receiver in the
desired place on or near the display.
UltraRes Quick Start Guide
2
3 Turn the power switch on. The display should now be in stand-by mode and the
wired IR module LED should show solid blue.
4 Install the UltraRes Control software on your Windows PC. This software is
contained on the USB drive in your accessory kit box. Follow the automatic
prompts. For more information about this software, see the Installation Guide on
the USB drive that is included in your accessory kit box. Connect a USB cable from
the PC to the display. In the UltraRes Control software, click the Connect button
to establish a connection to the display.
5 Turn on the display using one of two methods:
Pressing the power button on the remote control, point it at the IR receiver.
Using the UltraRes Control software, select the Power On button.
6 Using either method in the previous step, the IR receiver LED should blink and
then turn off. The display should change from a black screen to blue.
UltraRes Quick Start Guide
3
Setting Up UltraRes Using Single Inputs
Instead of having one central device into which you can connect and define your
source inputs, single source setup requires connecting from a single-headed source
to the display. For example, connecting one input directly from a Blu-ray player into
the 84” display.
The example below uses the following:
PC with 4K @ 24/25/30HZ output
4K Blu-ray player
The following formats are supported for single inputs:
(1x) DisplayPort or HDMI 4K @ 24/25/30Hz
PC with DisplayPort 1.1a or 1.2 output
4K Blu-ray player
There are two preferred ways in which you can select individual inputs. They are
described on the following pages.
UltraRes Quick Start Guide
4
Selecting Individual Inputs Using the Remote Control
The UltraRes remote control has individual inputs that can be selected. For example,
if this UltraRes input is connected to HDMI 2, press the HDMI 2 button on the remote
control.
Selecting Individual Inputs Using the UltraRes Control Software
On the Source tab, select the input that is connected to the UltraRes display. For
example, if this UltraRes input is connected to HDMI 2, select the HDMI 2 radio
button in the Input Source section on the left.
UltraRes Quick Start Guide
5
Setting Up UltraRes Using Multiple Inputs
In order to set up the UltraRes using multiple inputs, you must have a computer that
contains four video outputs. All four outputs will then be connected to the UltraRes
display. The following formats are supported for multiple inputs:
(4x) DisplayPort or HDMI/DVI 1080p @ 24/50/60Hz
PC with DisplayPort or HDMI/DVI (or mix of both)
External processors
(4x) DisplayPort or HDMI/DVI 960 x 2160 @ 60Hz
Needs a PC with a special graphics card setup
(2x) DisplayPort or HDMI 1920 x 2160 @ 60Hz
Needs a PC with a special graphics card setup
Note: When using (2x) 1920 x 2160 @ 60Hz, the connections must be: Input 1 and Input 3 or
Input 2 and Input 4. For example, using 1920 x 2160 @ 60Hz on Input 1 and Input 3 is allowed
but using 1920 x 2160 @ 60Hz on Input 1 and Input 2 is not allowed.
The graphics card that you install on your main PC will determine what outputs will
be plugged into the Planar UltraRes display. For example, some graphics cards have
two HDMI outputs and two DisplayPort outputs. Any combination of these outputs is
fine. Below is a visual example of how a basic connection might look.
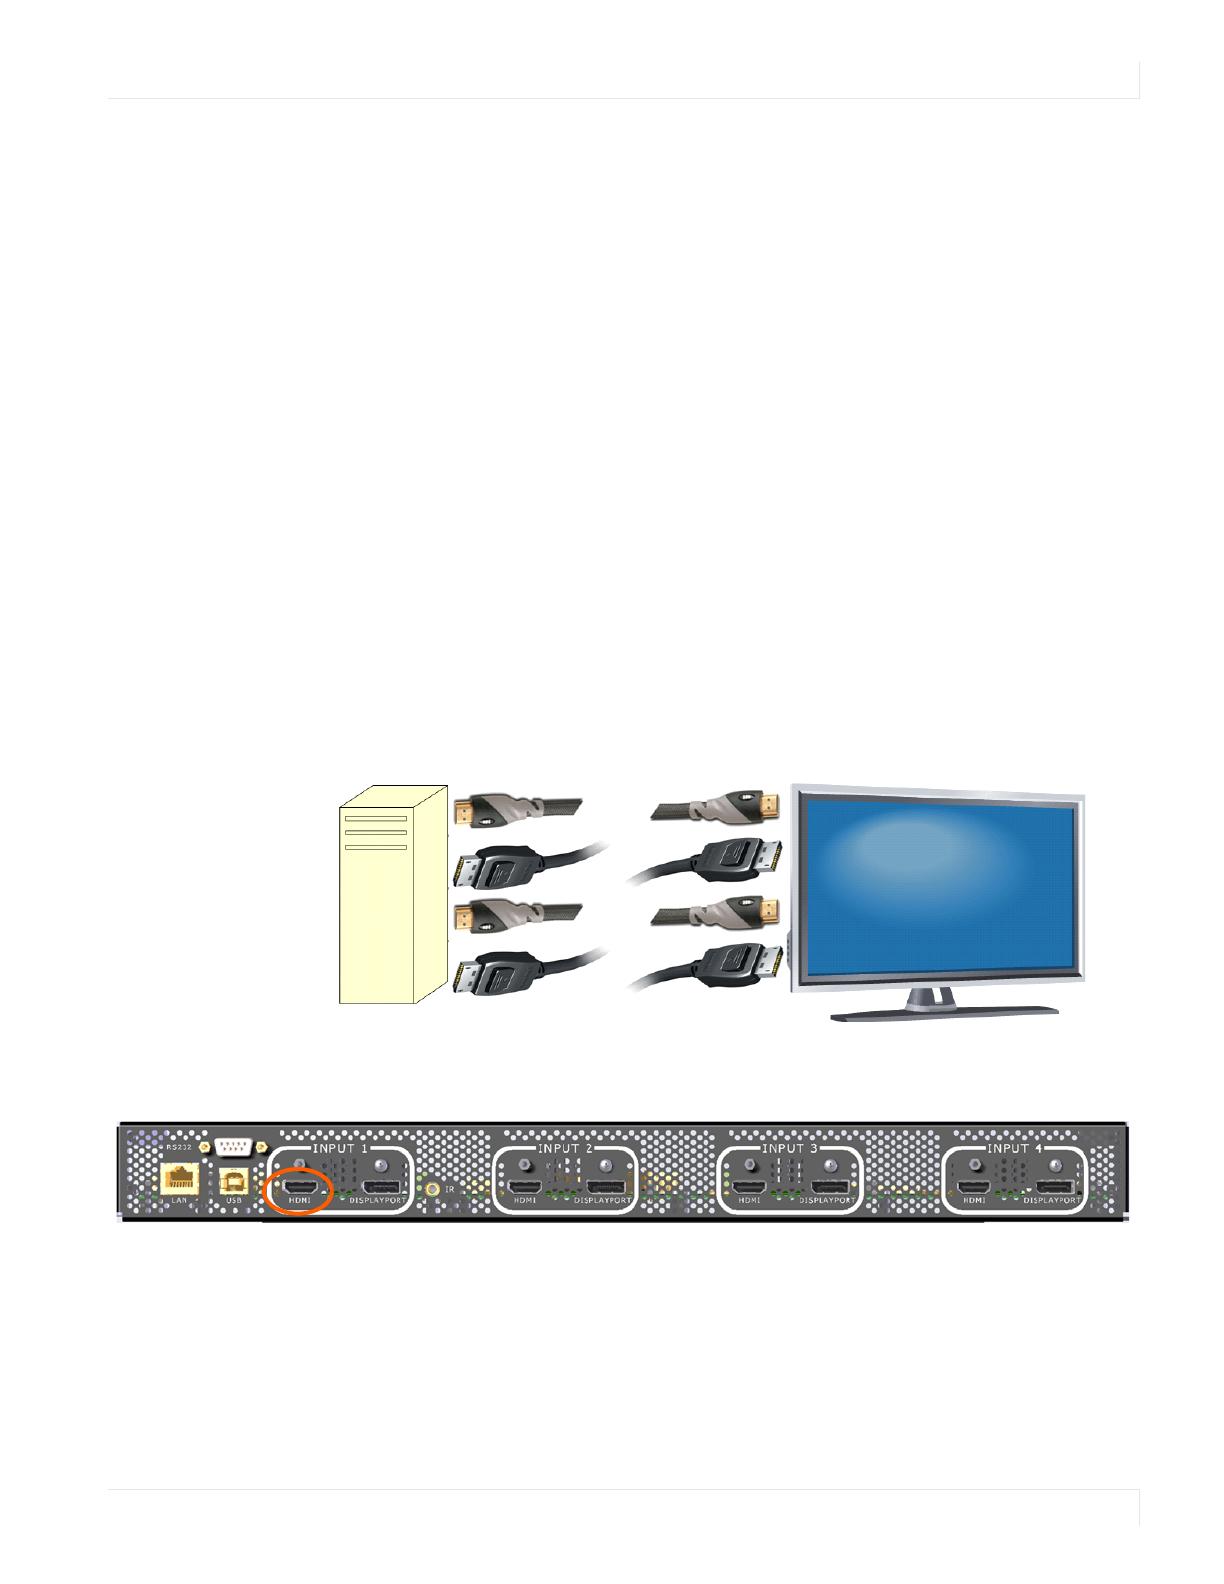
In the example below, using four input channels on a computer, you would use one
connector for each input on the I/O panel on the UltraRes display, as shown below.
As an example, you could use the following:
Note: You cannot plug into two ports on the same input channel. For example, you can’t
plug into HDMI 1 and DisplayPort 1 in Input 1 as shown above. You can only connect to one
input for each input channel.
Input 1 - HDMI 1 Input 3 - DisplayPort 3
Input 2 - DisplayPort 2 Input 4 - HDMI 4
UltraRes Quick Start Guide
6
Select that source using one of two methods:
Using the remote control.
Using the UltraRes Control software.
UltraRes Quick Start Guide
7
Using UltraRes Control Software to Set Up Multiple Inputs
If you use the UltraRes Control software to set up multiple sources, there are three
different settings per input channel. Before continuing, make sure you have selected
the Multiple Inputs radio button in the lower left corner.
Based on Input Source - This default option automatically selects the same type
of input as the current Input Source setting. For example, if you have four HDMI
input sources, this feature should detect that your sources are connected to
HDMI 1-4.
Select Individual Inputs - The example below shows the circled inputs that were
selected individually.
When you are finished, click Update to save your changes.
UltraRes Quick Start Guide
8
  • Page 1 1
  • Page 2 2
  • Page 3 3
  • Page 4 4
  • Page 5 5
  • Page 6 6
  • Page 7 7
  • Page 8 8

Planar UR8450 Touch Quick start guide

Type
Quick start guide
This manual is also suitable for

Ask a question and I''ll find the answer in the document

Finding information in a document is now easier with AI