Petsafe PWF00-13665 Owner's manual

Category
Pet care
Type
Owner's manual

The PetSafe PWF00-13665 helps you train your dog to stay out of specific areas of your home using static correction. Creating a pet-free zone is simple with the adjustable range that extends up to 10 feet in all directions. Plus, choose from progressive or continuous correction modes to effectively train your furry friend.

The PetSafe PWF00-13665 helps you train your dog to stay out of specific areas of your home using static correction. Creating a pet-free zone is simple with the adjustable range that extends up to 10 feet in all directions. Plus, choose from progressive or continuous correction modes to effectively train your furry friend.

pawz away
®
mini add-a-barrier
operating and training guide
PLEASE READ THIS ENTIRE GUIDE BEFORE BEGINNING
Model Number
PWF00-14040
2 Customer Care Center 1-800-732-2677 www.petsafe.net 3
Important Safety Information
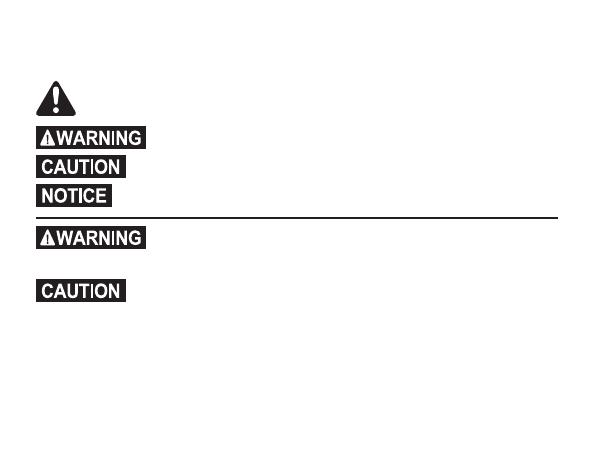
Explanation of Attention Words and Symbols used in this guide
This is the safety alert symbol. It is used to alert you to potential personal injury hazards.
Obey all safety messages that follow this symbol to avoid possible injury
or death.
WARNING indicates a hazardous situation which, if not avoided, could result in
death or serious injury.
CAUTION, used without the safety alert symbol, indicates a hazardous situation
which, if not avoided, could result in harm to your pet.
NOTICE is used to address safe use practices not related to personal injury.
Not for use with aggressive dogs. Do not use this product if your dog is prone to
aggressive behavior. Aggressive dogs can cause severe injury or death to their owners
and others. If you are not sure that this product is right for your dog, please talk to your
veterinarian or a certified trainer.
This System is NOT a solid barrier. The system is designed to act as a deterrent,
using Static Correction to condition pets to remain outside of the established barrier
area. It is important that you reinforce training with your pet on a regular basis.
Since the tolerance level to Static Correction varies from pet to pet, Radio Systems
®
Corporation CANNOT guarantee that the system will in all cases keep a pet outside
of the established barrier area. Not all pets can be trained to avoid entering the barrier
area. Therefore, if you have reason to believe that your pet may harm himself or pose
a danger to others if he is not kept from entering the barrier area, you should NOT
rely solely upon this system to restrict your pet. Radio Systems
®
Corporation shall
NOT be liable for any personal injuries, property damage, injury to or death of your
pet, economic loss or any consequential damages sustained as a result of any animal
entering the barrier area.
www.petsafe.net 3
Thank you for choosing PetSafe
®
brand. You and your pet deserve a
companionship that includes memorable moments and a shared understanding
together. Our products provide you with the tools and technologies to successfully
train your pet. If you have any questions about our products or training your pet,
please visit our website at www.petsafe.net or contact our Customer Care Center
at 1-800-732-2677.
To get the most protection out of your warranty, please register your product
within 30 days at www.petsafe.net. By registering and keeping your receipt,
you will enjoy the product’s full warranty and should you ever need to call the
Customer Care Center, we will be able to help you faster. Most importantly,
PetSafe
®
will never give or sell your valuable information to anyone. Complete
warranty information is available online at www.petsafe.net.
4 Customer Care Center 1-800-732-2677 www.petsafe.net 5
Table of Contents
Components ..............................................................................................6
Other Items Needed But Not Included ....................................................6
Other Items You May Need ......................................................................6
How the System Works .............................................................................7
Key Definitions ..........................................................................................8
Operating Guide ..................................................................................... 9
Install the Barrier Transmitter ................................................................ 9
Set Up the Barrier Transmitter ............................................................10
Test the Barrier Area ...........................................................................11
Mode A, B, and AB Feature ................................................................ 13
Time Out Feature ................................................................................ 15
Programming the Mode Settings........................................................15
www.petsafe.net 5
Training Guide ......................................................................................18
Begin Your Pet’s First Session .............................................................18
Further Training ................................................................................... 19
Additional Information ............................................................................19
Troubleshooting ...................................................................................20
Terms of Use and Limitation of Liability ..................................................21
Compliance .............................................................................................22
Customer Care International ................................................................... 23
Perchlorate Battery .................................................................................24
Warranty .................................................................................................. 24
6 Customer Care Center 1-800-732-2677 www.petsafe.net 7
Components
Barrier Transmitter
Operating and Training Guide
Other Items Needed But Not Included
3 AAA Batteries
Pawz Away
®
Receiver Collar, YardMax
®
Receiver Collar
or UltraSmart
®
Receiver Collar
Other Items You May Need
Drill and mounting hardware
Non-metallic collar and leash
Scissors
Lighter
www.petsafe.net 7
How the System Works
The PetSafe
®
Pawz Away
®
Mini Pet Barrier keeps your pet away from a certain room,
away from trash, off of furniture, etc. Just place the Barrier Transmitter near the
area your pet should avoid. The Mini Pet Barrier transmits an elliptical radio signal
adjustable up to 5 feet. Your pet wears a Receiver Collar with Contact Points that
touch his neck. When your pet enters the Barrier Area, he’ll hear a series of audible
tones from the Receiver Collar and he will feel a safe Progressive Static Correction,
delivered through the Contact Points on his neck. The Progressive Static Correction
will get his attention, but will not cause harm. The correction continues until your pet
leaves the Barrier Area. If your pet doesn’t leave, the collar will continue to correct
at the maximum level from 3 seconds until the 15 second time-out. The PetSafe
®
Pawz Away
®
Mini Pet Barrier has been proven safe, comfortable, and effective for
pets at least 6 months old and 5 pounds or more.
8 Customer Care Center 1-800-732-2677 www.petsafe.net 9
Key Definitions
Barrier Transmitter: Transmits the wireless radio signal.
Barrier Area: Area that you want to prevent your pet from gaining access to.
Contact Points: Deliver the safe Progressive Static Correction when your pet enters
the Barrier Area.
Progressive Static Correction: Static Correction begins at the lowest level
and automatically increases to maximum within 3 seconds of first detection
in the Barrier Area. From 3 seconds until the 15 second time-out, the collar will
continue to correct at the maximum level until your pet leaves the Barrier Area.
www.petsafe.net 9
Operating Guide
Install the Barrier Transmitter
The Barrier Transmitter emits a radio signal from all sides in an elliptical
pattern. The signal may transmit through a wall or the ceiling/floor.
The Barrier Transmitter can be placed laying flat on a surface or hung on
a wall. If you choose to hang the Barrier Transmitter, note that the signal
becomes very directional—the signal will be strongest directly in front of
and behind the unit. The signal is weakest to the side of the unit.
Do not:
Hang unit on a metal wall
Place Barrier Transmitter on metal surfaces
Place Barrier Transmitter near large metal objects such as
refrigerators, washers, etc.
Place Barrier Transmitter near audio speakers
Step
1
10 Customer Care Center 1-800-732-2677 www.petsafe.net 11
Set Up the Barrier Transmitter
To prevent an unintended correction, never perform set-up procedures while
your pet is wearing the Receiver Collar.
1. Turn over the Barrier Transmitter and rotate
back cover counter-clockwise, removing
the back cover. Install three AAA alkaline
batteries and replace the back cover. Turn
clockwise to secure cover.
2. Turn the Barrier Transmitter right side up
and press the (+) button once to turn ON
the Barrier Transmitter. A black bar in the
upper right hand corner of the LCD display
window indicates that the Barrier Transmitter
is set to mode A* (2A). A second black bar in
the bottom of the LCD display indicates the
range is set to one segment.
2A
3. Each segment represents approximately 5 inches from the unit.
You can create a Barrier Area of 5 inches to 30 inches from the unit.
Using the (+) and (-) buttons, adjust the range to fit the desired pet
Barrier Area.
Step
2
www.petsafe.net 11
*All Mini Pet Barriers and Receiver Collars are preset to mode A. The A and
B mode feature is designed to be used in multiple pet households where
you may want one pet to be able to access an area while preventing access
by another pet. For single pet households, you will not need to operate
the Barrier Transmitter in any mode other than A. Please see the Additional
Features section of this operating and training guide (beginning on page 13)
for instructions on how to utilize mode A and B.
Test the Barrier Area
1. Keeping your hands away from the
Contact Points, use the edge of the
Test Light Tool to turn the receiver
battery door to the ON position.
2. Hold the Receiver Collar with the Contact
Points facing up. Place the Test Light
Tool on the Contact Points so that the
wire in the Test Light Tool touches the
Contact Points (3A). The PetSafe
®
logo
on the Receiver Collar should face
the Transmitter.
3A
Step
3
12 Customer Care Center 1-800-732-2677 www.petsafe.net 13
3. Hold the Receiver Collar at the
approximate height of your pet’s neck
(3B). Start outside of the range and walk
slowly toward the Barrier Transmitter. As
you reach the Barrier Area, the Receiver
Collar emits a series of high-pitched
tones. For each tone you hear, you
should notice the Test Light flashing
which indicates that a Progressive Static
Correction is being delivered. The
Receiver Collar’s tone is easily heard by
pets but may be at a volume level difficult
for some humans to hear.
4. Check the range of the Barrier Area from
multiple angles to ensure you are getting
the desired coverage.
3B
Note: Should you find that you are not getting the desired range at the maximum setting,
move the Barrier Transmitter a foot, or change from its standing-on-end position to laying
flat. Metal objects can alter the magnetic field and change the transmitting signal range.
The effect on the range depends on the size and shape of the objects. Signal range can be
reduced if the Barrier Transmitter is placed on a concrete floor, due to steel reinforcement
in the concrete. For best range results, place the Barrier Transmitter on a nonconductive
surface, i.e., wood floor or table. Placing the Barrier Transmitter beneath sofas and beds
can reduce the range due to the metal springs altering the magnetic field.
www.petsafe.net 13
Mode Features
Mode A, B, and AB Feature
For multiple pet households, additional PetSafe
®
Pawz Away
®
Receiver
Collars can be purchased to work with one or more PetSafe
®
Pawz Away
®
Barrier Transmitters. You can set up an unlimited number of Barrier
Transmitters in your home and an unlimited number of Receiver Collars
can be used with one or more Barrier Transmitters. If you have multiple
pets, you may want to allow one pet access to an area while denying
access to another pet. With the purchase of additional Receiver Collars
and Barrier Transmitters, you can accomplish this by using the Mode A
and Mode B functions.
All PetSafe
®
Pawz Away
®
Mini Barrier Transmitters and Receiver Collars
come preset to mode A. Each Receiver Collar can operate in one of two
different modes—A or B. Each Barrier Transmitter may be set to either A,
B or AB mode to allow for multiple configurations.
Step
4
14 Customer Care Center 1-800-732-2677 www.petsafe.net 15
When the Barrier Transmitter
and Receiver Collar are set to
mode A, the Barrier Transmitter
denies access to pets wearing
a Receiver Collar programmed
to mode A. Receiver Collars set
to mode B will not pick up the
signal from a Barrier Transmitter
set to mode A.
When the Barrier Transmitter
and Receiver Collar are set to
mode B, the Barrier Transmitter
denies access to pets wearing
a Receiver Collar programmed
to mode B. Receiver Collars set
to mode A will not pick up the
signal from a Barrier Transmitter
set to mode B.
When the Barrier Transmitter
is set to mode AB, the Barrier
Transmitter denies access to all
pets wearing the Receiver Collar,
no matter which mode the
receiver is programmed to.
www.petsafe.net 15
Time Out Feature
For your pet’s safety, the Receiver Collar has a built in Time Out feature.
If your pet stays in the Barrier Area for longer than 15 seconds the Receiver
Collar will stop delivering the Progressive Static Correction. The Receiver
Collar will then administer a random single Static Correction every 5 to 10
seconds at the maximum level until the pet leaves the Barrier Area. Once
your pet leaves the Barrier Area, the Receiver Collar resets itself and will
deliver a Progressive Static Correction the next time your pet enters the
Barrier Area.
Programming the Mode Settings
All programming is done through the Barrier Transmitter and the
programming is synchronized with the Receiver Collar. The Receiver
Collar cannot be programmed separately from the Barrier Transmitter.
You may synchronize multiple Receiver Collars to a single Barrier
Transmitter at one time. However, make sure any Receiver Collar you do
not wish to synchronize is turned OFF during the programming procedure.
Any collar that is within 30 inches of the Barrier Transmitter and turned ON
may be reprogrammed. Familiarize yourself with the steps outlined before
attempting to program the Barrier Transmitter and Receiver Collar.
16 Customer Care Center 1-800-732-2677 www.petsafe.net 17
To prevent an unintended correction, do not perform set up procedures while the
Receiver Collar is on your pet.
1. Gather the Receiver Collar(s) you wish to synchronize with the Barrier
Transmitter. Turn the Receiver Collar(s) ON and place less than one foot
from the Barrier Transmitter.
2. Turn the Barrier Transmitter OFF by pressing the (-) button until there
are no bars displayed in the LCD window. Remove the back cover.
3. The mode switch is located inside the transmitter and is preset to mode
A. Move the switch to the center position for mode B or to the right
position for mode AB (4A). Once you have selected the desired mode,
replace the back cover.
Note: If you have selected mode AB you do not need to proceed with programming
the receiver in the next steps. Receiver Collars set to mode A or mode B will each
receive the radio signal from a Barrier Transmitter set to mode AB.
4A
www.petsafe.net 17
4. To program the Receiver Collar to either mode A or mode B,
press and hold the (-) button and then press the (+) button for
approximately 5 seconds. Programming is complete when you hear
a series of three beeps from the Receiver Collar. If the YardMax
®
Rechargeable Receiver Collar does not respond, wake it up from
sleep mode by rotating or shaking the Receiver Collar and program
within 20 seconds.
5. Once the Receiver Collar has been programmed, press the (+) button
to turn the Barrier Transmitter ON. Check to make sure the black bar(s)
appear on the LCD screen indicating the mode you have selected (4B)
and reset the Barrier Transmitter to the desired range.
4B
18 Customer Care Center 1-800-732-2677 www.petsafe.net 19
Training Guide
The PetSafe
®
Pawz Away
®
Mini Pet Barrier operates on the principle of
positive and negative reinforcement. Your pet will learn to avoid the
Barrier Areas you have set after receiving a Progressive Static Correction
(negative reinforcement) and your pet will learn that he is more
comfortable when he avoids the Barrier Areas (positive reinforcement).
In some cases, it may not be necessary to train your pet. You can let your
pet wander freely to determine the new boundaries. Monitor your pet
during his first session. Pets learn at different rates and it may take
several times for your pet to successfully understand and honor
the Barrier Areas.
Begin Your Pet’s First Session
1. Move your pet away from the Barrier Area.
2. Activate the Receiver Collar by turning the battery door to the ON
position. Place the Receiver Collar around your pet’s neck. Be sure
that the Receiver is directly under your pet’s neck.
3. Allow your pet to wander freely to learn the new boundaries.
www.petsafe.net 19
Further Training
If your pet is confused or unsure how to avoid the Barrier Areas then you may
need to teach your pet how to do so by following these easy training steps:
1. Place a second non metallic collar on your pet ABOVE the Receiver
Collar and attach a long leash.
Be sure the extra collar does not put pressure on the Contact Points of
the Receiver Collar.
2. Walk your pet toward the Barrier Area. As soon as you hear the tone or
you see that your pet is receiving a Static Correction, gently pull him away
from the Barrier Area and back into the safe zone.
3. Reward your pet with praise each time he leaves the Barrier Area.
4. Practice this technique a few times until you feel that your pet is
mastering avoidance of the Barrier Areas.
Be sure to never force or entice your pet to enter the Barrier Areas.
Additional Information
The system should only be used with healthy pets. Contact your
veterinarian if you have concerns about the medical condition of your pet
(medication, pregnant, heart conditions, etc).
This system is not for vicious or aggressive pets. If your pet may pose a
threat to others, DO NOT USE THIS SYSTEM. If you are unsure if your
dog is aggressive, please consult your veterinarian or a certified trainer.
20 Customer Care Center 1-800-732-2677 www.petsafe.net 21
Troubleshooting
Barrier Transmitter
does not appear
to work.
Check segment indicator on Barrier Transmitter.
Check/replace batteries in Barrier Transmitter.
Increase the Barrier Area range on the
Barrier Transmitter.
Check that the Barrier Transmitter setting corresponds
to the Receiver Collar setting. (i.e. Barrier Transmitter
is set to mode A and Receiver Collar is synchronized to
pick up mode A)—refer to Additional Features section
beginning on page 13 for instructions.
Barrier Area range
is too low.
Check/replace batteries in Receiver Collar.
Adjust Barrier Transmitter range to increase
Barrier Area size.
Barrier Area range
is too high.
Adjust Barrier Transmitter range to decrease
Barrier Area size.
No segments
on Barrier
Transmitter.
Press the (+) button.
Check/replace batteries in Barrier Transmitter.
1 / 1

Petsafe PWF00-13665 Owner's manual

Category
Pet care
Type
Owner's manual

The PetSafe PWF00-13665 helps you train your dog to stay out of specific areas of your home using static correction. Creating a pet-free zone is simple with the adjustable range that extends up to 10 feet in all directions. Plus, choose from progressive or continuous correction modes to effectively train your furry friend.

Ask a question and I''ll find the answer in the document

Finding information in a document is now easier with AI

Ask the document