AutoVentshade 94682 Owner's manual

Type
Owner's manual
Installation Instructions
Ventvisor® Deflector
Page 1 of 2
I - Sheet Number VV91 Rev.A
For proper installation and best possible fit, please read all instructions BEFORE you begin.
For technical assistance or to obtain missing parts, please call Customer Relations at 1-800-241-7219.
Important Safety Information
• CAUTION - Before driving, ensure that the vent visor is properly secured to vehicle.
• Do not use automatic “brush-style” car washes.
• Do not use cleaning solvents of any kind.
• Periodically check all components for tightness.
Car Wash Supplies Clean Towel
• A trial fit is recommended to ensure proper positioning and fit.
• Check fit of parts before painting as we will not accept the return of modified or painted parts.
• Wash and dry your vehicle to remove any debris and/or dirt from the installation area.
Alcohol Pad x2
Contents - 2 Piece Set
Contents - 4 Piece Set
Front Driver
Side Visor
Tools Required
NOTE: Actual product may vary from illustration.
Preparation Before Painting / Installation
Installation Steps
NOTE: Actual application may vary slightly from illustrations.
Front Passenger
Side Visor
Front Driver
Side Visor
Front Passenger
Side Visor
Rear Driver’s
Visor
Rear Passenger’s
Visor
Alcohol Pad x4
Clean the black metal frame or chrome trim that runs
along the top of the window with an alcohol pad, and
wipe dry with a soft cloth.
1 2
Remove tape liner from rear flange of visor. Peel back 2” (5 cm)
of tape liner from each end of the lateral flange.
free end
free end
lateral flange
rear
flange
front
flange
Installation Steps
NOTE: Actual application may vary slightly from illustrations.
3
4
Page 2 of 2
5
Apply pressure along all flanges to ensure proper adhesion of tape.
6
Repeat Steps 1-7 for opposite side.
Align visor to the previously cleaned surface. To facilitate positioning, line up the rear end flange and the radius of the visor first. The
front end flange may overlap the mirror cap by 1/8” depending on the style of mirror you have.
With the visor in its final position, remove the remaining tape liner
by pulling on free ends.
Gently press the exposed areas of tape against the surface and
verify position.
Care and Cleaning
• Wash only with mild soap & dry with a clean cloth.
Congratulations!
You have purchased one of the many quality Auto Ventshade™ branded products offered by Lund International, Inc. We take the utmost pride in our
products and want you to enjoy years of satisfaction from your investment. We have made every effort to ensure that your product is top quality in
terms of fit, durability, finish and ease of installation.
© 2005 Lund International, Inc. All rights reserved.
Auto Ventshade
TM
, the Auto Ventshade
TM
logo and the AVS
TM
logo are trademarks of Lund International, Inc.
Lund International, Ventshade Accessories Division
655 Raco Drive, Lawrenceville, GA 30045
800-241-7219 • Fax 770-339-5839 • Visit us at lundinternational.com
7
4 Piece Set
The rear visor attaches with the same
preparation methods as the front visor.
radius of visor
foam tape
offset onto plastic
mirror cap
plastic mirror
cap
inside face of window frame
foam tape
rubber window channel
PRESS
visor
cross section of visor in
place
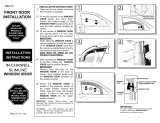
Pasos de instalación
AVISO: La colocación real puede variar con respecto a las ilustraciones.
Página 2 de 2
Cuidado y limpieza
• Limpie solamente con agua jabonosa tibia y seque con un paño limpio.
Felicidades
Usted ha comprado uno de los tantos artículos de calidad de Auto Ventshade™ ofrecidos por Lund International, Inc. Nuestros productos son nuestro mayor orgullo.
Deseamos que disfrute de años de satisfacción con su inversión. Hemos realizado todos los esfuerzos para asegurarnos de que su producto sea de la mejor calidad
en cuanto a ajuste, durabilidad, acabado y facilidad de instalación.
Lund International, Ventshade Accessories Division
655 Raco Drive, Lawrenceville, GA 30045
800-241-7219 • Fax 770-339-5839 • Visite nuestro sitio Web: lundinternational.com
© 2005 Lund International, Inc. Todos los derechos reservados.
Auto Ventshade
TM
, el logo de Auto Ventshade
TM
y el logo de AVS
TM
son marcas comerciales de Lund International, Inc.
3
4
5
Presione todos los rebordes para asegurarse de que la cinta se
adhiera correctamente.
6
Repita los pasos 1 al 7 para el otro lado del vehículo.
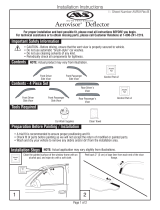
Alinee la visera con la superficie que limpió anteriormente. Para facilitar la colocación, primero alinee el extremo del reborde trasero con
el radio de la visera. El extremo del reborde frontal puede superponerse con la cubierta del espejo por 1/8” dependiendo del estilo de
espejo que tenga.
Una vez que la visera se encuentre en su posición definitiva, quite la
cinta protectora restante tirando de los extremos libres.
Presione suavemente las áreas expuestas de la cinta contra la
superficie y verifique la posición.
7
Juego de cuatro piezas
La visera trasera se coloca siguiendo los mismos pasos que se
siguen para la visera delantera.
radio de la
visera
cinta de espuma
superposición del
extremo del reborde
frontal en la cubierta
plástica del espejo
cubierta
plástica del
espejo
cara interna del marco de la
ventanilla
cinta de espuma
canal de goma de la
ventanilla
PRESIONE
visera
vista del corte transversal de
la visera ubicada en su lugar
  • Page 1 1
  • Page 2 2
  • Page 3 3
  • Page 4 4
  • Page 5 5
  • Page 6 6

AutoVentshade 94682 Owner's manual

Type
Owner's manual

Ask a question and I''ll find the answer in the document

Finding information in a document is now easier with AI