ITEM #0190443,0062870,0064014
4-TIER SHELF RACK
MODEL #143654W-DS,143654B-DS,143654C-DS
ATTACH YOUR RECEIPT HERE
Serial Number _______________________ Purchase Date _______________________
Questions, problems, missing parts? Before returning to your retailer, call our customer
service department at 1-877-888-8225, 8 a.m. - 8 p.m., EST, Monday - Friday.
1
Français
p.9
Español p.17
TM

D
B
C
A
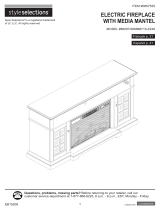
PACKAGE CONTENTS
4
B
4
C 4
32
PART DESCRIPTION QUANTITY
2
A Shelves
D Spacers
Top Rods
(post joiners pre-installed in rods)
Bottom Rods
(foot levelers pre-installed in bottom of rods)

3
HARDWARE CONTENTS
Please read and understand this entire manual before attempting to assemble, operate or install
the product.
T
wo adults required for a safe assembly. Use care when handling.
Do not allow children to climb or play in or around the shelves.
E
ach shelf holds up to 350 lbs., evenly distributed.
Assemble on a soft surface, such as carpeting, to avoid scratching the finish.
•
•
•
•
Before beginning assembly of product, make sure all parts are present. Compare parts with
Estimated Assembly Time: 25 minutes (depending on mounting option).
Tool required for securing unit to wall (not included): Drill and 1/4 in. drill bit.
Helpful Tools (not incluoed): Rubber mallet.
package contents list and hardware contents. If any part is missing or damaged, do not attempt
to assemble the product.
SAFETY INFORMATION
PREPARATION
Carefully read all instructions, warnings, notes and cautions before beginning assembly.
Decide on the shelf location before beginning the assembly. Once the product is assembled,
it is very difficult to move a shelf without taking the entire assembly apart and starting over.
Use the grooves on the vertical rods as a “ruler” to properly position the shelves.
AA
Washer
Qty. 2
BB
Plastic Anchor
Qty. 2
CC
Screw
Qty. 2

4
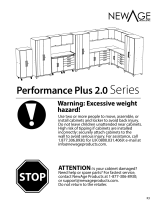
ASSEMBLY INSTRUCTIONS
1.
2.
3.
Screw the top rods (B) onto the threaded ends of
the bottom rods (C). Be sure the connection is
secure.
Attach two spacers (D) at about the third groove
(from the foot levelers) on each bottom rod (C)
assembly. Note: Be sure the arrows on the spacers
point upward.
Place the bottom rods (C) through the corner holes
of one shelf (A). Push the shelf (A) down until the
corners fit securely over each spacer (D). Hint: lf the
corners do not fit securely over each spacer, make
certain the arrows on the spacers (D) point upward.
1
B
C
2
D
C
3
C
C
D
A

5
4.
5.
6.
Stand the assembly upright.
Attach two spacers (D) at about the fifteenth
groove (from the bottom shelf (A)) on each
bottom rod (C) assembly.
Place a second shelf (A) over the rods. Push
down until the corners fit securely over each
spacer (D).
4
5
6
C
A
D
C
A
C

6
7.
8.
9.
Attach two spacers (D) at about the fifteenth
groove (from the second shelf (A)) on each
bottom rod (C) assembly.
Place a third shelf (A) over the top rods (B). Push
down until the corners fit securely over each
spacer (D).
Attach two spacers (D) at about the fifteenth
groove (from the third shelf (A)) on each top rod
(B) assembly.
7
D
C
8
9
D
B
A
B
C

7
10. Slace the remaining shelf (A) over the top rods
(B). Push down until the corners fit securely over
each spacer (D).
10
B
C
A
CARE AND MAINTENANCE
Periodically check the casters (sold separately), and spacers to be sure they are secure.
Never use abrasive or acid-based cleaners on the shelf rack.
Clean shelves and rods with a solution of mild detergent and water. Use a soft cloth or sponge
to wipe parts. Rinse and dry thoroughly.
Keep surfaces dry and clean for a longer lasting finish.
•
•
•
•
11. To prevent the unit from tipping over, secure it to a
wall in the following manner: Drill a hole in the wall
using a 1/4 in. drill bit (not included). Insert the
plastic anchor (BB) into the hole. Insert the screw
(CC) through the washer (AA) then through the back
of the top shelf wire and into the plastic anchor (BB)
as shown. Be sure unit is secure and doesn’t
wobble or tip over.
11
AA
BB
CC

Printed in China
REPLACEMENT PART LIST
A 1
Shelves
B 2
Top Rods
C 3
Bottom Rods
D 4
Spacers
A 5A
Washer
B 6B
Plastic
Anchor
CC 7 Screw
For replacement parts, call our customer service department
D
AA
CC
at 1-877-888-8225, 8 a.m. - 8 p.m.,
EST, Monday - Friday.
PART DESCRIPTION PART #
BB
AA
CC
D
B
C
A
8
/