Geemarc CL 1200 Owner's manual
- Category
- Telephones
- Type
- Owner's manual
This manual is also suitable for


1
CONTENTS 1
INTRODUCTION 3
Unpacking the Telephone 4
DESCRIPTION 5
General Description 5
INSTALLATION 10
Setting Up 10
Wall Mounting 11
SETTINGS 12
Ringer Settings 12
Flash (Recall) Setting 12
Receiving Voume and Tone Settings 13
Speakerphone Volume Setting 15
Sending Volume Setting 15
USING THE TELEPHONE 16
Making a Call 16
Receiving a Call 17
Last Number Redial 17
Mute Function 17
Hearing Aid Use 18
Flash Signal 18
MEMORY 19
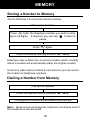
Storing a Number to Memory 19
Dialling a Number from Memory 19
CONTENTS

2
TROUBLESHOOTING 20
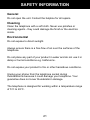
SAFETY INFORMATION 21
GUARANTEE 22
RECYCLING DIRECTIVES 24
CONTENTS

3
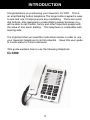
Congratulations on purchasing your Geemarc CL1200. This is
an amplified big button telephone The large button keypad is easy
to see and use, it helps prevent any misdialling. There are quick
dial buttons, also designed to make dialling easier because you
will be able to call friends, family and other important people with
the ease of one touch dialling. This telephone is compatible with
hearing aids.
It is important that you read the instructions below in order to use
your Geemarc telephone to its full potential. Keep this user guide
in a safe place for future reference.
This guide explains how to use the following telephone:
CL1200
INTRODUCTION

4
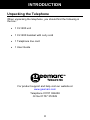
Unpacking the Telephone
When unpacking the telephone, you should find the following in
the box:
• 1 CL1200 unit
• 1 CL1200 handset with curly cord
• 1 Telephone line cord
• 1 User Guide
For product support and help visit our website at
www.geemarc.com
Telephone 01707 384438
Or fax 01707 372529
INTRODUCTION

5
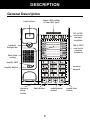
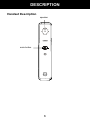
General Description
handset
hanger tab
speaker
amplify button
hook button
M1 to M3
one touch
memory
locations
M4 to M19
one touch
memory
locations
numeric
keypad
ringer LED (white)
in use LED (red)
memory
store
button
flash button redial/pause
button
hands free
button
flash time
setting
DESCRIPTION
amplify LED

6
Handset Description
speaker
mute button
DESCRIPTION

7
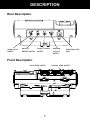
Rear Description
Front Description
ringer tone
switch
amplify
default switch
ringer volume
switch
sending
volume
switch
telephone line
jack
tone slide switch volume slide switch
DESCRIPTION

8
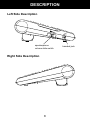
Left Side Description
Right Side Description
speakerphone
volume slide switch
handset jack
DESCRIPTION

9
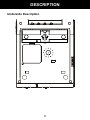
Underside Description
DESCRIPTION

10
Setting Up
Connect the handset to one end of the curly cord. Plug the other
end of the curly cord into the jack on the left hand side of the
CL1200 unit. Place the handset on the cradle.
Connect the line cord to the jack located at the rear of the
telephone. Connect the plug at the other end of the line cord into
the wall socket *.
Pick up the handset and listen for the dial tone.
(*) Classified TNV-3 according to EN60950 standard
INSTALLATION

11
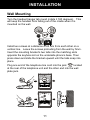
Wall Mounting
Turn the handset hanger tab round (rotate it 180 degrees). This
will keep the handset from falling out of the cradle when it is
mounted on the wall.
Install two screws at a distance of 83 mm from each other on a
vertical line. Leave the screws protruding from the wall by 5mm.
Insert the mounting bracket’s two tabs into the matching slots
opposite the keyhole slot on the underside phone’s base. Then
press down and slide the bracket upward until the tabs snap into
place.
Plug one end of the telephone line cord into the jack located
at the rear of the telephone unit and the other end into the wall
plate jack.
INSTALLATION

12
Ringer Settings
A switch located on the rear of the CL1200 unit allows the
ringer volume to be switched to HI (maximum volume), LOW
(lowest volume) or OFF (if you would prefer not to be disturbed).
A switch located on the rear of the CL1200 unit allows
the ringer tone to be selected. There are 3 tones available, HIGH,
MID and LOW.
Flash (Recall) Setting
You can adjust the flash time by using the switch located under
the protective cover on the top of the telephine unit. There are
two levels available, 100ms and 270ms. Your telephone works
with a flash time for United Kingdom (R=100ms).
SETTINGS

13
Receiving Volume and Tone Settings
You can alter the receiving volume and tone during a
conversation according to your hearing requirements.
The handset earpiece volume may be adjusted during a call using
the volume slide control
found at the front of the telephone
base. The volume adjustment available is 0-15dB.
The speakerphone volume is adjusted with the volume slide
control
found on the left side of the base.
The button on the telephone base provides additional
amplification of 15dB i.e the volume adjustment will become 15-
30B. When the amplify function is activated, the Amplify LED will
be lit.
Setting a default for Amplification.
The switch located at the rear allows the amplification facility
to be switched ON or OFF as a default each time you use the
telephone. ‘1’ is ON.
SETTINGS

14
AMPLIFY ON/OFF Switch at ON Position
The additional amplification and tone controls are automatically
activated each time you use the telephone. The amplify LED
light will be lit when you use the telephone.
Pressing the Amplify button during a call will turn off the additional
amplification and tone controls. However, you can still adjust the
handset receive volume with the Volume slide bar.
Irrespective of how many times you press the amplify key
throughout a call, the next time you pick up the handset to make a
new call, these functions will be activated once again.
AMPLIFY ON/OFF Switch at OFF Position
The additional amplification and tone controls are deactivated
each time you use the telephone. The Amplify LED will be off
whenever you use the telephone.
Pressing the Amplify button once during a call will enable tone
control and additional amplification. The LED light will turn on to
reflect this change. If you press the amplify button once more,
the additional amplification and tone control features will be turned
off once again. The LED light will turn off to reflect this change.
Irrespective of how many times you press the amplify key
throughout a call, the next time you pick up the handset, these
functions will be turned off once again.
SETTINGS

15
Tone Receiving Adjustment
If the receiver volume has been amplified, the tone control
can also be adjusted. You can adjust and increase
the low frequency or high frequency sounds with the tone slide
control on the top of the unit.
Note: The tone adjustment function will not be affective when the
receiver volume is set to normal level.
Speakerphone Volume Setting
In hands free mode you can adjust the speaker volume by using
the volume slide control on the left side of the base.
Sending Volume Setting
If your voice is quiet or called parties have difficulty hearing you,
you can increase the sending volume using the - 4 0 + 4 switch
found at the rear of the telephone.
SETTINGS

16
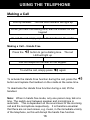
Making a Call
Pick up handset. The red LED indicator will light up
When you hear the dialling tone, dial the number on the
keypad
To end the call simply replace the handset in the cradle
Making a Call – Hands Free
Press the button to get a dialling tone. The red
LED will light up
Dial the telephone number on the keypad.
To end the call, simply press again
To activate the Hands Free function during the call, press the
button and replace the handset on the cradle at the same time.
To deactivate the Hands Free function during a call, lift the
handset.
Note: When in hands free mode, only one person may talk at a
time. The switch-over between speaker and microphone is
automatic. This is dependent on the sound level of the incoming
call and the microphone respectively. It is therefore essential
that there are no loud noises, e.g. music, in the immediate vicinity
of the telephone, as this will disrupt the hands free function.
USING THE TELEPHONE

17
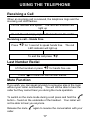
Receiving a Call
When an incoming call is received, the telephone rings and the
incoming call LED flashes.
Lift the handset and speak. The red LED indicator will
light up
To end the call simply replace the handset in the cradle
Receiving a call – Hands Free
Press for 1 second to speak hands free. The red
LED indicator will light up
To end the call press
Last Number Redial
Lift the handset or press for hands free use
Press
to redial the last number dialled.
Mute Function
If you wish, you can speak privately to someone else in the room
without your caller overhearing. You will still be able to hear the
caller but they cannot hear you during the mute operation.
To switch on the mute mode during a call press and hold the
button – found on the underside of the handset. Your caller will
not be able to hear you anymore.
Release the mute again to resume the conversation with your
caller.
USING THE TELEPHONE
USING THE TELEPHONE

18
Hearing Aid Use
This telephone is hearing aid compatible. Select the T mode on
your hearing aid to enable this feature.
Flash Signal
The R button can be used with special services such as Call
Waiting (if provided by your service provider) or transferring
external calls to another extension within a private switchboard.
This button acts as an electronic form of a switch hook operation.
USING THE TELEPHONE
Page is loading ...
Page is loading ...
Page is loading ...
Page is loading ...
Page is loading ...
Page is loading ...
Page is loading ...
Page is loading ...
-
 1
1
-
 2
2
-
 3
3
-
 4
4
-
 5
5
-
 6
6
-
 7
7
-
 8
8
-
 9
9
-
 10
10
-
 11
11
-
 12
12
-
 13
13
-
 14
14
-
 15
15
-
 16
16
-
 17
17
-
 18
18
-
 19
19
-
 20
20
-
 21
21
-
 22
22
-
 23
23
-
 24
24
-
 25
25
-
 26
26
-
 27
27
-
 28
28


Geemarc CL 1200 Owner's manual
- Category
- Telephones
- Type
- Owner's manual
- This manual is also suitable for
Ask a question and I''ll find the answer in the document
Finding information in a document is now easier with AI
Related papers
-
Geemarc AMPLI550 Installation guide
-
-
-
-
Geemarc CL10 User guide
-
Geemarc PHOTOPHONE 100 Owner's manual
-
-
-
-
