Kenmore 91141485890 Owner's manual
- Category
- Microwaves
- Type
- Owner's manual

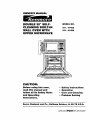
OWNER'S MANUAL
DOUBLE 30" SELF-
CLEANING BUILT-IN
WALL OVEN WITH
UPPER MICROWAVE
MODEL NO.
911. 41485
911.41489
i,,,,
CAUTION:
Before using this oven,
read this manual and
follow all its Safety Rules
and Operating
Instructions.
• Safety Instructions
• Operation
• Care and Cleaning
• Problem Solving
Sears, Roebuck and Co., Hoffman Estates, IL 60179 U.S.A.
229C4O2OP227-1 (SR10426)

TABLEOFCONTENTS
SELF-CLEANINGBUlLT-IN
WALLOVENWITHMICROWAVE
Oven Safety ................................ 3-6
Removal of Packaging Tape ........... 6
Features of Your Oven .................... 7
Microwave Oven Control ................ 8
Power Level ................................ 8-9
Time Cook I ..................................... 9
Time Cook Guide ............................ 9
Time Cook II .................................. 10
Time Defrost .................................. 10
Add 30 Seconds ........................... 10
Express Cook ................................ 10
Auto Feature ................................. 10
Timed Defrosting Guide ................ 11
Humidity Sensor ............................ 12
Popcorn ........................................ 12
Reheat ........................................... 12
Potato ............................................ 12
Beverage ...................................... 13
Snacks .......................................... 13
Snacks Guide ............................... 13
Cook .............................................. 13
Cook Guide ................................... 13
Upper Oven Clock ........................ 14
Display On/Off .............................. 14
Reminder ...................................... 14
Delay Start .................................... 14
Sound On/Off ................................ 14
Lower Oven Control ...................... 15
Lower Oven Display ...................... 16
Lower Oven Clock ........................ 17
Lower Oven Kitchen Timer ........... 17
Lower Oven Tones ........................ 18
Lower Oven F Code ...................... 18
Lower Oven Cooking Tips ...... 19-20
Baking With Margarine ................. 19
Baking ........................................... 21
Broiling .......................................... 22
Setting Special Features ............... 23
Self-Cleaning Cycle ................ 24-25
Microwave Oven Interior ............... 26
Microwave Oven Floor .................. 26
Microwave Oven Door Window .... 26
Outside Oven Surfaces ................. 26
Microwave Control Panel .............. 26
Lower Oven Control Panel ............ 27
Broiler Pan and Grid ..................... 27
Oven Racks .................................. 27
Walls of the Oven .......................... 27
Glass ............................................. 27
Oven Light Bulb ............................ 28
Oven Door ..................................... 28
Removable Oven Racks ............... 28
Before Calling for
Service .................................... 29-30
Temperature Adjustment .............. 31
Warranty ........................................ 35
Consumer Service Numbers ......... 36
For your convenience and future reference, please write down
your model and serial numbers in the space provided. They are
located on the inside of the microwave on the right side.
MODEL NUMBER: SERIAL NUMBER:
2

IMPORTANTSAFETY
INSTRUCTIONS
SAVE THESE INSTRUCTIONS
Read all instructions before using this appliance. When using gas or electrical
appliances, basic safety precautions should be followed, including the following:
IMPORTANT: To insure safety for
yourself, family, and home, please
read your Owner's Manual carefully.
Keep it handy for reference. Pay
close attention to Safety Sections. BE
SURE your appliance is installed and
grounded by a qualified technician.
• DO NOT leave children alone
or unattended near an appliance
in use.
• TEACH CHILDREN not to play
with controls or any part of the
appliance and not to sit, climb, or
stand on the door, or any part of the
appliance.
• CAUTION: NEVER STORE
items of interest to children in
cabinets above the appliance.
Children climbing on the appliance
could be seriously injured.
• KEEP THIS book.for later use.
• NEVER TRY to repair or replace
any part of the appliance unless
instructions are given in this manual.
All other work should be done by a
qualified technician.
• NEVER USE your appliance for
warming or heating the room.
• ALWAYS KEEP combustible wall
coverings, curtains, dishcloths,
towels, potholders, and other linens
a safe distance from the appliance.
• NEVER USE a towel or other bulky
cloth as a potholder, and make sure
the potholder is dry. Moist
potholders could cause steam
burns. DO NOT let potholders
touch hot surfaces.
• ALWAYS KEEP your appliance
clear of things that will burn
(gasoline and other flammable
vapors or liquids).
• ALWAYS KEEP the oven area
free from things that will burn. Food,
wooden utensils, and grease
buildup could catch fire. Plastic
utensils could melt and canned
foods could explode. Your
appliance should never be used as
a storage area.
• NEVER HEAT unopened food
containers. Pressure buildup can
cause the container to burst and
cause injury.
• NEVER LEAVE jars or cans of fat
or drippings in your oven.
• NEVER TRY to clean a hot
surface. Some cleaners produce
noxious fumes and wet cloths or
sponges could cause steam burns.
° BE SURE the oven is securely
installed in a cabinet that is firmly
attached to the house structure.
• DO NOT touch heating elements,
surfaces near them, or interior oven
surfaces. These may be hot enough
to cause burns even though they
are dark in color. During and after
use, do not touch or let clothing or
flammable material contact the
elements or hot surfaces until they
have had time to cool. Other
surfaces near the oven vent
openings, oven door, and window
surfaces may also be hot enough to
cause burns.
3

IMPORTANTSAFETY
INSTRUCTIONS
• PLACE OVEN RACKS in the desired
position while the oven is cool. If racks
must be moved while oven is hot, do not
let potholder contact the hot oven
element.
• AFTER BROILING, always take the
broiler pan and grid out of the oven and
clean them. Leftover grease in the
broiler pan could catch fire the next time
you use your oven.
,, ALWAYS USE care when opening the
oven door. Let hot air and steam escape
before moving foods.
• NEVER USE aluminum foil to line the
oven bottom. Improper use of foil could
start a fire, or electrical shock could
result.
• NEVER BLOCK the oven vent
opening.
• CLEAN ONLY the parts listed in this
manual. Follow all cleaning instructions.
Be sure to remove the broiler pan and
grid before self-cleaning
• NEVER RUB, move, or damage the
door gasket on self-cleaning ovens.
• NEVER TRY to clean utensils,
cookware, removable parts, or broiler
pan and grid in the self-clean cycle.
• DO NOT USE oven cleaners - No
commercial oven cleaner or protective
coating of any kind should be used in or
around any part of the oven.
IMPORTANT SAFETY NOTICE!
The California Safe Drinking Water
and Toxic Enforcement Act
requires the governor of California
to publish a list of substances
known to the state to cause birth
defects or other reproductive
harm and requires businesses to
warn their customers of potential
exposure to such substances. The
fiberglass insulation in a self.
cleaning oven will give off a very
small amount of carbon monoxide
during the cleaning cycle.
Exposure can be minimized by
venting with an open door or
window or using a ventilation fan
or hood.
IMPORTANT: The health of
some birds is extremely sensitive
to the fumes given off during the
self-cleaning cycle of any oven.
Move birds to another well-
ventilated room.
READ AND UNDERSTAND
THIS INFORMATION NOW!
Be sure everyone in your home
knows what to do in case of fire.
Never use water on a grease fire;
it will only spread the flames.
OVEN FIRE:
Do not try to move the pan!
t. Close the oven door and turn
controls off.
2. if fire continues, carefully open the
door, throw baking soda on the fire, or
use a dry chemical foam, or halon-
type extinguisher.
When using electrical
appliances, basic safety
precautions should be
followed, including the following:
WARNING: To reduce the risk of
burns, electric shock, fire, injury
to persons, or exposure to
excessive microwave energy:
• Read all instructions before
using this appliance.
• Read and follow the specific
microwave safety instructions.

IMPORTANTSAFETY
INSTRUCTIONS
• THIS APPLIANCE must be
grounded. Connect only to properly
grounded outlet. See the Grounding
instructions in the Installation
Instructions.
• USE this appliance only for its intended
use as described in this manual. Do not
use corrosive chemicals or vapors in
this appliance. This microwave oven is
specifically designed to heat or cook
food and is not intended for laboratory
or industrial use.
• INSTALL or locate this appliance only
in accordance with the provided
installation Instructions.
• DO NOT cover or block any openings
on the appliance.
• THIS MICROWAVE oven is not
approved or tested for marine use.
• DO NOT operate this appliance if itis
not working properly or if it has been
damaged or dropped.
• AS WITH ANY APPLIANCE close
supervision is necessary when used by
children.
• DO NOT overcook food. Carefully
attend appliance if paper, plastic,
or other combustible materials are
placed inside the oven to facilitate
cooking.
• REMOVE wire twist-ties from paper or
plastic bags before placing in the oven.
• DO NOT use your microwave oven to
dry newspapers.
• DO NOT use recycled paper products.
Recycled paper towels, napkins, and
waxed paper can contain metal flecks
which may cause arcing or ignite. Paper
products containing nylon or nylon
filaments should be avoided.
• DO NOT heat food in closed
containers, such as glass jars, which
may explode.
• DO NOT pop popcorn in your
microwave unless you use popcorn
labeled for use in microwave ovens.
• DO NOT overcook potatoes. They
could dehydrate and catch fire, causing
damage to your oven.
• DO NOT operate the microwave oven if
it is empty.
• DO NOT use your microwave oven as
a storage space.
• IF MATERIAL INSIDE the oven
should ignite, close the door, turn the
oven off, and disconnect the power to
the appliance
• OVERSIZED food or oversized metal
cookware should not be used in a
microwave oven Electrical shock or fire
could occur.
• DO NOT clean with metal scouring
pads. Pieces can break off the pad,
causing electrical shock.
• DO NOT defrost frozen beverages that
have narrow-necked bottles. Pressure
could build up, causing the bottle to
burst.
• USE POTHOLDERS when removing
cookware from the oven Cookware
could become hot during cooking due
to the transferred heat from the food.
• BE CAREFUL touching the walls or
the oven bottom during or after cooking.
The walls and floor could become hot.
• DO NOT boil eggs in a microwave
oven. Pressure will build up inside the
egg yolk and will cause the egg to burst.
• USE PLASTIC containers that are
approved by the manufacturer for
microwave use. Do not allow children to
use plastic containers unless
supervised. De not subject empty
containers to microwaving.
5

IMPORTANTSAFETY
INSTRUCTIONS
• FOODS WITH UNBROKEN OUTER
SKIN, such as potatoes, sausages,
tomatoes, apples, chicken liver, egg
yolks, and other giblets, should be
pierced to allow steam to escape during
cooking.
• MAKE SURE PLASTIC WRAPS
used during microwave cooking are
approved for microwave use.
• SPONTANEOUS BOILING: Under
certain circumstances, liquids may start
to boil during or shortly after removal
from the oven. Stirring the liquid briefly
before removing the container will help
prevent burns or splashing of liquids.
• DO NOT heat baby food in glass jars in
the microwave.
• BOILABLE COOKING POUCHES
and tightly closed plastic bags should
be slit, pierced, or vented as directed by
package. If they are not vented in some
way, pressure will cause them to burst.
• DO NOT attempt to operate this
oven with the door open since open-
door operation can result in harmful
exposure to microwave energy. It is
important not to defeat or
tamper with the safety
interlocks
• DO NOT place any object between
the oven front face and the door or
allow soil or cleaner residue to
accumulate on sealing surfaces.
• THE OVEN should not be adjusted
or repaired by anyone except
properly qualified service personnel,
• DO NOT operate the oven if it is
damaged. It is particularly important
that the oven door close properly
and that there is no damage to the:
1. door (bent)
2. hinges and latches (broken or
loosened)
3. door seals and sealing surfaces.
To remove the adhesive residue left from
packaging tape, use household
dishwashing liquid, mineral oil, or cooking
oil. With a soft cloth, rub into the area and
allow to soak. Rinse and dry well. Repeat
procedure using an appliance polish to
insure no damage is done. This should
be done before the oven is turned
on for the first time. The tape
cannot be removed once the
oven has heated. Packaging tape
may be found in the following areas:
Door Handle, Control Panel Area, Door
Trim, and Oven Area.
6

OPERATION
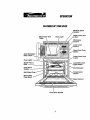
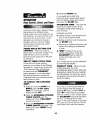
FEATURESOFYOUROVEN
Model & Serial
Microwave Turn Oven Light
Table
Microwave
Vent
Lower Oven
Auto Self-Clean
Door Latch
Ovel
Broiler Pan &
Grid
Oven Rack
Guides
Self-Clean Oven
Removable
Oven Rack
III
Open Door Push
Lower Oven Vent
& Grill
Automatic Oven
rght Switch
Element
_Element
Oven Door Gasket
7

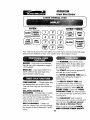
OPERATION
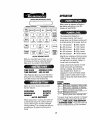
UPPER MICROWAVE OVEN
( )
SENSOR COOKING CONVENIENCE COOKING
GUIDE BEHIND DOOR
Withyour new Microwave Oven, youcan
microwave by time by using the Sensor
features or by using the Auto features.
TIME COOK EXPRESS COOK
TIME DEFROST ADD 30 SEC
Time Features allow you to set the exact
amount of time needed to prepare foods,
up to 99 minutes and 59 seconds.
Below is a list of buttons that control
Sensor features.
POPCORN SNACKS
BEVERAGE POTATO
REHEAT COOK
AUTO DEFROST
When using sensor cooking, the oven will
automatically adjust the cooking time for
you by detecting the humidity released
during cooking. The cooking time will vary
according to the types and amounts of
foods.
When power is restored, all digits in
the display will light up, then the
display will read RESET.
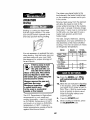
Thisfeature adds flexibility to
microwave cooking. Each level of
power gives you microwave energy with
a certain percent of the power.Such as:
1= 10%of power
2= 20%of power
3= 30%of power
4: 40% of power
5= 50% of power
6= 60%ofpower
7= 70%ofpower
8= 80%of power
9= 90%of power
O= 100%of power
Mostof your cooking will be done using
100%of power.Foods will cook faster
butwill need to be stirred, rotated, or
turned over morefrequently.
Using a lowerlevel of power will cook
foods moreevenly and need less
stirring or rotating.Somefoods may
have a better flavor,texture, or
appearance if one of the lower power
levels isused. A lower power is much
better for foods that have tendencies to
boil over.
POWER
LEVEL
10
7
5
2or3
1
FOODS
Fish,bacon, vegetables, boiling liquids
Meat,poultry,casseroles,or reheating
Stews,less tendercuts of meat
Defrosting,simmering
Keeping foods warm,softening butter
The power level may be entered or changed
immediately after entering the feature time,
such as TIME COOK, TIME DEFROST,
or EXPRESS COOK. The power levelmay
also be changed during a time countdown.
8

OPERATION
1. Pressthe TIME COOK pad orthe TIME
DEFROST pad.
2, Pressthe NUMBER padsto set a
cooking or defrosting time.
3, PressthePOWER LEVEL pad.
4. Pressa NUMBER pad toset thepower
level youneed.
5, Pressthe START pad.
TIME COOK t is automaticallyset for
power level 10,but you can change this level
to one you prefer.Youmay set a cooking time
up to 99 minutesand 59 seconds.
1, Pressthe TIME COOK pad.
2, Pressthe NUMBER pads to enter your
preferred cooking time.
3, If you wish to change the power level,
press the POWER LEVEL pad and then
press a NUMBER pad to select your
preferred power level.
4, Pressthe START pad.
If youopen theoven door during cooking to
check foods, whenthe door is closed press
theSTART pad to continue cooking.
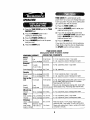
VEGETABLE
Beans
(fresh)
frozen)
Broccoli
(fresh)
frozenchopped)
Carrots
fresh, sliced
frozen)
Corn on the
cob
(fresh)
frozen)
Mixed reg.
(frozen)
Peas
fresh,shelled)
(frozen)
Potatoes
(fresh, cubed,
white)
(fresh,whole,
sweet,or white
WEIGHT
:1 lb.
10 oz. package
1 bunch
(1¼ to1½ Ibs.)
10 oz. package
10 oz. package
10 oz. package
1 to 5 ears
1 ear
2 to 6 ears
10 oz. package
21bs. unshelled
10 oz. package
4 potatoes
(6 to 8 oz. each)
1 (6 to 8 oz.)
TIME COOK GUIDE
(Use power level 10 unless noted)
C00KING TIME
10 to 15 min.
4 to 8 min.
5 to 9 min.
4 to 7 min.
4 to 8 rain.
3 to 7 min.
1V2rainperear
3 to 6 min.
2to3 min.perear
2 to 6 min.
7 to 10 min.
2 to 6 min.
9 to 12 min.
1 to 4 min.
COMMENTS
In 1V2-qt.casserole, place V2cup water.
In 1-qt. casserole, place 2 tablespoons water
In 2-qt. casserole, place ½ cup water.
In 1-qt. casserole.
In 1V2-qt.casserole, place _Acup water.
In 1-qt. casserole, place 2 tablespoons water.
In 2-qt. oblong glass baking dish, place corn. If corr
is in no water, husk corn and add ¼ cup water.
Rearrange after half the time.
Place in 2-qt. oblong glass baking dish. Cover with
vented plastic wrap. Rearrange after half the time.
In 1-qt. casserole, place 3 tablespoons water,
In 1-qt. casserole, place V4cup water.
In 1-qt. casserole, place 2 tablespoons water.
Peel and cut into 1-inch cubes. Place in 2-qt.
casserole with ½ cup water. Stir after half the time.
!Pierce with cooking fork. Place in center of the oven
Let stand 5 minutes.
9

OPERATION
TimedCooking
TIME COOK II allows you tochange power
levels automaticallyduring cooking.
t, Pressthe TIME COOK pad.
2. PresstheNUMBER pads toenteryour
first cooking time.
3, If youwish to change the power level,
press thePOWER LEVEL pad and then
press theNUMBER pad toselectyour
preferred power level.
4, PresstheTIME COOK pad again.
5, PresstheNUMBER pads again to enter
your second preferredcooking time.
6, If youwish tochange the power level,
press the POWER LEVEL pad and then
press the NUMBER pad toselect your
preferred power level.
7, PresstheSTART pad.
At the end of the first cooking time
countdown, the second cooking time will
start its countdown.
Allows you to defrost for a selected length of
time. The Power Level is automatically set
for level 3 but can be changed. Whenusing
higher power levels, foods will need to be
checked more frequently.
TO SET TIME DEFROST:
1. Press theTIME DEFROST pad
2. Press theNUMBER pads toenterthe
defrosting time.
3. PresstheSTART pad.
Youcan use this feature two ways:
• It will add 30 seconds tothe timecounting
down each time the pad is pressed.
• It can be used as a quick way to set 30
seconds of cooking time.
This is a quick way to set cooking time from
1 to 6 minutes.
Press one of the Express Cook pads (from
1 to 6) for 1to 6 minutes of cooking at
power level 10.
The power can be changed while the
time is counting down, Press the POWER
LEVEL pad and enter a number from
1 toO.
Auto Defrostautomatically setsthe defrosting
timesand power levelsto give even
defrostingresultsfor meats, poultry,and fish.
Use TimeDefrostfor most other frozen foods.
TO SET AUTO DEFROST:
1. Pressthe AUTO DEFROST pad.
2. Usingthe ConversionGuide, enter the
food weight.
3. Pressthe START pad.
Thereisa handy guide located on theinside
frontof the microwave oven.
• Removemeat frompackage and place on
a microwave-safedish.
• Twiceduring defrost, the oven signals
"TURn.*' At each "TURn" signal,turn the
food over.Removedefrosted meator
shieldwarm areaswith smallpieces of foil.
• Afterdefrosting, most meatsneed to stand
5 minutesto complete defrosting.Large
roastsshould standfor about 30 minutes.
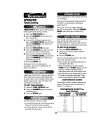
CONVERSION GUIDE
If theweight of food isstated in poundsand
ounces, the ounces must be converted to
tenths (.1)of a pound.
CONVERSION CHART for
Auto Defrost
FOOD WEIGHT FOOD WEIGHT
IN OUNCES IN TENTHS
1-2
3
4-5
6-7
8
9-10
11
12-13
14-15
.1
.2
.3
.4
.5
.6
.7
.8
.9
10

OPERATION
TimedCooking
FOOD
Breads, Cakes
Buns and rolls
Sweet rolls
Fish and Seafood
Fillets, frozen (1 lb.)
Shellfish,smallpieces(1lb.)
Meat
Bacon (1 lb.)
Franks (1 lb.)
Ground meat (1 lb.)
Roast:beef,lamb,vea!,pork
Steaks, chops, and
cutlets
Poultry
Chicken, broiler, fryer
cut up (2V2 to 3 Ibs.)
Chicken, whole
(21/2to 3 Ibs.)
Cornish Hen
Turkey breast
(4 to 6 Ibs.)
TIMED DEFROSTING GUIDE
TIME COMMENTS
_Amin.
2 to 4 min.
6 to 9 rain. Place block in casserole. Turnover and break up after
3 to 7 min. half the time.
2 to 5 min PlaceunopenedpackageinovenLetstand5minutesafterdefrosting
2 to 5 rain Place unopenedpackage in oven. Microwavejust until franks
can be separated.Let stand 5 minutes,if necessary,to
complete defrosting.
4 to 6 min. Turnmeatoverafterhalf thetime, Usepower level1.
9to 13min.perlb.
4 to8 min.per lb. Place unwrappedmeatin cooking dish. Turnoverafter half
the time and shieldwarmareaswithfoil. Whenfinished,
separate pieces and letstandto completedefrosting.
14 to 20 min. Placewrappedchickenin dish.Unwrapandturnoverafterhalf
thetime Whenfinished,separatepiecesand microwave2 to4
minutesmore,ifnecessaryLetstandtofinishdefrosting,
20 to 25 min. Place wrapped chicken in dish. After half the time,
unwrap and turn chicken over, Shield warm areas with foil.
Finish defrosting. If necessary, run cold water in the cavity
until giblets can be removed.
7 to 13 min. Place unwrapped hen in the oven breast side up. Turn
)er lb. over after half the time. Runcool water in the cavity until
giblets can be removed,
to 8 rain. Place unwrapped breast in dish breast side down. After
)er lb. half the time, turn over and shield warm areas with foil.
Finish defrosting. Let stand 1 to 2 hours in refrigerator to
complete defrosting.
• Foods frozen in paper or plastic can be
defrosted in the package. Closed
packages should be slit, pierced, or
vented after food has partially defrosted.
Plastic storage containers should be
partially uncovered.
• Family-size,prepackaged frozen dinners
can be defrosted and microwaved. If the
food is in a foil container, transfer itto a
microwave-safe dish.
• Foods that spoil easily should not be
allowed to sitout for more than one hour
after defrosting. Roomtemperature
promotes thegrowth of harmful bacteria.
• Formore even defrostingof larger foods,
such as roasts,useAuto Defrost.Be sure
large meatsare completely defrosted
before cooking.
• Whendefrosted, food should be cool and
softened in allareas. If you still notice icy
spots, just let stand a few minutes.
11

OPERATION
SensorCooking
The Sensor Feature detects the increasing
humidity released during cooking The oven
automatically adjusts the cooking time to
various types and amounts of food.
o Thepropercontainersand coversare
essentialfor bestsensorcooking.
, Alwaysusemicrowave-safecontainersand
coverthemwithlidsor ventedplasticwrap.
Neverusetight-sealingplasticcontainers,
which canpreventsteamfromescapingand
causefoodtoovercook.
. Besurethe outsideof thecookingcontainers
andtheinsideofthemicrowaveovenaredry
beforeplacinglood inthe oven.Beadsof
moistureturning intosteamcanmisleadthe
sensor.
Useonly with prepackagedmicrowave
popcornweighing 1.75to 3.5ounces.
TO USE THE POPCORN FEATURE:
Followpackage instructionsusingTIME COOK
ifthe package isless than175 ouncesor larger
than3.5 ounces.Placethe package of popcorn
inthe center ofthemicrowave.
1. Pressthe POPCORN pad.
Ifyouopenthe doorwhile"POP" isin display,
"ERROR" will appear.Closethe doorand press
theSTART pad
2. HOW TO ADJUST THE POPCORN
PROGRAM TO PROVIDE A SHORTER
OR LONGER COOK TIME:
Ifyoufind thatthe brand of popcornyouuse
underpopsorovercooksconsistently,you
canadd or subtract20to 30secondsto/from
theautomaticpopping time
TO ADD TIME:
AlterpressingthePOPCORN pad, press9
immediatelyaftertheovenstartsfor anextra
20seconds Press9 againtoadd another
10seconds(total30secondsadditionaltime).
TO SUBTRACT TIME:
Afterpressingthe POPCORN pad,press 1
immediatelyaftertheovenstartsfor
20secondslesscookingtime. PressI again
toreducecookingtimeanother10seconds
(total30secondslesstime).
TheReheatFeaturereheatssingleservingsof
previouslycookedfoodsor a plateof leftovers.
t. Placecoveredfoodin the oven.
2. Pressthe REHEAT pad. Theovenwill
startimmediately.
3. Theovensignalswhensteamis
sensedand thetime remainingbegins
countingdown.
Donot opentheovendooruntiltime isfinished
counting down, Ifthe door isopened,closeit
and pressthe START pad immediately.
Afterremovingfoodfromthe oven,stir,if
possible,to evenout thetemperature.If the
food isnothotenough,usetheTIME COOK
pad to reheatfor moretime.Reheated
foods may have wide variation in
temperature. Some areas may be
extremely hot.
FOODS NOT RECOMMENDED FOR
REHEATING:
• BreadProducts
• Foodsthat must bereheateduncovered
• Foodsthat needto bestirred
• Foodsthat callfor a dry lookor crisp surface
afterreheating
ThePotatoFeaturecooks _/2to2 Ibs.of
potatoes.
1. Pierceskinwith fork and placepotatoeson
theturntable.Ifcookingthreeor more
potatoes,arrangein a starpattern,
2. Pressthe POTATO pad.Theovenstarts
immediately.Theovensignalswhensteam
issensedand thetimeremainingbegins
countingdown,
Do notopentheovendooruntiltime isfinished
countingdown. Ifthe door isopened,closeit
and pressthe START pad immediately.Iffood
isnotdoneenough,usetheTIME COOK
12 pad to cookfor moretime.

OPERATION
ConvenienceFeatures
Touse the Beverage Feature:
Press the BEVERAGE pad once for
a 4 oz. beverage, twice foran 8 oz.
beverage, or three times for a 12oz.
beverage.
Drinks heated with the Beverage
Feature may be very hot. Remove
the container with care.
3. Enter weight of food in ounces.
4. Press the START pad.
Press and hold the COOK pad
during cooking to display the remaining
cook time.
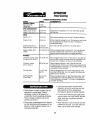
Cook Guide
FOODTYPE
f Canned
Vegetables
(VEG 1)
2 Frozen
Vegetables
(VEG 2},
- _fz[_,_I_ '_ 3 Fresh
___. Vegetables
(VEG3)
The Snacks Feature automatically sets the
microwaving times and power levels to
warm a variety of snack foods.
1, Press the SNACKS pad. 4 Potatoes
2, Select snack type 1 to 6. (See chart
below.) 5 Fish
3, Enter the number of items or the food
weight in ounces.
4. Press theSTART pad.
You can press and hold the SNACKS pad 6 Chicken
during cooking to display the remaining Pieces
microwaving time.
i
Snacks Guide
FOOD TYPE
1 Bread, rolls, muffins;
2 Sandwiches
3 Pizza (leftovers)
4 Dessert toppings
5 Soup
6 Cheese dip
The Cook Feature automatically sets
the cooking times and power levels for a
variety of foods.
t. Press the COOK pad.
2, Select food type t to 9. (See Cook
Guide at right.)
7 Ground
QUANTITY OR WEIGHT Meat
1 to 4 (beef, pork,
1 to 2 turkey)
8 Bacon
1 to4
lto4
8 to 40 oz. 9 Pizza
4 to 16 oz. [frozen,
Micr0waveable)
WEIGHT
4to20 oz.
4to 16oz.
4to 16oz.
to 40oz
to 16oz.
4 to40oz.
8 to 48oz.
2 to t0 oz.
4 to 16oz.
COMMENTS
Use microwave-safe
casserole or bowl.
Cover with lid or vented
3lastic wrap,
,Usemicrowave-safe
casserole or bowl.
:ollow package
instructions for adding
water.Cover with lid or
vented plastic wrap.
Use microwave-sate
casserole or bowl. Add
2 tablespoons water for
each serving. Cover
with lid or vented
)lastic wrap.
Pierce skin with fork.
Place potatoes on the
turntable.
Use oblong, square, or
round dish. Cover with
vented plastic wrap or
wax paper.
Use oblong, square,
or round dish. Cover
with lid or vented
plastic wrap.
Use round casserole
dish. Crumble meat into
dish. Cover with lid or
;vented plastic wrap.
__ayerstripson a plate,4 to
alayer.Covereachlayer
Mtha papertowel.
Follow package
instructions to prepare
)izza for microwaving
NOTE: You cannot enter a weight that is
more or _ess than the weight listed in the
Cook Guide above.
13

OPERATION
OtherFeatures
PresstheCLOCK pad to enter the time of
day orto check the time of day while
microwaving.
TO SET THE CLOCK:
1, Press the CLOCK pad.
2. Enterthe time of day.
3, Pressthe START or CLOCK pad.
Toturn the clock display on or off, press and
holdthe 0 pad for about 3 seconds. The
DISPLAY ON/OFF feature cannot be used
while the cooking features are being used.
Thereminder feature can be used likean
alarm clock.
1, Pressthe REMINDER pad,
2, Enter the time of day you want the oven
to remind you. (Be surethe microwave
clock shows the correct time of day.)
3. Press theSTART pad.
Whenthe Reminder Signal occurs, press
the CLEAN/OFF pad to turn itoff. The
Reminder time may be displayed by
pressing the REMINDER pad.
NOTE: The REM indicator will remainlit to
show that the Reminder Feature is set.To
clear the Reminder before it occurs, press
the CLEAR/OFF pad. TheREM indicator
light will go off.
Delay Start allows you to set the microwave
to delay the start time of cooking
t, Press the DELAY START pad,
2, Press the NUMBER pads to select the
time of day you wantthe oven to turn on
and start cooking. Make surethe clock is
showing the correct time of day.
3. Select TIME DEFROST, AUTO
DEFROST, orTIME COOK, Enterthe
amount of defrost or cook time, orweight
of food for Auto Defrost.
4. Pressthe START pad,
The Delay Starttime will be showing in the
display plus Start Time. The oven will
automatically start at the delayed start time
set. Thetime of day may be displayed by
pressing the CLOCK pad.
Toturn the control sound on or off, press
and hold the NUMBER 8 SOUND ON/
OFF pad for 3 to 4 seconds. The display
will flash "OFF" and the display will return
to the time of day,"MUTE" will remain in
the display. Toturn the sound back on,
press and hold the NUMBER 8 SOUND
ON/OFF pad for 3 to 4 seconds. "ON"
will flash in the display, mute will disappear,
and the display will returnto the time of day.
14

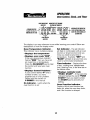
OPERATION
LowerOvenControl
I LOWER THERMAL OVEN
OVEN OVEN TIMER
Your new touch pad control will allow you to set many oven functions with ease.
Below are the features of your oven control and a description of each.
BAKING - Cook foods in the traditional
thermal oven with a temperature range of
170°F to 550°F.
BROILING - Cook meat at 550°F HI or
450°F LOW from the direct heat of the
upper element inside the oven.
TIME BAKING - Choose bake and
the temperature you prefer to use.
Then set how long you want foods to
cook.
DELAYED BAKING or
CLEANING - Choose bake or clean
and the temperature you prefer to
use, set the time of day you prefer the
oven to turn on, set how long you
prefer foods to cook.
SELF-CLEANING - Cleans the
oven for 4 hours, but you can change
this length of time to between 3 and 5
hours.
The NUMBER pads set the oven
temperature, time of day, delay start
time, cooking time, clean time, and
the kitchen timer.
The START pad must be pressed to
activate any oven function.
The OVEN COOKING TIME pad is
used when setting the length of
baking time.
The DELAY START TIME pad
is used to set the time of day you
prefer the oven to turn on and start
baking or cleaning. When DELAY
START TIME is used with OVEN
COOKING TIME, the oven will also
turn off automatically at the end of the
cooking time.
The CLEAR/OFF pad is used to
cancel any oven function and the end
of cycle tone. It will not cancel
the clock or Kitchen Timer.
Press to set or cancel the HOUR/
MIN KITCHEN TIMER ON/OFF.
15

OPERATION
OvenControl,Clock,andTimer
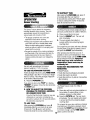
OVENTEMPEHATUREINDICATURTOLETTUUKNOW
INDICATOR THEOVENHASTURNEDON
gl J2_!_ CaEl C_C
FLASR,NGINO,CATURE... .. . I E... . . LOCATIONFORTUETIMEOFHAY
TL# L# L# INII _ TL# L# "e..# L#
TOALERTYOUTOSETA tl _ -,# "1"- CLOCK,KITCHENTIMER,DELAY
Tl:MpFn_TSm/:nnaTIM_:| 0ELAYCORVBAKE -- STARTCLOCKCLEAN ] STARTTIME,OVENCOOKING,OR
.......................... Lj_,E.,,,,.I_EA N LOCKE0DG0R CO_IMER J CLEANINGTIME
OVERFUNCTION OVENFUNCTION
INDICATOR INDICATOR
The display is an easy reference to use while learning your control. Below are
descriptions of how the display works:
Oven Temperature Indicator -
This indicator has a multiple purpose.
• Displays the temperature
• Displays error code "ERR" -
If the oven temperature indicator
flashes "ERR," then you have set
an invalid time or temperature.
Press the CLEAR/OFF pad to clear
the control and reset your oven
function.
• Displays Control Problems -
if your control flashes "F" and a
number or letter, you have
experienced an oven problem.
Please read the section on
F-CODES in this manual.
On Indicator - Lights when the
oven function is set.
Set Indicator - The set indicator
will flash in combination with an oven
function or timed function to let you
know you need to set a time or
temperature. Example: "SET" and
"SAKE" will flash to let you know you
need to set the bake temperature.
Time Indicator - Displays the time
of day, cooking time, delayed start
time, cleaning time, or the time set on
the kitchen timer.
• Displays reminder code
"PUSH START" - If the oven time
indicator flashes the words "PUSH
START," then you need to press
the START pad to activate your
setting.
Oven Function Indicator-
Displays which oven function has
been set, when the oven door locks,
and if the function is delayed.
16

OPERATION
Clockand Timer
The clock must be set for the correct
time of day before a delayed oven
function can work properly. The time
of day cannot be changed during a
delayed oven function, but can be
changed during a bake or broil
function.
HOW TO SET THE CLOCK
1, Press the CLOCK pad.
2. Press the NUMBER pads to set
the time.
3. Press the START pad.
RECALL THE CLOCK
While using your oven for timed
cooking, press the CLOCK pad if
you wish to check the time of day.
The current time of day will show in
the display.
POWER FAILURE
If you have had a power failure, the
time flashing in the display may be
incorrect. Reset the Clock.
Any oven function that was in process
will need to be reset.
The Kitchen Timer is used to time
cooking processes or other
household activities. It does not
control the oven. It can be set for up
to 9 hours and 59 minutes. It will
count down in minutes until the last
60 seconds is reached, then the
control will beep once. When the
countdown reaches zero, the control
will beep 3 times followed by one
beep every 6 seconds until the
HOUR/MIN KITCHEN TIMER
ON/OFF pad is pressed. This
6-second tone can be canceled.
See tones on the following page.
HOW TO SET THE TIMER
1. Press the HOURJMIN KITCHEN
TIMER ON/OFF pad.
2. Press NUMBER pads to set time.
3. Press the START pad.
4. When the countdown has reached
zero, press the HOUR/MiN
KITCHEN TIMER ON/OFF pad.
To cancel the timer during the
countdown, press the HOUR/MIN
KITCHEN TIMER ON/OFF pad
twice.
17

OPERATION
OvenControl, Clock, and Timer
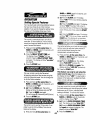
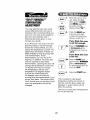
Your new control has a series of tones
that will sound at different times.
These tones may sound while you set
the control for an oven function, or at
the end of the oven function. It will
also alert you that there may be a
problem with the functions. Below
are the types of tones and a brief
description of each.
TONES WHILE SETTING THE
CONTROL - When you press a
touch pad, you will hear a beep. This
beep will let you know you have
placed enough pressure on the pad
to activate it.
END OF TIMED CYCLE TONE -
At the end of a timed cooking
function, you will hear 3 short beeps
followed by 1 beep every 6 seconds.
This 6-second beep will continue
to sound until the CLEAFI/OFF
pad is pressed, or you may select
the special feature to cancel this
6-second beep from sounding at the
end of future cycles.
TO CANCEL THE 6-SECOND
BEEP:
1. Press and hold the BAKE and
BROIL pads, at the same
time, for 3 seconds, until the
display shows "SF"
2. Press the HOUR/MIN KITCHEN
TIMER ON/OFF pad. The
display will show "CON BEEP"
(continuous beep)
3. Press the HOUR/MIN KITCHEN
TIMER ON/OFF pad again. The
display will show "BEEP" (beep
canceled).
4. Press the START pad.
If you would like to return the
6-second beep, repeat steps above
until the display shows your choice
and press the START pad.
ATTENTION TONE - This tone will
sound if you make an error or an
oversight is made while setting an
oven function.
Examples would be:
a. Setting a clean cycle and the oven
door is not properly closed.
b. Setting a function and not pressing
the START pad.
c. Pressing an additional function pad
without first setting a temperature
or time.
dm
"ERR" will flash if you set an
invalid temperature. Press the
CLEAR/OFF pad to clear the
control and reset your oven
function.
Any of these can be quickly identified
by watching the display.
PREHEAT TONE - When you start
a bake operation, the oven
automatically starts to heat. When the
temperature inside the oven reaches
the temperature you have set, a tone
will sound to let you know the oven is
ready for baking.
If you set an oven function and the
control beeps while the display is
flashing "F" and a number "F-4" or
letter "FI," there may be a problem
with the control or oven. Simply press
the CLEAR/OFF pad and wait about
an hour. Try setting the function
again. If the code repeats, write down
the code and call for service. Tell the
technician what code was flashing.
18

OPERATION
OvenCookingTips
It is normal to have some odor when
using your oven for the first time. To help
eliminate thisodor, ventilate the room
by opening a window or using a
vent hood.
IMPORTANT: Never cover the oven
bottom oroven rack with aluminum foil.
improper use can cause poor heat flow,
poor baking results, and may damage the
oven finish. To prevent staining from
spillovers, you may place a piece of
aluminum foil or a cookie sheet onthe rack
below the food which may spill over.
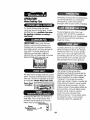
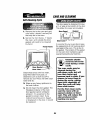
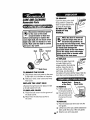
The oven vent is located under the control
panel. This area could become hot during
oven use. The vent is important for proper
air circulation. Never block this vent.
Oven Vent l r
Location
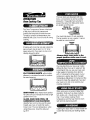
In the back of the oven you will notice a
small tube. This is a heat sensor that
maintains the temperature of the oven.
Never move or bend this tube.
Temperature_
Sensor
Preheating is bringing the oven temperature
up to the temperature you will be using
during baking. Let the oven preheat
thoroughly when recipes call for preheating.
Thelowtemperature zone ofyour oven
(between 170°Fand 200°F)is availableto
keep hotcookedfoods warm. However,foods
should notbe kept atthese temperatures
longer than 2 hours.
To prolong the life of your oven light bulb,
follow this helpful tip: Always turn the light
off when the oven is not in useor during a
clean cycle. If your oven light is left on for
an extended period of time, the oven will be
warm when the door is opened due to the
heat generated from the oven light bulb.
Most recipes for baking have been
developed using high-fat products suchas
butter or margarine (80%fat by weight--the
federal requirementfor products labeled
"margarine"),You will get poorresults if
cakes, pies, pastries, cookies, or candies are
made with low-fat spreads. Low-fat spreads
contain less fat and morewater. Thehigh
moisturecontent ofthese spreads affects the
texture and flavor of favorite baked recipes.
Thelowerthe fat content ofa spread
product, themore noticeable these
differences become. To ensurebest results,
usemargarine, butter,or stick spreads
containing at least 70%vegetable oil.
19

OPERATION
OvenCookingTips
The OvenTemperature Sensor at the back
of the oven continuously senses and
controls the temperature inside the oven.
To keep a constant set temperature, the
elements will cycle or turn on and off during
cooking.
If baking with morethan one pan, place the
pans so each has at least 1to 1W'of air
space around it. Place pans so one is not
directly above the other.
FLAT COOKIE SHEETS, without sides,
allow air to circulate all around the cookies
for even browning.
=======================
SHINY PANS reflect heat and are perfect
for cakes and quick breads that need a light
golden brown crust.
GLASS, DARK NON-STICK, OR
DARKENED-BY-AGE BAKEWARE
absorbs heat, and can be used for yeast
breads, pie crust, or foods that need a
brown crust. The oven temperature, when
using these pans, should be reduced
by 25°F.
Theoven racks are designed with stop
locks, a convenience as well as a safety
precaution. The guides have a bump to
prevent the racks from tilting when racks
are pulled out of the oven.
Bump in I_ ill
Rack G_
Your oven has seven (7) rack positions.
Thetop position is only a guide. It cannot
be used as a rack position.
Guide
Always place oven racks in the
proper position while oven is cool.
You may feel that your new oven cooks
differently than the oven it replaced. We
recommend that you use your new oven
a few weeks to become more familiar
with it, following the times given in your
recipes as a guide. See Do-It-Yourself
Temperature Adjustment in the back of this
manual to make the adjustment if you feel
your oven is too hot or too cool for your
cooking 3reference.
When using your convenient Delay Start
operation, foods such as dairy products,
fish, poultry, etc., should never sit more
than 1 hour before cooking. Room
temperatures and the heat from the oven
light promote bacterial growth.
?fe]r ,j..d,..d._,#l?["
Opening the door often to check foods will
cause heat loss and poor baking results.
20
Page is loading ...
Page is loading ...
Page is loading ...
Page is loading ...
Page is loading ...
Page is loading ...
Page is loading ...
Page is loading ...
Page is loading ...
Page is loading ...
Page is loading ...
Page is loading ...
Page is loading ...
Page is loading ...
Page is loading ...
Page is loading ...
-
 1
1
-
 2
2
-
 3
3
-
 4
4
-
 5
5
-
 6
6
-
 7
7
-
 8
8
-
 9
9
-
 10
10
-
 11
11
-
 12
12
-
 13
13
-
 14
14
-
 15
15
-
 16
16
-
 17
17
-
 18
18
-
 19
19
-
 20
20
-
 21
21
-
 22
22
-
 23
23
-
 24
24
-
 25
25
-
 26
26
-
 27
27
-
 28
28
-
 29
29
-
 30
30
-
 31
31
-
 32
32
-
 33
33
-
 34
34
-
 35
35
-
 36
36


Kenmore 91141485890 Owner's manual
- Category
- Microwaves
- Type
- Owner's manual
Ask a question and I''ll find the answer in the document
Finding information in a document is now easier with AI
Related papers
-
Kenmore 91147466791 Owner's manual
-
-
-
-
-
Kenmore 79048859901 User manual
-
-
-
-
Other documents
-
 Kenmore Elite 79048809100 Owner's manual
-
Kenmore Elite 79048902000 Owner's manual
-
 Kenmore Elite 79049113410 Owner's manual
-
 Kenmore Elite 79048912410 Owner's manual
-
GE JTP95BA5BB Owner's manual
-
-
GE JT965BF5BB Owner's manual
-
-
-
LG LMVM1945SB Owner's manual


