Page is loading ...

Therm
CoffeeTE AM
10-Cup Digital Coffee Maker /
Conical Burr Grinder Combination
• Operating
Instructions
• Warranty
Model #478
1000W/120V~/60Hz
Read this manual thoroughly before using and
save it for future reference

IMPORTANT SAFEGUARDS
When using electrical appliances, basic safety precautions should always be
followed, including the following:
1. Read all instructions.
2. Do not touch hot surfaces. Use handles or knobs.
3. To protect against fire, electric shock and injury to persons, do not immerse
cord, plugs, or body of machine in water or other liquid.
4. Close supervision is necessary when any appliance is used by or near children.
5. Unplug from outlet when not in use and before cleaning. Allow to cool
before putting on or taking off parts, and before cleaning the appliance.
6. Do not operate any appliance with a damaged cord or plug or after the
appliance malfunctions, or has been damaged in any manner. Return
appliance to the nearest authorized service facility for examination, repair,
or adjustment.
7. The use of accessory attachments not recommended by the appliance
manufacturer may result in fire, electric shock, or injury to persons.
8. Do not use outdoors.
9. Do not let the cord hang over the edge of a table or counter, or touch hot
surfaces.
10. Do not place on or near a hot gas or electric burner, or in a heated oven.
11. Risk of Fire or Electric Shock! Do not remove this cover. No user serviceable
parts inside. Repair should be done by authorized service personnel only.
12. Do not use appliance for other than intended use.
13. After coffee brewing is finished and the on-light has turned off, wait five
minutes before refilling the water container with cold water. Otherwise hot
steam could shoot out of the lid and cause injuries.
14. Scalding may occur if the lid is removed during the brewing cycles. Always
wait for brewing to complete before removing lid.
15. Do not block the steam vent on the side of the machine. Always leave 2
inches of space between the steam vent and the wall or any other material.
16. Avoid contacting moving parts such as the grinder. Always operate
machine with bean container lid in place.
FOR HOUSEHOLD USE ONLY
SAVE THESE INSTRUCTIONS
SPECIAL CORD SET INSTRUCTIONS
This appliance has a polarized plug (one blade is wider than the other).
To reduce the risk of electric shock, this plug will fit in a polarized outlet only
one way. If the plug does not fit fully in the outlet, reverse the plug. If it still
does not fit, contact a qualified electrician. Do not modify the plug in any way.
2

3
A. A short power supply cord is provided to reduce the risk resulting from
becoming entangled in or tripping over a long cord.
B. Longer extension cords are available and may be used if care is exercised
in their use.
C. If an extension cord is used,
1) the marked electrical rating of the extension cord should be at least as
great as the electrical rating of the appliance, and
2) the longer cord shall be arranged so that it will not drape over the counter
top or tabletop where it can be pulled on by children or tripped over.
CAUTION:
This appliance is for household use only. Any servicing other than cleaning and
user maintenance should be performed by an authorized service representative.
• Do not immerse base in water or try to disassemble.
• To reduce the risk of fire or electric shock, do not remove the base. No user
serviceable parts inside. Repair should be done by authorized service
personnel only.
• Check voltage to be sure that the voltage indicated on the name plate agrees
with your voltage.
• Never use warm or hot water to fill the water container. Use cold water only!
• Keep your hands and the cord away from hot parts of the appliance during
operation.
• Never clean with scouring powders or hard implements.
• Always ensure the upper burr and bean container are locked before brewing.
1. WELCOME AND THANK YOU
Thank you for choosing the CAPRESSO CoffeeTEAM PRO. Please read all of
the instructions in this booklet before operating your new machine. Understanding
and complying with these instructions is essential to ensure that the machine is
utilized without risk and to ensure safety during operation and maintenance.
Follow all cleaning instructions to ensure longevity of the machine.
2. HOW TO CONTACT CAPRESSO
Should you require further information or if particular problems occur that are
not covered in this manual, please CALL our toll free HELP LINE:
1-800-767-3554 Monday - Thursday 8AM to 9PM, Friday 8AM to 8PM and
Saturday 9AM to 5PM Eastern Time. Feel free to call at any time. If you are
connected to our voicemail, PLEASE DO NOT HANG UP. Leave your name,
telephone number and time to call back. Please leave the model number
of your Capresso product, in this case it is #478.
• FAX us at 1-201-767-9684
• E-MAIL us at [email protected]
• VISIT our website at www.capresso.com
• WRITE to Capresso Customer Service,
P.O. Box 775, Closter, NJ 07624

4
IMPORTANT: Grinder was tested with beans during assembly.
Despite cleaning, traces of ground coffee may be found in a new machine.
1. GoldTone filter
2. Filter insert with drip stop
3. Filter holder
4. Carafe
5. Digital display (Fig. 2)
6. Fineness knob /
Upper burr release (Fig. 4)
7. Removable bean container
8. Bean container lid
9. Removable upper burr
10. Fixed lower burr (not removable)
11. Water container lid
12. Removable water container
13. Steam vent
14. Charcoal filter holder (Fig. 12)
15. Scoop
16. Brush
Fig. 1
1
2
3
4
5 6
8
7
9
11
12
10
13
14
15
16

5
Fig. 2 Fig. 3
Fig. 4 Fig. 5 Fig. 6
Fig. 7 Fig. 8 Fig. 9
Fig. 10 Fig. 11 Fig. 12

3. COFFEE BEANS AND THE BUILT-IN BURR GRINDER
Grinding the beans just before brewing will maximize the flavor and aroma of
your coffee. Conical burr grinders are considered the best way of grinding
beans. The slower grinding speed of the conical burrs creates less heat thus
preserving more aroma of the ground coffee. Following the recommendations
below will make your coffee taste better and your machine last longer.
a. Storing Coffee Beans in the Freezer?
Coffee stores do not store beans in the freezer or refrigerator! Coffee will act
like baking soda, absorbing all odors and tastes surrounding it. Coffee beans
will stay fresh for several weeks as long as you keep them in a dry, dark
container. (It’s the ground coffee which will lose aroma rapidly!) If you must
store coffee beans in the freezer, take them out the day before use and thaw
in an open dish. This way they will thaw fully and evenly prior to adding the
beans to the machine.
CAUTION: Do not add frozen beans to the grinder, always thaw before using.
IMPORTANT: If you fill beans from the freezer directly into the grinder, moisture
will seep into the burrs and the ground chute. The moisture makes the ground
coffee stick in the ground coffee chute (Fig. 10) and will clog it up over time.
b. Finer or Coarser Grind?
The three grind settings (Fig. 4) of your CoffeeTEAM PRO are calibrated for
grinding drip coffee. Choose the coarser settings for darker, oilier beans.
Choose the finer settings for light or medium roasts.
CAUTION: Do not use the FINE setting when grinding more than 8 cups as this
could cause the filter basket to overflow during brewing.
c. Dark Beans versus Light Beans
Your CoffeeTEAM PRO burr grinder is calibrated to work with all different
kinds of roasts. Dark, oily beans will leave some oil residue in the ground
coffee chute so it is important to clean the grinder and ground coffee chute
often to avoid clogging. For cleaning the ground coffee chute see chapter
10.6. The machine has a special "OILY" button which adds extra time to the
grinding process for the slow moving beans. Press the OILY setting prior to
brewing to activate this feature. See chapter 7.1, f.
d. Maintaining the Ground Coffee Chute (Fig. 11)
As mentioned above, all coffee beans contain oils. These oils and other
residues from the ground coffee can build up in the ground coffee chute. It is
important to maintain this chute by using the angled cleaning brush to
sweep out the chute on a regular basis as described in Chapter 10.6.
e. Flavored beans, liquid flavorings, syrups
• Do not use sugar or powder coated beans in the grinder (e.g. cinnamon,
chocolate, vanilla etc). Coated beans can pit the bean container. The coating
might stick to the burrs and, over time, will reduce the performance of the
grinding mechanism.
• Do not add any liquid flavorings or syrups to the beans.
• If you like flavored coffee we recommend buying liquid flavorings at your
local coffee store. Add a few drops into the carafe before or after brewing.
f. Stones and Beans
Every coffee specialty store will tell you that occasionally small stones can
be found in between coffee beans. Very small stones will be processed
through the burr grinder without any harm (the stone will end up in your filter
6

- not in your brewed coffee). However, larger stones can block the burr
grinder permanently. If this happens, the grinder will make a loud noise.
Push the BREW button to stop grinding and call our customer service
number: 1-800-767-3554.
How to avoid stones entering the bean container:
• Shake coffee bag thoroughly, so any stones will fall to the bottom of the bag.
• Before emptying the bottom half of the bag of beans into the bean
container, check to see whether there are any particles that look like
stones, and remove them.
IMPORTANT: If you hear a loud buzzing noise during grinder operation or if the
grinder gets blocked or jammed, push the brew button to stop grinding and
unplug the machine and follow cleaning instructions in chapters 10.5 to 10.7.
4. PLEASE, NEVER... (the following voids the warranty):
• Never fill instant coffee into the bean container; it can damage the functioning
of the grinder and the machine.
• Never fill coated coffee beans into the bean container.
• Never fill water or any other liquid into the bean container.
• Never fill anything other than coffee beans into the bean container (no chocolate,
no nuts, no spices).
• Never fill anything but fresh, cold clean water into the water container.
• Never remove or attempt to disassemble the lower burr (Fig. 1.10) or any
other assembled parts.
• Never grind into the GoldTone filter unless it is empty of previously used
coffee grounds.
• Never operate the machine with the fineness knob (Fig. 1.6) in RELEASE
position, always lock the upper burr (Fig. 1.9). and bean container (Fig. 1.7)
into place as described in chapters 7.4 & 7.5.
• Never block the steam vent (Fig. 1.13) on the side of the machine. Always leave
2 inches of space between the steam vent and the wall or any other material.
5. EQUIPMENT
The CoffeeTEAM PRO Therm (#478) comes with:
• instruction book (includes warranty)
• one thermal carafe
• one GoldTone filter
• filter holder insert
• one measuring scoop*
• charcoal filter holder and one charcoal filter cartridge*
• one cleaning brush
* The scoop and the cartridge are located inside the carafe.
Empty carafe before using.
6. BEFORE INITIAL USE
• Carefully unpack your machine and remove packing materials.
• Place the machine on a flat surface and ensure steam vent (Fig. 1.13) is not
blocked by the wall or any other material.
• Wipe the machine with a damp cloth to remove any dust.
• Push the filter holder button (Fig. 6), remove the GoldTone filter and the filter
insert and clean as described in chapter 10.
7

• Make sure the drip stop of the filter insert is working properly. The spring
should allow the drip stop to move up when pressed and automatically pop
back out when released. (Fig. 5)
• Remove the water tank from the machine and remove the charcoal
filter holder. If you intend to use the charcoal filter insert, see chapter 7.8.
• Rinse out the water tank for first time use and fill the water tank to the
10 cups marking. Place back onto the machine and press down to fully
engage the base valve.
• Remove the charcoal cartridge and measuring scoop from the carafe and
wash the carafe as described in chapter 10.1.
NOTE: The filter insert and GoldTone filter are dishwasher safe (upper rack,
away from any heating element).
CAUTION: Do not immerse the machine in water or any other liquid.
• Let some water brew through the machine without any coffee as follows:
• Plug in machine and make sure the GoldTone filter and filter insert are in place.
• Place dry carafe with lid in the machine.
CAUTION: Never put wet carafe back into the machine! Always dry the
carafe before inserting back into the machine.
IMPORTANT: When brewing, always have the carafe lid and bean container
lid securely in place.
• Push the GROUND COFFEE button, then the BREW button (Fig. 2). The
machine starts processing the water into the carafe.
• After all water has passed through, empty the carafe and dry before placing
back into the machine.
7. PREPARING THE COFFEETEAM PRO
7.1 CLOCK AND GRINDER SETTINGS
Plug in machine. The display shows "12:00" blinking.
NOTE: You must set the actual time before you can operate the coffee maker.
a) Setting the Actual Time
• Push and hold the HOUR button until the actual hour is displayed. The display
will also show AM or PM.
• Push and hold the MINUTE button until the minutes are displayed. The time
is now set.
NOTE: You must change the clock when the time changes (Standard Time /
Daylight Savings Time).
b) Setting the Auto-On Time
You can only set the Auto-On Time after the actual time is set.
• Push and hold the AUTO button for 2-3 seconds until the display illuminates
with the clock icon and the clock icon starts blinking.
• Push and hold the HOUR, then the MINUTES button to set Auto-On time.
• If you will be using the grinder, select the number of cups you would like to
brew automatically by pressing the CUPS button. You may also choose to
program the machine to automatically brew with ground coffee. Push the
GROUND COFFEE button. Once pressed the CUPS number will disappear
and the ground coffee scoop icon will illuminate.
NOTE: You must program the CUPS button in Auto-On setting when using
the grinder to obtain the correct ground coffee volume to correspond to the
number of cups you will be brewing. See Grind Volume Setting below.
8

• Once desired Auto-On time is programmed, press the AUTO button again.
The display reverts to the actual time and the clock icon will remain illuminated.
• To turn off the Auto-On feature press the AUTO button again until the clock
icon disappears.
c) To change the Auto-On Time
• Push and hold the AUTO button for 2-3 seconds until the display illuminates
with the clock icon and the clock icon starts blinking.
• Push and hold the HOUR and then the MINUTES button to set a new
Auto-On time.
• Select the number of cups you would like to brew automatically by pressing
the CUPS button or choose GROUND COFFEE. See b) Setting the Auto-On
Time above.
• Once desired Auto-On time is programmed, press the AUTO button again.
The display reverts to the actual time and the clock icon will remain illuminated.
• To turn off the Auto-On feature press the AUTO button again until the clock
icon disappears.
d) Activating the Auto-On Time
• Push the AUTO button briefly. The display illuminates the clock icon,
indicating the Auto-On setting is active. The machine will show the actual
time. At the preprogrammed time the machine starts grinding and brewing (or
brewing only). For details see chapter 8.2.
e) Grind Volume Setting: the "2-10" button
The CoffeeTEAM PRO lets you set two different grinder settings: one for immediate
use and one for Auto-On use.
For immediate use: Push the "2-10" button repeatedly to select from 2, 4, 6,
8, 10.
For Auto-On use: Push and hold the AUTO button until the clock icon is
illuminated and starts blinking. Push the CUPS button to select from 2, 4, 6, 8, 10.
The grinder will automatically adjust the time to grind the right volume for the
cups programmed.
f) Oily Bean Setting
The machine features a special OILY button which adds extra time to the grinding
process for slow moving, oily coffee beans. To activate this setting, press the
OILY button on the display prior to brewing. The oily bean icon will illuminate
and the grinder will automatically add extra time to the grinding cycle.
IMPORTANT: Do not engage the OILY setting when using non-oily beans. This
could cause the filter to overflow with ground coffee and damage the machine.
CAUTION: Do not use the FINE grinder setting when using the OILY setting.
Oily beans should be ground using the COARSE grinder setting.
7.2 ADJUSTING THE COFFEE STRENGTH
To increase the strength of the coffee we recommend programming a higher
cup amount such as 10 cups then reducing the amount of water you add to
the water tank. For example, select 10 in the CUPS setting but only fill the
water tank to the 6 cup marking. This will add extra ground coffee to the filter
and increase the strength of the brew.
9

7.3 POWER INTERRUPTION
• If the machine is unplugged or power is interrupted all settings described in
chapters 7.1 and 7.2 must be reset.
• If the machine was set to Auto-On and power was interrupted, the machine
will not brew coffee at the programmed time.
7.4 REMOVING / ATTACHING THE BEAN CONTAINER
• Grasp the bean container with two hands and turn the bean container clockwise.
• Once the bean container is unlocked, lift straight up off of the machine. The door
on the bottom of the bean container will keep any beans from falling out of the
bottom of the bean container.
• To remove and replace the upper burr see chapter 7.5 below.
• Place the bean container back onto the machine at a slight angle and match the
"Align" icon on the left of the machine to the "Align" icon on the left of the bean
container (Fig.7) and turn the bean container counterclockwise to lock back into
position.
IMPORTANT: When the bean container is removed while the machine is in
"standby mode" the door to the ground coffee chute will open for cleaning
purposes. Once cleaning of the chute is complete, the door can be closed by
running a "Grind & Clean Cycle" (Chapter 10.5).
NOTE: If the bean container is not locked back into place when the BREW button
is pressed, the machine will beep indicating there is an error, correctly align and
lock the bean container.
7.5 REMOVING / REPLACING THE UPPER BURR
• Follow steps above in chapter 7.4 to remove the bean container.
• Turn the fineness knob clockwise towards RELEASE to unlock the upper burr.
• Pull the upper burr straight out using the small metal handle attached to the
upper burr (Fig. 8).
IMPORTANT: Never try to remove the lower burr!
NOTE: Clean the upper burr regularly as described in chapter 10.7
• To reassemble, place the upper burr back into the machine and ensure it is
correctly placed as seen in Fig. 8 & Fig. 9. If the upper burr does not fit correctly,
adjust it until the upper burr sits flush in the machine.
IMPORTANT: Push metal upper burr handle to the left or right side prior to
attaching the bean container.
• Turn the fineness knob counterclockwise to Coarse, Medium or Fine to lock
the upper burr in place.
IMPORTANT: Never run the machine with the upper burr unlocked (fineness knob
in RELEASE position). Always double check the upper burr is locked back in
place when reattaching the bean container.
• Attached the bean container as described in chapter 7.4
IMPORTANT: If the grinder seems to be clogged, always clean the ground coffee
chute, and then run a "Grind & Clean Cycle" before attempting to remove the
upper burr. (See chapters 10.5 to 10.7).
7.6 GRINDER SETTINGS / FILLING THE BEANS
• Select the fineness setting (Fig. 4) by turning the knob until the indicator
matches up with one of the fineness levels in front of the bean container from
fine to coarse.
10

• For first time use, use the coarsest setting.
• For dark oily beans use a coarse setting and push the OILY button until the
oily bean icon illuminates to select the oily bean function. For light, dry beans
use the finer settings.
• Open the bean container lid (Fig. 1.8) and fill the bean container (Fig. 1.7) with
whole coffee beans. Make sure that the water container lid is closed to prevent
beans from spilling into the water container.
CAUTION: Check beans for foreign objects (chapter 3e).
• The bean container will hold approximately 8-oz of beans.
IMPORTANT: Never fill the bean container with frozen or coated beans
(chapters 3a and 3d).
NOTE: If the bean container lid is not in place when the BREW button is
pressed, the machine will beep indicating there is an error. Push down on the
lid to fully engage the lid.
7.7 FILLING THE WATER CONTAINER
• Grasp the back section of the water tank and pull the water tank straight up.
• Open the water container lid (Fig. 1.11) and fill the water container with the
desired amount of fresh, cold water. Follow the 2 – 10 cup markings on the side
of the water container and fill to the corresponding cups you programmed in
the CUPS setting.
CAUTION: Never fill water above the 10-cup marking!
NOTE: See chapter 7.2 to increase strength
7.8 CHARCOAL WATER FILTRATION
CoffeeTEAM PRO comes with one charcoal cartridge and a charcoal filter holder.
You can brew coffee with or without the water filtration system.
NOTE: If you use distilled, spring or bottled water or if your water has little or
no chlorine you may not find a difference in taste in your coffee when using the
water filtration system. However, most tap water is treated with chlorine. The
water filter cartridge removes up to 82% of the chlorine found in your tap water.
Initial Preparation:
• Open the water container lid and remove the charcoal filter holder.
• Remove the charcoal filter from polybag.
• Soak the filter in a glass with cold water for a few minutes. This will activate
the filter.
• Insert the cartridge into the charcoal filter holder (Fig. 12) and snap charcoal
filter holder closed.
• Place the charcoal filter holder back into the water tank and ensure it is fitted
tightly above the valve.
When to replace the cartridge:
• Replace the filter after 60 pots of coffee or 6 weeks after first use, whichever
comes first. Unused cartridges can be stored indefinitely.
• Replacement cartridges are available through your local Capresso dealer or
through the website: www.capresso.com.
• The machine automatically counts the number of pots brewed and the display
will illuminate with a "CLEAN" icon when the charcoal filter needs to be replaced.
• Discard the used filter and replace with a fresh charcoal filter. Follow installation
instructions as described above.
11

• Once fresh filter has been placed in the water tank, hold the "OILY" and "AUTO"
button at the same time until the "CLEAN" icon disappears.
• The machine will reset and count another 60 pots of coffee.
IMPORTANT: Do not use charcoal filter for longer than recommended.
Change the charcoal filter as advised for best tasting coffee.
7.9 GOLD TONE FILTER AND FILTER INSERT
• Push the filter holder button (Fig. 6). The filter holder swings open. The
Goldtone filter and the filter insert can be removed.
• Before grinding/brewing coffee, always make sure that the GoldTone filter is
empty and placed into the filter insert.
IMPORTANT: Leaving used coffee grinds in the filter basket can lead to
problems with the machine. Excess moisture can build inside the ground
coffee chute and grinding a second portion of beans on top of used coffee
grounds can lead to severe clogging. When possible, always remove the
used coffee grounds shortly after brewing cycle has been completed. Use
caution if grounds still appear to be hot.
CAUTION/ DANGER!
• Never use the coffee maker without the filter insert and GoldTone filter.
Extremely hot water can overflow onto the machine and counter. If this
occurs, turn the machine off, unplug and wait until the brewing stops.
• Then push the filter holder button, add the filter insert and the GoldTone
filter and close the filter holder. Place the carafe underneath and continue
brewing until the water tank is empty.
7.10 MODEL #478: USING THE THERMAL CARAFE
The CoffeeTEAM PRO Therm, model #478, comes with a 10-cup thermal carafe.
For best coffee temperature pre-warm the carafe by rinsing it with hot water.
Always make sure the carafe is completely empty before brewing. Place the lid
onto the carafe as shown and turn lid clockwise until the pouring release lever
is aligned with the handle (Fig. 3). Insert carafe into the machine.
Please note: If you lose the lid, you cannot brew coffee. Visit our website
www.capresso.com or call 1-800-767-3554 to order a new lid.
Please note: Always make sure that the carafe is transported in an upright
position. If you turn the carafe on its side or upside down with its lid closed,
hot coffee may escape.
IMPORTANT: Do not try to remove the stainless steel bottom. Do not place the
carafe on any hot surfaces since this can loosen the vacuum seal inside the
bottom. This can cause the carafe to lose its thermal function. Do not place
carafe in dishwasher microwave, oven, stove or place on a range top or burner.
8. GRINDING AND BREWING COFFEE NOW
• Coffee maker is plugged in and the time is set.
• Beans are in the bean container and bean container lid is on and pushed
down securely.
• Fill the water tank with the desired amount of water.
• Make sure the filter insert and GoldTone filter are in place and the
GoldTone filter is empty.
• Make sure the filter holder is closed.
• Insert the carafe with lid into the machine.
12

• Select the number of cups you would like to brew by pressing the CUPS button.
• If using oily coffee beans, press the OILY button.
• Push the BREW button (Fig. 2). The cup icon will illuminate and there will be
a slight pause before grinding to allow the doors of the bean container and
coffee chute to open.
• The bean container door will open, then the grinder will start grinding and the
ground coffee will push into the GoldTone filter.
NOTE: Once grinding is finished, there will be a slight pause as the door of
the bean container closes. The grinder will grind again for a few seconds to
clear out any coffee beans remaining in the grinder. The ground coffee chute
will shut and the brewing process starts.
CAUTION: As long as the grinder is in operation, DO NOT open the bean
container lid, DO NOT open the filter basket and DO NOT insert your finger or
any other object into the grinder.
• After brewing is finished the cup icon light will turn off. For the next 1 to 2
minutes hot coffee will still pass from the filter into the carafe.
• To serve coffee, remove the carafe from the platform.
• Push and hold the pouring lever and slowly pour coffee.
IMPORTANT: If you hear a loud buzzing noise during grinder operation or if the
grinder gets blocked or jammed, push the brew button to stop grinding and
unplug the machine and follow cleaning instructions in chapters 10.5 to 10.7.
8.1 DRIP STOP / STOP AND SERVE
• While the coffee is brewing you can remove the carafe to pour a cup or two.
The drip stop will close automatically.
• To avoid any overflow, replace the carafe within 20 seconds.
CAUTION: The drip stop might not close completely allowing coffee to drip
onto the platform. In this case immediately place carafe back into the machine
and let all the coffee flow into the carafe.
• After brewing is finished, check the GoldTone filter for any clogging and rinse
the filter insert to remove any coffee particles from the drip stop (Fig. 5).
8.2 GRINDING AND BREWING LATER ("AUTO")
• Coffee maker is plugged in and the time and auto-on time are set.
• Beans are in the bean container and bean container lid is on and pushed
down securely.
• Fill the water tank with the desired amount of water.
• Make sure the filter insert and GoldTone filter are in place and the GoldTone
filter is empty.
• Make sure the filter holder is closed.
• Insert the carafe with lid, into the machine.
• Push the AUTO button briefly. The clock icon will illuminate on the display.
At the preprogrammed time, the clock icon will disappear, the cup icon will
illuminate and the grinding and brewing will start.
Recommendation: If you want your coffee ready by 7:30, set the auto-on
time to 7:15.
NOTE: See chapter 7.1, b for Setting the Auto-On Time.
13

9. BREWING COFFEE WITHOUT THE GRINDER
You can use your CoffeeTEAM PRO like a regular drip coffee maker with
pre-ground coffee (without using the grinder).
• Remove the water container (Fig.1.12) and fill to the desired amount of cups.
Place water container back onto the machine and push down to fully engage
the base valve.
• Push the filter holder button to open and fill ground coffee into the
GoldTone filter. Close the filter holder.
• Insert the carafe with lid into the machine.
• Push the GROUND COFFEE button and the scoop icon illuminates.
• Push the BREW button. The cup icon illuminates and the brewing process
starts immediately.
9.1 BREWING PREGROUND COFFEE LATER ("AUTO")
• Coffee maker is plugged in and the time, auto-on time are set and
GROUND COFFEE is selected in the AUTO programming menu.
• Remove the water container (Fig.1.12) and fill to the desired amount of cups.
Place water container back onto the machine and push down to fully engage
the base valve.
• Push the filter holder button to open and fill ground coffee into the GoldTone
filter. Close the filter holder.
• Insert the carafe with lid into the machine.
• Once desired Auto-On time is programmed, press the AUTO button again.
The display reverts to the actual time and the clock icon will remain illuminated.
To turn off the Auto-On feature press the AUTO button again until the clock
icon disappears.
• At the preprogrammed time, the clock icon will turn off, the cup icon and
ground coffee icon will illuminate and the brewing will start.
10. CLEANING
CAUTION: Make sure machine is turned off, unplugged and cooled down prior
to cleaning. Never use scouring agents. Never immerse the machine in any
liquid. Never clean machine under running water. Never submerge the conical
burrs or allow them to get wet. Never put thermal carafe in dishwasher. Always
empty the filter prior to cleaning the bean container or ground coffee chute so
no moisture enters the grinder.
Special Cleaning Tips:
10.1 Thermal Carafe: Never immerse carafe completely in hot water or any other
liquid. Wipe outside with a non-abrasive wet cloth and dry. Fill inside with hot
water and a mild detergent and scrub with a non-abrasive household brush.
Rinse thoroughly.
CAUTION: Do not place thermal carafe in dishwasher!
10.2 GoldTone Filter: Clean immediately after brewing, by hand or in the
dishwasher (upper rack, away from any heating element). Do not let used
coffee sit for hours in the filter. Coffee oils will clog the mesh, causing the
coffee to overflow the next time you brew coffee.
14

10.3 Filter Insert / Drip Stop: Clean the filter insert and the drip stop under
running water or in the dishwasher (upper rack, away from any heating element).
Test that the drip stop closes completely under running water (Fig. 5).
Periodically check that water can flow through the drip stop by filling the filter
insert with water and pressing down on the drip stop to check no particles are
stuck in the drip stop.
10.4 Bean Container: When the bean container is empty, use a dry cloth to
wipe off any oil deposits. Never pour any liquid into the bean container and
never wash under running water. Never try to disassemble the bean container.
NOTE: Always empty the filter prior to cleaning the bean container or ground
coffee chute so no moisture enters the grinder.
10.5 Grind & Clean Cycle:
The Grind & Clean Cycle can be used at anytime the machine is in standby mode
(Heating plate is off, brew light is not illuminated). This cycle will cut off the flow
of the beans and engage only the grinder. Any minor clogging caused by
grounds will be expelled into the filter basket. To run a Grind & Clean Cycle
simultaneously push and hold the "Ground Coffee" button and the "Auto" button
as shown below. It is recommend to empty all used grounds from the filter basket
before running a Grind & Clean Cycle.
10.6 Ground Coffee Chute: Periodically check the ground coffee chute
(Fig. 10 & 11) for oil and coffee build-up. The ground coffee chute should be
cleaned 1-2 times a week if you use the machine daily or if any of the following
situations occur:
• Heavy oil build-up has caused coffee to block the ground coffee chute from
opening.
• The ground coffee chute door is not closing all the way.
• You do not plan on using the grinder for more than a week.
Note: If extremely oily beans are used (i.e. French Roast) more regular cleaning
of the ground coffee chute may be required.
For cleaning, please follow this sequence:
• Remove the carafe and push the filter holder button (Fig. 6). Remove the
GoldTone filter and the filter insert and set aside.
• With the filter holder open, look inside the cavity of the machine and under
the grinder.
15
Simultaneously push and hold buttons for Grind & Clean Cycle

• Use a cloth or paper towel to wipe clean coffee residue from ground coffee
chute opening (Fig. 10).
• Remove the bean container from the top of the machine. The door to the
coffee chute will automatically open for cleaning and maintenance purposes.
Make sure the BREW light is off before attempting to open the chute door.
• Once the chute door is open, unplug the machine from the wall outlet.
• Make sure the carafe is removed and set aside, place a paper towel under
the coffee chute to catch any ground coffee during cleaning.
• Insert the angled cleaning brush into the the ground coffee chute and gently
remove any ground coffee or coffee residues. (see Fig. 13 below).
• Once cleaning is complete replace GoldTone filter and filter insert and close
the filter basket door. Replace the bean container back onto the top of the
machine. Remove the paper towel, and any loose coffee grounds from the
heating plate.
• Plug the machine back into the wall outlet, and run a "Grind & Clean Cycle"
by pushing the ground coffee button and the AUTO button simultaneously.
This will ensure that the ground coffee chute door is closed.
10.7 Conical Burrs: Once a week, remove the bean container and upper burr
as described in chapters 7.4 & 7.5 to remove coffee buildup from the upper
and lower burrs.
• Once upper burr is removed, use included brush to remove any left over
ground coffee from the upper burr then use the brush to remove any coffee
build up in the lower burr chamber.
IMPORTANT: Never try to remove the lower burr!
Note: Oily roasts may require more frequent cleaning of burrs.
11. DECALCIFYING
To keep your coffee maker operating efficiently, it is important to decalcify at
least every 2-4 months depending on local water hardness or when brewing
10 cups takes more than 15 minutes.
IMPORTANT: Before decalcifying, remove the Goldtone filter and charcoal filter.
11.1 Decalcifying with Capresso Cleaning Solution
Capresso recommends Capresso Cleaning Solution for drip coffee makers.
Order through www.capresso.com or call 1-800-767-3554.
• Remove GoldTone filter and charcoal filter.
• Dissolve 1 oz. (28 g) of Capresso Cleaning Solution (or other descaling
agent) with 32 oz. (1 L) of water and pour mixture into water tank.
16
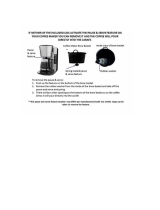
Chute door closed
Clogged
coffee chute
Clean chute with brush
Coffee chute cleaned
Chute
door
open
Sealing
gasket
Fig. 13

• Place the empty carafe with the lid closed underneath the filter holder with
insert and drip stop.
• Press GROUND COFFEE button to turn grinder off. Turn the machine on for
2 minutes by pressing BREW.
• Turn the machine off and let sit for 15 minutes.
• Turn machine on again and let the remaining descaling solution pass through.
• Turn the coffee maker off, remove the carafe, empty and rinse a few times
with fresh cold water.
• Rinse the filter insert thoroughly with fresh water and place back into the machine.
• Rinse water tank and fill with fresh cold water and brew through the machine
to rinse out any remaining solution.
11.2 Using other Decalcifying Agents
• All decalcifying agents are acidic and must be handled carefully. Check the
information on the packaging before using. Only use decalcifying agents
suitable for drip coffee makers and follow the instructions which come with
the agent and reference steps above in chapter 11.1.
• When the solution has run through, remove the carafe, empty and rinse
thoroughly.
IMPORTANT: let the machine cool down for 5 minutes.
• Fill 20 oz. of fresh cold water into the water tank and brew through the machine.
12. QUESTIONS/ TROUBLESHOOTING
There is no coffee coming out of the grinder. It seems as though the coffee
is completely clogged inside the grinder.
- Please follow the steps outlined in chapters 10.5 to 10.7 to clean the grinder
and grinder chute.
- Double check that the upper burr is locked into place before grinding.
- Call Customer Service for additional guidance to remove tough clogs.
Upper burr does not fit back into the machine.
- Double check that the fineness knob is in the RELEASE position before
placing the upper burr back into the machine, as described in chapter 9.
- Follow location of upper burr handle as shown in Fig. 8 & Fig. 9.
The machine beeps when I press the BREW button.
Check the following:
- Bean container lid is on, pushed down and fully engaged.
- Removable water tank is on, pushed down and fully engaged.
- Ensure the bean container is locked into place. See chapter 7.4 to correctly
attach bean container.
- If all loose parts are engaged correctly, unplug machine from wall outlet for
30 seconds. Replug and attempt to to press brew button again.
Can the grinder run without beans in the bean container?
- Yes, it is ok if the grinder runs without any beans.
Can I have different grind amount settings for the current and the
Auto-On mode?
- Yes. See chapter 7.1, e.
17

18
How long does the machine keep the grinding and brewing settings?
- As long as the machine is plugged in. If the machine loses power you have
to reset the time and personal settings (see chapter 7).
I want a full pot of coffee at 8:00 AM. What time should I program the
machine to start?
- Set the Auto-On timer 15 minutes earlier (in this case at 7:45 AM).
The grinder makes a loud noise, no coffee is processed.
- Ground coffee is blocking the grinder or grinder chute. Follow cleaning
instructions in chapters 10.5 to 10.7.
- Once cleaning instructions have been followed, attempt to run a Grind &
Clean Cycle (Chapter 10.5).
- A stone blocks the grinder. Remove bean container and upper burr to check
for any stones or foreign objects. If you cannot locate and remove the stone
on your own, please call 1-800-767-3554.
How can I increase the strength of the coffee?
- Select 10 in the CUPS setting but only fill the water tank to the 6 cup marking.
This will give you more ground coffee in the filter and increase the strength of
the brew See chapter 7.2.
Grinder suddenly stopped during grinding cycle or beans are not feeding.
- Check that bean container lid is pressed down and fully engaged.
- Press the "Ground Coffee" and "Auto" buttons at the same time to clear the
grinder of any left over coffee beans stuck in grinder.
Loud buzzing noise during grinder operation and grinder gets blocked or
jammed.
- Push the brew button to stop grinding and unplug the machine.
- Follow cleaning instructions in chapters 10.5 to 10.7 to remove the ground
coffee from the coffee chute and conical burrs.
- Once cleaning instructions have been followed, attempt to run a Grind &
Clean Cycle (Chapter 10.5).
13. LIMITED ONE YEAR WARRANTY
This warranty covers your CAPRESSO machine, model #478 CoffeeTEAM PRO
Therm. The model # can be found on the bottom of the machine. This warranty
is in effect for one year from the date of the first consumer purchase. This
warranty covers all defects in materials or workmanship (parts and labor).
This warranty does not cover:
• Any machine not purchased from an Authorized Capresso Dealer.
• Commercial use of the machine.
• Damage caused by accident, abuse, negligence, misuse, improper operation
or failure to follow instructions contained in this manual.
• Any service or alteration performed by an unauthorized person, company or
association.
• Carafes (Glass or Thermal).
• Charcoal filters.

1-800-767-3554
Mon-Thu 8AM – 9PM • Fri 8AM – 8PM • Sat 9AM – 5PM
Eastern Time Zone
JURA Inc.
81 Ruckman Road, Closter, NJ 07624
201-767-3999 • Fax: 201-767-9684
Website: www.capresso.com
Customer Service
Other limitations and exclusions:
Any implied warranties including fitness for use and merchantability are limited
in duration to the period of the express warranty set forth above and no person
is authorized to assume for JURA any other liability in connection with the sale of
the machine. JURA expressly disclaims liability for incidental and consequential
damages caused by the machine. The terms "incidental damages" refers to the
loss of the original purchasers time, loss of the use of the machine or other
costs relating to the care and custody of the machine. The term "consequential
damages" refers to the cost of repairing or replacing other property which is
damaged when this machine does not work properly. The remedies provided
under this warranty are exclusive and in lieu of all others. This warranty gives
you specific legal rights, and you may also have other rights which vary from
state to state.
14. CAPRESSO CUSTOMER SERVICE
Capresso CoffeeTEAM PRO Therm, Model #478 Product Registration Please go
to our website www.capresso.com to register your product. Your information
will help us to better serve you.

JURA Inc.
81 Ruckman Road, Closter, NJ 07624
201-767-3999 • Fax: 201-767-9684
Website: www.capresso.com
/