Page is loading ...

QUARRYMASTER
™
FLOOR MACHINE
SAFETY,
OPERATION
&
M
AINTENANCE
MANUAL
This unit is intended for commercial use.
S
AVE THESE INSTRUCTIONS
QuarryMaster™ Manual - PN 416304 - Printed in USA 11/19/03
PAGE 1
This floor machine will afford you many
years of trouble free operating satisfaction
if it is given proper care. All parts have
passed rigid quality control standards
before being assembled to produce the
finished product. Prior to packaging, the
unit is again inspected for assurance of
flawless assembly.
This floor machine was protectively
packed to prevent damage in shipment.
We recommend that upon delivery,
remove the unit from its carton and care-
fully inspect it for any possible damage in
transit.
If damage is discovered, immediately noti-
fy the transportation company that deliv-
ered your floor machine. As a shipper, we
are unable to act upon any claim for con-
cealed damage. You must originate any
claim within 5 days of delivery.
These instructions are for your protection
and information. PLEASE READ CARE-
FULLY! Failure to follow these precautions
could result in injury or discomfort.
READ ALL
INSTRUCTIONS
BEFORE
OPERATING
READ AND FOLLOW ALL
INSTRUCTIONS, WARNINGS AND
CAUTIONS BEFORE USING THIS
FLOOR MACHINE
Address:
777 South Street
P.O. Box 2310
Newburgh, New York 12550-0606
TEL:
800.835.7812
845.565.8850
FAX:
800.752.6883
845.565.9392
Internet Address:
www.mastercraftusa.com
techsupport.mastercraftusa.com

1) DO NOT leave this floor machine
plugged in when not in use. Unplug the
machine from the outlet when not in use
and before servicing.
2) Electric shock could occur if exposed to
rain. Store indoors.
3) This is NOT a toy. Close attention is
necessary when used around or near chil-
dren.
4) Use only as described in this manual.
Use only manufacturer's recommended
attachments.
5) DO NOT use with damaged cord plug.
If the machine is not working as it should
because it has been dropped, damaged,
left outdoors, or dropped into water, con-
tact the manufacturer or authorized serv-
ice center.
6) DO NOT pull or carry by cord, use the
power cord as a handle, close a door on
cord, pull cord around sharp edges or cor-
ners.
7) DO NOT run the machine over the
cord. Keep the cord away from heated
surfaces.
8) DO NOT unplug by pulling on cord. To
unplug, grasp the plug, not the power
cord.
9) DO NOT handle the plug or operate
with wet hands.
10) DO NOT put any objects into motor
openings.
11) Keep hair, loose clothing, fingers and
all parts of the body away from moving
parts.
12) DO NOT operate the machine where
oxygen or anesthetics are used.
13) DO NOT use around flammable or
combustible liquids such as gasoline or
use in areas where they may be present.
14) DO NOT use an extension cord
unless absolutely necessary. If an exten-
sion cord is used, then wire size must be
#14 gauge or thicker and should not
exceed 50 feet in length. Use only a three-
wire grounded extension cord to ensure
grounding protection.
15) Replace damaged or worn parts
immediately with genuine original equip-
ment parts to maintain safety and to pro-
tect your limited warranty.
16) Floor sanding can result in an explo-
sive mixture of fine dust and air. Use a
floor sanding machine only in a well venti-
lated area.
To reduce the risk of fire, electric shock or injury:
When using an electric floor machine,
basic precautions should always be followed, including the following:
PAGE 2
IMPORTANT
SAFETY
INSTRUCTIONS
DO NOT use this floor machine for sanding
possible motor damage may occur and the mixture of
fine dust and air can result in an explosive.
Use a floor sanding machine only in a well ventilated area.
SAVE THESE INSTRUCTIONS
WARNING:
WARNING:

This floor machine must be grounded. If it
should malfunction or breakdown, ground-
ing provides a path of least resistance for
electrical current to reduce the risk of
electric shock. This machine is equipped
with a cord having an equipment-grounded
plug. The plug must be inserted into an
appropriate outlet that is properly installed
and grounded in accordance with all local
codes and ordinances.
If repair or replacement of the cord or
plug is necessary, DO NOT connect the
grounding wire to either flat blade termi-
nal. The wire with insulation having an
outer surface that is green with or without
yellow stripes is the grounding wire.
Improper use of the grounding plug can result in a
risk of electric shock.
GROUNDING
INSTRUCTIONS
GROUNDING
METHODS
This floor machine is for use on a nominal
120 volt circuit, and has a grounding plug
that looks like the plug illustrated in (Fig
A). A temporary adaptor that looks like
the adaptor illustrated in (Fig B & C) may
be used to connect the plug to a 2-pole
receptacle as shown in (Fig A) if a proper-
ly grounded outlet is not available.
The temporary adaptor should be used
only until a properly grounded outlet (Fig
A) can be installed by a qualified electri-
cian. The green color rigid ear, lug, or the
like extending from the adaptor must be
connected to a permanent ground such
as a properly grounded outlet box cover.
Whenever the adaptor is used, it must be
held in place by the metal screw (Fig C).
Improper connection of the equipment-grounding conductor can result in a
risk of electrical shock. Check with a qualified electrician or service person if
you are in doubt as to whether the outlet is properly grounded.
DO NOT modify the plug provided with the burnisher. If it will not fit the
outlet, have a proper outlet installed by a qualified electrician.
NOTE: In Canada, the use of a temporary adaptor is not permitted
by the Canadian Electrical Code.
CARE OR THIS
FLOOR MACHINE
Treat this floor machine as you would any
other high grade precision made product.
Throwing, dropping, unreasonable bump-
ing across thresholds and other misuse
may result in a damaged unit and invali-
date the warranty.
DANGER:
WARNING:
PAGE 3

ABOUT THE
QUARRYMASTER
™
FLOOR MACHINE
Built-In AMP Meter
Flexible Dual Triggers
HHeeaavvyy--DDuuttyy SSwwiittcchh
*4 Gallon Solution Tank
50 Ft Power Cord
(2) 10 Lb Weights
(3) 25 Lb Weights
Triple Planetary
Gear System
Reinforced
Aluminum Apron
*Diamond Disc Driver
w/Splash Guard™
*On Deluxe Models Only
The floor machine is designed to clean and
restore all types of stone and run for a long
period of time without overheating, with low
amperage. The ”Select-A-Weight
™
” system
allow the operator of adjust the weight load
required for the job being preformed.
FEATURES:
Oversize Handle Grips
Better control, reduces fatigue.
Built-In AMP Gauge
Constantly monitors current draw, helping
operator to select the correct weight.
Flexible Dual Triggers
Non-conductive with built-in lockouts to pre-
vent accidental startup.
Operate with left or right hand.
Solution Tank*
Dispenses liquid for scrubbing, polishing and
diamond cutting.
Axle w/6 Mounting Points
Reinforced on the outside and inside of
wheels, strengthens the axle in order
to handle the additional weights.
Cast Aluminum Apron w/Lift Handle
Reinforced for added strength and rigidity.
Shields the transport wheels to prevent
damage.
”Select-A-Weight™” System
Vinyl coated discs with stainless holder.
Allows operator to adjust surface
pressure for multiple tasks, while staying
within recommended amperage range.
DC Motor
Rectified for AC operation, runs at a reduced
amperage.
Enhanced High Torque,
Triple Planetary Gear Box
Permanently lubricated, operates at
140 RPM with 1
1
/
2
HP motor.
Diamond
Pad
Driver*
Flexible velcro holder for quick changing
of diamond discs with splash guard
to contain the slurry.
*On Deluxe Models
PAGE 4

INSTALLATION
AND REMOVAL
OF DIAMOND
PAD DRIVER
DO NOT operate this machine without the diamond pad driver w/discs,
pad driver or brush in place.
Never attempt to lock pad driver/brush on floor machine by positioning
(JUMPING) running floor machine on unattached pad driver/brush.
HANDLE
ADJUSTMENT
The handle adjustment is controlled by a
lever located at the rear of the machine
at the base of the handle. To release, pull
up on the upper portion of the lever, then
pull back on the handle to appropriate
operating height.
Step down on the lever to lock handle in
selected position. When transporting or
attaching pad driver/brush, handle must
be LOCKED in the upright position.
NEVER TURN THIS MACHINE ON
WITH HANDLE IN LOCKED UPRIGHT POSITION.
O
PERATION
INSTRUCTIONS
The QuarryMaster is designed to move
from side to side. Raise handle SLIGHTLY
to guide right. Lower handle SLIGHTLY to
guide left.
1) Plug in the power cable.
2) With pad driver/brush in position,
adjust handle and lock into a comfortable
operating position.
3) Place hands on handle grips and
squeeze trigger locks beneath grips. This
will activate the motor and start the pad
driver/brush operating.
4) Begin operating the machine at the
closet possible point to an electrical outlet
and work away from the outlet. This will
prevent running over the electrical cord.
CAUTION:
P
AGE 5
To Install Pad Driver:
1) Unplug the power cable
and LOCK the handle in the
upright position.
2) Tilt the machine back until the handle is
laying on the floor and underside of the
machine is fully exposed.
3) Holding driver in both hands straddling
the motor with your back to the handle.
4) Bend over and fit the three slots of the
clutch plate over the three lugs of the
drive plate.
5) Turn the diamond pad driver counter-
clockwise as far as it will go.
66))
Attach the diamond discs to the velcro
holders.
To Remove Pad Driver:
Disengage clutch plate slots from drive
plate lugs by turning clockwise.

MARBLE
RESTORATION
PROCEDURES
1) Inspect the floor for lippage. This is
where one tile is higher than the other or
seams are not flush or level. When lip-
page is thicker than a quarter, lippage
diamonds must be used. Proceed using
all the steps.
2) Check for deep scratches. If there are
deep scratches, start with a 200 grit
metal bond diamond.
3) Select the grit of diamonds to be used.
Use the separate quart water containers
to rinse the various diamond. It is impor-
tant to keep diamonds separated so you
do not cross contaminate.
4) Release some water from the solution
tank to lubricate the diamonds, then turn
on the machine. It is important to keep an
ample amount of water on the floor to
lubricate the diamonds.
5) Use a side to side motion, then for-
ward and back motion to keep floor level.
Make a total of (4) passes or (2) cycles at
moderate speed, with about a 30% over-
lap, (See Pg 8 for diagram).
6) Using a lighted magnifying glass,
inspect the floor for uniformity of scratch
patterns.
7) Rinse the floor thoroughly and proceed
to the next diamond grit (400M, 500RB
800RB).
88))
Repeat the above steps until job is
completed.
99))
When the floor has dried completely
with no residue left, apply a marble finish-
er. We recommend Crystal Clear
™
Marble
Finisher. This will enhance and condition
the floor.
Application Instructions:
1) Use approximately 35 lbs of weight
on the machine and a #0 or #1 steel
wool pad.
2) MIST 2 or 3 squirts of marble fin-
isher in a 3 Ft X 3 Ft area and run
machine until the desired look is
achieved.
Note: It is better to use less chemical,
PAGE 6
When operating this floor machine the AMP meter must register
in the GREEN for maximum coverage, and to prevent overloading.
Operating this floor machine with the meter registering
in the RED can cause damage to the motor.
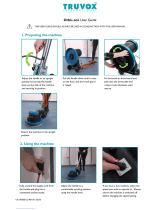
PREPARATION
FOR STONE
RESTORATION
1) Remove furniture from the area and
cover adjoining floors, foot rails, base-
boards, door edges, furniture,etc with
poly film and tape edges.
2) Remove all dirt, wax, floor finish or
floor sealer entirely by properly stripping,
rinsing and allowing the floor to dry com-
pletely before proceeding. Be sure floor is
neutralized with a neutral cleaner.
33))
Setup “Caution Wet Floor” signs and
rope off the area.
4) Fill a 5 gallon pails with water and keep
at your disposal.
5) Fill quart containers with water to use
for the diamonds.
6) Fill the floor machine solution tank and
AquaRinse
™
ring tank, wet/dry vacuum
or mop bucket with water.
IMPORTANT:

P
AGE 7
TERRAZZO
RESTORATION
PROCEDURES
1) Mop the floor with strong stripping
solution and allow time for it to activate.
2) Using this machine with 35 to 50 lbs
additional weight, place the machine on a
black stripping pad with a silicate carbide
sanding screen and begin stripping the
floor.
3) Always keep the floor wet, DO NOT let
it dry. When finished pickup the slurry
with a AquaRinse
™
Vacuum System or
wet/dry vacuum.
4) Fill AquaRinse
™
Solution (Ring) Tank or
mop bucket with a neutral cleaner solution
and rinse the floor. Then vacuum the floor.
5) Add 25 to 35 additional lbs to the
QuarryMaster™, and attach the diamond
disc driver with 120 Black or 200M Red
Diamond Pad. In most cases you will begin
with these pads.
6) Release some water from the solution
tank to lubricate the diamonds. It is impor-
tant to keep an ample amount of water on
the floor to lubricate the diamonds.
7) When operating the QuarryMaster™
use a side to side motion, then a forward
and back motion. This is to keep the floor
level. Make a total of at least (4) passes or
(2) cycles at a moderate speed, with about
a 30% overlap. (See Diagram on Pg 8)
8) Inspect the floor for scratch pattern
uniformity using a lighted magnifying
glass.
9) Vacuum and rinse floor thoroughly with
the AquaRinse™ or wet/dry vacuum,
then proceed to the next diamond grit
level.
10) Repeat steps 6 thru 9 when proceed-
ing through each diamond grit.
11) When the floor has dried completely
with no residue left, apply a marble finish-
er. We recommend Crystal Clear™
Marble Finisher. This will enhance and
condition the floor.
Application Instructions:
A) Use approximately 35 lbs of weight
on the machine and a #0 or #1 steel
wool pad.
B) Mist 2 or 3 squirts of Crystal Clear in
a 3 Ft X 3 Ft area and run machine to
desired look is achieved.
Note: It is better to use less chemical,
you can always reapply.
Floor Maintenance:
Maintain the floor with a dust mop on a
daily basis. Every 2 to 3 weeks for heavy
traffic or as needed repeat step 11 to
keep up the floors appearance.
FLOOR
MACHINE
MAINTENANCE
1) After each use, wipe off all of the pol-
ished and painted areas with a clean cloth.
3) Remove the diamond disc from pad
driver and rinse discs.
2) Always remove the pad driver/brush
when the machine is not in operation, and
hang it on a peg or lay flat on its back.
NEVER store pad driver/brush with the
bristles down.
4) When the machine is not in use,
remove pad driver/brush, wrap power
cord around cord hooks and store in a dry
area.
5) If the machine wobbles or vibrates:
A) Adjust by turning pad driver/brush
1
/
3
turn, then reinstall on machine.
B) Inspect the pad driver/brush for
warpage or out of round. Lay floor
machine down on handle with pad driv-
er/brush in place. With machine run-
ning, observe if pad driver/brush
appears to wobble or is out of round.
Replace if this problem occurs.

THIS DIAGRAM REPRESENTS
(2) PASSES OR (1) CYCLE
(L
EFT TO RIGHT - UP AND DOWN)
CLEANING
PASS
DIAGRAM
QuarryMaster Manual - PN 416304 - Printed in USA 11/19/03
PAGE 8
PROBLEM: Motor won’t run.
CAUSE SOLUTION
1. Blown fuse or tripped circuit 1. Replace fuse or reset circuit breaker.
breaker at wall panel.
2. Defective switch. 2. Replace switch.
3. Defective power cord. 3. Replace power cord.
PROBLEM: Floor machine runs slow.
CAUSE SOLUTION
1. Low in voltage. 1. If voltage is under recommended minimum,
check size of wiring from main switch.
If okay, contact power company.
PROBLEM: Noisy machine.
CAUSE SOLUTION
1. Defective motor or gear box. 1. Contact the manufacturer or authorized
service center.
T
ROUBLE
S
HOOTING
GUIDE
/