
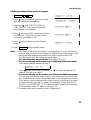
PRINTER INTERFACE TYPE 60
OPERATOR’S MANUAL

Trademark Notice:
Epson and Epson ESC/P are registered trademarks of Seiko Epson Corporation.
Epson LQ-2500, Epson FX-800/1000, Epson FX-86e/286e, Epson GL, Epson LQ, Epson FX,
Epson LQ-1050/850, Epson LQ-500, Epson LQ-1500, Epson FX-85, Epson FX-80, Epson GL Identity
Card, Epson Roman T, and Epson Sans Serif U are registered trademarks of Epson America Inc.
IBM and IBM PC are trademarks of International Business Machines Corporation.
HP LaserJet, HP LaserJet+, HP LaserJet 500, HP LaserJet series II, HP LaserJet IIP, HP LaserJet se-
ries III, HP LaserJet IIIP, and HP LaserJet IIISi are trademarks, and Hewlett-Packard and PCL are
registered trademarks of Hewlett-Packard Company.
LocalTalk is a trademark of Apple Computer, Inc.
Barf Watcher’s Field Identification Kit is a trademark of the Kanagawa Kulture Klub
Centronics is a trademark of Centronics Data Computer Corporation.
ITC Zapf Dingbats is a U.S.registered trademark of International Typeface Corporation.
Bitstream is a registered trademark of Bitstream Inc.
Speedo and FaceLift are trademarks of Bitstream Inc.
CG Times is a product of AGFA Compugraphic, a division of AGFA Corporation.
Univers is a U.S. registered trademark of Linotype AG and its subsidiaries.
MS-DOS is a registered trademark and Windows is a trademark of Microsoft Corporation.

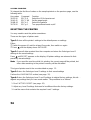
CONTENTS
INTRODUCTION
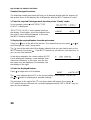
ABOUT THE PRINTER INTERFACE 1
What this Printer Interface Can Do 1
Sharing the Printer with Two Computers 1
Working with the Printer and the Fax Machine at the Same Time 2
Operating the Printer 3
CONVENTIONS 3
ABOUT THIS MANUAL 4
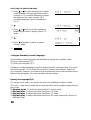
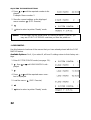
OPERATION PANEL
BUTTONS 5
INDICATORS 6
DISPLAY 6
INSTALLATION
INSTALLING THE INTERFACE KIT 7
CONNECTION TO THE COMPUTER 7
TESTING THE PRINTER 8
Printing a Test Page 8
Printing the Status Sheet and Font Samples 9
OPTIONAL KITS 10
Memory Expansion Board 10
Optional Font and Emulation Mode Cards 11
Optional Font Cartridges 12
CONNECTING THE PRINTER TO TWO COMPUTERS 13
Multi-user Modes 13
Configuring the Serial and Parallel Channels 13
BASIC OPERATIONS
TURNING THE PRINTER ON LINE AND OFF LINE 14
FORM FEED 14
RESETTING THE PRINTER 15
SELECTING THE CASSETTE FOR COMPUTER PRINTING 15

SELECTING THE EMULATION MODE
OVERVIEW 16
HP LASERJET III EMULATION MODE 16
EPSON LQ AND FX EMULATION MODES 17
CHANGING THE EMULATION MODE 17
Using the MODE ASSIGN Feature 17
Using an Emulation Control Language 18
ADJUSTING THE PRINTER SETTINGS
INTRODUCTION 21
Selectype Mode (Printer Setup Mode - Function 35) 21
Level 1 Features 21
Level 2 Features 22
Using Selectype Mode 23
The Display 23
Buttons 23
Sample Selectype Procedure 24
SELECTYPE LEVEL 1 FEATURES 26
How to Enter Selectype Level 1 26
INPUT 27
PAGE SIZE 27
COPIES 27
ORIENT. 28
FONT 28
STATUS SHEET 28
FONT SAMPLE 28
SUB CONFIG. 28
SYSTEM CONFIG. 29
FULL PRINT 29
MEMORY LEFT 30
T-OFFSET and L-OFFSET 30
SAVE MACRO 31
LOAD MACRO 32
POWERON MACRO 33
DELETE MACRO 33
SELECTYPE LEVEL 2 FEATURES 34
How to Enter Selectype Level 2 34
TEST PRINT 34
MODE ASSIGN 34
I/F CONFIG. (Interface Configuration) 35
Parallel Channel 35
Serial Channel 36
RX-BUFFER SIZE (Receive Buffer Size) 37
CH (Channel) 38

CH TIMEOUT (Channel Timeout) 40
AUTO CONT (Auto Continue) 41
P-CONFIG SAVE (Power-up Configuration) 41
FACTORY RESET 42
VERSION 42
PAGE COUNTER 43
STANDBY 43
SOLVING PROBLEMS
STATUS AND ERROR MESSAGES 44
PRINTING PROBLEMS 48
PROBLEMS WITH GRAPHICS 50
PROBLEMS WITH SELECTYPE MODE 51
PROBLEMS WITH OPTIONAL CARDS AND CARTRIDGES 52
DATA DUMP MODE 53
RESETTING THE PRINTER 54
APPENDIX A. SPECIFICATIONS
TABLE OF SPECIFICATIONS A-1
APPENDIX B. HP EMULATION MODE
HP EMULATION MODE VS HP LASERJET III B-1
Printable Area B-1
Character Clipping B-2
Paper Handling B-2
Resident Fonts B-2
Downloaded Fonts B-2
Symbol Sets B-3
OPERATING AS A LASERJET IIISi B-4
USING SELECTYPE MODE TO ADJUST THE HP EMULATION MODE B-5
ORIENT (Page Orientation) B-5
FONT B-5
SUB CONFIG. B-7
AVAILABLE FONTS AND SYMBOL SETS B-8
Resident Bitmap Fonts B-8
Resident Scalable Fonts B-9
Symbol Sets B-9
HP EMULATION COMMAND SUMMARY B-21

APPENDIX C. EPSON LQ AND FX EMULATION
MODES
OPERATING AS AN LQ OR FX PRINTER C-1
Printable Area C-1
USING SELECTYPE MODE TO ADJUST EPSON LQ AND FX
EMULATION C-2
ORIENT (Page Orientation) C-2
FONT C-2
SUB CONFIG. C-3
AVAILABLE FONTS AND SYMBOL SETS C-6
Resident Fonts C-6
Character Sets C-6
LQ AND FX EMULATION COMMAND SUMMARY C-8
APPENDIX D. OPTIONAL FONT CARDS AND
CARTRIDGES
FONT CARDS AND EMULATION MODE CARDS D-1
Font Cards D-1
Emulation Mode Cards D-1
Caring for Cards D-2
Using Font Cards D-2
Selecting a font with your application software D-2
Selecting a font with the Selectype FONT procedure D-2
Using a font card and a font cartridge at the same time D-3
Using the Epson GL Emulation Mode Card D-3
Recovering from a Card Error D-4
FONT CARTRIDGES D-4
Available Font Cartridges D-4
Selecting a font from a cartridge with your application program D-6
Recovering from a cartridge error D-6
APPENDIX E. LIST OF FEATURES
APPENDIX F. CONNECTOR PIN CONFIGURATION
APPENDIX G. STATUS SHEET
GLOSSARY

ABOUT THE PRINTER INTERFACE
What this Printer Interface Can Do
After you have the printer interface kit installed in your fax machine, you will be able to
use the machine as a desktop printer for your personal computer.
To ensure that the printer can be used with a wide range of application programs, emu-
lation modes for three different printer types have been provided. These emulation
modes are for:
❐ HP LaserJet IIIP (3/P/Si mode)
❐ Epson LQ
❐ Epson FX
There is a slot for an optional font cartridge (for a HP compatible font cartridge) and a
slot for an optional font card (for an Epson font card or HP plotter emulation mode
card).
The printer comes with 1 megabyte of memory, and you can add up to an extra 5
megabytes, making a possible total of 6 megabytes.
If you need optional font cards or cartridges, obtain them from your computer store.
The manufacturer of this fax machine does not supply these items, and cannot
guarantee satisfactory operation of the machine with every font card and cartridge
that is available. See Appendix D for more on optional font cards and cartridges.
Sharing the Printer with Two Computers
Your printer has two different interfaces (these will be referred to as channels in this
manual, because the printer’s software uses this term, or its abbreviation "CH"). There
is a Centronics parallel channel and an RS-232C serial channel, and you can connect
one PC to each. The RS-232C channel accepts data from a PC at high speeds up to
19,200 bps. The printer can automatically detect which channel data is coming in on,
and data is printed on a first-in first-out basis.
You can connect the printer to two computers at the same time, using both channels.
This is known as Multi-user mode. There are two basic types of Multi-user mode; these
are described on page 13.
If you wish, you can allocate a different emulation mode to each channel, and different
sets of printer settings. You can also allocate separate parts of the printer’s memory to
each channel. See page 38 for details on how to share your printer between two com-
puters.
INTRODUCTION
1

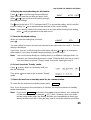
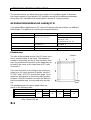
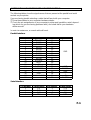
Working with the Printer and the Fax Machine at the Same Time
In a few cases, the machine can handle two tasks at the same time. The following ta-
bles show how to operate the machine while a job is currently in progress.
1. If you wish to print a file from the computer while the fax machine is busy
Current Task (Fax Machine) Printing a File from the PC
Immediate Transmission Not possible; wait until the machine has
finished the current task.
Memory Transmission
Scanning a document and storing it to memory Possible; you can print your file
immediately if you wish.
Receiving a fax message Not possible; wait until the machine has
finished the current task.
Printing a fax message from memory
Making a copy
2. If you wish to use the fax machine (or if someone tries to send you a fax message)
while you are printing a file from the computer
Desired Use of the Fax Machine Whether Possible or Not
Immediate Transmission Not possible; wait until the machine has finished
printing.
Memory Transmission You can store a document in the memory, but
transmission will not begin until at least 10
seconds after the machine has finished printing.
Scanning a document and storing it to memory Possible; you can start immediately, even though
the machine is printing a file from the computer.
Receiving a fax message Not possible; wait until at least 10 seconds after
the machine has finished printing.
Printing a fax message from memory Not possible; wait until the machine has finished
printing.
Making a copy
Note: You can tell if the machine is printing a file from the computer by looking at
the indicator (you can tell by looking at the indicator even if the machine is
in fax standby mode). When it is flashing, the computer is sending data to the
printer. When it is steady, only printing is taking place; the computer is not
sending data.
If the indicator remains steady but nothing is being printed, see Form Feed on
page 14.
While the machine is in printer mode (Function 35), the machine cannot re-
ceive fax messages.
INTRODUCTION
2

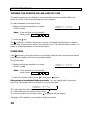
Operating the Printer
On Line
You can print data from your computer at any time, if the printer is on line (see page 14
for how to switch the printer on line).
Off Line
No data can be received from the computer if the printer is off line. However, any data
in the printer buffer can be printed manually by the Form Feed procedure (see page
14).
Function 35: Printer "Ready"/Set Up Mode (Selectype Mode)
In this mode, you can access a wide range of printer set-up features. Printer setup
mode is called "Selectype" mode. It is described on page 21 and the pages following
that. You can switch between On Line and Off Line if the printer "READY" display is
showing, but not if the printer is in Selectype mode.
To enter Printer Ready/Set Up Mode, use Function 35
Function 3 5 Yes
You can combine these into a keystroke program to enter this mode quickly. For infor-
mation on how to make a keystroke program, see the Operator’s Manual for your fax
machine.
To leave Printer Ready/Set Up mode:
Return to fax standby mode only from the printer "READY" display (shown above
right). To return to the "Ready" display, press repeatedly.
Press
Function to return to fax standby mode.
Also, if you do not touch the machine for 4 minutes while it is in printer mode, the ma-
chine will return to fax standby mode.
CONVENTIONS
The following conventions were used when writing this manual.
Keynames: Mainly, these have been placed in a different typeface, and enclosed in a
box. For example:
Function means "Press the Function key". For the arrow keys,
(for example) means "Press the key".
Displays: Messages seen in the bottom line of the display panel are shown in a larger
box, normally to the right of the operation that causes the display to appear.
INTRODUCTION
3

ABOUT THIS MANUAL
Operation Panel: This section will acquaint you with the buttons and indicators on the
operation panel that are for use only with the printer. It also outlines how to access the
various printer control functions.
Installation: This section shows you how to connect your computer to the printer and
check that it is working properly. It also tells you how to install the various optional kits
that you can get for your printer, such as extra memory.
Basic Operations: This section shows you how to perform basic operations, such as
resetting the printer and switching it on or off line.
Selecting the Emulation Mode: This section tells you how to select one of the emula-
tion modes.
Adjusting the Printer Settings: This section shows you how to modify the machine’s
settings.
Solving Problems: This section explains any error messages that may appear on the
screen while you are using your fax machine as a printer. It also tells you how to solve
some common problems. However, for mechanical problems such as paper jams, refer
to your fax machine’s Operator’s Manual.
Appendix A. Specifications: This contains a list of the printer’s most important specifi-
cations. Also see the Specifications section in your fax machine’s manual.
Appendix B. HP Emulation Mode: This section contains technical information on the
HP LaserJet emulation mode. It also shows you how to fine-tune the emulation mode
to adjust the appearance of your output.
Appendix C. Epson Emulation Modes: This section is similar to Appendix B, except
that it deals with the Epson emulation modes.
Appendix D. Optional Font Cards and Cartridges: This section gives details about
the optional cards and cartridges that you can use with this printer interface kit.
Appendix E. List of Features: This section lists up all the features that can be ad-
justed with "Selectype" mode, along with their factory settings.
Appendix F. Connector Pin Configuration: This section shows the names of the sig-
nals present on the serial and parallel connectors at the back of the machine. Show
this to a technician if you are having problems.
Appendix G: Status Sheet: This gives a sample status sheet printout.
INTRODUCTION
4

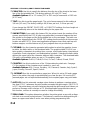
BUTTONS
To operate the printer, you will use the four buttons marked , , , and . These
keys are only for use with the printer (that is, they do not operate as cursor keys when
inputting telephone numbers). See your fax machine’s Operator’s Manual to see where
these are on your fax machine.
The main uses of these four printer mode buttons are as follows.
Press this to enter printer setup mode from printer "Ready" mode. Set up mode is also
known as Selectype mode. Also, when in printer setup mode, press this repeatedly to
return to printer "Ready" mode.
This button has three main functions:
❐ If the (Line Fail) indicator is flashing, read the error message on the display and
correct the problem (see page 44 for details). Then, press this button to resu me
printing.
❐ If you hold this button down for several seconds, RESET appears on the display and
all printer settings are returned to their previously stored settings. If you continue to
press this button after RESET appears, INITIALIZE will appear on the display, and
the printer settings will return to the power-on default settings. For more on resetting
the machine, see page 15.
❐ If you switch the printer off line then press this button during a multi-copy print run,
any remaining copies will be canceled.
When the printer is off line and the (Feed) indicator is lit, press this button to print
out the data remaining in the printer’s memory. If you are using more than one channel,
you can print data received by each channel alternately. See Form Feed on page 14.
(As a reminder, note that this arrow key points towards the printout tray.)
Watch the (on line/off line) indicator, and press this button to switch the printer be -
tween on line and off line modes. Do this only when the machine is in printer "Ready"
mode. (As a reminder, note that the arrow on the arrow key points the same way as the
arrow in the On Line indicator.)
OPERATION PANEL
5

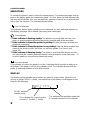
INDICATORS
To monitor the printer’s status, look at the display panel. The various messages that ap -
pear on the display panel are explained on page 44. Also, there are three indicators for
use only with the printer. See your fax machine’s operator’s manual to see where these
are on your fax machine. The indicators are as follows.
This indicator flashes when a printing error is detected. An error message appears on
the display (see page 44 for details concerning error messages).
❐ If this indicator is flashing rapidly: The printer is receiving data from the com -
puter, or receiving data and printing previously received data at the same time.
❐ If this indicator is lit and the printer is printing: All data has been received and
printout is in progress.
❐ If this indicator is lit and the printer is not printing: Data has been received and
stored in the printer’s buffer, but it has not yet been printed. See Form Feed
(page 14).
❐ If this indicator is flashing slowly: The printer is receiving data through an chan -
nel other than the currently selected channel, using Autosense mode (see page 13
for more details on channels and Autosense mode).
This indicator is lit when the printer is on line , indicating that the printer is ready to re -
ceive data. If the printer is off line, the indicator is out. The indicator flashes while the
printer is switching between on and off line status.
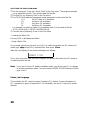
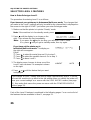
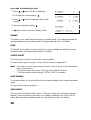
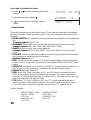
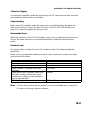
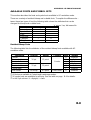
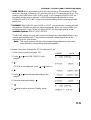
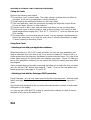
DISPLAY
The display on the operation panel shows the printer’s current status. When the ma -
chine is in printer "READY:" mode , the bottom line of the display should appear some -
thing like the following.
Line Fail indicator
Feed indicator
On Line indicator
READY indicates
standby mode.
This indicates the currently active
channel (P: Parallel, S: Serial).
This indicates the emulation mode that
is currently selected for this channel.
OPERATION PANEL
6

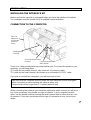
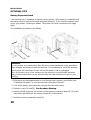
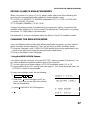
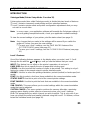
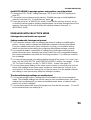
INSTALLING THE INTERFACE KIT
Make sure that the machine is unplugged before you have the interface kit installed.
The installation must be carried out by a qualified service technician.
CONNECTION TO THE COMPUTER
There is no cable provided with the printer interface kit. To connect the printer to your
computer, you will need either:
❐ A cable for the parallel channel, also known as a Centronics cable.
❐ A cable for the serial channel, also known as a null modem RS-232C cable.
If you plan to connect two computers, you will need one of each.
Make sure that the computer and the printer are both switched off and unplugged
before connecting or disconnecting the cable at either end.
Cables should not be longer than 2.5 metres [about 8 feet].
When connecting the printer to your computer, determine which channel you will be us -
ing. Some computers only provide one type of channel. If your computer has both
types, use the parallel channel, leaving the serial channel free for other devices, such
as modems. If you are in doubt about which type of connection to use, consult your
dealer.
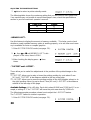
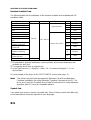
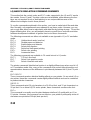
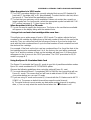
INSTALLATION
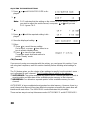
Font Car-
tridge Slot
(on the side
of the ma-
chine)
Font/Emulation
Card Slot
Connector for the Serial
Channel
Connector for the Par-
allel Channel
7

The printer is initially set up for the parallel channel. If your computer has a parallel
channel, you should be able to connect it up with a properly shielded, twisted pair ca -
ble and use it without having to change any of your printer’s settings.
If you have to use a serial channel, you may also need to adjust some of the serial
channel settings, such as Baud rate (see page 36), to match your computer’s settings.
If you plan to connect a computer to each channel, see page 13.
TESTING THE PRINTER
The printer has two built-in tests: the status sheet, and the test print. These tests let
you check the operation of your printer and obtain information on printer settings.
Printing a Test Page
1. Function 3 5 Yes
2. Hold down until the display is as shown on
the right. Then release it immediately.
Note: If you did not hold down for long
enough, press twice, then repeat
step 2.
3. Hold down or until the display is as
shown on the right.
4.
5. Select either the vertical lines test pattern ("1"
is displayed) or the horizontal line test pattern
("2" is displayed).
Use or to select the test pattern.
When the correct one is displayed, press .
The machine prints a test pattern.
6. Press twice to return to printer "Ready"
mode.
7. Press Function to leave printer mode.
INSTALLATION
8

Printing the Status Sheet and Font Samples
1. Function 3 5 Yes
2. Press until the screen is as shown on the
right, then release it immediately.
3. Hold down until STATUS SHEET (or
FONT SAMPLE if you need the font sam -
ples) appears on the display.
4. Press twice to print the status sheet (or the
font samples). The printer may take a few
seconds to get started on this.
5. Press twice to return to printer "Ready"
mode.
6. Press Function to leave printer mode.
Note: ❐ The status sheet shows the printer’s current settings. You can use macros
to store various sets of printer settings for different uses of the printer. If you
wish to print the settings stored with each macro, perform the LOAD
MACRO routine first, then follow the above steps.
For full information about macros: See pages 31 to 33 .
❐ If you have already set the printer up in Individual Multi-user mode:
The following display appears at step 2.
Press to select the serial (S) channel, or to choose the parallel (P)
channel, then go on to step 3.
❐ If you have already set the printer up in Autosense Multi-user mode:
You can only print out the status sheet or font samples for the channel that
was displayed on the screen immediately before you started this procedure.
If you wish to see the settings for the other channel, you will have to select
the other channel using the CH feature (for example, change from AUTO -
SENSE S to AUTOSENSE P). Then print the status sheet or font samples.
For information on the CH feature, see page 38.
❐ A sample of the status sheet is shown in Appendix G.
INSTALLATION
9

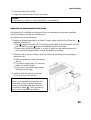
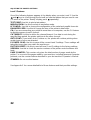
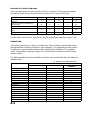
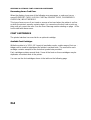
OPTIONAL KITS
Memory Expansion Board
Your machine has 1 megabyte of memory for the printer (this memory is separate from
the memory that is used for facsimile document memory). If you need some more mem -
ory for your printer, contact your dealer. The printer can have a maximum of 6 mega -
bytes.
The installation procedure is as follows.
WARNING
Do not remove any screws other than the four screws mentioned in this procedure.
High voltages are present inside the machine. Do not attempt to install the memory
board unless the machine is turned off and the power cord is unplugged.
Also, do not touch any of the contacts on the machine’s circuit boards, because
many of the components can be destroyed by the static electricity on you or your
clothing.
1. If there are any messages stored in your fax machine’s memory, print them (see
"Substitute Reception" in your fax machine’s Operator’s Manual.
2. Turn off the power, and unplug the machine from the wall socket.
3. Remove covers [A] and [B]. See the above Warning.
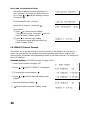
4. Insert the RAM chips into the sockets on the memory expansion board [C]. See the
instructions provided with the memory board for how to do this.
5. Insert the memory expansion board [C].
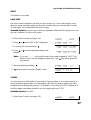
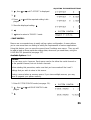
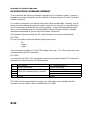
[A]
[B]
[C]
INSTALLATION
10

6. Put back covers [A] and [B].
7. Plug in the machine, then turn on the power.
Caution
Do not plug in or switch on until everything is connected up.
Optional Font and Emulation Mode Cards
See Appendix D for details on the types of font and emulation mode cards available,
how to use them, and how to look after them.
To install a card, do the following:
1. Make sure that the machine is in printer "Ready" mode and that it is off line (the
indicator must be off).
❐ The indicator must be off. If it is flashing, the printer is receiving data. If it is lit
but not flashing, press to print the data that is still in the buffer.
❐ Never insert a card if the printer is on line, or while you are making printer set -
tings (using Selectype mode), or while the printer is resetting.
2. Hold the card so that the maker’s logo is pointing up and the arrow is pointing to -
wards the slot.
❐ Make sure that the card is the correct
way up.
❐ The card is slightly bent. Do not try to
flatten it or bend it further.
❐ Do not touch the small gold contacts
along the card’s edge.
3. Carefully slide the card in to the slot.
❐ Do not force it into the slot.
If REMOVE CARD appears on the
display, you inserted the card when the
printer was on line or when the printer
memory contained some data. Remove
the card and press . Then go back to
step 1 of the installation procedure.
INSTALLATION
11

To take a card out of the slot, do the following:
1. Make sure that the machine is in printer "Ready" mode and that it is off line (the
indicator must be off).
❐ The indicator must be off. If it is flashing, the printer is receiving data. If it is lit
but not flashing, press to print the data that is still in the buffer.
2. Grasp the card at the center and gently pull it straight out of the slot.
Never remove a card if the printer is on line, while making printer settings (using
Selectype mode), or while the printer is resetting. If you remove a card while the
printer is in one of these states, a REINSERT CARD message will appear on the
display. An error will also occur if you remove a card while the indicator is on,
even if the printer is off line. See the error message descriptions (page 44) for
more details.
Optional Font Cartridges
See Appendix D for details on the types of font cartridges available, how to use them,
and how to look after them.
To install a font cartridge, do the following:
1. Make sure that the machine is in printer "Ready" mode and that it is off line (the
indicator must be off).
❐ The indicator must be off. If it is flashing, the printer is receiving data. If it is lit
but not flashing, press to print the data that is still in the buffer.
❐ Never insert a font cartridge if the printer is on line, or while you are making
printer settings (using Selectype mode), or while the printer is resetting.
2. Hold the font cartridge so that the label is facing
your left.
❐ Make sure that the font cartridge is facing the
correct way.
3. Press firmly until the cartridge snaps into place.
❐ Do not use excessive force.
If REMOVE CARD appears on the display, you
inserted the cartridge when the printer was on
line or when the printer memory contained some
data. Remove the card and press . Then go
back to step 1 of the installation procedure.
INSTALLATION
12

To take a cartridge out of the slot, do the following:
1. Make sure that the machine is in printer "Ready" mode and that it is off line (the
indicator must be off).
❐ The indicator must be off. If it is flashing, the printer is receiving data. If it is lit
but not flashing, press to print the data that is still in the buffer.
2. Grasp the cartridge at the edge and slowly pull it straight out of the slot.
Never remove a cartridge if the printer is on line, while making printer settings
(using Selectype mode), or while the printer is resetting. If you remove a cartridge
while the printer is in one of these states, a REINSERT CARD message will
appear on the display. An error will also occur if you remove a cartridge while the
indicator is on, even if the printer is off line. See the error message descriptions
(page 44) for more details.
CONNECTING THE PRINTER TO TWO COMPUTERS
Multi-user Modes
Your printer has two channels. One is serial (RS-232C) and the other is parallel (Cen -
tronics). You can hook up a separate computer to each channel.
If you connect two computers to your printer, you can set up the printer to monitor the
two channels in one of two different ways.
❐ Autosense Multi-user Mode: In this mode, the printer automatically detects which
channel is receiving data, and allocates all the available printer memory to that chan -
nel.
❐ Individual Multi-user Mode: The printer allocates a fixed proportion of available
printer memory to each channel.
To select one of these, use the CH feature (see page 38 for how to program this fea -
ture).
Configuring the Serial and Parallel Channels
Your printer will probably work straight away with the default settings. However, if your
computer is having problems communicating with the printer, you may have to adjust
the I/F CONFIG (Interface Configuration) settings (see page 35 and the pages follow -
ing that). The settings must match the settings for your computer.
INSTALLATION
13

TURNING THE PRINTER ON LINE AND OFF LINE
The printer must be on line before it can receive data from the computer. When the
printer is off line, it will not accept data from the computer.
To switch between on line and off line:
1. Make sure that the machine is in printer
READY: mode.
Note: If the machine is in fax standby
mode, press Function 3 5 Yes .
2. Press the key.
The indicator is lit when the printer is on line, indicating that the printer is ready to
receive data. If the printer is off line, the indicator is out. The indicator flashes while t he
printer is switching between on and off line status.
FORM FEED
If the indicator is lit and the printer is not printing, data has been received and stored
in the printer’s buffer, but it has not yet been printed.
To print the data:
1. Make sure that the machine is in printer
READY: mode.
Note: If the machine is in fax standby
mode, press Function 3 5 Yes .
2. Switch the printer off line (press ), then press to print.
If the printer is in Individual Multi-user mode: You can specify which channel to
print from. The display will be as follows if you do a form feed.
❐ To print data from the parallel channel, press .
❐ To print data from the serial channel, press .
❐ If you do not wish to print data, press to exit from this procedure.
See page 13 for details on your printer’s multi-user modes.
BASIC OPERATIONS
14
Page is loading ...
Page is loading ...
Page is loading ...
Page is loading ...
Page is loading ...
Page is loading ...
Page is loading ...
Page is loading ...
Page is loading ...
Page is loading ...
Page is loading ...
Page is loading ...
Page is loading ...
Page is loading ...
Page is loading ...
Page is loading ...
Page is loading ...
Page is loading ...
Page is loading ...
Page is loading ...
Page is loading ...
Page is loading ...
Page is loading ...
Page is loading ...
Page is loading ...
Page is loading ...
Page is loading ...
Page is loading ...
Page is loading ...
Page is loading ...
Page is loading ...
Page is loading ...
Page is loading ...
Page is loading ...
Page is loading ...
Page is loading ...
Page is loading ...
Page is loading ...
Page is loading ...
Page is loading ...
Page is loading ...
Page is loading ...
Page is loading ...
Page is loading ...
Page is loading ...
Page is loading ...
Page is loading ...
Page is loading ...
Page is loading ...
Page is loading ...
Page is loading ...
Page is loading ...
Page is loading ...
Page is loading ...
Page is loading ...
Page is loading ...
Page is loading ...
Page is loading ...
Page is loading ...
Page is loading ...
Page is loading ...
Page is loading ...
Page is loading ...
Page is loading ...
Page is loading ...
Page is loading ...
Page is loading ...
Page is loading ...
Page is loading ...
Page is loading ...
Page is loading ...
Page is loading ...
Page is loading ...
Page is loading ...
Page is loading ...
Page is loading ...
Page is loading ...
Page is loading ...
Page is loading ...
Page is loading ...
Page is loading ...
Page is loading ...
Page is loading ...
Page is loading ...
Page is loading ...
Page is loading ...
Page is loading ...
Page is loading ...
Page is loading ...
Page is loading ...
Page is loading ...
Page is loading ...
Page is loading ...
-
 1
1
-
 2
2
-
 3
3
-
 4
4
-
 5
5
-
 6
6
-
 7
7
-
 8
8
-
 9
9
-
 10
10
-
 11
11
-
 12
12
-
 13
13
-
 14
14
-
 15
15
-
 16
16
-
 17
17
-
 18
18
-
 19
19
-
 20
20
-
 21
21
-
 22
22
-
 23
23
-
 24
24
-
 25
25
-
 26
26
-
 27
27
-
 28
28
-
 29
29
-
 30
30
-
 31
31
-
 32
32
-
 33
33
-
 34
34
-
 35
35
-
 36
36
-
 37
37
-
 38
38
-
 39
39
-
 40
40
-
 41
41
-
 42
42
-
 43
43
-
 44
44
-
 45
45
-
 46
46
-
 47
47
-
 48
48
-
 49
49
-
 50
50
-
 51
51
-
 52
52
-
 53
53
-
 54
54
-
 55
55
-
 56
56
-
 57
57
-
 58
58
-
 59
59
-
 60
60
-
 61
61
-
 62
62
-
 63
63
-
 64
64
-
 65
65
-
 66
66
-
 67
67
-
 68
68
-
 69
69
-
 70
70
-
 71
71
-
 72
72
-
 73
73
-
 74
74
-
 75
75
-
 76
76
-
 77
77
-
 78
78
-
 79
79
-
 80
80
-
 81
81
-
 82
82
-
 83
83
-
 84
84
-
 85
85
-
 86
86
-
 87
87
-
 88
88
-
 89
89
-
 90
90
-
 91
91
-
 92
92
-
 93
93
-
 94
94
-
 95
95
-
 96
96
-
 97
97
-
 98
98
-
 99
99
-
 100
100
-
 101
101
-
 102
102
-
 103
103
-
 104
104
-
 105
105
-
 106
106
-
 107
107
-
 108
108
-
 109
109
-
 110
110
-
 111
111
-
 112
112
-
 113
113


Ask a question and I''ll find the answer in the document
Finding information in a document is now easier with AI
Related papers
-
Epson EPL-8000 User manual
-
-
-
-
-
-
-
-
-
Other documents
-
Panasonic KXP7200 Operating instructions
-
Garmin 1600 User manual
-
Homelite HL-2400Ce User manual
-
Brother HL-2270DW Technical Reference Manual
-
-
-
Brother HL-2060 Technical Reference Manual
-
RIDGID 34893 Operating instructions
-
OKI B6300 User guide
-
KYOCERA DP-3600 User manual