Page is loading ...
Model
ZKT6050
User
Manual
Cooker
2
The following symbols are used in this user manual:
WARNING!
Important information concerning your
personal safety and information on
how to avoid damaging the appliance.
IMPORTANT!
General information and tips
Environmental information
Contents
Important safety instructions 3
Product description
5
Controls and their functions
5
Before first use
6
Grill and oven furniture
8
The electronic timer
9
Operation
12
Cooking charts
20
Hints and tips
26
Care and cleaning
28
Troubleshooting
33
Installation instructions
35
Technical details
37
Environment
37
Guarantee / Custormer care
38
3
Important safety instructions
These warnings are provided in the interests of
your safety. Ensure that you understand them
all before installing or using the appliance.
Your safety is of paramount importance. If you
are unsure about any of the meanings of these
warnings please contact customer care.
Installation
• The appliance must be installed according to
the instructions supplied.
• The installation work must be undertaken by
a qualified electrician or competent person.
• The appliance should be serviced by an
authorised service engineer and only genuine
approved spare parts should be used.
• The appliance must be installed in an
adequately ventilated room.
• If the appliance is to be placed on a base,
measures must be taken to prevent the
appliance from slipping.
• This appliance is heavy and care must be
taken when moving it.
• Do not attempt to lift or move this appliance
by the handles.
• All packaging, both inside and outside the
appliance must be removed before the
appliance is used.
• It is dangerous to alter the specifications or
modify the appliance in any way.
Child safety
• Do not allow children to play with any part of
the packaging.
• Do not allow children to sit or climb on the
drop down doors.
• This appliance is not intended for use by
children and other persons whose physical,
sensory or mental capabilities or lack of
experience and knowledge prevents them
from using the appliance safely without
supervision or instruction by a responsible
person to ensure that they can use the
appliance safely.
• Children should be supervised to ensure that
they do not play with the appliance.
WARNING!
Accessible parts may be hot during use.
Young children should be kept away.
During use
• This appliance is not intended to be operated
by means of an external timer or separate
remote control system.
• This appliance has been designed for
domestic use to cook edible foodstuffs only
and must not be used for any other purposes.
• Take great care when heating fats and oils,
as they will ignite if they become too hot.
• Never place plastic or any other material,
which may melt in or on the oven.
• Do not leave the grill pan handle in position
when grilling, as it will become hot.
• Always support the grill pan when it is in the
withdrawn or partially withdrawn position.
• Always use oven gloves to remove and
replace the grill pan handle when grilling.
• Always use oven gloves to remove and place
food in the oven.
• Ensure cooking utensils are large enough to
contain foods to prevent spillage and boil
over.
• The handles of saucepans, which are smaller
than the heated area on the hob, will become
hot.
• Ensure your hand is protected before
handling the pan.
4
• Do not use the appliance if the ceramic glass
is damaged. If a fault or crack becomes
visible, disconnect the appliance immediately
from the electricity supply and contact your
local service force centre.
• During use the appliance becomes hot. Care
should be taken to avoid touching heating
elements inside the oven.
• Ensure that all vents are not obstructed to
ensure ventilation of the oven cavity.
• Never line any part of the appliance with foil.
• Always stand back from the appliance when
opening the doors to allow any build up of
steam or heat to release.
WARNING!
Never leave the appliance unattended when
the oven door is open.
• Do not place sealed cans or aerosols inside
the oven. They may explode if they are
heated.
• Ensure that all control knobs are in the off
position when not in use.
• Do not stand on the appliance or on the open
oven doors.
• Do not hang towels, dishcloths or clothes
from the appliance or its handles.
• Do not use this appliance if it is in contact
with water.
• Never operate it with wet hands.
Cleaning and maintenance
WARNING!
For hygiene and safety reasons this
appliance should be kept clean at all times.
A build-up of fat or other foodstuff could
result in a fire especially in the grill pan.
• Do not leave the cookware containing
foodstuff, e.g. fat or oil in the appliance in
case it is inadvertently switched on.
• Extreme care must be taken when using a
ceramic hob scraper.
• Always allow the appliance to cool before
switching off at the wall prior to carrying out
any cleaning/maintenance work.
• Only clean this appliance in accordance with
the instructions given in this book.
• Never use steam or high-pressure steam
cleaners to clean the appliance.

5
Product description
Control panel
Top oven / Grill
Main oven
Controls and their functions
A
B
C D E F G
HIJKLMNOP
A. Hob On/Off
B. Left Rear/Front Hotplates
C. Left Hotplates +/- Control
D. Right Hotplates +/- Control
E. Right Rear/Front Hotplates
F. Heat Indicator
G. Temperature/Time
H. Time/Temperature +/- Selectors
I. Time Selector Control
J. Temperature Review
K. Function Selector
L. Oven Cavity Selector
M. Oven On/Off
N. Child Lock
O. Hob Timer
P. Stop + Go Selector
6
Before using the appliance
Rating plate
• This is situated on the lower front frame of
the appliance and can be seen upon opening
the door. Alternatively the rating plate may
also be found on the back or top of some
models (where applicable).
• The appliance must be protected by a
suitably rated fuse or circuit breaker.
• The rating of the appliance is given on the
rating plate.
• Do not remove the rating plate from the
appliance as this may invalidate the
guarantee.
Preparing to use your appliance
• Wipe over the base of the oven(s) with a soft
cloth using hot soapy water. Wash the
furniture before use.
• We suggest that you run the oven(s) and grill
for 10 – 15 minutes at maximum
temperature, to burn off any residue from
their surfaces. Accessible parts may become
hotter than in normal use. Children should be
kept away. During this period an odour may
be emitted, it is therefore advisable to open a
window for ventilation.
The cooling fan for the controls
• The cooling fan comes on immediately when
the grill/top oven is switched on and after a
short time when the main oven is in use. It
may run on after the controls are switched
off until the appliance has cooled.
• During the initial period the cooling fan may
turn on and off, this is quite normal.
WARNING!
Always allow the cooling fan to cool the
appliance down before switching off at the
wall prior to carrying out any cleaning or
maintenance work.
Touch control sensors
• This appliance is operated using touch
control sensors. Functions are controlled by
touching sensor fields and confirmed by
displays and acoustic signals. Touch the
sensor fields from above, without covering
other sensor fields.
Switching the hob on/off
• The hob must be switched on before setting
any cooking function or programme. When
the on/off touch sensor
is pressed and
held, the hotplate settings will show in the
electronic display.
• To switch off the hob, you can press and
hold the on/off touch sensor
at any time.
Any cooking functions or programme will
stop.
• After switching on, within approximately 10
seconds a heat setting or function must be
set, otherwise the appliance automatically
switches itself off.
7
Switching the oven on/off
• The oven must be switched on before setting
any cooking function or programme. When
the on/off touch sensor
is pressed and
held, the cavity symbol will show in the
electronic display.
• To switch off the oven, you can press and
hold the on/off touch sensor
at any time.
Any cooking functions or programme will
stop, the oven light will switch off and the
electronic display will show the time of day
only.
• After switching on, within approximately 10
seconds a heat setting or function must be
set, otherwise the appliance automatically
switches itself off.
Operating time
• The operating time display shows how long
the oven has been operating. This display
can only be seen if none of the clock
functions Countdown, Cook Time or End
Time are set.
Condensation and steam
• When food is heated it produces steam
similar to a boiling kettle. The vents allow
some of this steam to escape. However,
always stand back from the appliance when
opening the door(s) to allow any build up of
steam or heat to release.
• If the steam comes into contact with a cool
surface on the outside of the appliance, e.g.
a trim, it will condense and produce water
droplets. This is quite normal and is not
caused by a fault on the appliance.
• To prevent discolouration, regularly wipe
away condensation and foodstuff from
surfaces.
• For your safety wall coverings at the rear of
the appliance should be securely fixed to the
wall.
Cookware
• Baking trays, dishes etc., should not be
placed directly against the grid covering the
fan at the back of the oven.
• Do not use baking trays larger than 30cm x
35cm (12” x 14”) as they will restrict the
circulation of heat and may affect
performance.

8
Grill and oven furniture
• The following items of grill and oven furniture
have been supplied with the appliance. If
you require replacements of any of the items
listed below please contact your local service
force centre.
1 grill pan
1 grill pan handle
1 grill pan grid
1 straight shelf
(For grilling and top oven cooking)
2 straight shelves
(For main oven cooking)
9
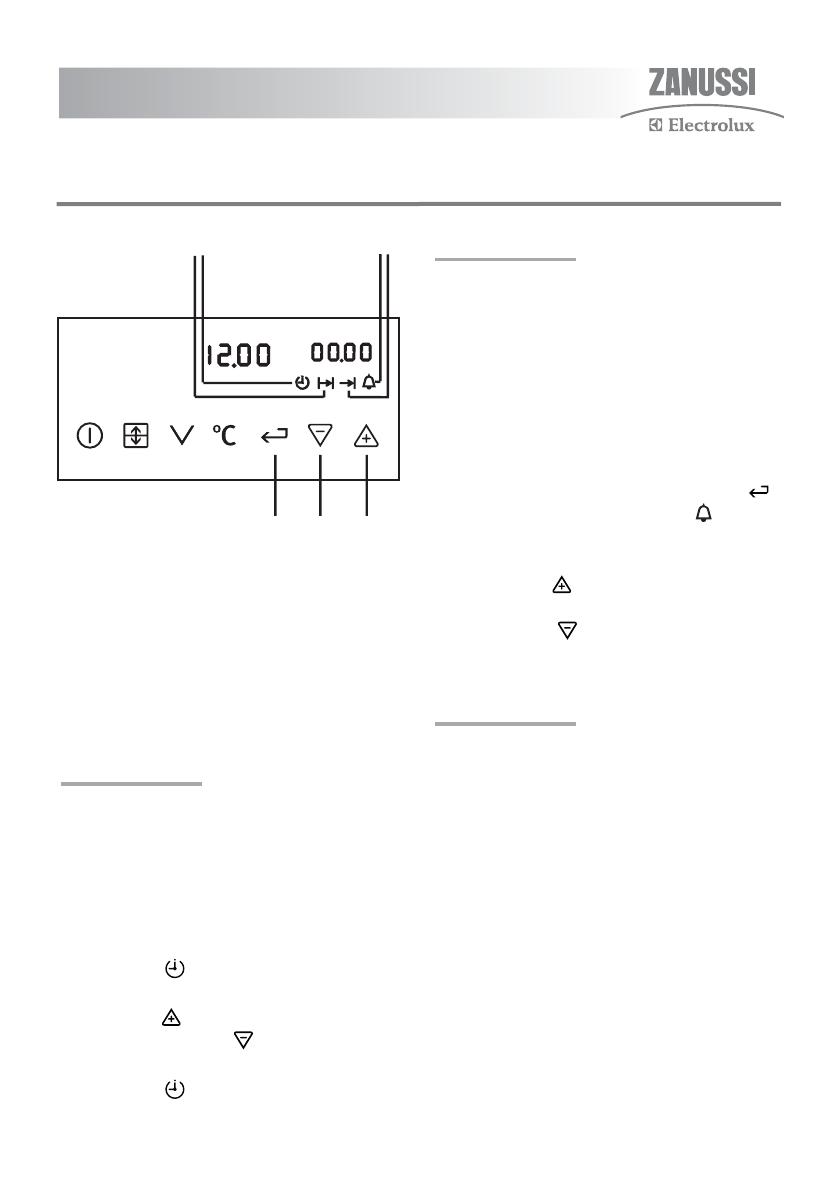
The electronic timer
12 34
567
Key
1. Cook time indicator neon
2. Time indicator neon
3. Countdown indicator neon
4. End time indicator neon
5. Selector control
6. Decrease control
7. Increase control
IMPORTANT!
The time of day must be set before the main
oven will operate manually.
To set the time of day
The oven has a 24 hour clock.
When the electricity supply is first switched on,
the display will show 12:00 and the 'Time'
indicator neon
will flash.
To set the correct time press the increase
control button
and if necessary, the
decrease control button
until the correct time
on the 24 hour clock is reached. The 'Time'
indicator neon
will flash for 5 seconds and
then go out.
IMPORTANT!
The increase and decrease control buttons
operate slowly at first, and then more rapidly.
They should be pressed separately.
To set the countdown
The 'Countdown' gives an audible reminder at
the end of any period of cooking.
It is not part of the automatic control.
Set the oven control to the required function.
To set, press the Selector Control button
until the 'Countdown' indicator neon
is
illuminated and the display reads 0:00.
To set the required time duration, press the
increase control
until the display indicates
the interval to be timed. If necessary press the
decrease control
to achieve the correct time
interval.
IMPORTANT!
This must be completed within 5 seconds of first
pressing the Selector Control button.
During the operation of the 'Countdown', the
remaining time period will be shown in the
display.
When 90% of the time set has elapsed an
audible signal sounds.
The 'Countdown' will sound intermittently for up
to 2 minutes at the end of the timed period. The
sound can be stopped by pressing any button.

10
To cancel the countdown
If you change your mind and want to cancel the
'Countdown', press the Selector Control button
until the 'Countdown' indicator neon
flashes then depress the decrease control
until 00:00 shows in the display. The
'Countdown' indicator neon
will continue to
flash for a few seconds and then return to the
time of day.
To set the oven timer control
Only the main oven can be automatically timed.
When using the timer control for the very first
time, it is advisable to let it operate while you
are at home. The display can be checked to
show that it is operating correctly and you will
feel confident to leave a meal to cook
automatically in the future.
To set the timer to switch on
and off automatically
1. Ensure the electricity supply is switched on
and that the correct time of day is displayed.
2. Set the oven control to the required function.
3. Place food in oven.
4. To set the length of cooking time. Press the
Selector Control button
until the 'Cook
Time' indicator neon
is illuminated.
5. Press the increase control
until the
required length of cooking time is displayed. If
necessary press the decrease control
until the correct time interval is achieved.
6. Release the buttons. The 'Cook Time'
indicator neon
will be illuminated.
IMPORTANT!
Remember, this must be completed within 5
seconds of first pressing the Selector Control
button.
7. To set the 'End Time'. Press the Selector
Control button
until the 'End Time'
indicator neon
flashes. Press the
increase control button
until the required
stop time is displayed. If necessary press the
decrease control
until the required time
interval is achieved.
8. Release the buttons. The 'Cook Time'
and 'End Time'
indicator neons will be
illuminated.
9. The function and temperature selected will
remain in the display.
IMPORTANT!
When the automatic timed period starts, the
heat indicator neon will flash untill the oven has
reached the desired temperature.
Heat and hold
This feature will keep food warm for up to 30
minutes after the end time has elapsed.
To activate heat and hold press the selector
control
and then the increase control
directly after you have entered the 'Endtime'
, and 00.30 will show in the display.
To set the timer to switch off
only
1. Ensure the electricity supply is switched on
and that the correct time of day is displayed.
2. Set the oven control to the required function.
3. Place food in the oven.
11
4. To set the length of cooking time, press the
Selector Control button
until the 'Cook
Time' indicator neon
is illuminated.
Press the increase control
until the
required length of cooking time is displayed.
Press the decrease control
if necessary.
5. Release the buttons. The 'Cook Time'
indicator neon
will illuminate and the
time of day will be displayed after 5 seconds.
6. The heat indicator neon will flash untill the
oven has reached the desired temperature.
To cancel an automatic
programme
1. To cancel an automatic programme press the
Selector Control button
until the 'Cook
Time' indicator neon
flashes. Press the
decrease control
until the display reads
00:00.
2. Release the buttons. The 'Cook Time'
indicator neon
will flash and after 5
seconds return to the time of day.
3. Turn off the oven controls.
To return the appliance to
manual
At the end of a timed cooking period, the 'End
Time' indicator neon
will flash and an alarm
will sound for up to 2 minutes.
1. To stop the sound, press any button.
2. Turn off the oven controls.
Things to note
In the event of an interruption of the electricity
supply, the timer will reset it self to zero and all
programming will be cancelled.
Automatic cooking
It is advisable to leave food in the oven for as short
a time as possible before automatic cooking.
Always ensure commercially prepared food is well
within its use by date and that home prepared food
is fresh and of good quality.
When cooking is complete, do not leave food to
stand in the oven, but remove and cool it quickly if
the food is not to be consumed immediately.
Always ensure food in the oven has been
covered before cooking if it is not possible to
remove food immediately after cooking.
12
Operation
The ceramic hob
WARNING!
Do not use the appliance if the ceramic glass
is damaged. If a fault or crack becomes
visible, disconnect the appliance
immediately from the electricity supply and
contact your local service force centre.
Using the hob
•
The hob must be switched on before
setting any cooking function or programme.
• For single hotplates press the increase
or decrease
control to vary the heat
setting. The highest number represents
the hottest setting and the lowest number
represents the coolest setting. Choose a
setting appropriate to the quantity and type
of food to be cooked.
• To turn off a hob element press increase
and decrease controls together.
Automatic warm up
All cooking zones are equipped with an
automatic warm up function. The cooking zone
switches to full power for a certain amount of
time and then automatically switches back to
the heat setting set.
Press the increase
control and scroll
through the heat settings to 9 then press the
increase
control again 'A' will show in the
display. An audible signal will sound. Now
press the decrease
control to the setting you
require. The hob will show 'A' in the display
until the Automatic warm up programme has
finished then returns to the setting set.
Using the stop + go function
The stop + go function switches all cooking
zones that are switched on to the keep warm
setting and then back to the heat setting that
was previously set.
This function can be used to briefly interrupt
and then continue the cooking process.
To switch on press the stop and go control.
The hob display will show the keep warm
symbol
.
To switch off press the stop and go control.
The display will revert to the heat setting that
was previously set.
Using the hob timer
All cooking zones can use each one of the two
timer functions at the same time.
If a cooking zone is switched off, the timer
function set is also switched off.
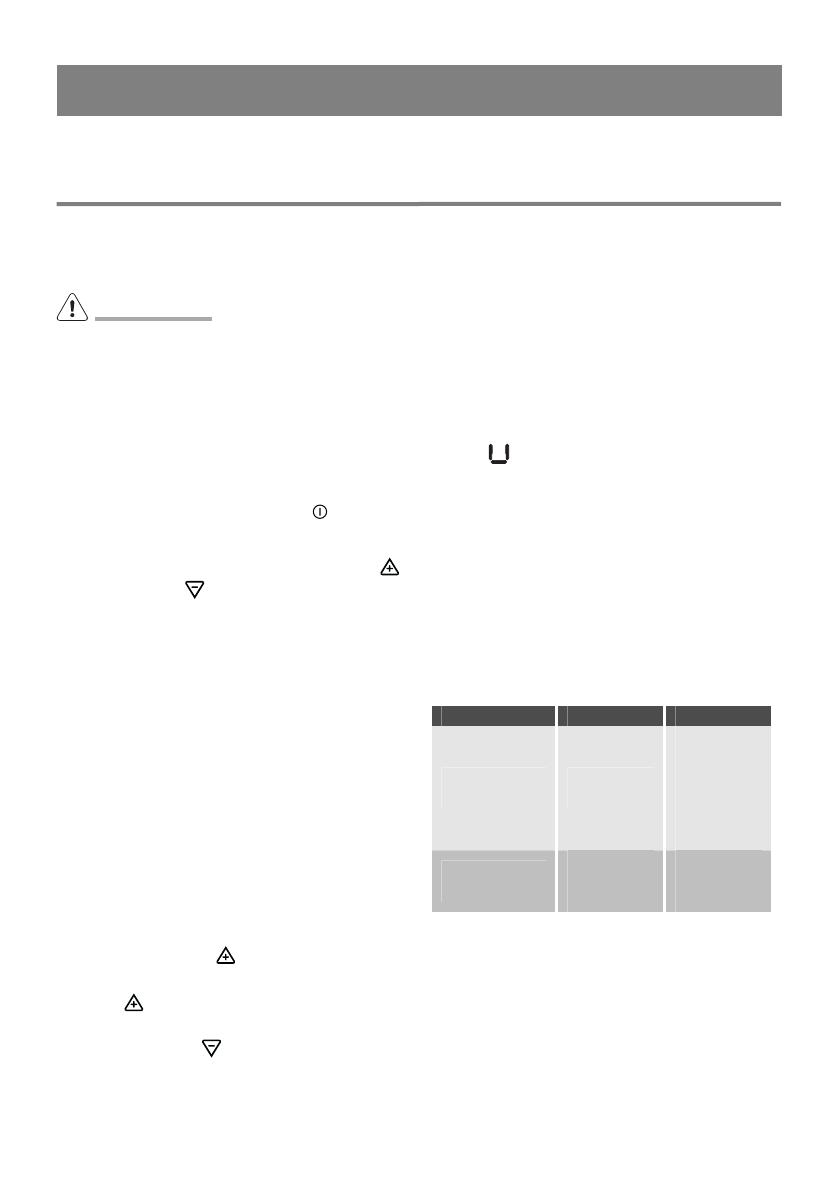
Function Condition Outcome
Automatic cut-
out
A heat
setting is set
Acoustic
signal
00 flashes
Cooking
zone
switches off
Countdown
timer
Cooking
zones not in
use
Acoustic
signal 00
flashes

13
Selecting a cooking zone
Control panel Display
1.
Touch hob
timer once
Pilot light of the first
cooking zone flashes
2.
Touch hob
timer once
Pilot light of the second
cooking zone flashes
3.
Touch hob
timer once
Pilot light of the third
cooking zone flashes
4.
Touch hob
timer once
Pilot light of the fourth
cooking zone flashes
When the pilot light is flashing more slowly, the
heat setting can be set or modified.
If other timer functions are set, after a few
seconds the shortest remaining time of all the
other timer functions is displayed and the
corresponding pilot light flashes.
Setting the time
Control panel Display
1.
Select
cooking
zone
Pilot light of the cooking
zone selected flashes
2.
Touch
or for the
cooking
zone
selected
00 to 99 minutes
After a few seconds the pilot light flashes more
slowly.
The time is set.
The time counts down.
Switching off the timer function
Control panel Display
1.
Select cooking
zone
Pilot light of the
cooking zone
selected flashes
faster
2.
Touch for
the cooking
zone selected
The time remaining
counts down to 00.
The pilot light goes out.
The timer function for the selected cooking zone
is switched off.
Switching off the acoustic
signal
When the time has elapsed an acoustic signal
will sound. Press the Hob Timer
to switch
this signal off.
Safety cut-out
If after switching on the cooking surface, a heat
setting is not set for a cooking zone within
approximately 10 seconds, the cooking surface
automatically switches itself off.
If one or more sensor fields are covered for
longer than approximately 10 seconds, e.g. by a
pan placed upon it, a signal sounds and the
cooking surface switches off automatically.
Recommended saucepans
Only saucepans with flat bases and close fitting
lids are recommended. The saucepan base
should be approximately the same size as the
cooking area.
Ensure that new saucepans are well
scrubbed to remove edges and take off any
deposits left from manufacture.
Traditional round-bottomed Woks must not
be used even with a stand. Woks with flat-
bottomed bases are available and do comply
with the above recommendations.

14
IMPORTANT!
Occasionally the heated areas may be seen to
switch on and off when higher heat settings are
being used. This is due to a safety device,
which prevents the glass from overheating.
Some switching on and off when cooking at high
temperatures, e.g. deep fat frying is quite
normal, causes no damage to the hob and little
delay in cooking times.
Excessive switching may however be
caused by the use of an unsuitable saucepan or
a saucepan which is smaller than the heated
area. If excessive switching occurs, discontinue
use of the saucepan.
Residual heat HOB
When a hob function has been switched off the
residual heat indicator will remain alight to indicate
that the hob is still hot. ‘ H‘ will show in the
display until the appliance has cooled. If the
appliance is switched off at the supply before the
hob has fully cooled, the residual heat indicator will
remain illuminated when the electricity is restored.
This is a safety precaution.
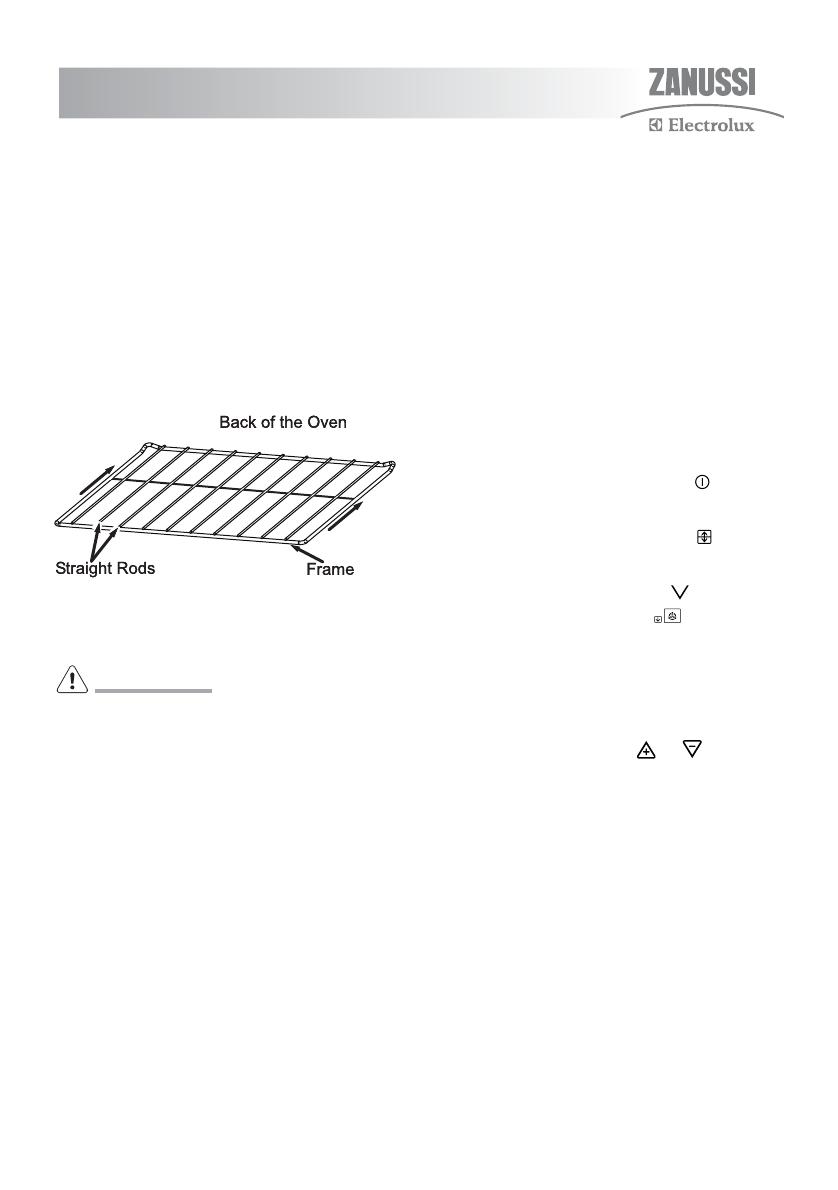
To fit the top oven shelf
The shelf should be fitted with the straight rods
uppermost on the frame and the forms towards the
back of the oven.
To remove a shelf slide the shelf towards you until
the shelf stop is reached. Tilt shelf up at the front
to that the stops clear the side supports. Lift shelf
clear. To install a shelf, reverse the above steps.
Each shelf position has an upper and lower
support.
WARNING!
Do not place cookware and cooking pots
with rough bases e.g. cast iron on the oven
door as damage to the glass may occur.
Top oven intelligent grill
WARNING!
CAUTION: Accessible parts may be hot
when the grill is in use. Young children
should be kept away.
Using intelligent grill
•
The oven must be switched on before
setting any cooking function or programme.
• Press the Oven Cavity selector until the
top oven cavity indicator is illuminated.
• Press the Function selector until the
required setting is shown
.
• To use the grill at lower settings press the
function selector
untill the required
setting is shown
.
• Wait 5 seconds until your choice is
confirmed. The temperature will
automatically set to 250°C if grilling with
the door closed.

15
• If grilling with the door open the
temperature will automatically set to setting
- 4 -. If you wish to alter the set
temperature, you may do so by pressing
or until the required temperature
setting is reached.
• To switch off a function simply press the
Function selector once. The function neon
will go out and the display will return to the
time of day.
Things to note
•
To ensure optimal cooking performance
the elements have been carefully
designed, so that only the inner element
glows red. The outer element is hot, but
will remain dark in colour. This gives
you the best possible cooking results.
• The oven light will illuminate.
• The heat indicator neons will flash until the
oven has reached the desired temperature
and then stop, an audible signal will sound.
When the oven has been switched off the
bars that are still lit indicate the remaining
residual heat in the oven.
• The cooling fan for the controls may
operate after a time.
• Some smoke from fat splashes may be
evident as the grill cleans itself.
• Some internal noise may be heard during
operation. This is quite normal.
• The grill may be used with the door open or
with the door closed.
The grill pan and handle
The grill pan has a removable handle. Attach
and remove as described below
To attach the handle, press the button on the
handle with the thumb and insert the lip into the
widest part of the bracket. Slide the handle
towards the left and release the button.
WARNING!
Ensure the handle is correctly located.
To remove the handle, press the button on the
handle with the thumb and slide the handle
towards the right. Release the button.
WARNING!
Always remove the grill pan handle during
grilling.
16
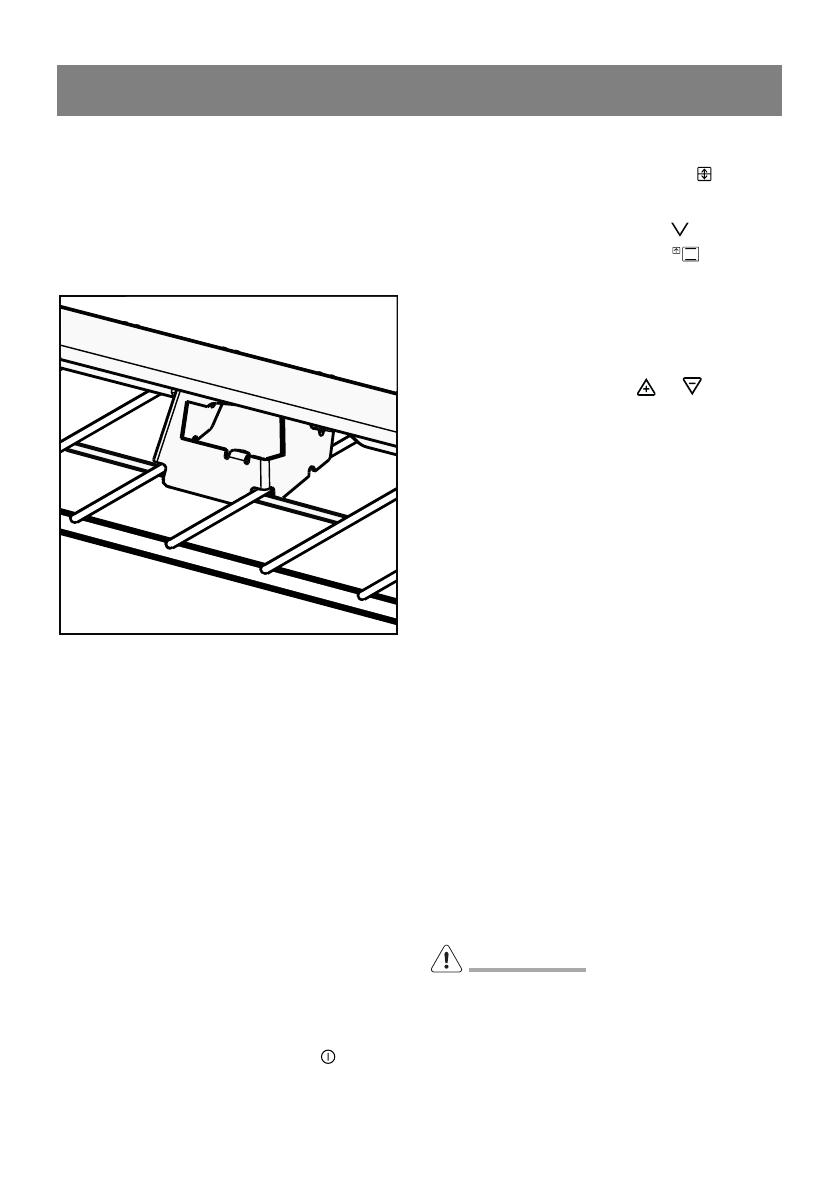
Place the grill pan on the shelf so that the pan is
positioned centrally beneath the grill. Ensure
that the cut out on the underside of the handle
bracket locates between the bars of the shelf
and over the cross bar on the shelf.
The top oven
The top oven is the smaller of the two ovens. It
is heated by elements in the top and bottom of
the oven. It is designed for cooking smaller
quantities of food. It gives especially good
results if used to cook fruitcakes, sweets and
savoury flans or quiche.
The top oven is ideal for use as a warming
compartment. It can be used to warm dishes
and keep food hot. Use the top oven when you
want to warm plates. Use the lowest setting on
the top oven temperature control.
Using the top oven
•
The oven must be switched on before
setting any cooking function or programme.
• Press the Oven Cavity selector until the
top oven cavity indicator is illuminated.
• Press the Function selector until the
required neon is illuminated
.
• Wait 5 seconds until your choice is
confirmed. The temperature will
automatically set to 200°C.
• If you wish to alter the set temperature, you
may do so by pressing
or until the
required temperature setting is reached.
• To switch off a function simply press the
Function selector once. The function neon
will go out and the display will return to the
time of day.
Things to note
•
The oven light will illuminate.
• The heat indicator neons will flash until the
oven has reached the desired temperature
and then stop, an audible signal will sound.
When the oven has been switched off the
bars that are still lit indicate the remaining
residual heat in the oven.
• The cooling fan for the controls may operate
after a time.
• If an automatic programme has been set, the
light does not come on until cooking begins.
• Some internal noise may be heard during
operation. This is quite normal.
WARNING!
Do not place dishes, tins and trays directly
on the oven base as it becomes very hot and
damage will occur.
17
To fit the main oven shelves
The shelf should be fitted with the straight rods
uppermost on the frame and the forms towards
the back of the oven. To remove a shelf slide
the shelf towards you until the shelf stop is
reached. Tilt shelf up at the front to that the
stops clear the side supports. Lift shelf clear.
To install a shelf, reverse the above steps.
Each shelf position has an upper and lower
support.
Main oven grill
WARNING!
Accessible parts may be hot when the grill is
in use. Young children should be kept away.
Main oven fan cooking
The advantages of fan oven cooking are:
Preheating
The fan oven quickly reaches its temperature,
so it is not usually necessary to preheat the
oven. Without preheating however, you may
need to add an extra 5 – 10 minutes on the
recommended cooking times. For recipes
needing high temperatures, e.g. bread, pastries,
scones, soufflés etc., best results are achieved
if the oven is preheated first. For best results
when cooking frozen or cooked chilled ready
meals always preheat the oven first.
Cooking temperatures
Fan oven cooking generally requires lower
temperatures than conventional cooking.
Follow the temperatures recommended in the
cooking chart. As a guide reduce temperatures
by about 20°C – 25°C for your own recipes,
using a conventional oven.
Batch baking
The fan oven cooks evenly on both shelf levels,
especially useful when batch baking.
Using main oven fan cooking
•
The oven must be switched on before
setting any cooking function or programme.
• Press the Oven Cavity selector until the
main oven cavity indicator is illuminated.
• Press the Function selector until the
required setting is shown
.
• Wait 5 seconds until your choice is
confirmed. The temperature will
automatically set to 180°C.
• If you wish to alter the set temperature, you
may do so by pressing
or until the
required temperature setting is reached.
• To switch off a function simply press the
Function selector once. The function neon
will go out and the display will return to the
time of day.
Things to note
•
The oven light will illuminate.
• The heat indicator neons will flash until the
oven has reached the desired temperature
and then stop, an audible signal will sound.
When the oven has been switched off the
bars that are still lit indicate the remaining
residual heat in the oven.

18
• The cooling fan for the controls may
operate after a time.
• If an automatic programme has been set,
the oven fan and light do not come on until
cooking begins.
• Some internal noise may be heard during
operation. This is quite normal.
WARNING!
Do not place cookware and cooking pots
with rough bases e.g. cast iron on the oven
door as damage to the glass may occur.
Defrost
This main oven function enables you to defrost
most foods without heat faster than some
conventional methods as the oven fan circulates
air around the food. It is particularly suitable for
delicate frozen foods which are to be served cold
e.g. cream filled gateaux, cakes covered with
icings or frostings, cheesecakes, biscuits, scones,
etc.
Using defrost
•
The oven must be switched on before
setting any cooking function or programme.
• Press the Oven Cavity selector until the
main oven cavity indicator is illuminated.
• Press the Function selector until the
defrost neon is illuminated
.
• Wait 5 seconds until your choice is
confirmed. The temperature will
automatically set to 30°C.
• To switch off a function simply press the
Function selector once. The function neon
will go out and the display will return to the
time of day.
Things to note
•
The oven fan and oven light will come on.
• The cooling fan does not operate.
Child lock
To avoid children switching on the oven it is
possible to lock the hob and oven controls.
Activating the child lock
•
The hob and oven must be on but no hob or
oven function must be selected.
• Press the child safety selector , an audible
signal will sound. Then press a hotplate
increase control
"SAFE" appears in the
oven display and 'L' appears in the hob
display.
• The child safety device is now activated.
Deactivating the child lock
•
The hob and oven must be on but no hob or
oven function must be selected.
• Press the child safety selector , an audible
signal will sound. Then press a hotplate
decrease control
until "SAFE" disappears
from the oven display and 'L' disappears from
the hob display.
• The child safety device is now deactivated
and the oven is again ready for use.
Adult overide
Press a hotplate increase and decrease
control together.
Functions can now be selected as required but
when the appliance is turned off then turned
back on again the child lock will still be active.
19
Function lock
When both the hob and oven have a function
selected, the hob and oven can be locked whilst
both in use, to prevent settings being changed.
Press the child safety selector
once. 'L' will
show in the hob display and ‘LOC’ will show in the
oven display.
To turn off the function lock press the child safety
selector
. The displays will revert to the setting
set.
Oven Safety cut-out
If not switched off after a certain time, or if the
temperature is not modified, the oven switches off
automatically.
The last temperature set flashes in the
temperature display.
The oven switches off when the oven temperature
is :
30 - 120°C after 12.5 hours
120 - 200°C after 8.5 hours
200 - 250°C after 5.5 hours
250 - Max°C after 3.0 hours
Switching on after a safety cut-
out
Switch the oven off completely.
It can then be switched on again.
The safety cut-out is cancelled if the clock function
Cook time or End Time is set.
Residual heat oven
When an oven function has been switched off, the
bars of the heat indicator, that are still lit, indicate
the remaining residual heat in the oven.
Temperature review
During any cooking function it is possible to
display the current temperature by pressing the
temperature review
button.

20
Grilling chart
FOOD GRILL TIME (mins in total)
Bacon Rashers 5 - 6
Beef Burgers 10 - 15
Chicken Joints 30 - 40
Lamb Chops 15 - 20
Pork Chops 20 - 30
Whole Trout/Mackerel 15 - 25
Plaice/Cod Fillets 10 - 15
Kebabs 20 - 30
Kidneys – Lamb/Pig 8 - 12
Liver – Lamb/Pig 10 - 20
Sausages 20 - 30
Steak – Rare 6 - 12
Steak – Medium 12 - 16
Steak – Well Done 14 - 20
Toasted Sandwiches 3 - 4
The times quoted above are given as a guide and should be adjusted to suit personal taste.
Adjust the grill setting and the grill pan grid to suite different thicknesses of food.
/