Vision Fitness ST760 User manual
- Type
- User manual

ST760
LEG/CALF PRESS
Assembly &
Owner’s Guide

2

3
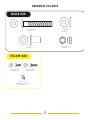
ASSEMBLY GUIDE . . . . . . . . . . . . . . . . 4
HARDWARE BAGS . . . . . . . . . . . . . . . . 6
STEP 1: ORANGE BAG . . . . . . . . . . . . 10
STEP 2: BLUE BAG . . . . . . . . . . . . . . . 11
STEP 3: PINK BAG . . . . . . . . . . . . . . . 12
STEP 4: GREEN BAG . . . . . . . . . . . . . . 13
STEP 5: BLACK BAG . . . . . . . . . . . . . . 14
STEP 6: YELLOW BAG . . . . . . . . . . . . 15
STEP 7: RED BAG . . . . . . . . . . . . . . . 16
ASSEMBLY GUIDE OWNER’S GUIDE
RESISTANCE TRAINING BENEFITS
& TIPS, WORKOUT VARIATIONS . . . . . . 18
TRAINING PROGRAMS . . . . . . . . . . . . 19
STRETCHING . . . . . . . . . . . . . . . . . . . 20
MAINTENANCE SCHEDULE . . . . . . . . . . 22
COMMERCIAL WARRANTY . . . . . . . . . . 23
WORKOUT LOGS . . . . . . . . . . . . . . . . 24
Table of Contents

4
To avoid possible damage to this Leg/Calf Press, please follow these assembly steps in the correct order. Before
proceeding, find your new Leg/Calf Press serial number located on the back of the center floor support (AG2),
and enter here:
Refer to this number when calling for service, and enter this serial number on your Warranty Card and in your
own records. Be sure to read your Owner’s Guide before using your new Leg/Calf Press.
If any parts, hardware or tools are missing, please call 1.800.335.4348, Extension 12
NOTE: During assembly, it is recommended to ensure that all bolts are in place and partially threaded before completely
tightening any one bolt. During assembly steps 1 thru 4, do not completely tighten any bolts until completion of Step 4.
Assembly &
Owner’s Guide
ST760
LEG/CALF PRESS

5
Serial #
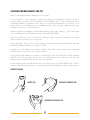
General Warnin
g
Decal
Pinch Point
Decal
2
STEP
1
STEP
3
STEP
4
STEP
5
STEP
6
STEP
7
STEP

ORANGE BAG
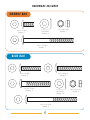
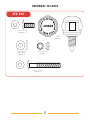
6
BLUE BAG
HARDWARE INCLUDED
10.2 x 22 x 2
Flat Washer
Quantity: 3
M10 Nylon Nut
Quantity: 1
M10 x 120 Bolt
Quantity: 1
10.2 x 22 x 2
Flat Washer
Quantity: 16
M10 Nylon Nut
Quantity: 8
M10 x 120 Bolt
Quantity: 2
M10 x 48 Bolt
Quantity: 2
M10 x 70 Bolt
Quantity: 2
M10 x 25 Bolt
Quantity: 1
M10 x 60 Bolt
Quantity: 2

7
PINK BAG
GREEN BAG
HARDWARE INCLUDED
M5 x 10 Bolt
Quantity: 24
5.2 x 10 x 1.5
Flat Washer
Quantity: 24
5.1 x 9.3 x 1.3
Lock Washer
Quantity: 24
M8 x 62 Bolt
Quantity: 2
8.4 x 15.5 x 1.6
Flat Washer
Quantity: 4
M8 Nylon Nut
Quantity: 2
M10 x 123 Bolt
Quantity: 2
10.2 x 22 x 2
Flat Washer
Quantity: 4
M10 Nylon Nut
Quantity: 2
10.2 x 18.4 x 2.5
Lock Washer
Quantity: 8
M10 x 25 Bolt
Quantity: 8
20 x 30 x 1
Spacer/Teflon Washer
Quantity: 8
98mm Shaft (Z18)
illustration not to scale
Quantity: 2
105mm Shaft (Z19)
illustration not to scale
Quantity: 2
10 x 25 x 2
Flat Washer
Quantity: 8

8
BLACK BAG
YELLOW BAG
HARDWARE INCLUDED
M5 x 10 Bolt
Quantity: 22
10.2 x 22 x 2
Flat Washer
Quantity: 2
M10 Nylon Nut
Quantity: 1
Bushing
Quantity: 2
M10 x 70 Bolt
Quantity: 1
Slip-On Nut
illustration not to scale
Quantity: 2
M5 x 15 Bolt
Quantity: 6

9
RED BAG
HARDWARE INCLUDED
M10 x 25 Bolt
Quantity: 8
Pull Pin
Quantity: 1
10.2 x 22 x 2
Flat Washer
Quantity: 4
M10 Nylon Nut
Quantity: 2
M10 x 75 Bolt
Quantity: 2

10
AC1
AC1
AG2
AG2
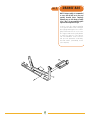
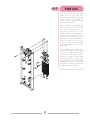
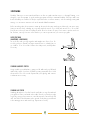
1
STEP
NOTE: During assembly, it is recommended
to ensure that all bolts are in place and
partially threaded before completely
tightening any one bolt. During assembly
steps 1 thru 4, do not completely tighten
any bolts until completion of Step 4.
• Lay the center floor support (AG2) flat
on the ground. Hold the main seat support
(AC1) upright and align the holes near the
pulley bracket with the holes on the center
floor support. Make sure the pulley bracket
on center floor support is on the opposite
side of the attachment. Secure connection
with two bolts (M10x120 & M10x25),
three flat washers (10.2x22x2), and a
nylon nut (M10).
ORANGE BAG

AC1
AC1
AG2
AG2
AG1
AG1
AB1
AB1
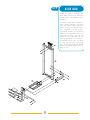
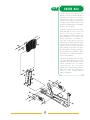
11
2
STEP
• Attach two pulleys to the weight stack
tower (AB1) with two bolts (M10x48),
four flat washers (10.2x22x2), and two
nuts (M10).
• Stand the weight stack tower (AB1) so
that it is upright, and place it next to the
center floor support (AG2). Attach the
tower to the center floor support using two
bolts (M10x70), four flat washers
(10.2x22x2), and two nylon nuts (M10).
Attach the connecting brace (AG1) from
the weight stack tower to the main seat
support. On the weight stack side, use
two bolts (M10x60), four flat washers,
(10.2x22x2), and two nylon nuts (M10)
to secure. On other side of connecting
brace, use two bolts (M10x120), four flat
washers (10.2x22x2), and two nylon nuts
(M10) to secure.
BLUE BAG

12
3
STEP
• Loosely secure top and bottom shield
brackets (B10) to weight stack tower
(AB1) using eight bolts (M5x10), eight flat
washers (5.2x10x1.5), and eight lock
washers (5.1x9.3x1.3) provided. Repeat
for all side brackets (B09).
• Place two rubber weight plate bumpers
(Z42) over the holes in the weight stack
tower. With the horizontal holes at the
top, place the guide rods over and
through the rubber weight plate bumpers
and into the weight stack tower. Let the
guide rods tilt outward from the tower.
Slide each of the 20 weight plates over
both of the guide rods on top of one
another. Place the header weight plate
(K01) over both guide rods on top of other
weight plates.
• Slip the rubber guide rod sleeves (Z41)
over the top of the guide rods, then snap
into holes in the weight stack tower. Lift the
guide rods into top of weight stack tower
until holes in the guide rod are lined up
with the horizontal holes on the top of the
weight stack tower. Insert a bolt (M8x62)
and flat washer (8.4x15.5x1.6) through
each guide rod and fasten with another
flat washer and nylon nut (M8).
PINK BAG
AB1
AB1
Z41
Z41
Z42
Z42
Z42
Z42
B10
B10
B09
B09
B09
B09

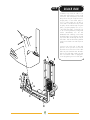
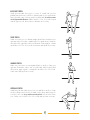
13
4
STEP
• Both swing arm covers (C13) must be
placed on the front of the main seat support
with tallest sides facing rear of machine.
Align bottom two holes on covers with the
front two holes along bottom edge of main
seat support (AC1). Attach using two bolts
(M10x123), four flat washers (10.2x22x2),
and two nylon nuts (M10).
• Take the swing arm without the pulleys
(AD2) and align the holes at either end
with the front swing arm bracket on
main seat support. Slide the 105mm shaft
(Z19) through holes in swing arm cover,
bracket, and spacer (one 20x30x1 on
each side of swing arm). Use two bolts
(M10x25), two lock washers (10.2x18.4x2.5),
and two flat washers (10x25x2) to secure.
Repeat using the swing arm with pulleys
(AD1), making sure the pulleys are down,
facing the pulleys on the main seat support.
Check diagram for clarification. Make
sure the flats of the shafts line up with those
of the mounting brackets.
• Attach foot plate (AD3) to the top of both
swing arms (AD1&AD2) using one 98mm
shaft (Z18), two bolts (M10x25), two flat
washers (10x25x2), two lock washers
(10.2x18.4x2.5), and two spacers
(20x30x1) for each swing arm connection.
Make sure the flats of the shafts line up
with those of the mounting brackets.
Tighten all hardware.
GREEN BAG
AC1
AC1
AD1
AD1
C13
C13
C13
C13
AD2
AD2
AD3
AD3
Z18
Z18
Z18
Z18
Z19
Z19
Z19
Z19

14
5
STEP
• With the loop end of the cable in your
hand, guide it through hole in top of weight
stack tower, and around pulleys A and B.
Bring it down along the weight stack tower,
through pulley C and around pulley D.
Loosen or remove pulley D to be able to
ensure cable is routed between the post and
the pulley. Weave cable through swing arm
pulleys, going through pulleys E, F, G, H, I,
J. End at the main frame, securing the loop
on the connecting bracket by sliding a flat
washer (10.2x22x2) onto the bolt
(M10x70). Slide a bushing onto bolt and
put bolt through hole in main frame, through
loop end of cable, and through other side of
main frame. Slide another bushing and flat
washer onto bolt and secure with a nylon nut
(M10).
• Remove nut on bolt end of cable and
place the selector pin tether on bolt shaft.
Thread the nut on the bolt end of the cable
all the way to the head of the bolt. Thread the
bolt into the header plate, making sure that
there is a minimum of 0.5” of engagement.
Secure by tightening nut onto header plate.
BLACK BAG
A
B
C
D
E
F
G
H
I
J

15
6
STEP
• Align holes in rear shield (Q01) with the
holes in the brackets on the back side of
the weight stack tower (AB1); secure using
10 bolts (M5x10). Take the left side shield
(Q03) and repeat on front side of weight
stack tower using six bolts (M5x10).
Tighten interior brackets (B09 & B10).
Attach right side shield (Q02) with six
bolts (M5x10)
• Place slip-on nuts over holes on the left
upright of the weight stack tower (AB1).
Snap two top covers (Q05 & Q06)
together. With tallest point facing the rear
of the machine, place the top covers on
top of the weight stack tower and secure
using six bolts (M5x15).
YELLOW BAG
AB1
AB1
Q02
Q02
Q03
Q03
Q01
Q01
Q06
Q06
Q05
Q05

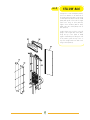
16
AC1
AC1
AC2
AC2
AC3
AC3
AH1
AH1
7
STEP
• Attach handlebars (AC2 & AC3) to side
of main seat support (AC1) using two bolts
(M10x75), four flat washers (10.2x22x2),
two nylon nuts (M10).
• Secure seat bottom to seat support using
four bolts (M10x25).
• Attach seat back to seat back post
(AH1) using four bolts (M10x25). Slide
the assembly into seat back post support.
Thread pull pin into seat back post support
until it locks seat back into position.
RED BAG

17

18
RESISTANCE TRAINING BENEFITS AND TIPS
Always consult a physician before starting an exercise program.
To be successful in your exercise program, it is important to develop an understanding of the basic principles of
resistance training. Now that you have assembled your VISION FITNESS gym, it is only natural that you want to
get started immediately. First, determine a few realistic, short term goals and expectations for yourself. Choose an
appropriate exercise routine that best suits your individual needs. Any of the 3 programs, explained in the Training
Programs section below, is a great starting point.
Warm up properly before engaging in resistance training. Stretching, yoga, jogging, calisthenics, or other cardiovascular
exercise can help prepare your body for the heavier workload of lifting weights.
Learn how to perform the exercise correctly before using heavy weight. Correct form is important to avoid injury
and ensure that you work the proper muscle groups.
Know your limitations. If you are new to resistance training or are starting back, after an extended layoff, start slowly
and build foundational strength over a longer period of time.
Pay attention to your breathing. As a general rule of thumb: inhale on the non-exertion part of the movement and
exhale during the exertion portion. Never hold your breath.
Keep in mind how important the recovery phase is in achieving your goals. The general rule is to allow a minimum
of 48-72 hours before training the same muscle/s. If you still experience soreness after this period of time has
elapsed, take a few additional days until the soreness has subsided.
Use this manual to guide you through the basic exercises you can perform on your VISION FITNESS gym. To achieve
maximum results and avoid possible injury, consult a fitness professional to formulate a complete exercise program.
WORKOUT VARIATIONS
NEUTRAL GRIP
OVERHAND OR PRONATED GRIP
UNDERHAND OR SUPINATED GRIP

19
TRAINING PROGRAMS
MUSCULAR ENDURANCE
A program that stresses moderate intensity, a lower amount of resistance, and higher repetitions (anywhere from
13-100 or more). These types of sets will take longer to complete. This type of training conditions the muscles for
activities that stress the slow twitch muscle fibers of your body. This is beneficial for sustaining energy over moderate
periods of time.
MUSCULAR STRENGTH
A program that stresses high intensity, a higher amount of resistance, and lower repetitions (anywhere from 6-12).
These types of sets will take a shorter period of time to complete. This type of training conditions the muscles for
activities that stress the fast twitch muscle fibers of the body. This is beneficial for activities that require short bursts
of speed and power.
SPRINT 8
This program is exclusive to VISION FITNESS exercise equipment. This is a program that stresses high intensity, a
moderate amount of resistance, and as many repetitions that a person can perform in a specified period of time
(usually 20-30 seconds). This program works especially well for the time crunched exerciser. It allows you to work
both the slow and fast twitch muscle fibers of the body. This program gives you a good cardiovascular and strength
workout. The thing that is most appealing about this program is that an individual can complete it in 20 minutes.
This is how the program works:
The person picks the number of exercises they want to perform. Examples would be 1, 2, 4, or 8 exercises. The
individual completes a 3 minute warm up with a brisk walk or on a piece of cardiovascular equipment. After the
warm up is complete, the user begins performing the first exercise maintaining a high intensity pace throughout the
determined amount of time (20-30 seconds). After this period of time, the individual can perform an active, low
intensity recovery phase, stretching, or complete rest. This should last 1.5-2 minutes or less, if you are at a higher
fitness level. After the recovery phase, the individual performs the second high intensity exercise for the required
amount of time (20-30 seconds). This is followed by the second recovery phase. This process repeats until you are
done with 8 high intensity intervals. Finish the workout by completing a 3-5 minute very low intensity cool down.

20
STRETCHING
Flexibility Training is not associated with fitness as often as cardiovascular exercise or Strength Training, even
though it is just as important. A good stretching program will help to maintain flexibility of the hips and lower
back. A flexible person will be less likely to injure themselves in common activities, such as reaching, twisting and
turning, or in uncommon activities such as the annual softball tournament.
Before stretching, take a few minutes to warm up the muscles because stretching a cold muscle can cause injury.
Start your stretch slowly, exhaling as you gently stretch the muscle. Try to hold each stretch 15 to 30 seconds.
Don’t bounce when you stretch. Holding a stretch offers less chance of injury. Don’t strain or push a muscle too
far. If it hurts, ease up. Here are a few stretches you can incorporate into your exercise program:
SEATED TOE TOUCH
(HAMSTRINGS & LOWER BACK)
Sit on the floor with your legs together and straight out in front of you. Do
not lock your knees. Extend your fingers toward your toes, exhaling as you
go. Hold for 15 to 30 seconds. Return to the start position, and repeat as
necessary.
STANDING QUADRICEPS STRETCH
Using a wall to provide balance, grasp your left ankle with your left hand
and hold to stretch. Your knee should be pointing toward the floor. Hold
the stretch for 15 to 30 seconds. Repeat with your right leg, and continue
to alternate as necessary.
STANDING CALF STRETCH
Standing about three to four feet from the wall, take one step forward with
your right foot. Place your hands on the wall in front of you. Bend your right
leg slowly, using your movement to control the amount of stretch in the left
calf. Your left heel should remain on the ground. Slowly bring yourself back
to the starting position and switch legs. Repeat as necessary.
Page is loading ...
Page is loading ...
Page is loading ...
Page is loading ...
Page is loading ...
Page is loading ...
Page is loading ...
Page is loading ...
-
 1
1
-
 2
2
-
 3
3
-
 4
4
-
 5
5
-
 6
6
-
 7
7
-
 8
8
-
 9
9
-
 10
10
-
 11
11
-
 12
12
-
 13
13
-
 14
14
-
 15
15
-
 16
16
-
 17
17
-
 18
18
-
 19
19
-
 20
20
-
 21
21
-
 22
22
-
 23
23
-
 24
24
-
 25
25
-
 26
26
-
 27
27
-
 28
28


Vision Fitness ST760 User manual
- Type
- User manual
Ask a question and I''ll find the answer in the document
Finding information in a document is now easier with AI
Related papers
-
Vision Fitness ST700 User manual
-
-
-
-
-
-
-
-
-
Other documents
-
Oakland Living HD7208T-7201C8-7202S2-D54-21-AB Installation guide
-
 Body-Solid GSTCK Owner's manual
-
FreeMotion GZFI8093.2 Owner's manual
-
Inspire M1 Assembly & Operation Manual
-
Zennio ZVI-Z41PRO Owner's manual
-
FreeMotion GZFI8136.0 Owner's manual
-
FreeMotion BICEP Owner's manual
-
-
Titan Fitness Rowing Platform User manual
-
Titan Scratch and Dent User manual
