
INSTALLATION INSTRUCTIONS - INSTALLATIONSANLEITUNG -INSTRUCTIONSPOURLʼINSTALLATION-AANWIJZINGEN VOOR
DE INSTALLATIE
-ISTRUZIONIPERLʼINSTALLAZIONE-
INSTRUCCIONES PARA LA INSTALACIÓN
-INSTRUÇÕESDEINSTALAÇÃO-
ΟΔΗΓΙΕΣ ΕΓΚΑΤΑΣΤΑΣΗΣ
-INSTALLATIONSANV
ISNINGAR -
ASENNUSOHJEET
-INSTALLATIONSVEJLEDNING-
ИНСТРУКЦИИ ПО УСТАНОВКЕ
-MONTERINGSANVISNING-
POKYNY NA I
ENNUSOH-

6 N·m
6 N·m
INŠTALÁCIU
-ИНСТРУКЦИИЗАИНСТАЛИРАНЕ-
NÁVOD K INSTALACI
-INSTRUKCJEINSTALOWANIA-
ÜZEMBE HELYEZÉSI ÚTMUTATÓ
-
INSTRUCŢIUNI DE INSTALARE -
INSTALLATIONSANLEITUNG
-INSTRUCTIONSPOURLʼINSTALLATION-
AANWIJZINGEN VOOR DE INSTALLATIE
- ISTRUZIONI PER LʼINSTALLAZIONE -
I
NSTRUCCIONES PARA LA INSTALACIÓN
-INSTRUÇÕESDEINSTALAÇÃO-
ΟΔΗΓΙΕΣ ΕΓΚΑΤΑΣΤΑΣΗΣ
-INSTALLATIONSANVISNINGAR-
ASE

3
DEUTSCH Installationsanweisungen Seite 4
ENGLISH Installation instructions Page 5
FRANÇAIS Instructions d’installation Page 6
NEDERLANDS Aanwijzingen voor de installatie Pagina 7
ESPAÑOL Instrucciones para la instalación Página 8
PORTUGUÊS Instruções para instalação Página 9
ITALIANO Istruzioni per l’installazione Pagina 10
ΕΛΛΑΣ Oδηγίες εγκαταςταςηςΣελί‰α 11
SVENSKA Installationsanvisningar Sidan 12
NORSK Installasjonsveiledning Side 13
DANSK Opstillingsvejledning Side 14
SUOMI Asennusohjeet Sivu 15
POLSKI Instalacja Strona 16
ČESKY Instalace Strana 17
SLOVENSKY Inštalácia Strana 18
MAGYAR Üzembe helyezés Oldal 19
РУCCКИЙ Уc
т
a
н
oв
к
a
Cтpaницa
20
БЪЛГAРCКИ Инстал
иране Cтpaницa
21
ROMANA Instalarea Pagina 22
УКРАЇНСЬКА Інструкції з монтажу Сторінка 23
Page is loading ...

5
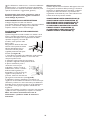
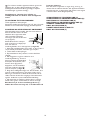
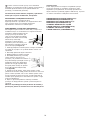
For correct and safe installation of the appliance,
please carefully read this manual and the other
documentation provided (see section "Precautions and
general advice").
Specifications, technical data, images and parts
supplied may be subject to change without prior
notice.
ELECTRICAL CONNECTION
Connect the appliance to the mains power supply.
Electrical safety of the appliance can only be guaranteed if
it is correctly connected to an efficient, approved earthing
system.
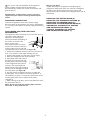
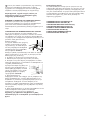
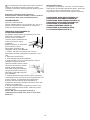
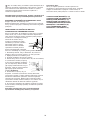
POSITIONING AND LEVELLING YOUR
REFRIGERATOR
If the appliance seems unsteady or you want the doors to
close more easily, adjust the
appliance's tilt following the
instructions below (depending on
the model, as shown in the
figures on the right).
The refrigerator has two front
and two rear wheels at the base
of the product on each side and
two adjustable feet at the front (see figure A).
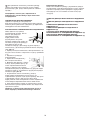
1. Check the installation location to be sure you have at
least 1 cm clearance on all sides including the top.
2. Connect the appliance to the mains power supply.
3. Move the refrigerator into its final position.
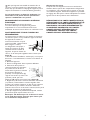
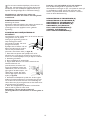
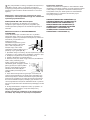
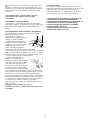
4. Open both doors and remove
the plinth to locate the feet and
levelling bolts at the left and right
of the refrigerator base (where
present). The top bolt (1) will
adjust the rear wheel (if provided),
and the bottom bolt (2) will adjust
the front wheel (see figure B).
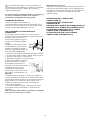
5. Use the wrench provided (if present) to adjust the
levelling bolts. Turn clockwise to raise the appliance, or
anticlockwise to lower it. It may take several turns of the
levelling bolts and/or feet to adjust the tilt of the
refrigerator.
6. After levelling the product, ensure that both feet touch
the ground for safe use.
Note: do not unscrew the levelling bolts and feet
too much as they could fall out.
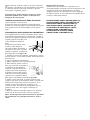
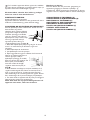
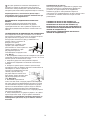
Aligning the doors
If, after switching on the appliance and adjusting the
refrigerator and freezer doors, the doors are misaligned,
disconnect the appliance from the power supply and
adjust both doors as indicated in the diagram at the end of
this manual.
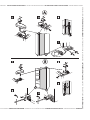
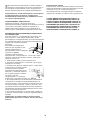
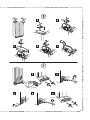
REMOVING THE FREEZER DOOR (A)
REMOVING THE REFRIGERATOR DOOR (B)
MOUNTING THE FREEZER DOOR (C)
MOUNTING THE REFRIGERATOR DOOR (D)
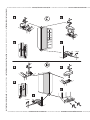
HORIZONTAL ALIGNMENT OF FREEZER
AND REFRIGERATOR DOORS (E)
VERTICAL ALIGNMENT OF FREEZER
AND REFRIGERATOR DOORS (F)
GB
A
B
Page is loading ...
Page is loading ...
Page is loading ...
Page is loading ...
Page is loading ...
Page is loading ...
Page is loading ...
Page is loading ...
Page is loading ...
Page is loading ...
Page is loading ...
Page is loading ...
Page is loading ...
Page is loading ...
Page is loading ...
Page is loading ...
Page is loading ...
Page is loading ...
Page is loading ...
Page is loading ...
Page is loading ...
Page is loading ...
Page is loading ...
Page is loading ...
Page is loading ...

6 N·m
INSTALLATION INSTRUCTIONS - INSTALLATIONSANLEITUNG -INSTRUCTIONSPOURLʼINSTALLATION-AANWIJZINGEN VOOR
DE INSTALLATIE
-ISTRUZIONIPERLʼINSTALLAZIONE-
INSTRUCCIONES PARA LA INSTALACIÓN
-INSTRUÇÕESDEINSTALAÇÃO-
ΟΔΗΓΙΕΣ ΕΓΚΑΤΑΣΤΑΣΗΣ
-INSTALLATIONSANV
ISNINGAR -
ASENNUSOHJEET
-INSTALLATIONSVEJLEDNING-
ИНСТРУКЦИИ ПО УСТАНОВКЕ
-MONTERINGSANVISNING-
POKYNY NA I
ENNUSOH-

5019 102 00804
n
Printed in Italy 05/11
FGBD NL E P I GR S N
FINDK PL CZ SK H
RUS
BG RO
INŠTALÁCIU
-ИНСТРУКЦИИЗАИНСТАЛИРАНЕ-
NÁVOD K INSTALACI
-INSTRUKCJEINSTALOWANIA-
ÜZEMBE HELYEZÉSI ÚTMUTATÓ
-
INSTRUCŢIUNI DE INSTALARE -
INSTALLATIONSANLEITUNG
-INSTRUCTIONSPOURLʼINSTALLATION-
AANWIJZINGEN VOOR DE INSTALLATIE
- ISTRUZIONI PER LʼINSTALLAZIONE -
INSTRUCCIONES PARA LA INSTALACIÓN
-INSTRUÇÕESDEINSTALAÇÃO-
ΟΔΗΓΙΕΣ ΕΓΚΑΤΑΣΤΑΣΗΣ
-INSTALLATIONSANVISNINGAR-
ASE
UKR
-
 1
1
-
 2
2
-
 3
3
-
 4
4
-
 5
5
-
 6
6
-
 7
7
-
 8
8
-
 9
9
-
 10
10
-
 11
11
-
 12
12
-
 13
13
-
 14
14
-
 15
15
-
 16
16
-
 17
17
-
 18
18
-
 19
19
-
 20
20
-
 21
21
-
 22
22
-
 23
23
-
 24
24
-
 25
25
-
 26
26
-
 27
27
-
 28
28
-
 29
29
-
 30
30
-
 31
31
-
 32
32


Ask a question and I''ll find the answer in the document
Finding information in a document is now easier with AI
in other languages
- italiano: O.E.M 20RW-D1L A+ Guida d'installazione
- français: O.E.M 20RW-D1L A+ Guide d'installation
- español: O.E.M 20RW-D1L A+ Guía de instalación
- Deutsch: O.E.M 20RW-D1L A+ Installationsanleitung
- русский: O.E.M 20RW-D1L A+ Инструкция по установке
- Nederlands: O.E.M 20RW-D1L A+ Installatie gids
- português: O.E.M 20RW-D1L A+ Guia de instalação
- slovenčina: O.E.M 20RW-D1L A+ Návod na inštaláciu
- dansk: O.E.M 20RW-D1L A+ Installationsvejledning
- polski: O.E.M 20RW-D1L A+ Instrukcja instalacji
- čeština: O.E.M 20RW-D1L A+ instalační příručka
- svenska: O.E.M 20RW-D1L A+ Installationsguide
- suomi: O.E.M 20RW-D1L A+ Asennusohje
- română: O.E.M 20RW-D1L A+ Ghid de instalare
Related papers
Other documents
-
Whirlpool WSN 5556 A+ X Installation guide
-
Whirlpool AKR 861 IX Installation guide
-
Whirlpool WSG5588 A+B Owner's manual
-
Whirlpool WSC5533 A+S600 Owner's manual
-
Whirlpool SP XRA 602 ENF Installation guide
-
Whirlpool MSZ 801/HA Installation guide
-
Whirlpool WSE5530 A+W Installation guide
-
Whirlpool WSF6222 A+S Installation guide
-
-
Whirlpool AKR 861 IX Installation guide