Yamaha TF1 Owner's manual
- Category
- DJ controllers
- Type
- Owner's manual
This manual is also suitable for

EN
TF5 / TF3 / TF1
DIGITAL MIXING CONSOLE
Quick Guide
Thank you for choosing a Yamaha TF5/TF3/TF1 Digital Mixing Console.
To take full advantage of the superior features and performance offered by
your TF-series console, and to enjoy years of trouble-free use, please read this
document carefully before operating your console.

- 2 -
TF series Quick Guide
Contents
1. Precautions ................................................................................................ 5
2. Introduction ................................................................................................ 7
2-1 Intended user ...................................................................................... 7
2-2 Intended usage ................................................................................... 7
2-3 Included items .................................................................................... 7
2-4 Documentation .................................................................................... 7
2-5 Updating the product's software and firmware .................................. 7
2-6 Nomenclature used in this document ................................................. 7
3. Workflow Overview .................................................................................... 8
Connect .............................................................................................. 8
Use Presets to Set Up Each Channel ................................................. 8
Adjust the Mix ..................................................................................... 9
Save Your Settings .............................................................................. 9
4. Panels........................................................................................................ 10
4-1 Top panel .......................................................................................... 10
4-2 Rear panel ........................................................................................ 11
5. Connections ............................................................................................. 12
5-1 Connecting inputs ............................................................................. 12
5-2 Connecting outputs .......................................................................... 13
6. Controls and functions ............................................................................ 14
6-1 Channel Strip section ........................................................................ 14
6-2 ST IN (Stereo Input) section .............................................................. 14
6-3 FX section ......................................................................................... 15
6-4 USER DEFINED KEYS section .......................................................... 15
6-5 MUTE section .................................................................................... 15
6-6 METER section .................................................................................. 15
6-7 PHONES section ............................................................................... 15
6-8 FADER BANK section ....................................................................... 16
6-9 TAP section ....................................................................................... 16
6-
10
SENDS ON FADER section ............................................................... 16
6-
11
Display section ................................................................................. 16
6-
12
STEREO/MASTER section ................................................................ 20
6-
13
iPad connector .................................................................................. 20
6-
14
USB connector .................................................................................. 20
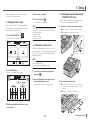
7. Setup ......................................................................................................... 21
7-1 Setting the internal clock .................................................................. 21
7-2 Initialization (factory reset) ................................................................ 21
7-3 Attaching the optional Rack Mount Kit (RK5014) (TF1 only) ............ 21
8. Specifications ........................................................................................... 22

- 3 -
TF series Quick Guide
Explanation of Graphical Symbols
Explication des symboles
The lightning ash with arrowhead symbol within
an equilateral triangle is intended to alert the
user to the presence of uninsulated “dangerous
voltage” within the product’s enclosure that may
be of sufcient magnitude to constitute a risk of
electric shock to persons.
L’éclair avec une èche à l’intérieur d’un triangle
équilatéral est destiné à attirer l’attention de
l’utilisateur sur la présence d’une « tension
dangereuse » non isolée à l’intérieur de l’appareil,
pouvant être sufsamment élevée pour constituer
un risque d’électrocution.
The exclamation point within an equilateral
triangle is intended to alert the user to the
presence of important operating and maintenance
(servicing) instructions in the literature
accompanying the product.
Le point d’exclamation à l’intérieur d’un triangle
équilatéral est destiné à attirer l’attention de
l’utilisateur sur la présence d’instructions
importantes sur l’emploi ou la maintenance
(réparation) de l’appareil dans la documentation
fournie.
The above warning is located on the rear of the unit.
L’avertissement ci-dessus est situé sur l’arrière de l’unité.
PRÉCAUTIONS CONCER-
NANT LA SÉCURITÉ
1 Lire ces instructions.
2 Conserver ces instructions.
3 Tenir compte de tous les avertissements.
4 Suivre toutes les instructions.
5 Ne pas utiliser ce produit à proximité d’eau.
6 Nettoyer uniquement avec un chiffon propre et sec.
7 Ne pas bloquer les orifices de ventilation. Installer l’appareil
conformément aux instructions du fabricant.
8 Ne pas installer l’appareil à proximité d’une source de chaleur
comme un radiateur, une bouche de chaleur, un poêle ou tout
autre appareil (y compris un amplificateur) produisant de la
chaleur.
9 Ne pas modifier le système de sécurité de la fiche polarisée
ou de la fiche de terre. Une fiche polarisée dispose de deux
broches dont une est plus large que l’autre. Une fiche de
terre dispose de deux broches et d’une troisième pour le
raccordement à la terre. Cette broche plus large ou cette
troisième broche est destinée à assurer la sécurité de
l’utilisateur. Si la fiche équipant l’appareil n’est pas compatible
avec les prises de courant disponibles, faire remplacer les
prises par un électricien.
10 Acheminer les cordons d’alimentation de sorte qu’ils ne soient
pas piétinés ni coincés, en faisant tout spécialement attention
aux fiches, prises de courant et au point de sortie de l’appareil.
11 Utiliser exclusivement les fixations et accessoires spécifiés par
le fabricant.
12 Utiliser exclusivement le chariot, le stand, le
trépied, le support ou la table recommandés
par le fabricant ou vendus avec cet appareil.
Si l’appareil est posé sur un chariot, déplacer
le chariot avec précaution pour éviter tout
risque de chute et de blessure.
13 Débrancher l’appareil en cas d’orage ou
lorsqu’il doit rester hors service pendant une période
prolongée.
14 Confier toute réparation à un personnel qualifié. Faire réparer
l’appareil s’il a subi tout dommage, par exemple si la fiche ou le
cordon d’alimentation est endommagé, si du liquide a coulé ou
des objets sont tombés à l’intérieur de l’appareil, si l’appareil
a été exposé à la pluie ou à de l’humidité, si l’appareil ne
fonctionne pas normalement ou est tombé.
AVERTISSEMENT
POUR RÉDUIRE LES RISQUES D’INCENDIE OU DE DÉCHARGE
ÉLECTRIQUE, N’EXPOSEZ PAS CET APPAREIL À LA PLUIE OU À
L’HUMIDITÉ.
(UL60065_03)
IMPORTANT SAFETY
INSTRUCTIONS
1 Read these instructions.
2 Keep these instructions.
3 Heed all warnings.
4 Follow all instructions.
5 Do not use this apparatus near water.
6 Clean only with dry cloth.
7 Do not block any ventilation openings. Install in accordance
with the manufacturer’s instructions.
8 Do not install near any heat sources such as radiators, heat
registers, stoves, or other apparatus (including amplifiers) that
produce heat.
9 Do not defeat the safety purpose of the polarized or grounding-
type plug. A polarized plug has two blades with one wider than
the other. A grounding type plug has two blades and a third
grounding prong. The wide blade or the third prong are provided
for your safety. If the provided plug does not fit into your outlet,
consult an electrician for replacement of the obsolete outlet.
10 Protect the power cord from being walked on or pinched
particularly at plugs, convenience receptacles, and the point
where they exit from the apparatus.
11 Only use attachments/accessories specified by the manufacturer.
12 Use only with the cart, stand, tripod, bracket,
or table specified by the manufacturer, or
sold with the apparatus. When a cart is used,
use caution when moving the cart/apparatus
combination to avoid injury from tip-over.
13 Unplug this apparatus during lightning storms
or when unused for long periods of time.
14 Refer all servicing to qualified service personnel. Servicing is
required when the apparatus has been damaged in any way,
such as power-supply cord or plug is damaged, liquid has been
spilled or objects have fallen into the apparatus, the apparatus
has been exposed to rain or moisture, does not operate
normally, or has been dropped.
WARNING
TO REDUCE THE RISK OF FIRE OR ELECTRIC SHOCK, DO NOT
EXPOSE THIS APPARATUS TO RAIN OR MOISTURE.
(UL60065_03)

- 4 -
TF series Quick Guide
FCC INFORMATION (U.S.A.)
1. IMPORTANT NOTICE: DO NOT MODIFY THIS
UNIT!
This product, when installed as indicated in the
instructions contained in this manual, meets FCC
requirements. Modifications not expressly approved
by Yamaha may void your authority, granted by the
FCC, to use the product.
2. IMPORTANT: When connecting this product to
accessories and/or another product use only high
quality shielded cables. Cable/s supplied with
this product MUST be used. Follow all installation
instructions. Failure to follow instructions could void
your FCC authorization to use this product in the USA.
3. NOTE: This product has been tested and found
to comply with the requirements listed in FCC
Regulations, Part 15 for Class “B” digital devices.
Compliance with these requirements provides a
reasonable level of assurance that your use of this
product in a residential environment will not result in
harmful interference with other electronic devices. This
equipment generates/uses radio frequencies and, if
not installed and used according to the instructions
found in the users manual, may cause interference
harmful to the operation of other electronic devices.
Compliance with FCC regulations does not guarantee
that interference will not occur in all installations. If
this product is found to be the source of interference,
which can be determined by turning the unit “OFF”
and “ON”, please try to eliminate the problem by using
one of the following measures:
Relocate either this product or the device that is being
affected by the interference.
Utilize power outlets that are on different branch
(circuit breaker or fuse) circuits or install AC line
filter/s.
In the case of radio or TV interference, relocate/
reorient the antenna. If the antenna lead-in is 300 ohm
ribbon lead, change the lead-in to co-axial type cable.
If these corrective measures do not produce
satisfactory results, please contact the local retailer
authorized to distribute this type of product. If you
can not locate the appropriate retailer, please contact
Yamaha Corporation of America, Electronic Service
Division, 6600 Orangethorpe Ave, Buena Park,
CA90620
The above statements apply ONLY to those products
distributed by Yamaha Corporation of America or its
subsidiaries.
* This applies only to products distributed by
YAMAHA CORPORATION OF AMERICA.
(class B)
ADVARSEL!
Lithiumbatteri—Eksplosionsfare ved fejlagtig håndtering.
Udskiftning må kun ske med batteri af samme fabrikat og
type. Levér det brugte batteri tilbage til leverandoren.
VARNING
Explosionsfara vid felaktigt batteribyte. Använd samma
batterityp eller en ekvivalent typ som rekommenderas
av apparattillverkaren. Kassera använt batteri enligt
fabrikantens instruktion.
VAROITUS
Paristo voi räjähtää, jos se on virheellisesti asennettu.
Vaihda paristo ainoastaan laitevalmistajan suosittelemaan
tyyppiin. Hävitä käytetty paristo valmistajan ohjeiden
mukaisesti.
(lithium caution)
COMPLIANCE INFORMATION STATEMENT
(DECLARATION OF CONFORMITY PROCEDURE)
Responsible Party : Yamaha Corporation of America
Address : 6600 Orangethorpe Ave., Buena
Park, Calif. 90620
Telephone : 714-522-9011
Type of Equipment : Digital Mixing Console
Model Name : TF5/TF3/TF1
This device complies with Part 15 of the FCC Rules.
Operation is subject to the following two conditions:
1) this device may not cause harmful interference, and
2) this device must accept any interference received
including interference that may cause undesired
operation.
See user manual instructions if interference to radio
reception is suspected.
* This applies only to products distributed by
YAMAHA CORPORATION OF AMERICA
(FCC DoC)
IMPORTANT NOTICE
FOR THE UNITED KINGDOM
Connecting the Plug and Cord
WARNING: THIS APPARATUS MUST BE EARTHED
IMPORTANT. The wires in this mains lead are coloured in
accordance with the following code:
GREEN-AND-YELLOW : EARTH
BLUE : NEUTRAL
BROWN : LIVE
As the colours of the wires in the mains lead of this
apparatus may not correspond with the coloured
markings identifying the terminals in your plug proceed
as follows:
The wire which is coloured GREEN-and-YELLOW must
be connected to the terminal in the plug which is marked
by the letter E or by the safety earth symbol or colored
GREEN or GREEN-and-YELLOW.
The wire which is coloured BLUE must be connected to
the terminal which is marked with the letter N or coloured
BLACK.
The wire which is coloured BROWN must be connected
to the terminal which is marked with the letter L or
coloured RED.
(3 wires)
이 기기는 가정용(B급) 전자파적합기기로서 주로
가정에서 사용하는 것을 목적으로 하며, 모든
지역에서 사용할 수 있습니다.
(class b korea)
NEDERLAND / THE NETHERLANDS
•Dit apparaat bevat een lithium batterij voor geheugen
back-up.
•This apparatus contains a lithium battery for memory
back-up.
•Raadpleeg uw leverancier over de verwijdering van de
batterij op het moment dat u het apparaat ann het einde
van de levensduur of gelieve dan contact op te nemen
met de vertegenwoordiging van Yamaha in uw land.
•For the removal of the battery at the moment of the
disposal at the end of life please consult your retailer or
Yamaha representative office in your country.
•Gooi de batterij niet weg, maar lever hem in als KCA.
•Do not throw away the battery. Instead, hand it in as
small chemical waste.
(lithium disposal)
This product contains a battery that contains perchlorate
material.
Perchlorate Material—special handling may apply,
See www.dtsc.ca.gov/hazardouswaste/perchlorate.
* This applies only to products distributed by
YAMAHA CORPORATION OF AMERICA.
(Perchlorate)
In Finland: Laite on liitettävä suojamaadoituskoskettimilla
varustettuun pistorasiaan.
In Norway: Apparatet må tilkoples jordet stikkontakt.
In Sweden: Apparaten skall anslutas till jordat uttag.
(class I hokuo)

- 5 -
TF series Quick Guide
1. Precautions
PLEASE READ CAREFULLY
BEFORE PROCEEDING
Please keep this manual in a safe place
for future reference.
WARNING
Always follow the basic precautions listed below to
avoid the possibility of serious injury or even death
from electrical shock, short-circuiting, damages, fire
or other hazards. These precautions include, but are
not limited to, the following:
Power supply/power cord
• Donotplacethepowercordnearheatsourcessuch
as heaters or radiators, and do not excessively bend or
otherwise damage the cord, place heavy objects on it, or
place it in a position where anyone could walk on, trip over,
or roll anything over it.
• Onlyusethevoltagespeciedascorrectforthedevice.The
required voltage is printed on the name plate of the device.
• Useonlythesuppliedpowercord/plug.
If you intend to use the device in an area other than in the
one you purchased, the included power cord may not be
compatible. Please check with your Yamaha dealer.
• Checktheelectricplugperiodicallyandremoveanydirtor
dust which may have accumulated on it.
• Besuretoconnecttoanappropriateoutletwithaprotective
grounding connection. Improper grounding can result in
electrical shock, damage to the device(s), or even fire.
Do not open
• Thisdevicecontainsnouser-serviceableparts. Do not
open the device or attempt to disassemble the internal
parts or modify them in any way. If it should appear to be
malfunctioning, discontinue use immediately and have it
inspected by qualified Yamaha service personnel.
Water warning
• Donotexposethedevicetorain,useitnearwaterorin
damp or wet conditions, or place on it any containers (such
as vases, bottles or glasses) containing liquids which might
spill into any openings. If any liquid such as water seeps
into the device, turn off the power immediately and unplug
the power cord from the AC outlet. Then have the device
inspected by qualified Yamaha service personnel.
• Neverinsertorremoveanelectricplugwithwethands.
Fire warning
• Donotputburningitems,suchascandles,ontheunit.
A burning item may fall over and cause a fire.
If you notice any abnormality
• Whenoneofthefollowingproblemsoccur,immediately
turn off the power switch and disconnect the electric plug
from the outlet. Then have the device inspected by Yamaha
service personnel.
- The power cord or plug becomes frayed or damaged.
- It emits unusual smells or smoke.
- Some object has been dropped into the device.
- There is a sudden loss of sound during use of the device.
• Ifthisdeviceshouldbedroppedordamaged,immediately
turn off the power switch, disconnect the electric plug from
the outlet, and have the device inspected by qualified
Yamaha service personnel.
CAUTION
Always follow the basic precautions listed below
to avoid the possibility of physical injury to you or
others, or damage to the device or other property.
These precautions include, but are not limited to,
the following:
Power supply/power cord
• Whenremovingtheelectricplugfromthedeviceoran
outlet, always hold the plug itself and not the cord. Pulling
by the cord can damage it.
• Removetheelectricplugfromtheoutletwhenthedevice
is not to be used for extended periods of time, or during
electrical storms.
Location
• Donotplacethedeviceinanunstablepositionwhereit
might accidentally fall over.
• Donotblockthevents.This device has ventilation holes at
the top/front/rear to prevent the internal temperature from
becoming too high. In particular, do not place the device on
its side or upside down. Inadequate ventilation can result in
overheating, possibly causing damage to the device(s), or
even fire.
• Donotplacethedeviceinalocationwhereitmaycomeinto
contact with corrosive gases or salt air. Doing so may result
in malfunction.
• Beforemovingthedevice,removeallconnectedcables.
• Whensettingupthedevice,makesurethattheACoutlet
you are using is easily accessible. If some trouble or
malfunction occurs, immediately turn off the power switch
and disconnect the plug from the outlet. Even when the
power switch is turned off, electricity is still flowing to the
product at the minimum level. When you are not using the
product for a long time, make sure to unplug the power cord
from the wall AC outlet.
• Whentransportingormovingthedevice,alwaysusetwoor
more people. Attempting to lift the device by yourself may
damage your back, result in other injury, or cause damage
to the device itself.
Connections
• Beforeconnectingthedevicetootherdevices,turnoffthe
power for all devices. Before turning the power on or off for
all devices, set all volume levels to minimum.
Maintenance
• RemovethepowerplugfromtheACoutletwhencleaning
the device.
Handling caution
• Donotinsertyourngersorhandsinanygapsoropenings
on the device (vents, etc.).
• Avoidinsertingordroppingforeignobjects(paper,plastic,
metal, etc.) into any gaps or openings on the device (vents,
etc.) If this happens, turn off the power immediately and
unplug the power cord from the AC outlet. Then have the
device inspected by qualified Yamaha service personnel.
• Donotrestyourweightonthedeviceorplaceheavy
objects on it, and avoid use excessive force on the buttons,
switches or connectors.
• Donotuseheadphonesforalongperiodoftimeata
high or uncomfortable volume level, since this can cause
permanent hearing loss. If you experience any hearing loss
or ringing in the ears, consult a physician.
Backup battery
• Donotreplacethebackupbatterybyyourself.Doingso
may cause an explosion and/or damage to the device(s).
If the backup battery power is fully depleted, have qualified
Yamaha service personnel replace the battery.
Yamaha cannot be held responsible for damage caused by
improper use or modifications to the device, or data that is
lost or destroyed.

- 6 -
TF series Quick Guide
Precautions
NOTICE
To avoid the possibility of malfunction/damage to
the product, damage to data, or damage to other
property, follow the notices below.
Handling and maintenance
• DonotusethedeviceinthevicinityofaTV,radio,stereo
equipment,mobilephone,orotherelectricdevices.
Otherwise,thedevice,TV,orradiomaygeneratenoise.
• Donotexposethedevicetoexcessivedustorvibration,
orextremecoldorheat(suchasindirectsunlight,neara
heater,orinacarduringtheday),inordertopreventthe
possibilityofpaneldisguration,unstableoperation,or
damagetotheinternalcomponents.
• Donotplacevinyl,plasticorrubberobjectsonthedevice,
sincethismightdiscolorthepanel.
Whencleaningthedevice,useadryandsoftcloth.Donot
usepaintthinners,solvents,cleaninguids,orchemical-
impregnatedwipingcloths.
• Condensationcanoccurinthedeviceduetorapid,drastic
changesinambienttemperature—whenthedeviceis
movedfromonelocationtoanother,orairconditioning
isturnedonoroff,forexample.Usingthedevicewhile
condensationispresentcancausedamage.Ifthereis
reasontobelievethatcondensationmighthaveoccurred,
leavethedeviceforseveralhourswithoutturningonthe
poweruntilthecondensationhascompletelydriedout.
• Avoidsettingallequalizercontrolsandfaderstotheir
maximum.Dependingontheconditionoftheconnected
devices,doingsomaycausefeedbackandmaydamage
thespeakers.
• Donotapplyoil,grease,orcontactcleanertothefaders.
Doingsomaycauseproblemswithelectricalcontactor
fadermotion.
• WhenturningontheACpowerinyouraudiosystem,always
turnonthepoweramplierLAST,toavoidspeakerdamage.
Whenturningthepoweroff,thepowerampliershouldbe
turnedoffFIRSTforthesamereason.
• A
lwaysturnthepoweroffwhenthedeviceisnotinuse.
Saving your data
• Thisproductutilizesaninternalbackupbatterythatis
usedtoretainyourdataaftertheproductisturnedoff.The
backupbatteryisaconsumableitem.Werecommend
yourreplacethebackupbatterybeforeitisdepleted,
otherwisedataretainedinmemorywillbelost.Whenthe
backupbatteryneedstobereplaced,"LowBattery"or"No
Battery"willappearonthedisplay.Inthiscase,contact
yourYamahadealerandhavequaliedYamahaservice
personnelreplacethebackupbattery.Theaveragelifeof
thebackupbatteryisapproximatelyveyears,depending
onoperatingconditions.
*Thefollowdataareretainedbythebackupbattery.
•Internalclockinformation
Nootherdatareliesonthebackupbattery,thereforeno
otherdatawillbelostifthebackupbatteryisdepleted.
• Thisproductregularlysavesthestateofitsworkspaceso
thatitcanreturntothepreviousstatewhentheproductis
turnedon.Toensurethatthestateissavedproperly,waitat
least10secondsafterperformingthelastoperationbefore
turningtheproductoff.
Connectors
• XLR-typeconnectorsarewiredasfollows(IEC60268
standard):
pin1:ground,pin2:hot(+),andpin3:cold(–).
Information
• Copyingofthecommerciallyavailablemusicaldata
includingbutnotlimitedtoMIDIdataand/oraudiodatais
strictlyprohibitedexceptforyourpersonaluse.
• TheillustrationsandLCDscreensasshowninthismanual
areforinstructionalpurposesonly,andmayappear
somewhatdifferentfromthoseonyourdevice.
• WindowsisaregisteredtrademarkofMicrosoft®
CorporationintheUnitedStatesandothercountries.
• Apple,iOS,iPadandiPodaretrademarksofAppleInc.,
registeredintheU.S.andothercountries.
• Thecompanynamesandproductnamesinthismanualare
thetrademarksorregisteredtrademarksoftheirrespective
companies.
Information for Users on Collection
and Disposal of Old Equipment
Thissymbolontheproducts,
packaging,and/oraccompanying
documentsmeansthatused
electricalandelectronicproducts
shouldnotbemixedwithgeneral
householdwaste.
Forpropertreatment,recoveryand
recyclingofoldproducts,please
takethemtoapplicablecollection
points,inaccordancewithyour
nationallegislationandtheDirectives
2002/96/EC.
Bydisposingoftheseproductscorrectly,youwillhelp
tosavevaluableresourcesandpreventanypotential
negativeeffectsonhumanhealthandtheenvironment
whichcouldotherwisearisefrominappropriatewaste
handling.
Formoreinformationaboutcollectionandrecyclingof
oldproducts,pleasecontactyourlocalmunicipality,your
wastedisposalserviceorthepointofsalewhereyou
purchasedtheitems.
[For business users in the European Union]
Ifyouwishtodiscardelectricalandelectronicequipment,
pleasecontactyourdealerorsupplierforfurther
information.
[Information on Disposal in other Countries outside
the European Union]
ThissymbolisonlyvalidintheEuropeanUnion.Ifyou
wishtodiscardtheseitems,pleasecontactyourlocal
authoritiesordealerandaskforthecorrectmethodof
disposal.
(weee_eu_en_01)
European Models
Purchaser/UserInformationspeciedinEN55103-1:2009and
EN55103-2:2009.
InrushCurrent:5.6A(oninitialswitch-on)
4.9A(afterasupplyinterruptionof5s)
ConformstoEnvironments:E1,E2,E3andE4

- 7 -
TF series Quick Guide
2-1 Intended user
Thisproductwasdesignedforuserswhoarefamiliar
withusinganalogmixersaspartofaPAsystem.
2-2 Intended usage
Thisproductwasdesignedtomixmultipleaudio
sources,suchaslivebandinstrumentsoraudio
devicesusedatcorporateevents.
2-3 Included items
Accessories
•ACpowercord
•QuickGuide(thisdocument)
2-4 Documentation
Quick Guide (this document)
Thisdocumentprimarilyexplainspanelcontrols,
functions,andbasicoperationoftheproduct.
Reference Manual (PDF; downloadable from
the website)
Thisdocumentprimarilyexplainsdetailsabout
functions,productionoperation,andeffects
parameters.
TheReferneceManualisavailableontheYamahaPro
Audiowebsite.
http://www.yamahaproaudio.com/
Using the Reference Manual
TheReferenceManualisanelectronicleinPDF
format.Youcanreadthisdocumentonacomputer.
UseAdobe®Reader®toreadthisbookonscreen,
searchforwordsveryquickly,printspecicpages,or
clicklinkstodisplaysectionsofspecialinterest.The
abilitytosearchforwords,ortofollowlinksdirectlyto
relevantsectionsinthedocument,arehelpfulattributes
ofthiselectronicleformat.Weencourageyoutotake
advantageofthesebenets.
YoucandownloadthelatestAdobeReaderapplication
fromthewebsitelistedbelow.
http://www.adobe.com/
2-5 Updating the product's software
and firmware
Software
YourTF-seriesconsolecanbeusedwithavarietyof
utilitysoftware.
• TF Editor
Thisapplicationenablesyoutosetupandoperate
theconsolefromaconnectedcomputer.Youcanalso
usetheapplicationtobackupconsolesettingsorset
consoleparameterswithoutconnectingtheconsole.
• TF mobile control application
ThisappallowsyoutoremotecontrolyourTF-series
consoleusinganiPadandaWi-Ficonnection.
• Yamaha Steinberg USB Driver
Thisdriversoftwareisrequiredwhenconnecting
theconsoletoyourcomputer.Itsupportsupto34
channelsofaudioinputand34channelsofaudio
output.
Informationaboutthesoftwaredescribedhereis
availableontheYamahaProAudiowebsite.
http://www.yamahaproaudio.com/
Informationaboutdownloading,installingandsetting
upthesoftwaredescribedhereisavailableonthe
websitelistedabove.Inaddition,refertotheinstallation
guidethatisincludedwitheachprogram.
Firmware
ThermwarecontainedinyourTF-seriesconsolecan
beupdatedtotakeadvantageofnewfeatures,feature
improvements,andbugxes.
Detailsaboutupdatingthermwareareavailable
online.
http://www.yamahaproaudio.com/
Forinformationaboutupdatingandsettingupthe
console,pleaserefertothermwareupdateguide
availableonthewebsite.
2-6 Nomenclature used in this
document
Inthisdocument,switch-typecontrolsonthepanelare
called“keys.”
Controlslocatedonthepanelareenclosedin[square
brackets](e.g.,the[CUE]key)todistinguishthem
fromvirtualbuttonsandknobsdisplayedonscreen.
Forcertaincontrols,thenameofthesectionappears
beforethebrackets(e.g.,SENDSONFADER[AUX1]
key).
2. Introduction
Themodelnumber,serialnumber,powerrequirements,
etc.,maybefoundonornearthenameplate,whichis
attherearoftheunit.Youshouldnotethisserialnumber
inthespaceprovidedbelowandretainthismanualasa
permanentrecordofyourpurchasetoaididentication
intheeventoftheft.
Model No.
Serial No.
(rear_en_01)

- 8 -
TF series Quick Guide
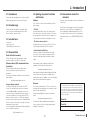
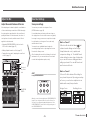
Connect your inputs and outputs
Connect your inputs and outputs
Connecttheinstrumentsandmics.
Connectoutputdevicessuchaspoweredspeakers.
Inputandoutputsettingsarereadytogowhenthe
consoleisshipped,soyoucanstartmixingassoonas
youmakeyourconnections(page12).
Whenyourconnectionsarenished,turnonthepower.
NOTICE
• Rapidly turning the unit on and off in succession
can cause it to malfunction. After turning the unit
off, wait for at least 6 seconds before turning it
on again.
• This product regularly saves the state of its
workspace so that it can return to the previous
state when the product is turned on. To ensure
that the state is saved properly, wait at least
10 seconds after performing the last operation
before turning the product off.
Set up each channel
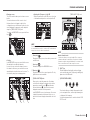
> Step 1
Select a channel by pressing its [SEL] key
in the Channel Strip section.
Thechannel's[SEL]keylights,indicatingthatyou
cancontrolthechannelusingtheDisplaysection.
>
Step 2
Press the Library key (
) to access the
Library and recall a Preset.
Adjust the overall balance of the mix
Afteradjustingeachchannel,adjusttheoverallbalance
ofthemixwhiledoingasoundcheck.Whilelisteningto
themainspeakers,payattentiontotheoverallsound
quality,thebalanceofeachinstrument,thevolumeof
eachperformer'smonitor,andtheamountofeffects
appliedtoeachinstrument.
•AdjustingSENDSONFADERforthelevelsentto
AUXforeachchannel(page16)
•Mutingallinputchannelsoreffects(page15)
•Turningeffectsonandoff,adjustingtheoveralllevel
ofeffects(page15)
Save your settings
YoucansaveyourentiremixsetupasaScene.
(SCENEwindowgpage18)
Ifseveralbandsareperformingonthesamestage,or
ifasingleperformer’smixoraudiosourcesvarygreatly
fromsongtosong,youcansaveacompletemixsetup
foreachbandoreachsongasaScene,andeasily
switchbetweenScenes.
Youcanalsosaveindividualchannelsetupsby
overwritingexistingPresetsorbysavingthemasnew
PresetsintheLibraryscreen.
Afterne-tuningthesoundofeachchanneltosuiteach
instrumentormic,youcansavethemasPresetsand
recreatethatcongurationanytime,easily.
HINT
Using USER DEFINED KEYS
Whentheconsoleisinthedefaultstate,USERDEFINEDKEYS
(page15)areconguredas"DirectSceneRecall"keys.You
cansaveaScenebypressingandholdingdownoneofthe
USERDEFINEDKEYS,andrecallaScenebypressingoneof
theUSERDEFINEDKEYS.
>
Step 3
Adjust the channel’s parameters.
Adjusttheinputgain,EQ,compressor,andgate
fromtheOVERVIEWscreenandtheindividual
congurationscreens(page18).
AdjusttheinputgainontheINPUTscreensothat
theloudestsoundthatisinputcausesthecenter
graphtolight.
>
Repeat steps 1 to 3 and set up each
channel.
NOTE
YoucansetupchannelswithoutusingPresets.Fordetailsabouttheavailablefeaturesandparameters,refertotheReference
Manual.
3. Workflow Overview
Here'sabriefoverviewofhowtostartmixingusingaPresets.
Powerswitch
ACINconnector
Connecttheincluded
powercord.
Connect Use Presets to Set Up Each Channel
Adjustingtheinputgain
Displaysection[SEL]key
Librarykey(
)

- 9 -
TF series Quick Guide
Workflow Overview
Connect your inputs and outputs
Connect your inputs and outputs
Connecttheinstrumentsandmics.
Connectoutputdevicessuchaspoweredspeakers.
Inputandoutputsettingsarereadytogowhenthe
consoleisshipped,soyoucanstartmixingassoonas
youmakeyourconnections(page12).
Whenyourconnectionsarenished,turnonthepower.
NOTICE
• Rapidly turning the unit on and off in succession
can cause it to malfunction. After turning the unit
off, wait for at least 6 seconds before turning it
on again.
• This product regularly saves the state of its
workspace so that it can return to the previous
state when the product is turned on. To ensure
that the state is saved properly, wait at least
10 seconds after performing the last operation
before turning the product off.
Set up each channel
> Step 1
Select a channel by pressing its [SEL] key
in the Channel Strip section.
Thechannel's[SEL]keylights,indicatingthatyou
cancontrolthechannelusingtheDisplaysection.
>
Step 2
Press the Library key (
) to access the
Library and recall a Preset.
Adjust the overall balance of the mix
Afteradjustingeachchannel,adjusttheoverallbalance
ofthemixwhiledoingasoundcheck.Whilelisteningto
themainspeakers,payattentiontotheoverallsound
quality,thebalanceofeachinstrument,thevolumeof
eachperformer'smonitor,andtheamountofeffects
appliedtoeachinstrument.
•AdjustingSENDSONFADERforthelevelsentto
AUXforeachchannel(page16)
•Mutingallinputchannelsoreffects(page15)
•Turningeffectsonandoff,adjustingtheoveralllevel
ofeffects(page15)
Save your settings
YoucansaveyourentiremixsetupasaScene.
(SCENEwindowgpage18)
Ifseveralbandsareperformingonthesamestage,or
ifasingleperformer’smixoraudiosourcesvarygreatly
fromsongtosong,youcansaveacompletemixsetup
foreachbandoreachsongasaScene,andeasily
switchbetweenScenes.
Youcanalsosaveindividualchannelsetupsby
overwritingexistingPresetsorbysavingthemasnew
PresetsintheLibraryscreen.
Afterne-tuningthesoundofeachchanneltosuiteach
instrumentormic,youcansavethemasPresetsand
recreatethatcongurationanytime,easily.
HINT
Using USER DEFINED KEYS
Whentheconsoleisinthedefaultstate,USERDEFINEDKEYS
(page15)areconguredas"DirectSceneRecall"keys.You
cansaveaScenebypressingandholdingdownoneofthe
USERDEFINEDKEYS,andrecallaScenebypressingoneof
theUSERDEFINEDKEYS.
>
Step 3
Adjust the channel’s parameters.
Adjusttheinputgain,EQ,compressor,andgate
fromtheOVERVIEWscreenandtheindividual
congurationscreens(page18).
AdjusttheinputgainontheINPUTscreensothat
theloudestsoundthatisinputcausesthecenter
graphtolight.
>
Repeat steps 1 to 3 and set up each
channel.
NOTE
YoucansetupchannelswithoutusingPresets.Fordetailsabouttheavailablefeaturesandparameters,refertotheReference
Manual.
What is a "Preset"?
APresetisalestoredintheLibrary
( )that
containschannelsettingssuchasthetype
ofinput(instrumentormic),equalizerand
compressionsettings,etc.ThedefaultPresets
containsettingsforvarioustypesofinstruments,
soyoucanusethemasastartingpointwhen
settingupachannel.YoucaneditPresetsand
savethemasnewPresets.
What is a "Scene"?
ASceneislethatcontainsallthesettingsfor
everychannelinyourmix.Bysavingyoursetups
asScenes,youcanloadacompletemixinan
instantandbereadyforanysituation.
SavingaScene RecallingaScene
Adjust the Mix Save Your Settings
SENDSON
FADER
Effectson/
off,effects
level
MUTE

- 10 -
TF series Quick Guide
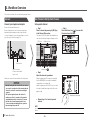
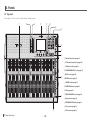
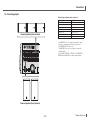
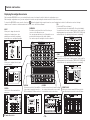
4-1 Top panel
ThetoppanelofTFSeriesconsolesisdividedintothefollowingsections.
1 Channel Strip section (page 14)
2 ST IN (stereo input) section (page 14)
3 FX (effects) section (page 15)
4 USER DEFINED KEYS section (page 15)
5 MUTE section (page 15)
6 METER section (page 15)
7 PHONES section (page 15)
8 FADER BANK section (page 16)
9 TAP key (page 16)
0 SENDS ON FADER section (page 16)
a Display section (page 16)
b STEREO/MASTER section (page 20)
c iPad connector (page 20)
d USB connector (page 20)
4. Panels
①
⑪ ⑭
④
⑤
⑥
⑦
⑧
⑨
⑩
⑫
③
⑬ ②

- 11 -
TF series Quick Guide
Panels
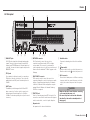
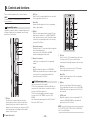
4-2 Rear panel
1 OMNI OUT jacks
XLR-3-32maleoutputjacksthatoutputanalogaudio
signals.ThesejacksareusedmainlytooutputAUX
channelsandSTEREOchannels.Nominaloutputlevel
is+4dBu.Youcanselectwhichsignalisoutputonthe
OMNIOUTscreen.
2 ST IN jacks
Stereoinputjacksthatcanbeusedforconnectinga
CDplayerorotherlineleveldevice.Thesejacksare
unbalancedfemaleRCAjacks.Nominalinputlevelis
-10dBV.
3 INPUT jacks
CombinationjacksthatsupportbothXLRandTRS
phoneconnectors.Usethesejackstoconnectmics
andinstruments.Nominalinputlevelis-62dButo
+10dBu.Theheadampsettingforeachjackissaved
inmemory.
4 NETWORK connector
RJ-45jackusedtoconnecttheconsoletoa
computerviaanEthernetcable(CAT5eorhigher
recommended).Thisconnectorisusedmainlyto
controlmixparametersortoeditScenememoriesand
Librariesfromthededicated"TFEditor"programorthe
iPadapp.
5 USB TO HOST connector
USBconnectorusedtoconnecttheconsoletoa
computer,allowingtheconsoletofunctionasanaudio
interface.Supportsinputandoutputfor34channels
of48kHz,24-bitaudio.Whenusingwithacomputer
runningMicrosoftWindows,theYamahaSteinberg
USBDriverisrequired.
6 FOOT SW jack
UsedforconnectinganoptionalFC5footswitch.You
canusetheconnectedfootswitchasaneffectbypass
switch,amuteswitch,oruseittotapthedelaytime.
7 Expansion slot
Anexpansionslottobeusedinthefuture.
8 Ventilation holes
Topreventoverheating,donotblocktheventilation
holes.
9
Power switch
Whentheswitchisinthe
position,thepowerison.
Whentheswitchisinthe
position,thepowerisoff.
0 AC IN connector
Connecttheincludedpowercord.Whenconnecting
toapoweroutlet,rstconnectthepowercordtothe
console,thenconnectthepowercordtothepower
outlet.
CAUTION
• Make sure the unit is turned off before connecting
or disconnecting the power cord.
• Disconnect the power cord from the outlet when
the unit will not be used for extended periods of
time (page 8).
⑩ ⑨ ⑧
①
②
③
⑦ ⑥ ⑤ ④

- 12 -
TF series Quick Guide
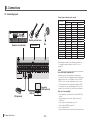
5-1 Connecting inputs
Default signal routing for each channel
CHANNEL
ANALOGINPUT
TF5 TF3 TF1
CH1 INPUT1 INPUT1 INPUT1
: : : :
CH16 INPUT16 INPUT16 INPUT16
CH17 INPUT17 INPUT17 INPUT1
: : : :
CH24 INPUT24 INPUT24 INPUT8
CH25 INPUT25 INPUT1 INPUT9
: : : :
CH32 INPUT32 INPUT8 INPUT16
CH33 INPUT1 INPUT9 -
: : : :
CH40 INPUT8 INPUT16 -
STIN1L STIN1L STIN1L STIN1L
STIN1R STIN1R STIN1R STIN1R
STIN2L STIN2L STIN2L STIN2L
STIN2R STIN2R STIN2R STIN2R
Defaultsignalroutingforeachchannelisshownabove.
Tochangethesignalrouting,usetheINPUTscreen
(page18).
HINT
What if I'm using condenser mics?
Phantompowermustbesuppliedtocondensermics.
Somedirectboxesalsoneedphantompower.Whenusing
phantompower,rstset"+48VMaster"ontheSYSTEM
SETUPscreentoon,thenturnphantompoweronoroff
foreachchannelonthecorrespondingchannel'sINPUT
screen.Makesureyouturnphantompoweroffifitisnot
needed.Formoredetails,refertotheReferenceManual.
Why can't I hear anything?
•IsthefaderthatcorrespondstothedesiredINPUTjack
raised?
•Doestheinputselectforeachchannelmatcheach
INPUTjack?
• Isthechannel'sheadampgainsettoolow?
•Isthechannel's[ON]keypressed?
•Isthechannelmuted?
5. Connections
Keyboard or synthesizer
Electric guitar or bass
Mic
FC5 (optional)
Computer
(DAW software)
USB 2.0
Direct box

- 13 -
TF series Quick Guide
Connections
5-2 Connecting outputs
Default signal routing for each output jack
OMNIOUT1 AUX1OUT
OMNIOUT2 AUX2OUT
: :
OMNIOUT12 AUX12OUT
OMNIOUT13 MONITORLOUT
OMNIOUT14 MONITORROUT
OMNIOUT15(L) STEREOLOUT
OMNIOUT16(R) STEREOROUT
EachOMNIOUTjackisconguredbydefaulttooutput
abus.Youcanchangethebusthatisoutputonthe
SYSTEMOMNIOUTPATCHscreen.
TheOMNIOUTjackscanbeconguredtooutputthe
followingsignals.
AUX1–AUX20,STEREOL,STEREOR,SUB,MONITORL,
MONITORR,NOASSIGN(nooutputsignalassigned).
Powered speakers (front speakers)
Powered speakers (floor monitors)

- 14 -
TF series Quick Guide
2 [CUE] key
Usedtoselectthechannelthatwillbecue-controlled.
ThekeylightswhentheCUEison.
3 Meter LEDs
Indicatetheaudiosignallevelofthecorresponding
inputoroutputchannel.
4 [ON] key
Turnsthecorrespondingchannelonandoff.Thekey
lightswhenthechannelison.InSENDSONFADER
mode,thekeyfunctionsasanon/offswitchforsignals
sentfromthecorrespondingchanneltothecurrently
selectedAUXorFXbus.
5 Channel name display
Displaysthename,ID,orportnamethatisassignedto
thecorrespondingchannel.
Italsoservesasthe+48V,GATE,andCOMP
indicator,anddisplaysthefadervalue.
6 Channel color indicator
Lightsinthecolorassignedtothecorresponding
channel.
7 Fader
Adjuststhechannel’ssignallevel.InSENDSON
FADERmode,thefaderallowsyoutoadjustthesignal
levelsentfromthecorrespondingchanneltothe
currentlyselectedAUXorFXbus.
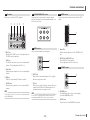
6-2
ST IN (Stereo Input) section
Thissectioncontrolsthestereoinputs.
STIN1isusedastheplaybackchannelforiOSdevices
connectedtotheiPadconnectororaudiolesstoredin
theconnectedUSBstoragedevice.
STIN2isusedastheplaybackchannelforsignals
receivedfromtheUSBTOHOSTconnector(USB
IN33/34).
YoucanswitchtheinputsignalsforbothSTIN1andST
IN2fromtheINPUTscreen.
①
②
③
④
⑤
1 [SEL] key
UsedtoselecttheSTINchannelthatyouwillcontrol.
Youcanpressthe[SEL]keytoswitchbetween
controllingtheleftandrightchannelofthestereopair.
2 [CUE] key
UsedasthecuemonitorkeyfortheSTINchannel.
Thekeylightswhenthecueison.
3 Meter LEDs
Indicatetheaudiosignallevelofthecorresponding
inputoroutputchannel.
4 [ON] key
TurnsthecorrespondingSTINchannelonandoff.
Thekeylightswhenthechannelison.InSENDSON
FADERmode,turnsthesignalsenttotheAUXorFX
busonandoff.
5 [LEVEL] knob
AdjuststhesignallevelofthecorrespondingSTIN
channel.InSENDSONFADERmode,adjuststhe
signalsenttotheAUXorFXbus.
HINT
ForTF5andTF3consoles,STINcanalsobecontrolledusing
INPUT2intheFADERBANK.
Thissectionbrieyintroducestheconsole'sfeatures.
NOTE
Fordetailsabouteachfeatureandparameter,refertothe
ReferenceManual.
6-1
Channel Strip section
Similarlytoachannelmoduleofatraditionalanalogmixer,
aChannelStripallowsyoutomanuallycontrolthemain
parametersofthechannel.
①
②
③
④
⑤
⑥
⑦
1 [SEL] key
Usedtoselectthechannelthatyouwillcontrol.
Pressingthiskeywillcausethekeytolight,which
indicatesthatyoucancontrolthechannelonthe
display.Forstereochannels,youcanpressthe[SEL]
keytoswitchbetweencontrollingtheleftandright
channelofthestereopair.
6. Controls and functions

- 15 -
TF series Quick Guide
Controls and functions
6-3
FX section
Allows you to control the FX RTN channels.
① ② ③ ④ ⑤
1 [EDIT] key
Displays the FX SEND screen. The key lights while the
FX SEND screen is displayed.
2 [CUE] key
Used as the cue monitor key for the corresponding FX
channel. The key lights when the CUE is on.
3 Meter LEDs
Indicate the audio signal level of the corresponding FX
channel.
4 [ON] key
Turns the corresponding FX channel on and off.
5 [LEVEL] knob
Adjusts the total output level of the corresponding FX
channel.
HINT
For TF5 and TF3 consoles, FX can also be controlled using INPUT
2 in the FADER BANK.
6-4
USER DEFINED KEYS section
These keys can be customized to control the desired
function. Various functions are assigned by default, such
as Direct Scene Recall.
6-5
MUTE section
Used to mute all channels in a mute group.
①
②
1 [INPUT] key
Allows you to mute all input channels. The key lights
when the mute group is muted.
2 [FX] key
Allows you to mute the FX module. Insertion effects for
channels in AUX9/10–AUX19/20 are bypassed. The
key lights when the mute group is muted.
HINT
You can remove certain input and FX channels from the mute
group by turning MUTE SAFE on for the desired channels.
6-6
METER section
Used to monitor audio signal level and control the CUE
feature.
①
②
1 Meter LEDs
Indicate the audio signal level of the STEREO or CUE
bus.
2 [CLEAR] key (CLEAR CUE key)
Turns off the CUE for all channels.
The key lights when the CUE is turned on.
6-7
PHONES section
①
②
1 [PHONES] jack
This headphones jack is used to monitor signals
selected for MONITOR or CUE.
2 [LEVEL] knob
Controls the level of the [PHONES] jack output.

- 16 -
TF series Quick Guide
Controls and functions
6-8
FADER BANK section
Allows you to quickly assign different channels to the
console’s faders.
① ②
1 [INPUT1], [INPUT2] keys
Allow you to change the channels that are assigned
to the console’s faders. The keys light to indicate
which fader bank is currently selected. You can press
the [INPUT1] and [INPUT2] keys at the same time to
light both keys and display the GROUP BANK in the
Channel Strip section.
2 [OUTPUT] key
Displays the OUTPUT BANK in the Channel Strip
section. You can press the [INPUT2] and [OUTPUT]
keys at the same time to light both keys and display
the CUSTOM FADER BANK in the Channel Strip
section.
6-9
TAP section
①
1 [TAP] key
Allows you to tap and set the delay time used for
effects on FX1/FX2 and AUX9/10–AUX19/20. The key
flashes in time with the tempo.
The tempo you tap on the [TAP] key is applied to
effects that have “Sync” set to “On”.
6-
10
SENDS ON FADER section
Switches each channel strip to temporarily control the
SEND LEVEL and SEND ON of the designated bus.
①
1 [SENDS ON FADER] keys
Press a key to set the corresponding bus to SENDS
ON FADER mode. The key you pressed lights to
indicate SENDS ON FADER mode is enabled.
Press the key again to release SENDS ON FADER
mode.
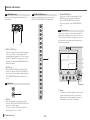
6-
11
Display section
Allows to you control the console by interacting with the
graphic interface displayed on the touchscreen. You can
also use the knobs to perform fine adjustments. You can
dive further into various features by pressing the keys to
display contextual menus.
①
②
③
④
⑤
⑥
⑦
1 Display
The display is a multitouch capable touchscreen that
you can operate with your fingers. You can touch,
double-touch, slide, swipe, and pinch in and out to
interact with the items shown on the display.

- 17 -
TF series Quick Guide
Controls and functions
• Changing screens
The screen switches when you touch an on-screen
button.
You can touch an area of the screen to select
that area, then touch it again to switch to the
configuration screen for that area. A pink selection
area is displayed if a parameter can be adjusted
using the [TOUCH AND TURN] knob.
To return to the OVERVIEW screen, press the Home
key (
).
• Scrolling
In the OVERVIEW screen, you can slide the screen
left and right to view different channels.
In some screens, such as the channel screen or
the channel edit screen, you can slide the screen
up and down to view other items on the screen. To
scroll quickly, simply use a swiping gesture.
• Adjusting the Q (steepness) of the EQ
When in manual mode on the EQ screen, select one
of the handles and pinch in or out to adjust the Q.
NOTE
This functionality is not available when multiple parameters can
be controlled by one knob (i.e., 1-knob mode). Use the button at
the top of the screen to switch to manual mode.
2 Library key ( )
Displays the Library screen, from which you can recall
saved Presets.
3 Home key (
)
Returns the display to the OVERVIEW screen.
4 Menu key (
)
Displays the menu for the current operation. The key
lights when a menu is available.
5 [TOUCH AND TURN] knob
Allows you to control the parameter of the feature
selected on the display. As shown below, touch the
parameter you want to control (
1
) and then turn
the knob as desired (
2
). A pink selection area is
displayed around the selected parameter.
In the OVERVIEW screen, touch an area of the screen
to adjust the parameter in that area. In this case, a
pink selection area is displayed around the selected
area.
HINT
What is “1-knob” mode?
1-knob mode allows you to control multiple EQ or compressor
parameters with just one knob. When 1-knob mode is enabled,
parameters cannot be adjusted individually. You can turn 1-knob
mode on and off from the EQ and compressor screens.
6 [SHIFT] key
Provides additional functionality, such as allowing
you to switch between the F (frequency) and G (gain)
parameters of the EQ handle.
7 [USER DEFINED KNOBS]
These knobs allow you to adjust the parameters that
you've assigned to them, such as input channel gain
or high-pass filter frequency.
You can assign parameters to each knob in the USER
SETUP screen.
[TOUCH AND TURN] knob

- 18 -
TF series Quick Guide
Controls and functions
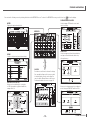
Displaying the configuration screens
While viewing the OVERVIEW screen, you can double-touch an area of a channel to switch to that area's configuration screen.
While viewing a configuration screen, you can easily switch to another area by touching the desired area in the left side of the screen.
To return to the OVERVIEW screen, press the Home key (
) below the display. In the example shown here, we will explain how to switch to the different screens from the input
channel screen. For details or information about other screens, refer to the Reference Manual.
INPUT
Allows you to change the stereo link
setting, select an input source, turn
phantom power on and off, turn phasing
normal and reverse,
and adjust input gain.
EQ
Controls the EQ for each channel.
You can pinch in and out to adjust the Q of the selected handle.
You can also use this screen to switch between 1-knob mode (for
adjusting parameters easily using the [TOUCH AND TURN] knob)
and manual mode (for adjusting each parameter individually).
GATE
Allows you to configure the noise gate
for each channel.
COMP
Allows you to configure the compressor for each channel.
You can also use this screen to switch between 1-knob mode (for
adjusting parameters easily using the [TOUCH AND TURN] knob)
and manual mode (for adjusting each parameter individually).
FX1/FX2
Used to select effects and edit their
parameters.
SEND TO AUX
Allows you to set each channel's AUX bus send levels.
Swipe left and right to view levels for other AUX buses.
ASSIGN
Allows you to turn Recall Safe and Mute
Safe on and off, assign the channel to a
DCA, and adjust the SUB bus send level.
CH VIEW
Provides an overall view of a channel's settings.
You can adjust settings on this screen or switch
to the dedicated screen for each setting.
OVERVIEW
Provides an overall view of the mixer. From here you
can move to the different screens.
You can swipe up and down to scroll through the screen
and view the desired area of the visible channels.
You can also swipe left and right to view other channels.

- 19 -
TF series Quick Guide
Controls and functions
You can view the following screens by touching the buttons in the OVERVIEW screen. To return to the OVERVIEW screen, press the Home key ( ) below the display.
SCENE
Used to recall previously saved mixer setups.
OVERVIEW
USER SETUP
Used to assign user-defined keys and knobs,
configure custom fader banks, and set up
other preferences.
CH VIEW
Provides an overall view of a channel's settings.
You can adjust settings on this screen or switch
to the dedicated screen for each setting. You
can also edit the Channel Name on this screen.
For information about each screen, see page 18.
METER
Displays the input and output level.
INPUT/OUTPUT/TITLE LIST
Allows you to record directly to a computer
or USB storage device, play back audio files,
manage titles, etc.
CUE/MONITOR/OSCILLATOR
Used to manage CUE/monitor source and
control oscillators.
SYSTEM SETUP
Allows you to configure general mixer settings, as
well as settings for OMNI OUT and Recall Safe
.

- 20 -
TF series Quick Guide
Controls and functions
6-
12
STEREO/MASTER section
Allows you to control the main parameters of the STEREO
channel.
①
②
④
⑤
⑥
③
1 [SEL] key
Used to select the STEREO channel that you will
control. You can press the [SEL] key to switch
between controlling the left and right channel of the
stereo pair.
2 [CUE] key
Used as the cue monitor key for the corresponding
STEREO channel. The key lights when the CUE is on.
3 Meter LEDs
Indicate the audio signal level of the STEREO or CUE
bus.
4 [ON] key
Turns the STEREO channel on and off. The key lights
when the channel is on. In SENDS ON FADER mode,
the [ON] key turns the bus selected by the SENDS ON
FADER key on and off.
5 [MASTER] LED
Lights when SENDS ON FADER mode is turned on.
In SENDS ON FADER mode, the entire section
becomes the master section for the selected bus.
6 Fader
Adjusts the output level of the STEREO channel. In
SENDS ON FADER mode, the fader adjusts the signal
level sent to the bus selected by the SENDS ON
FADER key.
6-
13
iPad connector
Allows you to connect an iOS device or a USB storage
device.
To connect an iOS device, use the dedicated cable that
was included with the device. This connector allows you
to use audio files on your iOS device as background
music.
When a USB storage device is connected, you can use
the device to play audio files or record the mixer's output
directly and save it as an audio file (format: WAV).
NOTE
When using a USB storage device for recording, use a hard disk
drive or other high-speed device. (USB memory drives are not
guaranteed to function properly.)
For information about compatible iOS devices, visit the
Yamaha pro audio website.
http://www.yamahaproaudio.com/
6-
14
USB connector
Used for connecting USB memory drives.
You can connect a USB memory drive and read/write data
from/to the drive.
Supported formats for USB memory drives
Drives formatted using FAT32 are supported.
Preventing accidental erasure
Some USB memory drives offer a write-protect feature
which prevents accidental data erasure. If you save
important data on a USB memory drive, we recommend
using the drive's write-protect feature to protect your data
from being erased. Conversely, make sure the drive's
write-protect feature is turned off before trying to save
data to the drive.
NOTE
The ACCESS indicator is displayed in the upper right of the
screen while data is being accessed (read, written, erased,
etc.). While this indicator is displayed, do not turn off the unit or
disconnect the USB memory drive. The unit, the drive, and data
stored on the drive could become damaged.
Page is loading ...
Page is loading ...
Page is loading ...
Page is loading ...
-
 1
1
-
 2
2
-
 3
3
-
 4
4
-
 5
5
-
 6
6
-
 7
7
-
 8
8
-
 9
9
-
 10
10
-
 11
11
-
 12
12
-
 13
13
-
 14
14
-
 15
15
-
 16
16
-
 17
17
-
 18
18
-
 19
19
-
 20
20
-
 21
21
-
 22
22
-
 23
23
-
 24
24


Yamaha TF1 Owner's manual
- Category
- DJ controllers
- Type
- Owner's manual
- This manual is also suitable for
Ask a question and I''ll find the answer in the document
Finding information in a document is now easier with AI
Related papers
Other documents
-
M-Audio OMNI I-O Owner's manual
-
 Pacific Digital AD8HR User manual
-
Samsung MX-T50 User manual
-
Samsung MX-T70 User manual
-
Harman Kardon HKADAPTPLWHTAM Owner's manual
-
ZKTeco FBL5200 Pro Series Installation guide
-
 T'nB TSXUK Datasheet
-
Aviom AVIOM16/O-Y1 User manual
-
 Rotronic TF5 Owner's manual
-
Armstrong 880100-002 Installation and Operating Instructions


