Page is loading ...

IMPORTANT SAFETY INSTRUCTION
CAPACITY: 6.5 CFT.
DO NOT operate if any part is damaged or broken.
DO NOT use on steep inclines where tipping may occur.
NOT FOR USE BY CHILDREN.
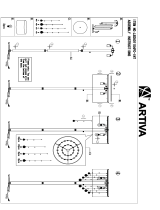
Big washer, 2pcs
Lock pin, 2pcs
M6*50 bolts and
nuts, 5pcs
M6*30 bolts & nuts,10pcs
M6*25 bolts & nuts,6pcs
Small nut
Small washer
U shape
frame,1pc
M shape
frame,1pc
Connect frame, 2pcs
Extended part
Extended part
Connect bar
L shape frame, 2pcs.
The right one has a
threaded bolt at the
short end.
Axle
Wheels, 2pcs
Back fence, 1pc
Side fences, 2pcs
Bottom bed, 1pc

Step 1.
Put the L shape frames on the floor, the right
frame has a thread bolt on the short end, then
make the axle put through the L shape frames.
Step 3.
Tighten with big washer and lock pin on each
side.
Step 2.
Slide wheels onto the axle.
Step 4.
Put the bottom bed on L shape frame.
Step 5.
Assemble one connect frame on back side of
cart, which is under the bottom bed. Here, we
will use M6*30 bolts and nuts, 2pcs.
Step 6.
Assemble another connect frame in the
middle of the bottom bed with M6*30 bolts
and nuts, 2pcs.
Step 7.
Then assemble the W shape frame with
M6*50 bolts and nuts, 1pc.
Step 8.
Put the side fences on the bottom bed,
assemble with M6*50 bolts and nuts, 4pcs. The
bolts should connect the side fence, M shape
frame and L shape frame together. Then use
M6*25 bolts and nuts, 6pcs to connect the
bottom side, side fences and L shape frame.
Step 9.
Assemble one side of the connect bar on end
of right L shape with a small washer and a
nut.
Step 10.
Then put the back fence close to L shape
frame, hang another end of connect bar on L
shape frame.
Step 11.
Find U shape frame, put the extend parts into
it.
Step 12.
Assemble the whole U shape frame on top of
side fences, tighten with M6*30 bolts and
nuts, 6pcs.
/