Page is loading ...

DE
Bedienungsanleitung
GB
instRuCtiOn manual
FR
mOde d’emplOi
NL
Handleiding
IT
istRuziOni peR l’usO
ES
instRuCCiOnes de usO
MyTime Bath Art. No. 80-20110 / 80-20112
Analoge Wanduhr für das Badezimmer
Analog wall clock for the bathroom
Horloge murale analogique pour la salle de bain
Analoge wandklok voor de badkamer
Orologio analogico da parete per il bagno
Reloj de pared analógico para el cuarto de baño

7
DE
GB
FR
NL
IT
ES
Garantie / Warranty
Gen eral Infor mat ion
This item is available in the models listed below. The features
and technical data are identical for both models, they differ
only in design / in colour.
Model 80-20110: MyTime Bath, black / silver
Model 80-20112: MyTime Bath, white / silver
About this Instruction Manual
These operating instructions are to be considered a
component of the device.
Please read the safety instructions and the operating instruc-
tions carefully before use.
Keep these instructions for renewed use at a later date. When
the device is sold or given to someone else, the instruction
manual must be provided to the new owner/user of the prod-
uct. The device is intended only for indoor use.
General Warnings
RISK OF CHOKING!
This product contains small parts that could be swallowed by
children. There is a RISK OF CHOKING.
RISK OF CHEMICAL BURN!
Leaking battery acid can lead to chemical burns. Avoid contact
of battery acid with skin, eyes and mucous membranes. In the
event of contact, rinse the affected region immediately with a
plenty of water and seek medical attention.
RISK OF FIRE/EXPLOSION!
Do not expose the device to high temperatures. Use only the
recommended batteries. Do not short-circuit the device or bat-
teries, or throw them into a fire. Excessive heat or improper
handling could trigger a short-circuit, a fire or an explosion.
NOTE!
Do not disassemble the device. In the event of a defect, please
contact your dealer. The dealer will contact the Service Centre
and can send the device in to be repaired, if necessary.
Protect the device from severe shocks! The manufacturer is
not liable for damage related to improperly installed batteries.
CONTENT
Wall Clock (A), base (B), operating instructions
A 1.5V AA/LR battery is required for operation (not included).
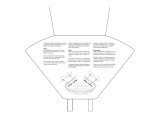
PARTS LIST
B Clock face
C Hanging hole
D Stand (inside)
E Suction cups
F Protective rubber ring
G Battery compartment
H Stand receptacle
I Time setting dial
J LCD display for temperature display
1) Cover

8
FEATURES
• Water resistant
• LCD display with indication of indoor temperature (° C)
• Easy to install with four strong suction cups
• Modern design with an elegant aluminum frame
START-UP/POWER SUPPLY
1. Turn the housing cover (10) with a little force, coun-
ter-clockwise and detach it.
2 Insert a 1.5V battery into the battery compartment (6) AA/
LR6. Pay attention to the correct polar direction (+ / - ) of the
battery as indicated inside the battery compartment.
SETTING THE TIME
1. After inserting the battery, the movement works (hands
move).
2. Turn the dial (8) to set the correct time.
3. Put the front cover (10) back on and tighten it with a little
force, clockwise.
TEMPERATURE DISPLAY
After inserting the battery, the interior temperature is displayed
on the LCD display (9). The temperature range is between 0°C
~ +50°C.
MOUNTING/POSITIONING OF THE CLOCK
There are 3 ways to mount this clock on the wall or on a flat
surface:
1. Open the housing cover (10) and remove the pedestal
stand (3). Insert it into the receptacle for the stand (7) and
position the clock on a flat surface (e.g. bathroom cabinet).
2. Hang the clock using a screw or nail (not included) onto the
desired and suitable wall (2).
3. Slightly moisten the suction cups (4) and press the clock
with the suction cups against a flat wall surface.
CAUTION:
Always make sure to mount or stand the clock securely.
Dropping the unit may cause serious damage, for which the
manufacturer takes no responsibility! The suction cups must
be placed on a perfectly flat, clean and dry surface. Moisture
favours slipping!
NOTES ON CLEANING
Before cleaning the device, disconnect it from the power sup-
ply (remove batteries).
Only use a dry cloth to clean the exterior of the device. To
avoid damaging the electronics, do not use any cleaning fluid.
DISPOSAL
Dispose of the packaging materials properly, according
to their type, such as paper or cardboard. Contact your
local waste-disposal service or environmental authority for in-
formation on the proper disposal.

9
DE
GB
FR
NL
IT
ES
Garantie / Warranty
Do not dispose of electronic devices in the household
garbage!
As per Directive 2002/96/EC of the European Parlia-
ment on waste electrical and electronic equipment and its
adaptation into German law, used electronic devices must be
collected separately and recycled in an environmentally friend-
ly manner.
In accordance with the regulations concerning batteries
and rechargeable batteries, disposing of them in the nor-
mal household waste is explicitly forbidden. Please make sure
to dispose of your used batteries as required by law — at a local
collection point or in the retail market. Disposal in domestic
waste violates the Battery Directive.
Batteries that contain toxins are marked with a sign and a
chemical symbol. “Cd” = cadmium, “Hg” = mercury, “Pb” =
lead.
EC DECLARATION OF CONFORMITY
Bresser GmbH has issued a “Declaration of Conform-
ity” in accordance with applicable guidelines and cor-
responding standards. This can be viewed any time upon re-
quest.

2222
DE
GARANTIE & SERVICE
Die reguläre Garantiezeit beträgt 2 Jahre und beginnt am Tag
des Kaufs. Um von einer verlängerten, freiwilligen Garantiezeit
wie auf dem Geschenkkarton angegeben zu profitieren, ist
eine Registrierung auf unserer Website erforderlich.
Die vollständigen Garantiebedingungen sowie Informationen
zu Garantiezeitverlängerung und Serviceleistungen können
Sie unter www.bresser.de/garantiebedingungen einsehen.
Sie wünschen eine ausführliche Anleitung zu diesem Produkt in
einer bestimmten Sprache? Dann besuchen Sie unsere Web-
site über nachfolgenden Link (QR Code) für verfügbare Versio-
nen. Alternativ können Sie uns auch eine E-Mail an die Adresse
manuals@bresser.de schicken oder eine Nachricht unter
+49 (0) 2872 - 8074-220* hinterlassen. Bitte geben Sie stets
Ihren Namen, Ihre genaue Adresse, eine gültige Telefonnum-
mer und E-Mail-Adresse sowie die Artikelnummer und -be-
zeichnung an.
*Lokale Rufnummer in Deutschland (Die Höhe der Gebühren je Telefonat
ist abhängig vom Tarif Ihres Telefonanbieters); Anrufe aus dem Ausland
sind mit höheren Kosten verbunden.
GB
WARRANTY & SERVICE
The regular guarantee period is 2 years and begins on
the day of purchase. To benefit from an extended vol-
untary guarantee period as stated on the gift box, reg-
istration on our website is required. You can consult the
full guarantee terms as well as information on extend-
ing the guarantee period and details of our services at
www.bresser.de/warranty_terms.
Would you like detailed instructions for this product in a par-
ticular language? Then visit our website via the link below (QR
code) for available versions.
Alternatively you can also send an email to manuals@bress-
er.de or leave a message on +49 (0) 28 72 – 80 74-220*.
Please always state your name, precise address, a valid phone
number and email address, as well as the article number and
name.
*Number charged at local rates in Germany (the amount you will be
charged per phone call will depend on the tariff of your phone provider);
calls from abroad will involve higher costs.
FR
GARANTIE ET SERVICE
La durée normale de la garantie est de 2 ans à compter du jour
de l’achat. Afin de pouvoir profiter d’une prolongation faculta-
tive de la garantie, comme il est indiqué sur le carton d’embal-
lage, vous devez vous enregistrer sur notre site Internet.
Vous pouvez consulter l’intégralité des conditions de garan-
tie ainsi que les informations concernant la prolongation de
la garantie et les prestations de service sur www.bresser.de/
warranty_terms.
Vous souhaitez un mode d’emploi détaillé pour ce produit dans
une langue spécifique ? Alors consultez notre site Internet à
l’aide du lien suivant (code QR) pour voir les versions dispo-
nibles.
Vous pouvez également nous envoyer un e-mail à l’adresse
manuals@bresser.de ou nous laisser un message au
/