Campingaz 3 in 1 Grill R Instructions For Use Manual
- Category
- Barbecues & grills
- Type
- Instructions For Use Manual
Page is loading ...

2
IFU 4010011854 - 3 in 1 Grill R.qxp 06/10/2010 09:15 Page 2

3
IFU 4010011854 - 3 in 1 Grill R.qxp 06/10/2010 09:15 Page 3

4
IFU 4010011854 - 3 in 1 Grill R.qxp 06/10/2010 09:15 Page 4
Page is loading ...
Page is loading ...
Page is loading ...

8
Rate: 109 g/h (1,5 kW) - injector n° 65
Category : butane direct pressure
Thank you for choosing the Campingaz
®
3 In 1 Grill R.
A - IMPORTANT: ALWAYS BE CAREFUL WHEN
USING GAS !
The purpose of these instructions is to enable you to use
your Campingaz
®
appliance correctly and in complete
safety.
Please read them carefully to familiarise yourself with
the equipment prior to attaching the gas cylinder.
Please observe these instructions. Failure to obser-
ve these instructions may result in the user and
people in the immediate vicinity being put at risk.
Keep these instructions in a safe place so that you
can refer to them if needed.
This appliance must only be used with Campingaz
®
cylinders R901 / R904 / R907. Using other gas cylin-
ders may be dangerous.
The Société Application Des Gaz accepts no
responsibility where cylinders of any other make
are used.
This equipment should only be used outside premi-
ses and kept away from inflammable materials.
Do not use equipment which leaks, functions incor-
rectly or is damaged. Return it to your retailer who
will inform you of your nearest after-sales service.
Never modify this equipment or use it for purposes
for which it is not intended
B - STARTING UP
When using the stove for the first time
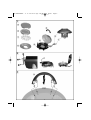
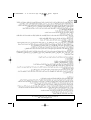
a) Remove the device from its packaging.
b) Open the cover (see figure 2 for unlocking the
cover).
c) Unlock the cooking grills by pulling each side lock
toward the outside (fig. 4).
d) Remove the two cooking plates (8) (9), as well as
the pan support (7) (fig. 1).
e) Position the cover handle as shown in figure 3.
Fitting to Campingaz cylinders R901 / R904 / R907
(Where the existing cylinder is empty, read paragraph E:
"Removing the cylinder").
To install or remove a cylinder, always work in a well-
ventilated area, preferably outside and never in the pre-
sence of a flame, heat source or spark (lit cigarette,
electrical equipment, etc.) at a good distance from other
people and flammable material.
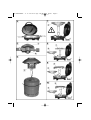
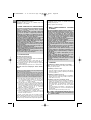
f) Check to see that the gas inlet is securely closed by
turning the adjustment wheel (1) - found on the
regulator (2) - in a clockwise direction (toward the "-
" on the arrow) (fig. 6) until it stops.
g) Be sure that the "A" sealing ring found on the regu-
lator outlet connection (2) (fig. 5) is present and in
proper working condition before attaching the gas
tank. Do not use the stove if the seal is missing or
damaged: return it to your retailer.
h) Place the gas tank on a stable, horizontal surface
and remove the stopper.
i) Holding the regulator (2), screw the gas tank to the
regulator by turning it as shown in figure 6. Screw
the tank all the way in.
In the event of leakage (smell of gas prior to turning the
tap on), take the equipment outside immediately, in a
well-ventilated area with no combustion source, where
the leak can be located and halted. If you wish to check
that your equipment is correctly sealed, do so outside.
Never attempt to locate leaks using a flame. Use gas
leak solution.
The equipment is ready for use.
C - ADDITIONAL INSTRUCTIONS
- Do not use your device at a distance of less than 20
cm from a wall, a combustible object or the tank.
- Position the equipment on a stable, horizontal sur-
face and do not move when in use so as to avoid
the appearance of large flames resulting from the
combustion of liquid butane rather than vaporised
butane. Should this occur, position the equipment
and turn the tap off - found on the regulator (2).
- In case of leakage (gas smell), close the valve
(located on the regulator).
- Never leave the cooking plate in operation for lon-
ger than 3 minutes without a gas supply.
- Set the cooker at low power when using flat metal-
lic utensils such as a toaster or a rack for toasting
bread.
- When using the device with a cooking plate,
always check to see that the water tray is present.
- Do not use pans with a diameter less than 18 cm.
- Do not stack cooking plates and pan supports on
top of each other on the burner when it is in ope-
ration (fig. 10 bis).
- Wait until the device has completely cooled befo-
re preparing it for storage.
- Careful: some parts may be very hot. Keep young
children away from the device.
- Use cooking mitts to manipulate the cooking pla-
tes, pan support and water tray.
- Avoid twisting the flexible hose.
D - USE
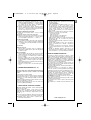
1 - Placement of the pan support / cooking plate
Important: be sure that the water tray (6) has been
placed in the device before each use.
Placement of the water tray
- Pull each side lock on the device toward the outside
(fig. 4).
- Place the water tray (6) inside the device and check
its stability (fig. 7).
Placement of the pan support(7)
- Be sure that the water tray (6) is in place.
- Place the pan support on the water tray and check its
stability.
Placement of a cooking plate (8 or 9)
- Be sure that the water tray (6) is in place.
- Pour about ¼ liter of water into the water tray to
avoid carbonization of fats from cooking meat.
- Edged cooking plate (8): place the plate on the water
tray with the rim at the rear.
- Non-edged cooking plate (9): place the plate on the
water tray with the fat drainage hole at the rear.
- Check cooking plate stability.
Important: never stack cooking plates / pan
supports together when you are using your
grill (fig. 10 bis).
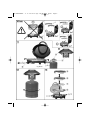
2 - Lighting the burner with a push igniter (fig. 11)
a) Open the gas by turning the adjustment wheel (1) -
found on the regulator (2) - in a counterclockwise
direction (toward the " + " on the arrow) and push
once or twice on the ignition button (5) until the bur-
ner is lighted.
b) If the burner does not light, close the gas inlet by
turning the wheel (1) fully clockwise (toward the "-"
on the arrow); check to see that there is still gas in
the tank and start the ignition process again.
3 - Manual burner lighting
a) Remove the cooking plate (8 or 9 - fig. 1) if neces-
sary.
GB
IFU 4010011854 - 3 in 1 Grill R.qxp 06/10/2010 09:15 Page 8

9
b) Put a lighted match next to the burner.
c) Slowly open the gas by turning the wheel (1) - found
on the regulator (2) - in a counterclockwise direction
(toward the " + " on the arrow).
4 - Switching off
Close the tap by turning the control knob (1) - found on
the regulator (2) - clockwise as far as it will go (direc-
tion "-" of the arrow). Fully tighten the wheel to ensure
that the gas is completely turned off.
5 - Cooking
Pan support (7)
Put a pan on the pan support, center over the burner,
and adjust gas flow so that flames are not higher than
the pan.
Cooking plates
- The non-edged cooking plate (9) is perfect for
cooking eggs, thin slices of meat or fish, small
vegetables, toast, etc.
- The edged cooking plate (8) is ideal for grilling.
- Since fats from cooking fall into the water tray,
cooking is perfectly healthy (no residual or carboni-
zed fats) and food stays tasty and tender.
- The plate attains a maximum temperature (ideal for
searing grilled foods) after 3 minutes of pre-heating
with the cover closed.
- When the plate is hot, place the food on it and
adjust heat to the proper cooking level using the
adjustment wheel (1).
- Cooking can be done with the cover closed.
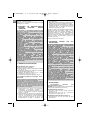
E - REMOVING THE CYLINDER (fig. 12)
The cylinder may be removed without being empty.
Change the tank outdoors and away from people.
- Wait for the stove to cool down.
- Check that the gas input is securely closed by turning
the wheel (1) - found on the regulator (2) - in a clock-
wise direction (toward the " - " on the arrow) until it
stops.
- Holding the regulator (2), unscrew it from the tank by
turning as shown in figure 12.
- Check the sealing ring before attaching a new tank
(see paragraph B g).
F - DISASSEMBLY, CLEANING AND STORAGE
If you take care of your device properly, you will be able
to enjoy using it for many years.
Do not clean your device when it is being used. Wait
until it has cooled to avoid burns caused by hot parts
(cooking plates, pan support, water tray, etc.)
a) After complete cooling, remove the cooking plate (8
or 9) or pan support (7) and the water tray (6).
b) Clean greasy parts with soap and water or a non-
abrasive detergent.
c) For easier cleaning, you can wash the cooking pla-
tes, pan support and water tray in a dishwasher.
- Cooking plates
The cooking plates are enameled. To clean them, we
recommend first removing all cooking residues with a
sponge or cleaning pad. Next, remove grease with a
dishwashing product. Be careful not to hit the
cooking grill against anything, since this could chip
the enamel.
d) After cleaning the water tray and the cooking plates,
place them in the device in the following order:
- water tray (6),
- pan support (7),
- edged cooking plate (8),
- non-edged cooking plate (9),
then pull both side locks toward the inside to lock the
cooking plates in place (fig. 13).
Close and lock the cover. The device can be carried
by its handle.
e) Store the equipment and the cylinder in a cool, dry
and well-ventilated area, out of reach of children.
Never store in a basement or cellar.
f) If the device will not be used for a long period of time,
disconnect the tank as indicated in paragraph E.
g) In the case of the injector becoming clogged (the
cylinder still contains gas but the equipment will not
light), do not try to unclog it yourself. Return the
equipment to your retailer.
WARRANTY APPLICATION TERMS AND CONDI-
TIONS
The product is covered by a total parts and labor war-
ranty for a period of 2 (two) years from its purchase
date. The warranty applies to products that do not
conform to the order or that are defective. Within the
guarantee period, the product shall be either repaired,
replaced or reimbursed - in full or in part. Liability to
Buyer under a claim shall in no event exceed the price
of the product.
The warranty is null and void and does not apply should
the damage arise from (i) abuse of the products (ii) fai-
lure to operate and maintain the products in accordance
with the instructions of use (iii) repair, service, alteration
or modification of the product by unauthorized third par-
ties (iv) original parts are not used.
The warranty is excluded in case of professional use.
Proof of the purchase date (ie. invoice, till receipt) and
claim report are required to obtain a free warranty servi-
ce.
Do not return the appliance with the gas container (cylin-
der or cartridge) fitted; ensure it is dismantled before
sending back.
Service under the guarantee does not affect the expiry
date of the warranty.
All other claims including for damages resulting from
this warranty are excluded unless ADG’s liability is
legally mandatory.
This guarantee in no way affects a Buyer’s statutory
rights.
In the event of difficulty, please contact the Local
Customer Service in your country. List of contacts is
available in this leaflet.
CONSUMER SERVICE
In case of continued difficulty, please contact your
local retailer who will give you details of the nearest
After Sales Service point, or call the CAMPINGAZ
Customer Service at:
COLEMAN UK PLC - Gordano Gate
Wyndham Way - Portishead
BRISTOL BS20 7GG
ENGLAND
Tel: +44 (0)1275 845 024
Fax: +44 (0)1275 849 255
WARNING: Due to our policy of continual product devel-
opment, the company reserves the right to alter or mod-
ify this product without prior notice.
website : www.campingaz.com
GB
IFU 4010011854 - 3 in 1 Grill R.qxp 06/10/2010 09:15 Page 9
Page is loading ...
Page is loading ...
Page is loading ...
Page is loading ...
Page is loading ...
Page is loading ...
Page is loading ...
Page is loading ...
Page is loading ...
Page is loading ...
Page is loading ...
Page is loading ...
Page is loading ...
Page is loading ...
Page is loading ...
Page is loading ...
Page is loading ...
Page is loading ...
Page is loading ...
Page is loading ...
Page is loading ...
Page is loading ...
Page is loading ...
Page is loading ...
Page is loading ...
Page is loading ...
Page is loading ...
Page is loading ...
Page is loading ...
Page is loading ...
Page is loading ...
Page is loading ...
Page is loading ...
Page is loading ...
Page is loading ...
Page is loading ...
Page is loading ...
Page is loading ...
Page is loading ...
Page is loading ...
Page is loading ...
Page is loading ...
Page is loading ...
Page is loading ...
Page is loading ...
Page is loading ...
Page is loading ...

57
AE
IFU 4010011854 - 3 in 1 Grill R.qxp 06/10/2010 09:15 Page 57

58
AE
IFU 4010011854 - 3 in 1 Grill R.qxp 06/10/2010 09:15 Page 58

59
AE
APPLICATION DES GAZ SA - Route de Brignais - BP 55 - 69563 Saint Genis Laval - France
Tél: +33 (0)4 78 86 88 94 Fax: +33 (0)4 78 86 88 38
Web : www.campingaz.com
IFU 4010011854 - 3 in 1 Grill R.qxp 06/10/2010 09:15 Page 59
Page is loading ...
Page is loading ...
Page is loading ...
Page is loading ...
Page is loading ...
Page is loading ...
Page is loading ...
Page is loading ...
Page is loading ...
Page is loading ...
Page is loading ...
Page is loading ...
Page is loading ...
Page is loading ...
Page is loading ...

IFU 4010011854 - 3 in 1 Grill R.qxp 06/10/2010 09:15 Page 75

IFU 4010011854 - 3 in 1 Grill R.qxp 06/10/2010 09:15 Page 76
-
 1
1
-
 2
2
-
 3
3
-
 4
4
-
 5
5
-
 6
6
-
 7
7
-
 8
8
-
 9
9
-
 10
10
-
 11
11
-
 12
12
-
 13
13
-
 14
14
-
 15
15
-
 16
16
-
 17
17
-
 18
18
-
 19
19
-
 20
20
-
 21
21
-
 22
22
-
 23
23
-
 24
24
-
 25
25
-
 26
26
-
 27
27
-
 28
28
-
 29
29
-
 30
30
-
 31
31
-
 32
32
-
 33
33
-
 34
34
-
 35
35
-
 36
36
-
 37
37
-
 38
38
-
 39
39
-
 40
40
-
 41
41
-
 42
42
-
 43
43
-
 44
44
-
 45
45
-
 46
46
-
 47
47
-
 48
48
-
 49
49
-
 50
50
-
 51
51
-
 52
52
-
 53
53
-
 54
54
-
 55
55
-
 56
56
-
 57
57
-
 58
58
-
 59
59
-
 60
60
-
 61
61
-
 62
62
-
 63
63
-
 64
64
-
 65
65
-
 66
66
-
 67
67
-
 68
68
-
 69
69
-
 70
70
-
 71
71
-
 72
72
-
 73
73
-
 74
74
-
 75
75
-
 76
76


Campingaz 3 in 1 Grill R Instructions For Use Manual
- Category
- Barbecues & grills
- Type
- Instructions For Use Manual
Ask a question and I''ll find the answer in the document
Finding information in a document is now easier with AI
in other languages
- italiano: Campingaz 3 in 1 Grill R
- français: Campingaz 3 in 1 Grill R
- español: Campingaz 3 in 1 Grill R
- Deutsch: Campingaz 3 in 1 Grill R
- Nederlands: Campingaz 3 in 1 Grill R
- português: Campingaz 3 in 1 Grill R
- slovenčina: Campingaz 3 in 1 Grill R
- dansk: Campingaz 3 in 1 Grill R
- polski: Campingaz 3 in 1 Grill R
- čeština: Campingaz 3 in 1 Grill R
- Türkçe: Campingaz 3 in 1 Grill R
- eesti: Campingaz 3 in 1 Grill R
- svenska: Campingaz 3 in 1 Grill R
- suomi: Campingaz 3 in 1 Grill R
- română: Campingaz 3 in 1 Grill R
Related papers
-
Campingaz CV Instructions For Use Manual
-
Campingaz Compact LX R Instructions For Use Manual
-
Campingaz 400 S Instructions For Use Manual
-
-
-
-
-
Campingaz Classic LS LAVA Operation And Maintenance
-
-
Other documents
-
Aeg-Electrolux HC412000GB User manual
-
-
NAPOLEON BIB18RTNSS Owner's manual
-
NAPOLEON BIB18IRNSS Owner's manual
-
KitchenAid KFRU488TSS User manual
-
Brinkmann 810-3250-F Owner's manual
-
-
-
-
KitchenAid KFRU368TSS00 Owner's manual