Page is loading ...

Thermosystems
CSL31-B BEVERAGE BODY
H
EATING SYSTEM
Operating Instructions


Table of Contents
www.webasto.us Webasto Thermo & Comfort N.A., Inc. www.techwebasto.com
1
Topic Page
1. Safety Information 3
1.1 Warning Symbols used in this Manual. . . . . . . . . . . . . . . . . . . . . . . . . . . . . . . . . . . . . . . . . . . . . . . . . . . . . . . . . . . . . 3
1.2 General Safety Instructions . . . . . . . . . . . . . . . . . . . . . . . . . . . . . . . . . . . . . . . . . . . . . . . . . . . . . . . . . . . . . . . . . . . . . 4
2. General Information 5
2.1 Introduction . . . . . . . . . . . . . . . . . . . . . . . . . . . . . . . . . . . . . . . . . . . . . . . . . . . . . . . . . . . . . . . . . . . . . . . . . . . . . . . . 6
3. Component Identification 7
4. Functional Description 9
4.1 Standby Mode . . . . . . . . . . . . . . . . . . . . . . . . . . . . . . . . . . . . . . . . . . . . . . . . . . . . . . . . . . . . . . . . . . . . . . . . . . . . . . 9
4.2 System Start . . . . . . . . . . . . . . . . . . . . . . . . . . . . . . . . . . . . . . . . . . . . . . . . . . . . . . . . . . . . . . . . . . . . . . . . . . . . . . . . 9
4.3 Full Heat. . . . . . . . . . . . . . . . . . . . . . . . . . . . . . . . . . . . . . . . . . . . . . . . . . . . . . . . . . . . . . . . . . . . . . . . . . . . . . . . . . 10
4.4 Switching to Standby . . . . . . . . . . . . . . . . . . . . . . . . . . . . . . . . . . . . . . . . . . . . . . . . . . . . . . . . . . . . . . . . . . . . . . . . 10
5. Operating Instructions 11
5.1 Indicator Lamp Description . . . . . . . . . . . . . . . . . . . . . . . . . . . . . . . . . . . . . . . . . . . . . . . . . . . . . . . . . . . . . . . . . . . . 11
6. Technical Data 12

Table of Contents2
www.webasto.us Webasto Thermo & Comfort N.A., Inc. www.techwebasto.com
Topic
7. Preventive Maintenance 14
7.1 Visual Checks . . . . . . . . . . . . . . . . . . . . . . . . . . . . . . . . . . . . . . . . . . . . . . . . . . . . . . . . . . . . . . . . . . . . . . . . . . . . . .14
7.2 Check Available Power . . . . . . . . . . . . . . . . . . . . . . . . . . . . . . . . . . . . . . . . . . . . . . . . . . . . . . . . . . . . . . . . . . . . . . .14
7.3 Coolant Level Check . . . . . . . . . . . . . . . . . . . . . . . . . . . . . . . . . . . . . . . . . . . . . . . . . . . . . . . . . . . . . . . . . . . . . . . . .15
7.4 Fuel Filter Check . . . . . . . . . . . . . . . . . . . . . . . . . . . . . . . . . . . . . . . . . . . . . . . . . . . . . . . . . . . . . . . . . . . . . . . . . . . .15
7.5 Operational Test . . . . . . . . . . . . . . . . . . . . . . . . . . . . . . . . . . . . . . . . . . . . . . . . . . . . . . . . . . . . . . . . . . . . . . . . . . . .15
7.6 Heater Smokes White at Start Up . . . . . . . . . . . . . . . . . . . . . . . . . . . . . . . . . . . . . . . . . . . . . . . . . . . . . . . . . . . . . . .15
8. Troubleshooting 16
8.1 Know the System and Components . . . . . . . . . . . . . . . . . . . . . . . . . . . . . . . . . . . . . . . . . . . . . . . . . . . . . . . . . . . . .16
8.2 Diagnostic Table . . . . . . . . . . . . . . . . . . . . . . . . . . . . . . . . . . . . . . . . . . . . . . . . . . . . . . . . . . . . . . . . . . . . . . . . . . . .16
9. Wiring Diagrams 18
10.Overview of Sub-assemblies 21
11.Spare Parts Lists 22
12.Limited Warranty 23

Safety Information
www.webasto.us Webasto Thermo & Comfort N.A., Inc. www.techwebasto.com
3
1. Safety Information
Read this operating instruction manual in its entirety before operating this equipment.
Failure to follow the operating instructions and the notes contained therein will lead to all liability being refused by
Webasto.
1.1 Warning Symbols used in this Manual
The purpose of safety symbols is to attract your attention to possible hazardous conditions. This manual uses a series
of symbols and signal words which are intended to convey the level of importance of the safety messages. The
progression of symbols is described below. Remember that safety messages by themselves do not eliminate danger
and are not a substitute for proper accident prevention measures.
Indicates an imminently hazardous situation which, if not avoided, WILL result in
death or serious injury.
Indicates a potentially hazardous situation which, if not avoided, COULD result in
death or serious injury.
Indicates a potentially hazardous situation which, if not avoided, MAY result in
minor or moderate injury or property damage.
It may also be used to alert against unsafe practices.
DANGER
WARNING
CAUTION

Safety Information4
www.webasto.us Webasto Thermo & Comfort N.A., Inc. www.techwebasto.com
1.2 General Safety Instructions
• While heater is in use, the product surface or surrounding air from air outlet may become hot to the
touch. Contact with skin may cause burns.
• Improper installation or repair of Webasto heating and cooling systems can cause fire or the leakage of
deadly carbon monoxide leading to serious injury or death.
• NEVER attempt to install or repair a Webasto heating or cooling system unless you have successfully
completed Webasto factory training and have the technical skills, technical information, tools and
equipment required to properly complete the necessary procedures. Only genuine Webasto parts may
be used.
• Webasto rejects any liability for problems and damage caused by the system being installed by untrained
personnel.
• Webasto products produce temperatures high enough to ignite surrounding combustible materials such
as inflammable liquids, gases, vapor, and other combustible matter. The heater must be switched off
when loading or unloading inflammable materials to prevent the risk of explosion.
• ALWAYS and carefully follow Webasto installation and repair instructions and heed all WARNINGS.
DANGER

General Information
www.webasto.us Webasto Thermo & Comfort N.A., Inc. www.techwebasto.com
5
2. General Information
Webasto Thermo & Comfort N.A., Inc. is pleased to provide this owner’s manual with the CSL31-B Heating System.
When used according to the operating instructions stated in this manual, you can expect trouble-free, enjoyable
operation for many years.
This manual represents our latest effort to produce the best documentation possible.
In our efforts towards continuous, ongoing product improvement, we encourage our customers to write to us with
their comments or criticisms concerning this manual and the CSL31-B Heating System.
Please write to us at:
Webasto Thermo & Comfort N.A., Inc.
Technical Documentation Group
15083 North Road
Fenton MI 48430
You are also invited to fill out our online questionnaire concerning our technical documentation and web site at:
www.techwebasto.com
If you have any immediate questions concerning this manual, or the product itself, please call us at:
(800) 555-4518 or send a fax to:(810) 593-6001

General Information6
www.webasto.us Webasto Thermo & Comfort N.A., Inc. www.techwebasto.com
2.1 Introduction
Thank you for purchasing the Webasto CSL31-B Beverage Body Heating System. The CSL31- B
heating system is specifically engineered to provide freeze protection during overnight storage or during
in-transit operations.
Targeting the application needs of the beverage body and product environment has led development to a system
exclusive to the Beverage Market.
The CSL31-B features the Webasto Thermo 90 ST diesel-fired 31,000 Btu/hr (output) coolant heater. The Thermo 90 ST
combined with a balanced heat system, heat exchanger and powerful fan provides a safeguard to the interior
temperature.
The electronics of the CSL31-B utilize an efficient cool down cycle once the container has reached the thermostat set
point. This is accomplished with a fan “after run” time to allow transferring the developed heat from the system into
all areas of the container. This smart “after run” is designed around the container size and insulation properties.
Advantages of the CSL31B include:
• 22° C (72° F) fixed thermostat utilizing the heating
system only when necessary
• Independently operated low temperature red
warning light
• Low heat outlet-operating temperatures to
• avoid damaging product or packaging
• Two levels of heating; Maintenance and Recovery
heating
• System Efficiency 84%
• Diagnostic code at switch indicator light
• Maintenance on/off switch at heater
• No fuel or coolant within the product area
• Upward exhaust
• Simple access to heating system
• Manufactured to ISO 9002 and QS 9000
• Weather Resistant Electrical Connections

Component Identification
www.webasto.us Webasto Thermo & Comfort N.A., Inc. www.techwebasto.com
7
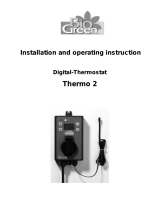
3. Component Identification
Figure 1. CSL31-B Assembly
Thermo 90 ST
Coolant
Hoses
Exhaust
Control
Module
Coolant
Tank
Fuses/Relay
Electrical
Connectors
Heat
Exchanger
Enclosure
Diagnostic
Connector
Combustion
Air Intake
Low Temp.
Indicator
Operation/
Diag.
Indicator

Component Identification8
www.webasto.us Webasto Thermo & Comfort N.A., Inc. www.techwebasto.com
Figure 2. Thermo 90 ST Heater
Fuel Pump
Combustion
Air Inlet
Control
Unit
Exhaust
Coolant Pump
Coolant
Inlet
Combustion
Chamber
Water Jacket
(Heat Exchanger)
Overheat
Thermostat
Coolant
Outlet
Burner
Assembly
Fuel
Inlet

Functional Description
www.webasto.us Webasto Thermo & Comfort N.A., Inc. www.techwebasto.com
9
4. Functional Description
4.1 Standby Mode
Upon switching the system on, power is supplied to the interior regulation thermostat and to the operation status relay
(K1 page 12 and 13) inside the heating system enclosure. When the interior regulation thermostat is open, not
requiring heat.The operation status relay will illuminate the green LED and remain in this state until the interior
thermostat closes and commences the system start.
4.2 System Start
Temperature within the container drops and switches the interior regulation thermostat closed at 10º C (50° F). The12
Volt output from the thermostat energizes the operation status relay and also supplies the on signal to begin the
Thermo 90 ST operation. The Thermo 90 ST will perform a brief self-diagnostic check, indicated by the combustion fan
motor powering on high speed momentarily and then reducing to start (low) speed. The ceramic igniter circuit begins a
20-30 second pre-heat followed by the fuel-metering pump beginning the fuel supply/pulse. The Thermo 90 ST will
begin to increase fan/air speed as well the fuel pump will increase pulse/fuel delivery. A start mode flame is established
and sensed by the flame detector and electronic control unit. Once this initial flame is sensed the combustion air fan
and fuel increase to the full heat mode.
Approximately one minute after the Thermo 90 ST has started the air delivery fan will commence via a coolant
temperature thermostat located near the coolant outlet connection. The heating system is now in the Full Heat Mode.

Functional Description10
www.webasto.us Webasto Thermo & Comfort N.A., Inc. www.techwebasto.com
4.3 Full Heat
The Thermo 90 ST and Air Delivery Fan will continue operation until the interior regulation thermostat within the
container opens/senses 22° C (72° F).
4.4 Switching to Standby
Once the interior is heated, the regulation thermostat opens which disconnects the on signal to the Thermo 90 ST and
operation status relay. A cool down sequence will begin by stopping fuel delivery, the combustion air fan motor
continues on high speed until the flame detector has sensed the flame being extinguished.At which time a cool down
period of 2-3 minutes begins. The cool down period will allow the combustion air fan and circulation pump to operate
and cool down the system.
The forced air delivery fan will continue operation until the coolant system has cooled, allowing additional air
circulation and heat distribution within the container

Operating Instructions
www.webasto.us Webasto Thermo & Comfort N.A., Inc. www.techwebasto.com
11
5. Operating Instructions
Product loading will require a minimum of one pallet to separate the product from the floor to providing warm air
distribution. To insure of adequate airflow the loaded product should not exceed the height of the bay walls.
The heater on/off switch with green indicator light is located at the exterior front wall on the driver side of vehicle. This
provides visible identification of the heaters Operation State to the vehicle operator.
An additional red light is located on the heater enclosure. The red light indicates that the temperature within the
container has dropped to a level where the product has the potential of freezing. To operate the heating system simply
push rocker switch top position.
5.1 Indicator Lamp Description
Green Indicator Lamp:
1. On - Heater System On or in Stand By Mode (not requiring heat)
2. Blinking - System Fault. Notify maintenance personnel.
3. Off - System Fault. Switch heater off and then back on again, one time only permitted. Notify maintenance
personnel if heater fails to turn On.
Red Indicator Lamp On with Green Indicator Lamp Off:
System Fault. Switch heater off and then back on again, one time only permitted. If unit starts and the green light
remains on, allow 10 minutes for red light to go out. Notify maintenance personnel.
Red Indicator Lamp On with Green Indicator Lamp On:
System Fault. Low Temperature Warning Light On / Heating System Operational. Ensure there are no obstructions
to airflow above bay wall height. Check that all bay doors are closed properly. During overnight product storage
operation, check that the power cord 110 VAC is plugged in. Notify maintenance personnel.

Technical Data12
www.webasto.us Webasto Thermo & Comfort N.A., Inc. www.techwebasto.com
6. Technical Data
6.1 CSL31- B Specifications
Specifications CSL31- B Thermo 90 ST
Heating Capacities Btu/hr (kW)
– Recovery /Boost Mode
– Maintaining Regulation Temperature
17,000 Btu (5 kWh)
Btu/ hr Output = 31,000 (9.1)
Btu/ hr Output = 28,500 (8.4)
Air Flow 700 cfm (1120 m3h)
Fuel Consumption
– Recovery /Boost Mode
– Maintaining Regulation Temperature
0.28 gal/ hr (1.06 L/ hr)
0.26 gal/ hr (0.98 L/ hr)
Rated Voltage 12 Vdc
Operating Voltage 11 to 15 Vdc
Power Consumption Including Fan 11 Amps/132 Watt in boost/ recovery mode -10 Amps/120 Watt in maintenance mode
Permissible Fuels (Winter Operation) Diesel #2 to 32° F (0° C) / Winter Blend Diesel #1 to 0° F (-17.7 C) /
Below 0° F (-17.7 C) Use arctic fuel W/ anti-gelling additives
Permissible Additives All types with manufactures instructions followed -Do not over concentrate!
Operating Temperature Range - 40° F to 72° F (- 40° C to 22.2° C)
CO2 Content in Exhaust 10.5%
Enclosure Dimensions L 42.75 in x W14.25 in x H 12.25 in (L 108.5 cm x W36.1 cm x H 31.1 cm)
Weight 60 lbs (27.24 kg)
Coolant Capacity 0.84 Gallon (3.2 Liters)

Technical Data
www.webasto.us Webasto Thermo & Comfort N.A., Inc. www.techwebasto.com
13
CSL31- B Specifications Continued
CSL31- B Kit Contents Assembled CSL31- B Enclosure
Straight Truck Chassis Harness
– Connection from enclosure to batteries = 21 ft. (640 cm)
– Connection from enclosure to exterior mount switch box = 12 ft. (365.7 cm)
Thermostat Harness = 26 ft. (792.4 cm)
Thermostats with Mounting Hardware
Fuel System Complete = 17 ft. (518 cm)
Exterior Switch with Hour Meter

Preventive Maintenance14
www.webasto.us Webasto Thermo & Comfort N.A., Inc. www.techwebasto.com
7. Preventive Maintenance
7.1 Visual Checks
Inspect the following components for corrosion, damage, loose connections, leakage, and dirt build up:
•Enclosure
• Thermo 90 ST Heater
•Fuel Pump
• Batteries
• Switches and Thermostats
7.2 Check Available Power
1. Measure battery voltage (with no110 VAC plug in)
2. Measure available voltage at Fuse #1
a. Connect volt meter between enclosure ground lug and Fuse #1
b. Switch heater On with mechanics switch
c. Read volt meter -available voltage must be no less than 0.8 VDC from battery voltage
3. Turn Off mechanics switch
4. If voltage drop measures greater than 0.8 VDC:
a. Replace battery ring terminals
b. Inspect batteries per manufactures recommended test
c. Inspect electrical connections in heater enclosure for corrosion or damage

Preventive Maintenance
www.webasto.us Webasto Thermo & Comfort N.A., Inc. www.techwebasto.com
15
7.3 Coolant Level Check
Ensure coolant recovery container is filled to proper level.
A 50% water to 50% glycol solution must be used.
7.4 Fuel Filter Check
The fuel filter must be changed at the start of each heating season.
a. Fuel filter must be changed mid season in regions of -10° F
and lower.
b. A fuel filter in new condition will fill approximately 25% with
fuel.
c. Fuel filters found with 50% or more fuel must be replaced.
7.5 Operational Test
Switch On mechanics switch in enclosure, when air delivery
fan switches on, switch mechanics switch to the Off
position.
7.6 Heater Smokes White at Start Up
Inspect air hole located in the burner assembly for obstructions if
the heater smokes white at start up, and a no start is experienced.
Remove the burner and ceramic ignitor for complete cleaning (See
Figure 3).
Figure 3. Burner Rear Wall
Starting
Air Hole
Ceramic
Ignitor
Burner
Assembly

Troubleshooting16
www.webasto.us Webasto Thermo & Comfort N.A., Inc. www.techwebasto.com
8. Troubleshooting
8.1 Know the System and Components
Effective troubleshooting requires knowledge of the complete system and its normal operation sequence. The
Functional Description beginning on page 9 must be read and understood before beginning any diagnosis to the
system. Preventive Maintenance beginning on page 14 must be completed when performing troubleshooting
inspections. The fault alert code are the five fast flashes (not counted) followed by the slower (counted) flashes.
Begin Troubleshooting by placing the Mechanics Switch to ON position (the mechanics switch will by-pass the cargo/
interior thermostat)
8.2 Diagnostic Table
Failure Symptom Probable Cause Check and Correct
No Function Electrical wiring, fuses
Control unit
Fuses
Battery connections: + 12Vdc at Relay (K1) pin 86 (yellow wire)
Replace control unit
0x Flash
Fault Lockout
3 start-up attempts with faults Turn switch to ON position. Pull main fuse, wait 20 seconds.
Turn heater switch off. Reinsert main fuse. Rectify the cause of
the fault.
1x Flash
No Start
Fuel delivery Correct fuel type for ambient conditions
Check condition of fuel filter
Clean or replace burner assembly
2x Flashes
Flame Outage During Operation
Fuel delivery
Combustion air/exhaust
Burner assembly
Correct fuel type for ambient conditions
Check combustion air/exhaust
Clean or replace burner assembly
3 x Flashes - Undervoltage Electrical power supply Check battery and electrical connections

Troubleshooting
www.webasto.us Webasto Thermo & Comfort N.A., Inc. www.techwebasto.com
17
4 x Flashes
Flame Monitor Continuously Hot
Flame monitor defective Replace flame monitor
5 x Flashes
Flame Monitor Defective
Wiring
Flame monitor defective
Inspect wiring at heater
Replace flame monitor
6 x Flashes
Temperature Sensor Defective
Wiring
Defective
temperature sensor
Inspect wiring at heater
Replace temperature sensor
7 x Flashes
Fuel Pump
Wiring
Fuel pump open circuit
Inspect wiring for open circuit
Replace Fuel Pump
8 x Flashes
Combustion Air Fan
Wiring
Combustion air fan defective
Inspect wiring at heater
Replace combustion air fan motor
9 x Flashes
Glow Plug Defective
Wiring
Glow plug defective
Inspect wiring
Replace glow plug
10 x Flashes
Overheat
Coolant system Inspect for restrictions in coolant circuit
Check for proper coolant level
Reset overheat sensor
11 x Flashes
Coolant Pump
Wiring
Coolant pump open circuit
Inspect wiring
Replace coolant pump
Failure Symptom Probable Cause Check and Correct

Wiring Diagrams18
www.webasto.us Webasto Thermo & Comfort N.A., Inc. www.techwebasto.com
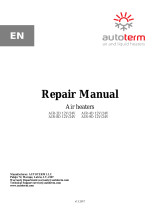
9. Wiring Diagrams
Wiring Diagram - Enclosure and Chassis Harness
86 87 85 87a 30
2 1
1 2 3 4
3 4 2 1
C
A
B
1
2
3
4
5
6
1
8
3
4
7
9
12
5
2
6
10
11
2
1
16 GA BROWN
14 GA BROWN
16 GA YELLOW
16 GA GREEN
16 GA GREEN
16 GA BROWN
14 GA RED
18 GA GREEN
18 GA YELLOW
18 GA RED
16 GA BROWN
16 GA BROWN
14 GA BROWN
18 GA RED
18 GA GREEN
18 GA BLACK
18 GA ORANGE
18 GA BROWN
18 GA BLUE
16 GA BROWN
18 GA BLUE
18 GA BLUE
16 GA BLUE
16 GA BLUE
18 GA BLUE
18 GA BROWN
18 GA BROWN
18 GA ORANGE
18 GA ORANGE
18 GA GREEN
18 GA BLACK
18 GA BLACK
18 GA YELLOW
18 GA YELLOW
18 GA GREEN
87
86
85
30
87a
(MATING END SHOWN)
GROUND
GROUND
X1
X2
X8
X4
X5
X7
X6
X3
T8
18 GA
BLACK
F1
F2
F3
FUSE BLOCK
BATTERY +
14 GA RED
X8
Item Designation
F1 Fuse 20A
F2 Fuse 7.5A
F3 Fuse 20A
S1 Toggle switch
X1 12-pin Thermo 90 S/ST
X2 2-pin Diagnostic Link
X3 2-pin Fan Motor
X4 3-pin Mechanic Switch
X5 6-pin Chassis Harness
X6 4-pin Cargo Thermostats
X7 4-pin Indicator Lights
X8 5-pin Relay - Indicator Lights
T8 1-pin x 2 Fan Thermostat
/