
Use and care
GUIDE
THERMADOR.COM
MASTERPIECE
®
SERIES GAS COOKTOP SGS SGSX SGSP SGSXP


Table of
CONTENTS
Table of Contents
Use and care manual
Safety Definitions ....................................................... 4
IMPORTANT SAFETY INSTRUCTIONS ........................ 5
Gas Appliance Safety ...................................................... 5
Fire Safety ....................................................................... 6
Gas Safety ....................................................................... 6
Burn Prevention .............................................................. 7
Child Safety ..................................................................... 7
Cleaning Safety ............................................................... 7
Cookware Safety ............................................................. 8
Proper Installation and Maintenance .............................. 8
State of California Proposition 65 Warning: ................... 8
Getting Started .......................................................... 9
Before Using the Appliance for the First Time ............... 9
Parts and Accessories ..................................................... 9
Accessories ................................................................... 11
Sealed STAR™ Burners ................................................. 11
STAR™ Burner Caps ..................................................... 11
Thermador ExtraLow
®
(XLO) STAR™ Burners
(SGSX and SGSXP models only) ................................... 12
Burner “ON” Lights ...................................................... 12
Install Burner Grates ..................................................... 12
Control Knobs ............................................................... 13
Operation ................................................................. 14
About the Appliance ..................................................... 14
Getting the Most Out of Your Appliance ..................... 14
Cleaning and Maintenance ....................................... 21
Cleaning ........................................................................ 21
Cleaning Guidelines ...................................................... 22
Maintenance ................................................................. 23
Service ...................................................................... 24
Before Calling for Service ............................................. 24
Product Rating Label .................................................... 25
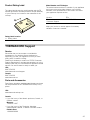
THERMADOR® Support ........................................... 25
Service ........................................................................... 25
Parts and Accessories ................................................... 25
STATEMENT OF LIMITED PRODUCT WARRANTY .... 26
What this Warranty Covers & Who it Applies to .......... 26
How Long the Warranty Lasts ....................................... 26
Repair/Replace as Your Exclusive Remedy ................... 26
Out of Warranty Product ............................................... 26
Warranty Exclusions ...................................................... 27

4
Safety Definitions
9 WARNING
This indicates that death or serious injuries may
occur as a result of non-observance of this warning.
9 CAUTION
This indicates that minor or moderate injuries may
occur as a result of non-observance of this warning.
NOTICE: This indicates that damage to the appliance or
property may occur as a result of non-compliance with
this advisory.
Note: This alerts you to important information and/or
tips.

5
9 IMPORTANT SAFETY INSTRUCTIONS
READ AND SAVE THESE INSTRUCTIONS
IMPORTANT SAFET Y I NST RUCT I ONSRE AD AND SAVE THESE INSTRUCTIONS
Gas Appliance Safety
²
'RQRWVWRUHRUXVHJDVROLQHRURWKHUIODPPDEOH
YDSRUVDQGOLTXLGVLQWKHYLFLQLW\RIWKLVRUDQ\
RWKHUDSSOLDQFH
²
:+$772'2,)<2860(//*$6
'RQRWWU\WROLJKWDQ\DSSOLDQFH
'RQRWWRXFKDQ\HOHFWULFDOVZLWFK
'RQRWXVHDQ\SKRQHLQ\RXUEXLOGLQJ
,PPHGLDWHO\FDOO\RXUJDVVXSSOLHUIURPD
QHLJKERU·VSKRQH)ROORZWKHJDVVXSSOLHU·V
LQVWUXFWLRQV
,I\RXFDQQRWUHDFK\RXUJDVVXSSOLHUFDOO
WKHILUHGHSDUWPHQW
²
,QVWDOODWLRQDQGVHUYLFHPXVWEHSHUIRUPHG
E\DTXDOLILHGLQVWDOOHUVHUYLFHDJHQF\RUWKH
JDVVXSSOLHU
:$51,1*,IWKHLQIRUPDWLRQLQWKHVHLQVWUXFWLRQV
LVQRWIROORZHGH[DFWO\DILUHRUH[SORVLRQPD\
UHVXOWFDXVLQJSURSHUW\GDPDJHSHUVRQDOLQMXU\
RUGHDWK

9 IMPORTANT SAFETY INSTRUCTIONS
READ AND SAVE THESE INSTRUCTIONS
6
IMPORTANT: SAVE THESE INSTRUCTIONS FOR THE
LOCAL ELECTRICAL INSPECTOR’S USE.
INSTALLER: LEAVE THESE INSTRUCTIONS WITH THE
UNIT FOR THE OWNER.
OWNER: PLEASE RETAIN THESE INSTRUCTIONS FOR
FUTURE REFERENCE.
WARNING
When properly cared for, your new appliance has been
designed to be safe and reliable. Read all instructions
carefully before use. These precautions will reduce the
risk of burns, electric shock, fire and injury to persons.
When using kitchen appliances, basic safety precautions
must be followed including those in the following pages.
Fire Safety
Save these instructions.
Set the burner control so that the flame does not extend
beyond the bottom of the pan.
Do not allow aluminum foil, plastic, paper or cloth to
come in contact with a hot surface element, burner or
grate. Do not allow pans to boil dry.
If the cooktop is near a window, forced air vent or fan,
be certain that flammable materials such as window
coverings do not blow over or near the burners or
elements. They could catch on fire.
Always have a working smoke detector near the kitchen.
Never leave the cooktop unattended when in use.
Boilovers cause smoking and greasy spillovers may
ignite.
WARNING
TO REDUCE THE RISK OF A GREASE FIRE:
a.
Never leave surface units unattended at high settings.
Boilovers cause smoking and greasy spillovers that
may ignite. Heat oils slowly on low or medium settings.
b.
Always turn hood ON when cooking at high heat or
when flambéing food (i.e. Crêpes Suzette, Cherries
Jubilee, Peppercorn Beef Flambé).
c.
Clean ventilating fans frequently. Grease should not be
allowed to accumulate on fan or filter.
d.
Use proper pan size. Always use cookware
appropriate for the size of the surface element.
In the event that personal clothing or hair catches fire,
drop and roll immediately to extinguish flames.
Smother flames from food fires other than grease fires
with baking soda. Never use water on cooking fires.
Take care that drafts like those from fans or forced air
vents do not push the flames so that they extend beyond
the edges of the pan.
Have an appropriate fire extinguisher available, nearby,
highly visible and easily accessible near the appliance.
WARNING
TO REDUCE THE RISK OF INJURY TO PERSONS IN
THE EVENT OF A GREASE FIRE, OBSERVE THE
FOLLOWING:
a.
SMOTHER FLAMES with a close-fitting lid, cookie
sheet, or metal tray, then turn off the burner. BE
CAREFUL TO PREVENT BURNS. If the flames do not
go out immediately, EVACUATE AND CALL THE FIRE
DEPARTMENT.
b.
NEVER PICK UP A FLAMING PAN – You may be
burned.
c.
DO NOT USE WATER, including wet dishcloths or
towels – a violent steam explosion will result.
d.
Use an extinguisher ONLY if:
- You know you have a Class ABC extinguisher, and
you already know how to operate it.
- The fire is small and contained in the area where it
started.
- The fire department is being called.
- You can fight the fire with your back to an exit.
During a power failure, only the cooktop burners can be
lit manually.
Whenever possible, do not operate the ventilation system
during a cooktop fire. However, do not reach through fire
to turn it off.
Gas Safety
To prevent carbon monoxide build-up, do not block
appliance air vents.
Have the installer show you where the gas shut-off valve
is located.
For proper burner performance, keep igniters clean and
dry.
If a burner goes out and gas escapes, open windows
and doors. Wait until gas dissipates before using the
appliance.
WARNING
All igniters spark when any single burner is turned on for
SGS and SGSP models. One igniter sparks on SGSX and
SGSXP when burner is turned on. Do not touch any of
the burners when the cooktop is in use.
If you smell gas, your installer has not done a proper job
of checking for leaks. If the connections are not perfectly
tight, you can have a small leak and, therefore, a faint
smell. If you smell gas, immediately shut off the unit and
contact an authorized service technician to diagnose the
issue. See Warning, ~ "Gas Appliance Safety"
on page 5

7
9 IMPORTANT SAFETY INSTRUCTIONS
READ AND SAVE THESE INSTRUCTIONS
WARNING
To prevent flare-ups all grates must be properly
positioned on the cooktop whenever the cooktop is in
use. Each of the feet must be placed into the
corresponding dimples in the cooktop. Do not use a
grate if the rubber feet are missing or damaged.
Keep the igniter ports clean for proper lighting
performance of the burners. It is necessary to clean
these when there is a boilover or when the burner does
not light even though the electronic igniters click.
WARNING
To prevent flare-ups do not use the cooktop without all
burner caps and all burner grates properly positioned.
WARNING
Do not clean or touch any of the burners when an extra
low burner (if equipped) is in use. When the extra low
burner automatically reignites the ignitor at the burner will
spark.
WARNING
Use this appliance only for its intended use as described
in this manual. NEVER use this appliance as a space
heater to heat or warm the room. Doing so may result in
carbon monoxide poisoning and overheating the
appliance. Never use the appliance for storage.
Burn Prevention
DO NOT TOUCH SURFACE UNITS OR AREAS NEAR
UNITS - Surface units may be hot even though they are
dark in color. Areas near surface units may become hot
enough to cause burns. During and after use, do not
touch, or let clothing, potholders, or other flammable
materials contact surface units or areas near units until
they have had sufficient time to cool. Among these areas
are the cooktop and areas facing the cooktop.
Do not heat or warm unopened food containers. Build-up
of pressure may cause the container to burst and cause
injury.
Always turn hood ON when cooking at high heat or when
flambéing food (i.e. Crêpes Suzette, Cherries Jubilee,
Peppercorn Beef Flambe).
Use high heat settings on the cooktop only when
necessary. To avoid bubbling and splattering, heat oil
slowly on no more than a low-medium setting. Hot oil is
capable of causing extreme burns and injury.
Never move a pan of hot oil, especially a deep fat fryer.
Wait until it is cool.
Secure all loose garments, etc. before beginning. Tie
long hair so that it does not hang loose, and do not wear
loose fitting clothing or hanging garments, such as ties,
scarves, jewelry, or dangling sleeves.
Child Safety
When children become old enough to use the appliance,
it is the responsibility of the parents or legal guardians to
ensure that they are instructed in safe practices by
qualified persons.
Do not allow anyone to climb, stand, lean, sit, or hang on
any part of an appliance, especially a door, warming
drawer, or storage drawer. This can damage the
appliance, and the unit may tip over, potentially causing
severe injury.
Do not allow children to use this appliance unless closely
supervised by an adult. Children and pets should not be
left alone or unattended in the area where the appliance
is in use. They should never be allowed to play in its
vicinity, whether or not the appliance is in use.
CAUTION
Items of interest to children should not be stored in an
appliance, in cabinets above an appliance or on the
backsplash. Children climbing on an appliance to reach
items could be seriously injured.
Cleaning Safety
IMPORTANT SAFETY NOTICE: The California Safe
Drinking Water and Toxic Enforcement Act requires the
Governor of California to publish a list of substances
known to the state to cause cancer, birth defects or other
reproductive harm, and requires businesses to warn
customers of potential exposure to such substances. The
burning of gas cooking fuel and the elimination of soil
during self-cleaning can generate some by-products
which are on the list. To minimize exposure to these
substances, always operate this unit according to the
instructions contained in this booklet and provide good
ventilation.
WARNING
The burning of gas cooking fuel can create small
amounts of Carbon Monoxide, Benzene, Formaldehyde
and Soot. To minimize exposure to these substances the
burners should be adjusted by a certified installer or
agency to ensure proper combustion. Ensure proper
ventilation with an open window or use a ventilation fan
or hood when cooking with gas. Always operate the unit
according to the instructions in this manual.

9 IMPORTANT SAFETY INSTRUCTIONS
READ AND SAVE THESE INSTRUCTIONS
8
After a spill or boilover, turn off the burner and allow the
cooktop to cool. Clean around the burner and burner
ports. After cleaning, check for proper operation.
Do not clean the appliance while it is still hot. Some
cleaners produce noxious fumes when applied to a hot
surface. Wet clothes and sponges can cause burns from
steam.
Cookware Safety
Hold the handle of the pan when stirring or turning food.
This helps prevent spills and movement of the pan.
Use Proper Pan Size.
The use of undersized cookware will expose a portion of
the heating element or burner to direct contact and may
result in ignition of clothing. Select cookware having flat
bottoms large enough to cover the surface heating unit.
This appliance is equipped with one or more surface
units of different size. Proper relationship of cookware to
heating element or burner will also improve efficiency.
Always position handles of utensils inward so they do not
extend over adjacent work areas, burners, or the edge of
the cooktop. This reduces the risk of fires, spills and
burns.
Adjust burner flame size so that it does not extend
beyond the edge of the cookware. Proper relationship of
cookware to burner flame reduces safety risks.
Use only certain types of glass, heatproof glass, ceramic,
earthenware, or other glazed utensils that are suitable for
cooktop use.
Proper Installation and Maintenance
Have the installer show you the location of the circuit
breaker or fuse. Mark it for easy reference.
This appliance must be properly installed and grounded
by a qualified technician. Connect only to properly
grounded outlet. Refer to Installation Instructions for
details.
This appliance is intended for normal family household
use only. It is not approved for outdoor use. See the
Statement of Limited Product Warranty. If you have any
questions, contact the manufacturer.
Do not store or use corrosive chemicals, vapors,
flammables or nonfood products in or near this
appliance. It is specifically designed for use when
heating or cooking food. The use of corrosive chemicals
in heating or cleaning will damage the appliance and
could result in injury.
WARNING
Failure to operate knobs properly may result in personal
injury and damage to the appliance.
This appliance is not intended for operation with an
external time switch or external remote control.
Do not operate this appliance if it is not working properly,
or if it has been damaged. Contact an authorized
servicer.
Do not repair or replace any part of the appliance unless
specifically recommended in this manual. Refer all
servicing to a factory authorized service center.
To avoid electrical shock hazard, before servicing the
appliance, switch power off at the service panel and lock
the panel to prevent the power from being switched on
accidentally.
State of California Proposition 65
Warning:
WARNING
This product can expose you to chemicals including vinyl
chloride, which is known to the State of California to
cause cancer and birth defects or other reproductive
harm. For more information go to
www.P65Warnings.ca.gov.
Note: IMPORTANT SAFETY NOTICE: The California Safe
Drinking and Toxic Enforcement Act requires the
Governor of California to publish a list of substances
known to the state to cause cancer, birth defect or other
reproductive harm, and requires businesses to warn
customers of potential exposure to such substances. The
burning of gas cooking fuel and the elimination of soil
during self-cleaning can generate small amounts of
carbon monoxide. The fiberglass insulation in Self Clean
ovens gives off very small amounts of formaldehyde
during the first several cleaning cycles. California lists
formaldehyde as a potential cause of cancer. Carbon
monoxide is a potential cause of reproductive toxicity.
Exposure to these substances can be minimized by:
1.
Providing good ventilation when cooking with gas.
2.
Operating the unit according to the instructions in this
manual.

9
Getting Started
Before Using the Appliance for the First Time
▯ Remove all packing materials and literature from the
cooktop surface.
▯ Wipe with a clean, damp sponge and dry.
▯ There may be a slight odor during the first several
uses. This is normal and will disappear.
▯ Optimum cooking results depend on the proper
cookware being selected and used. See “Proper
Cookware”.
▯ Read all safety precautions and Use and Care Manual
information prior to operating.
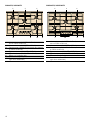
Parts and Accessories
SGS305TS, SGSX305TS
SGSP305TS, SGSXP305TS
1 Left front burner (8,000 BTU/2.34 kW ) XLO fea-
ture on SGSX model only
2 Left rear burner (10,000 BTU/2.93 kW)
3 Center burner (16,000 BTU/4.69 kW) XLO feature
on SGSX model only
4 Right rear burner (8,000 BTU/ 2.34 kW)
5 Right front burner (10,000 BTU/ 2.93 kW)
6 Burner “on” indicator light
7 Serial Number/Data Plate location
(right front underneath)
1 Left front burner (8,000 BTU/ 2.34 kW) XLO fea-
ture on SGSXP model only.
2 Left rear burner (10,000 BTU/ 2.93 kW)
3 Center burner (18,000 BTU/ 5.28 kW) XLO feature
on SGSXP model only.
4 Right rear burner (8,000 BTU/ 2.34 kW)
5 Right front burner (10,000 BTU/ 2.93 kW)
6 Burner “on” indicator lights - XLO has a light ring,
see XLO burner section for details.
7 Serial Number/Data Plate location
(right front underneath)

10
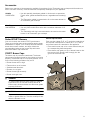
SGS365TS, SGSX365TS SGSP365TS, SGSXP365TS
1 Left front burner (9,100 BTU/ 2.67 kW) XLO fea-
ture on SGSX model only
2 Left rear burner (12,000 BTU/ 3.52 kW)
3 Center burner (16,000 BTU/ 4.69 kW) XLO feature
on SGSX model only
4 Right rear burner (9,100 BTU/ 2.67 kW)
5 Right front burner(12,000 BTU/ 3.52 kW)
6 Burner “on” indicator light
7 Serial Number/Data Plate location
(right front underneath)
1 Left front burner (9,100 BTU/ 2.67 kW) XLO fea-
ture on SGSX model only
2 Left rear burner (12,000 BTU/ 3.52kW)
3 Center burner (18,000 BTU/ 5.28 kW) XLO feature
on SGSX model only
4 Right rear burner (9,100 BTU/ 2.67 kW)
5 Right front burner (12,000 BTU/ 3.52 kW)
6 Burner “on” indicator light
7 Serial Number/Data Plate location
(right front underneath)

11
Accessories
Below is an overview of the accessories available for purchase for the Thermador gas cooktops and information on
how to use them correctly. These accessories are specially developed for your appliance.
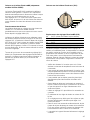
Sealed STAR™ Burners
Your new cooktop has sealed STAR™ gas burners.
There are no burner parts under stainless steel to clean,
disassemble or adjust. Your cooktop has three different
burner sizes: small, medium, and large. Match the
corresponding letters on the burner cap and burner
base. See Burner Cap Placement.
STAR™ Burner Caps
The burner cap is porcelain coated steel. The burner
caps must be properly placed for the cooktop to function
properly. If the burner cap is not properly placed, one or
more of the following problems may occur:
▯ Burner flames are too high.
▯ Flames shoot out of burners.
▯ Stainless steel discolors.
▯ Burners do not ignite.
▯ Burner flames light unevenly.
▯ Burner emits gas odor.
9 WARNING
To prevent flare-ups and avoid creation of harmful
by-products, do not use the cooktop without all
burner caps, all burner bases and all burner grates
properly positioned.
9 WARNING
To prevent burns, do not touch burner caps, burner
bases or grates while hot. Turn the cooktop off and
allow the burners to cool.
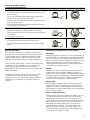
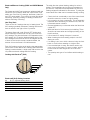
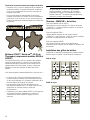
Burner Cap Placement
Each cap has a letter (B, D, or F) cast in the underside of
the cap that corresponds to a letter (B, D, or F) cast in
the burner base that is attached to the appliance.
▯ Place each burner cap on its correct burner base per
its corresponding letter designation.
▯ Place burner cap gently on top of burner base so that
the prongs of the burner base fit snugly into the
groove of the burner cap.
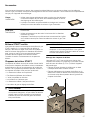
Griddle
SGRIDDLEW
▯ Use this specially developed griddle for foods such as pancakes,
French toast, grilled sandwiches, bacon, vegetables and hamburg-
ers.
▯ The Thermador griddle is customized to fit on the center burner for
all Thermador gas cooktops.
Wok Ring
SWOKRINGW
▯ For stir frying meat, vegetables and rice with a round-bottom wok.
▯ Use only with round-bottom woks with a maximum diameter of 16
inches.
▯ The Thermador wok ring is recommended to be used on the center
burner for all Thermador gas cooktops.
12
'
'

12
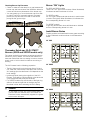
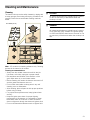
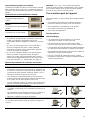
Checking Burner Cap Placement
▯ Check to make sure that there is no gap between the
burner cap and burner base. See illustration below for
correct and incorrect placements of the burner cap.
▯ You may gently try to move the burner cap from side
to side to check if it is properly placed. If properly
placed, the cap will click from side to side as the
prongs hit the groove ridge.
Thermador ExtraLow
®
(XLO) STAR™
Burners (SGSX and SGSXP models only)
The center and left front burners are enhanced with the
ExtraLow
®
(XLO
®
) feature. XLO allows the reduction of
heat even further than the Low setting in order to simmer,
poach, melt or hold cooked food without scorching or
burning.
The XLO feature has the following properties:
▯ The XLO feature will cycle the burner flame ON and
OFF when the control knob is set within one of the five
XLO settings (the time the flame is ON depends on the
knob setting).
▯ Igniters will spark during the re-ignition of the XLO
burners. There will be a slight clicking noise when this
occurs (approximately every 60 seconds).
▯ For SGSXP models only, the left side of the light ring
will turn off and the right side of the light ring will
illuminate in blue when activating the XLO setting.
9 WARNING
Do not clean or touch any of the burners when one
or both ExtraLow
®
burners are in use. When the
ExtraLow
®
burner automatically reignites, the igniter
at the burner will spark.
Burner “ON” Lights
For SGS and SGSX models:
There is an “ON” light on this cooktop. When illuminated,
it indicates at least one burner is in use.
For SGSP models:
An “ON” light corresponds with the knob for each burner
(a total of five lights). When illuminated, it indicates that
the corresponding burner is in use.
For SGSXP models:
A light ring around each knob will illuminate to indicate
that the corresponding burner is in use.
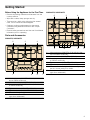
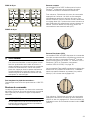
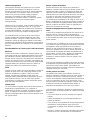
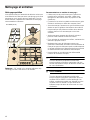
Install Burner Grates
Properly position and install each burner grate according
to each individual model as shown in the illustrations
below.
30” SGS
30” SGSP
36” SGSX

13
36” SGSXP
9 WARNING
To prevent flare-ups, properly support pots and
avoid spills, all grates must be properly positioned
on the cooktop whenever the cooktop is in use.
Each of the four feet must be placed into the
corresponding dimples in the cooktop. Do not use a
grate if the rubber feet are missing or damaged.
For replacement of rubber feet: Call Customer Support
at 1-800-735-4328.
Control Knobs
The cooktop has one control knob for each burner. Push
down and turn to the left to light and set the desired heat
setting.
9 WARNING
Failure to operate knobs properly may result in
personal injury and damage to the appliance.
Standard Knobs
SGS and SGSP models, which do not feature ExtraLow
®
operation, have only standard metal burner controls and
rubber grommets.
To operate: Select the appropriate control knob and push
down. A clicking noise will occur immediately after
pushing the knob. Turn knob counterclockwise to the HI
setting to ignite the flame. Continue turning knob
counterclockwise to desired flame size. Turn off by
turning the control knob clockwise to OFF.
ExtraLow
®
(XLO) Knobs
SGSX and SGSXP models have standard metal burner
controls and rubber grommets as well as two ExtraLow
®
burner controls on the left front and center.
~ "Thermador ExtraLow
®
(XLO) STAR™ Burners (SGSX
and SGSXP models only)" on page 12
The ExtraLow® burner controls have five XLO settings
that vary in heating level. A slight catch will be felt when
at the LO position and each designated XLO setting.
To operate: Select the appropriate control knob, push
down and turn counterclockwise until the control knob is
set within one of the five XLO settings. Turn off by turning
the control knob clockwise to OFF.
Control Knob Removal
To remove knob and/or grommet: With control knob in
the OFF position, gently lift knob up and off. Gently pull
the grommet from the sides and lift out.
9 WARNING
To avoid possible electric shock, do not reach
through control opening into rough-in box.
9 WARNING
Do not use the appliance without the knobs and
grommets in place.
To replace knob and/or grommet: Carefully insert the
grommet into the opening, ensuring that the maintop is
seated in the track around the entire perimeter of the
grommet. Replace control knob by placing indicator line
at the OFF position. Press down firmly.

14
Operation
About the Appliance
Use the cooktop for surface cooking applications such
as boiling, frying, simmering, steaming and sautéing.
9 WARNING
The burning of gas cooking fuel can create small
amounts of carbon monoxide, benzene,
formaldehyde and soot. To minimize exposure to
these substances, the burners should be adjusted
by a certified installer or authorized servicer to
ensure proper combustion. Ensure proper
ventilation with an open window or use a ventilation
fan or hood when cooking with Gas. Always operate
the unit according to the instructions in this manual.
Normal Operation - Electronic Ignition/Reignition
The cooktop uses electronic igniters to light the burners.
There is no pilot light. Each burner has its own igniter. If a
burner flame blows out during use, the burner will
automatically reignite.
9 CAUTION
To avoid possible injury or damage to the
appliance, ensure grates are installed exactly per
installation instructions and not backwards or
upside down.
The igniter should be clean and dry for proper operation.
▯ Avoid getting water or food on the igniter.
▯ If the igniter is wet or soiled, it may spark without
igniting the burner, or even spark continuously when a
flame is present.
Note: If the burner does not light within 4 seconds, turn
the burner off. Check to see that the burner cap is
positioned correctly on the burner base and the igniter is
clean and dry. If a burner still fails to ignite, see “Before
Calling for Service”.
When a flame is present and a Low setting is used, the
igniter may occasionally spark. This is normal.
9 CAUTION
To avoid possible injury or damage to the
appliance, ensure grates are installed exactly per
installation instructions and not backwards or
upside down.
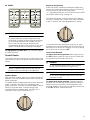
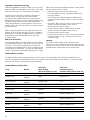
Typical Flame Characteristics
The burner flame should be blue in color and stable with
no yellow tips, excessive noise or fluttering. It should
burn completely around the burner cap.
Checking Flame Characteristics:
▯ If the flame is completely or mostly yellow, verify that
the regulator is set for the correct fuel. After
adjustment, retest.
▯ Some yellow streaking is normal during the initial start-
up. Allow unit to operate 4 to 5 minutes and re-
evaluate before making adjustments.
▯ Foreign particles in the gas line may cause an orange
flame during initial use. This should disappear with
use. Check burner to make sure port holes are not
obstructed. If the ports are clogged. ~ "Before
Calling for Service" on page 24
Note: An audible “pop” may be heard when the burner
is turned off manually. The “popping” may be louder with
LP gas than with natural gas. This is normal.
Getting the Most Out of Your Appliance
Here the following can be found:
▯ Selection of dishes and ideal setting (heating level and
burner) for them
▯ Suitable cooking accessories
▯ Tips about cookware
▯ Preparation methods
General Tips
Proper Cookware
▯ Aluminum or copper bottomed pans conduct heat
evenly.
▯ Steel pans, if not combined with other metals, may
cook unevenly.
▯ Cast-iron cookware absorbs heat slowly and cooks
more evenly at low-to-medium settings.
▯ Flat heavy bottom pans provide even heat and
stability.
▯ DO NOT USE pans that are thin, warped, dented or
ridged as they heat unevenly.
Yellow flames:
Further adjustment is required.
Yellow tips on outer cones:
Normal for LP Gas.
Soft blue flames:
Normal for Natural Gas.

15
Choosing Suitable Cookware
Specialty Cookware
Pans that span 2 burners, (i.e. griddles, roasters, fish
poachers, etc.) may be used when placed front to back.
For all models, use the Thermador accessory griddle
(Model SGRIDDLEW) on the center burner only. See
Parts and Accessories section for further information.
Use a wok with a flat bottom. Round bottom woks (with
a maximum 16 inch diameter) can be used with the
Thermador accessory support wok ring (Model
SWOKRINGW). See Parts and Accessories section for
further information.
Canners and pressure cookers must meet the same
requirements as described above. After bringing
contents to a boil, use lowest heat setting possible to
maintain a boil or pressure (for pressure canners or
cookers)
Cooking Recommendations for Your Cooktop
Beverages
Beverages should be heated to a boil on High heat, and
then simmered on a lower setting. If the beverage is held
on Low (or ExtraLow) to keep warm, stir approximately
every 10 minutes to prevent sticking or burning. You can
find the ideal settings for several beverages in the
Standard Burner and ExtraLow Cooking Tables. Use a
lower setting if the pan is covered.
Breads
Breads (i.e. French toast and grilled sandwiches) are
best cooked using a preheated skillet or griddle on
Medium heat. Once the pan is preheated, begin cooking
breads according to ideal settings in the Standard Burner
Cooking Table. From batch to batch, the heat setting
may need to be adjusted for optimal browning.
Deep Frying
Deep Frying is recommended on the large burner on
Medium High heat. The heat setting may need to be
adjusted to maintain oil temperature. You can find the
ideal settings for several deep fried foods in the Standard
Burner Cooking Table.
Sauces, Soups and Stocks
Sauces, Soups, and Stocks should be heated to a boil
on High heat and then simmered on a lower setting.
When heating cream sauces on your cooktop, use a
lower setting than tomato sauces to prevent scorching. If
sauce, soup or stock is held on Low (or ExtraLow) to
keep warm, stir approximately every 10 minutes to
prevent sticking or burning. You can find the ideal
settings for several sauces, soups and stocks in the
Standard Burner and ExtraLow Cooking Tables. Use a
lower setting if the pan is covered.
Cookware Recommendations
Pan Bottom Diameter
▯ The flame should be the same size as the bottom of the
pan or smaller.
▯ Do not use small pans with high flame settings as the
flames can lick up the sides of the pan.
▯ Oversize pans that span two burners are placed front to
back, not side to side.
▯ For best cooking results, large pans should not extend
over the sides of the grates.
Use Balanced Pans
▯ Balance is important for stability and even cooking.
▯ Pans must sit level on the cooktop grate without rocking
or wobbling.
▯ Center pan over burner.
Proper Fitting Lid
▯ A well-fitting lid helps shorten the cooking time.
▯ For best cooking results, always use a lid when boiling
water.

16
Vegetables, Side Dishes and Eggs
Steamed vegetables are easy to make on your cooktop.
Bring the water and vegetable to a boil with a lid on High
heat, then turn down to a lower setting until tender.
Cereals and rice should be cooked on the large or
medium burner on High heat, and then finished
according to the recipe instructions or until liquid is
absorbed. Cereals and rice can both be simmered using
ExtraLow. Pasta is best cooked on the large burner.
Using High heat with a lid, bring water to a boil. Once
pasta is added, the heat may need to be turned down to
prevent boil over.
When cooking scrambled or fried eggs melt butter on
Medium High, and then add eggs to cook to desirable
doneness. You can find the ideal settings for several of
these dishes in the Standard Burner and ExtraLow
Cooking Tables.
Meat, Fish and Poultry
In the Standard Burner and ExtraLow® Cooking Tables,
the ideal heating setting for any meat, fish or poultry can
be found. The cooking time depends on the amount,
composition and temperature of the food. Setting ranges
are indicated for this reason. Try using the lower values
at first or increase the temperatures throughout cooking.
Below are a few recommendations when cooking meat,
fish and poultry on the cooktop:
▯ Meats are best cooked on the large burner.
▯ It is recommended to use a preheated skillet when
pan frying meats.
▯ Cook bacon and sausage patties on Medium High
until meat starts to sizzle, and then turn heat down to
Medium.
▯ Simmering: Bring liquid to a boil on High, and then
simmer covered on Medium Low to Low (or
ExtraLow®) until meat is tender.
▯ Braising: Brown meat on Medium High, and then
simmer covered on Medium Low to Low (or
ExtraLow®) until meat is tender.
▯ Poaching: Bring liquid to a boil on High heat, and then
simmer covered on Low or ExtraLow until meat is
cooked through.
Desserts
Chocolate is best melted using ExtraLow® (see
ExtraLow® Cooking Table for appropriate setting). If the
cooktop does not have ExtraLow®, chocolate should be
melted using a double boiler on the small burner.
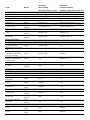
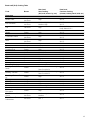
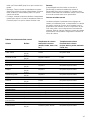
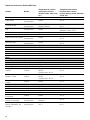
Standard Burner Cooking
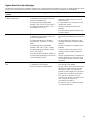
The table lists the optimal heating setting for various dishes. The temperature and cooking time depend on the
amount, composition and temperature of the food. Setting ranges are indicated for this reason. Try using the lower
values at first. During cooking heat may be increased.
Standard Burner Cooking Table
Food Burner
Heat Level
Start Cooking
(boil, melt, brown. fry, etc.)
Heat Level
Continue Cooking
(simmer, braise, poach, hold, etc.)
Beverages
Mulled Cider
Large
Medium
High Medium Low
Hot Chocolate
Large
Medium
Medium High Low
Tea Small High Low
Breads
French toast
Large
Medium
Medium Medium-Medium Low
Pancakes
Large
Medium
Medium Medium-Medium Low
Grilled Sandwiches
Large
Medium
Medium Medium-Medium Low
Cereals
Beans
Large
Medium
High Medium-Medium Low
Cornmeal/Polenta Medium High Medium-Medium Low
Grits Medium High Medium-Medium Low
Oatmeal Medium High Medium-Medium Low

17
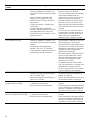
Deep Frying
French Fries Large Medium High Medium High
Donuts Large Medium High Medium High
Desserts
Pie Filling, Fruit Compote Small Medium Low Medium-Medium Low
Pudding Small Medium Low Medium-Medium Low
Poached Fruit
Large
Medium
High-Medium High Medium-Medium Low
Eggs
Fried
Large
Medium
Medium High Medium Low
Scrambled
Large
Medium
Medium High Medium Low-Low
Meat, Fish, Poultry
Bacon, Sausage Patties Large Medium High Medium-Medium Low
Braising: Swiss Steak, Pot
Roast, Stew Meat
Large Medium High Low
Shallow Frying: Chicken,
Fish
Large Medium Medium-Medium Low
Pan Frying: Lamb Chops,
Thin Steaks, Hamburg-
ers, Link Sausage
Large Medium High Medium
Simmering: Stewed
Chicken, Corned Beef,
Poaching Fish
Large High Medium Low
Pasta
All types
Large
Medium
High High
Rice
White Rice Medium High Low
Brown Rice Medium High Low
Sauces
Tomato Sauce: Marinara,
Bolognese
Large High Low
Cream Sauce: Alfredo,
Queso
Large Medium Low
Butter Sauce: Bearnaise,
Hollandaise
Medium
Small
Medium Low
Soups and Stocks
Cream Soup
Large
Medium
Medium Low
Broth Soup
Large
Medium
High Low
Stock: Beef, Chicken,
Vegetable
Large
Medium
High Low
Vegetables
Fresh
Medium
Small
High Medium
Frozen
Medium
Small
High Medium
Food Burner
Heat Level
Start Cooking
(boil, melt, brown. fry, etc.)
Heat Level
Continue Cooking
(simmer, braise, poach, hold, etc.)

18
ExtraLow® Burner Cooking (SGSX and SGSXP Models
Only)
The Center and Left Front burners are enhanced with the
ExtraLow® (XLO) feature. When the control knob is set
within one of the five XLO settings, the flame cycles ON
and OFF automatically. This cycling is normal and allows
simmering, poaching, melting or holding cooked food
without scorching or burning.
How They Work
There are five XLO settings that vary in heating level. The
XLO settings gradually decrease in heating level as the
knob is turned to the right of the LO position.
The burner flame will cycle ON and OFF during each
minute when the control knob is at any one of the five
XLO settings. The time the flame is ON depends on the
XLO setting. XLO 5 has the highest heating level of the
XLO settings so the flame is ON for the longest amount
of time. As the knob is turned counterclockwise, the
amount of time the flame is ON will decrease.
Each XLO setting can be set by turning the appropriate
control knob to the desired XLO setting (see ExtraLow®
Setting Locations below). A slight catch will be felt at the
LO position and each designated XLO setting.
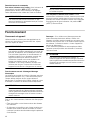
Cooking with ExtraLow
®
(XLO)
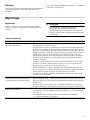
ExtraLow® (XLO) Setting Locations
The table lists the optimal heating setting for various
dishes. The temperature and cooking time depend on
the amount, composition and temperature of the food.
Setting ranges are indicated for this reason. Try using the
lower values first. Heat can be increased during cooking.
▯ Check the food occasionally to see if the control knob
should be turned to a lower or higher setting.
▯ It is normal to stir food occasionally. This is especially
important when simmering for several hours, such as
homemade sauce or beans.
▯ Simmer bubbles may not be seen when the flame has
cycled OFF.
▯ While the flame is ON, there may be bubbling. There
should be at least steam and a slight quivering of the
liquid’s surface.
▯ Use a lower XLO setting if the pan is covered.
▯ When lowering the flame setting, adjust it one XLO
setting at a time.
▯ If a setting is too low to hold a simmer, bring the food
back to a boil before resetting to a higher heat.
▯ If an oversized pan is used, the simmer action may
occur more in the center. For even cooking, stir the
food around the outer edges into the food in the
center.
▯ The quantity and type of food affects which setting to
use.
A XLO 5 (highest heating level)
B XLO 4
C XLO 3
D XLO 2
E XLO 1 (lowest heating level)
(
'
$
%
&

19
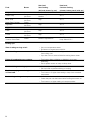
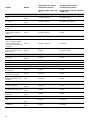
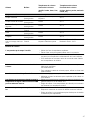
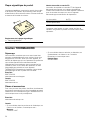
ExtraLow® (XLO) Cooking Table
Food Burner
Heat Level
Start Cooking
(boil, melt, brown. fry, etc.)
Heat Level
Continue Cooking
(simmer, braise, poach, hold, etc.)
Beverages
Mulled Cider
Center
Left Front
High XLO 4
Hot Chocolate
Center
Left Front
Medium High-Medium
Medium High
XLO 2
XLO 3
Tea Left Front High
Steep-XLO 2
Keep Warm-XLO 1
Cereals
Beans Center High XLO 2
Cornmeal/Polenta
Center
Left Front
High
XLO 2
XLO 3
Grits
Center
Left Front
High
XLO 2
XLO 3
Oatmeal Center High XLO 3
Desserts
Chocolate Left Front XLO 2 XLO 2
Poached Fruit Center High XLO 3
Butter Left Front Melt-XLO 2 XLO 2
Marshmallows Center Melt-XLO 1 XLO 1
Eggs
Poached Center High XLO 5
Scrambled Center XLO 5 XLO 5
Frittata Center Medium High-Medium XLO 5
Meat, Fish, Poultry
Braising: Beef, Pork,
Lamb
Center
Standard Cook-Medium High
Slow Cook-XLO 4
XLO 4
Braising: Chicken Center
Standard Cook-Medium High
Slow Cook-XLO 3
XLO 3
Poaching: Fish and Poul-
try
Center High XLO 3
Rice
White Rice Left Front High XLO 4
Brown Rice Left Front High XLO 3
Risotto Center Medium High-Medium XLO 5
Sauces
Tomato Sauce: Marinara,
Bolognese
Center High XLO 2
Cream Sauce: Alfredo,
Queso
Center
Left Front
Medium High-Medium
Medium
XLO 2
Butter Sauce: Bearnaise,
Hollandaise
Left Front XLO 1 XLO 1

20
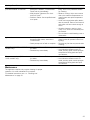
Cooking Tips
Soups and Stocks
Cream Soup
Center
Left Front
Medium High-Medium
Medium
XLO 1
Broth Soup
Center
Left Front
High XLO 1
Stock: Beef, Chicken,
Vegetable
Center
Left Front
High XLO 5
Vegetables
Fresh
Center
Left Front
High XLO 5
Frozen
Center
Left Front
High XLO 5
Casseroles: Macaroni &
Cheese, Green Bean
Center Medium High-Medium
Heat/Simmer-XLO 2
Keep Warm-XLO 1
Food Burner
Heat Level
Start Cooking
(boil, melt, brown. fry, etc.)
Heat Level
Continue Cooking
(simmer, braise, poach, hold, etc.)
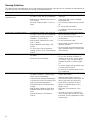
Water is taking too long to boil. ▯ Use room temperature water.
▯ Boil water on largest burner with lid.
Water is boiling over. ▯ Turn burner down to Medium High or Medium to prevent water
from boiling over.
▯ If pot has a lid on, remove lid before turning burner down.
Frying oil is splattering on to cooktop. ▯ Turn burner down to Medium or Medium Low to stop
splattering.
▯ Use a splatter screen to keep cooktop clean.
Food is sticking or burning to pan. ▯ Use lower heat setting or XLO.
▯ Stir food often to prevent sticking or burning.
Food is not staying warm during hold on Low
or ExtraLow®
▯ Use a lid to keep food warm on Low or XLO.
▯ Turn burner to a higher heat setting to keep food at desired
temperature.
Pan is taking too long to heat up. ▯ Use a burner that is a similar size to your pan.
▯ Center the pan over the burner before turning the burner on.
▯ Turn burner to a higher setting to heat pan quicker.
Page is loading ...
Page is loading ...
Page is loading ...
Page is loading ...
Page is loading ...
Page is loading ...
Page is loading ...
Page is loading ...
Page is loading ...
Page is loading ...
Page is loading ...
Page is loading ...
Page is loading ...
Page is loading ...
Page is loading ...
Page is loading ...
Page is loading ...
Page is loading ...
Page is loading ...
Page is loading ...
Page is loading ...
Page is loading ...
Page is loading ...
Page is loading ...
Page is loading ...
Page is loading ...
Page is loading ...
Page is loading ...
Page is loading ...
Page is loading ...
Page is loading ...
Page is loading ...
Page is loading ...
Page is loading ...
Page is loading ...
Page is loading ...
-
 1
1
-
 2
2
-
 3
3
-
 4
4
-
 5
5
-
 6
6
-
 7
7
-
 8
8
-
 9
9
-
 10
10
-
 11
11
-
 12
12
-
 13
13
-
 14
14
-
 15
15
-
 16
16
-
 17
17
-
 18
18
-
 19
19
-
 20
20
-
 21
21
-
 22
22
-
 23
23
-
 24
24
-
 25
25
-
 26
26
-
 27
27
-
 28
28
-
 29
29
-
 30
30
-
 31
31
-
 32
32
-
 33
33
-
 34
34
-
 35
35
-
 36
36
-
 37
37
-
 38
38
-
 39
39
-
 40
40
-
 41
41
-
 42
42
-
 43
43
-
 44
44
-
 45
45
-
 46
46
-
 47
47
-
 48
48
-
 49
49
-
 50
50
-
 51
51
-
 52
52
-
 53
53
-
 54
54
-
 55
55
-
 56
56


Ask a question and I''ll find the answer in the document
Finding information in a document is now easier with AI
in other languages
Related papers
-
Thermador SGS365FS/03 Owner's manual
-
-
-
-
-
-
Thermador SGSP365TS Installation guide
-
Thermador SGSP305TS Installation guide
-
Thermador GGNCV36 User manual
-
Other documents
-
Bosch HGS8645UC User manual
-
Gaggenau VG 425 211CA Owner's manual
-
Gaggenau VG 491 211CA Owner's manual
-
Gaggenau VG 415 211CA Owner's manual
-
Gaggenau VG 231 Owner's manual
-
Gaggenau VG 232 Owner's manual
-
Bosch NGM5456UC User manual
-
-
Gaggenau VG 295 Owner's manual
-