TAG MIL-BOOK 10 User manual
- Category
- Graphic tablets
- Type
- User manual
This manual is also suitable for

OPERATOR’ S MANUAL
MIL-BOOK 10 SERIES NOTEBOOK
22355 TAG Way, Dulles, VA 20166
Tel: (703) 406.3000 Fax: (703) 607.3853

TRADEMARKS
All brand and product names are trademarks or registered trademarks of their
respective companies.
NOTE
Information in this manual is subject to change without notice.

1
CHAPTER
Getting Started
Congratulations on purchasing this Tablet PC.
This hand-held computer, having no fan and being almost noiseless, is
especially designed for the practical applications of warehouses,
automobiles, vehicles, public security, repairing, assisting the
handicapped, and other demanding situations where conventional
notebook computers just cannot measure up.
This chapter first tells you step by step how to get the computer up and
running. You will find instructions for these procedures:
Unpacking
Connecting to AC power
Turning on the computer
Turning off the computer
Then, you will find a section briefly introducing the external components
of the computer. And the last section navigates you to the information
you may need after the computer is ready for use.

Getting the Computer Running
This section guides you through the procedures for getting the computer
ready for operation.
Unpacking
After unpacking the shipping carton, you should find these standard
items:
Tablet PC
Accessories:
− AC adapter (100~240 VAC, 50~60 Hz)
− AC power cord (US, CE, UK, SA)
− Driver CD
− X-Bay (optional):
Module-1: two serial I/O / RJ-45 / IEEE 1394
Module-2: wireless LAN (802.11B)
Module-3: wireless modem (CDPD)
− Expansion box (optional)
Port Replicator module: includes COM1/4, PIO1, CRT, two
USB ports (connects behind USB hub, FDD bootable), PS/2
keyboard and mouse, MIC input, earphone out, CD-ROM and
AC adapter input
CD-ROM module: 24X TEAC CD-224E or better
DVD-ROM module: 8X Pioneer K-11T or better
USB FDD module: 1.44 MB double-sided high density
− Wireless keyboard (optional)
− Car adapter/charger (10.7~32 VDC) − (optional)
− Secondary battery (optional)
− Battery charger for secondary battery (optional)
− Carrying bag (optional)
− CCD camera module (optional)
− This Operation Manual
Inspect all the items. If any item is damaged or missing, notify your
dealer immediately.
1-2 Getting Started

Keep the shipping carton and packing materials in case you need to ship
or store the computer in the future.
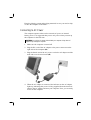
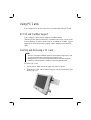
Connecting to AC Power
The computer operates either on the external AC power or internal
battery power. It is suggested that you use AC power when you start up
the computer for the first time.
CAUTION: Use only the AC adapter included with your computer. Using other AC
adapters may damage the computer.
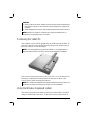
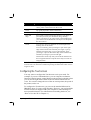
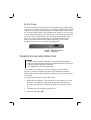
1. Make sure the computer is turned off.
2. Plug the DC cord of the AC adapter to the power connector on the
right side of the computer (
).
3. Plug the female end of the AC power cord to the AC adapter and the
male end to an electrical outlet (
).
4. When the AC adapter is connected, the indicator on the AC adapter
lights up, indicating that power is being supplied from the electrical
outlet to the AC adapter and onto your computer. Now, you are ready
to turn on the computer.
Getting Started 1-3

CAUTION:
When you disconnect the AC adapter, disconnect from the electrical outlet first and
then from the computer. A reverse procedure may damage the AC adapter or the
computer.
When unplugging the connector, always hold the plug head. Never pull on the cord.
NOTE: When the AC adapter is connected, it also charges the battery pack. For
information on using battery power, see Chapter 3.
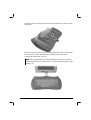
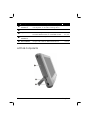
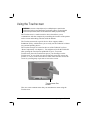
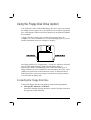
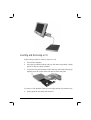
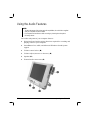
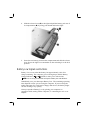
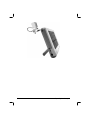
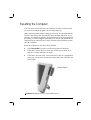
Positioning the Tablet PC
The computer can be placed upright using its stand found at the back. To
place the computer in an upright position, pull open the stand located at
the back as shown on the next figure.
NOTE: It is recommended that you operate the Tablet PC in an upright position as
opposed to letting it lie flat on its back in order to provide adequate air ventilation.
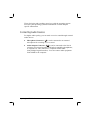
The wireless keyboard operates on four “size-AA” (1.5-volt) batteries on
the battery compartment located at the back. Be sure to observe the
correct polarity when inserting the batteries.
NOTE: The condition of the batteries also affects the effectiveness of transmission. If a
weakness in transmission is detected, try changing a set of new batteries.
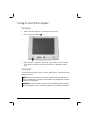
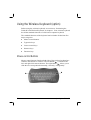
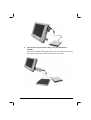
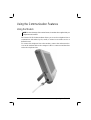
Using the Wireless Keyboard (option)
The wireless keyboard can either be placed flat on the table or inclined
using its stand found at the back. To place the wireless keyboard in an
1-4 Getting Started

upright position, pull open the stand located at the back as shown on the
next figure.
Place the wireless keyboard in front of the Tablet PC with no obstructions
between them to allow unhampered communication between the
computer and keyboard’s IR port.
NOTE: It is recommended that the transmission distance must not exceed 3 meters
and that vertical transmission angle is within ± 15
0
while horizontal transmission angle
is within ± 30
0
.
Getting Started 1-5

Turning On and Off the Computer
Turning On
1. Make sure the computer is connected to AC power.
2. Press the power button
.
3. Each time the computer is turned on, it performs a Power-On Self
Test (POST), and the operating system such as Windows should
start.
Turning Off
To turn off the computer power, use the “Shut Down” command of your
operating system.
NOTE: There are other ways you can stop the computer so that you will be back to
where you left off when you next turn on the computer. (See “Stopping the Computer”
in Chapter 2 for information.)
CAUTION: If you have to turn the computer on again immediately after turning it off,
wait for at least five seconds. Turning the computer off and on rapidly can damage it.
1-6 Getting Started

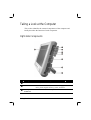
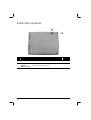
Taking a Look at the Computer
This section identifies the external components of the computer and
briefly describes the function of each component.
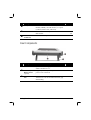
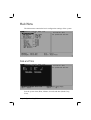
Right-Side Components
Ref Component Description See Also
Reset Button
Allows you to reset the system. P. 8-16
USB Port
Connects a USB device, such as a USB floppy
drive, printer, digital camera, joystick, and more.
P. 4-7
Microphone
Connector
Connects an external microphone. P. 2-20
Getting Started 1-7

Ref Component Description See Also
Audio Output
Connector
Connects a set of headphones, external speakers
with amplifier, or an audio recording device.
P. 2-20
Serial Port
Connects a serial device, such as a mouse. P. 4-6
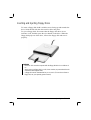
Expansion Port
For connecting to: Port Replicator,
CD/DVD-ROM module, or USB FDD module.
P. 2-14,
4-2, 4-4
Power
Connector
Connects the AC adapter. P. 1-3
PC Card Slot
Accepts a PC Card for additional functions. P. 4-10
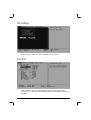
Left-Side Components
1-8 Getting Started

Ref Component Description See Also
X-Bay Interface
Connects additional wireless LAN, wireless
modem (CDPD), external monitor, or 4 ports
(COM1/4, IEEE 1394, and LAN).
P. 4-2
IR Port
Connects an IrDA-compliant device for wireless
data transfer.
P. 1-5,
4-8
RJ-11
Connector
Connects the telephone line. P. 2-21
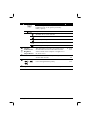
Rear Components
Ref Component Description See Also
Stand
System’s vertical angle of inclination after the
stand is released 18 ± 3
o
.
P. 1-4
Secondary
Battery Pack
(option)
Supplies power to your computer when external
power is not connected.
P. 3-3
Touchscreen
Pen
Provides a convenient way to use the
Touchscreen. Can be stretched for better grip
and handling.
P. 2-9
Getting Started 1-9

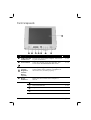
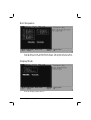
Front Components
Ref Component Description See Also
LCD Panel and
Touchscreen
Displays the output of the computer. Also serves
as your Touchscreen.
P. 2-9
Power Button
Turns the computer power ON and OFF. Also
serves as the SUSPEND/RESUME switch.
P. 1-6
Volume
Control/
Brightness
Control/
Battery
Capacity
Allows you to toggle between adjusting the
sound volume of the computer or brightness of
the LCD screen, or battery capacity.
P. 2-19
Device
Indicators
Shows the current status of the computer’s
devices.
Power ON indicator
Num Lock Indicator P. 2-5
Caps Lock Indicator P. 2-5
Scroll Lock Indicator P. 2-5
1-10 Getting Started

Ref Component Description See Also
Shows the speaker volume, or the LCD
brightness level, or the primary/secondary
battery capacity
Suspend mode indicator (in reverse video)
Hard disk drive in-use indicator
Primary battery status indicator
Secondary battery status indicator
Volume adjust indicator
LCD brightness adjust indicator
Speaker
Volume/LCD
Brightness
Adjust Button
The upper button provides you a quick way to
increase while the lower button decreases the
sound volume of the computer or brightness of
the LCD screen.
P. 2-16,
2-19
IR Port
Connects with a wireless keyboard (option) for
wireless data transfer.
P. 1-5,
4-8
Function Keys
1
, 2 ,
3
Each of the three buttons can be defined from F1
to F12 through the Setup utility.
P. 2-7,
5-15
Speaker
Sends out sound and voice from the computer. P. 2-19
Getting Started 1-11

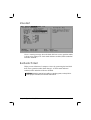
Bottom-Side Components
Ref Component Description See Also
CCD USB Port
Connects a standard USB CCD PC camera. P. 4-7
Internal
Primary
Battery Switch
Allows you to turn on/off power coming from
the internal primary battery.
1-12 Getting Started

Getting Started 1-13
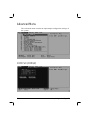
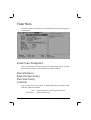
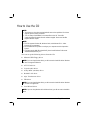
Where to Go from Here
As your computer is ready for operation, you may want to do any of the
following now:
For this purpose… Do this…
To know more about the computer… Go on to the next chapter.
To install the operating system if your
dealer has not already done so…
See the operating system manual.
To know more about the operating
system…
Read the operating system manual.
To install the drivers if your dealer has
not already done so…
See Chapter 6.
To set a power-on password… See “Security Menu” in Chapter 5.
To charge the battery pack for the first
time…
See “Charging the Battery Pack” in
Chapter 3.

2
CHAPTER
Operating Your Tablet PC
This chapter provides information about the use of the computer.
If you are new to computers, reading this chapter will help you learn the
operating basics. If you are already a computer user but are new to Tablet
PCs, you may choose to read only the parts containing information
unique to your computer.
Described in this chapter are the operating basics of these components:
Wireless Keyboard
Touchscreen
Floppy disk drive
Hard disk drive
CD/DVD drive
And these features:
Starting and stopping the computer
Function keys
Video features
Audio features
Communication features

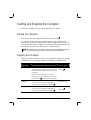
Starting and Stopping the Computer
There are a number of ways to start and stop the computer.
Starting the Computer
You always start the computer using the power button .
A computer starts up with an operating system (OS) existing on the
storage device such as the hard disk; or from a floppy disk or CD if you
have the docking station installed. The computer will automatically load
the OS after you turn it on. This process is called booting.
NOTE: An operating system is the platform for all your software application programs to
run on. The most widely used operating system today is Microsoft Windows.
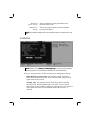
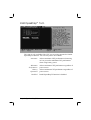
Stopping the Computer
When you finish a working session, you can stop the computer by turning
off the power or leaving the computer in Standby or Suspend mode:
To stop in
this mode…
Do this… To start up or
resume again
Off Follow the shutdown procedure of your
operating system. This can prevent loss of
unsaved data or damage to your software
programs.
If the system is locked up because of
hardware or software problems, press the
power button
to turn off the computer.
Press the power
button
.
Standby
Depending on your settings in Windows,
you can put the computer in Standby
mode by pressing the power button
Press any key.
Suspend
Depending on your settings in Windows,
you can put the computer in Suspend
mode by pressing the power button
Press the power
button .
2-2 Operating Your Tablet PC

If you choose to stop in Standby or Suspend mode, you can return to
where you left off the next time you start up the computer. (See “Power
Management” in Chapter 3 for more information.)
Operating Your Tablet PC 2-3

Using the Wireless Keyboard (option)
Before using the wireless keyboard, see section on “Positioning the
Tablet PC and Wireless Keyboard” on chapter 1. Your wireless keyboard
has all the standard functions of a full-sized computer keyboard.
The standard functions of the keyboard can be further divided into five
major categories:
Mouse-control buttons
Typewriter keys
Cursor-control keys
Numeric keys
Function keys
Mouse-control Buttons
Mouse-control buttons found on both sides of the wireless keyboard are
similar to the buttons on a mouse. The left button (
)
is similar to the
left- and right-click mouse function. The right button (
)
allows you to
slide the on-screen pointer horizontally, vertically, or diagonally.
2-4 Operating Your Tablet PC

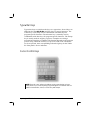
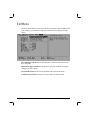
Typewriter Keys
Typewriter keys are similar to the keys on a typewriter. Several keys are
added such as the
Ctrl, Alt, Esc, and lock keys for special purposes. The
Control key is normally used in combination with other keys for
program-specific functions. The Alternate key is normally used in
combination with other keys for program-specific functions. The Escape
key is usually used for stopping a process. Examples are exiting a
program and canceling a command. The function depends on the program
you are using. When the lock keys (Caps Lock, Num Lock, and Scroll
Lock) are pressed, their corresponding indicators light up on the Tablet
PC front panel’s device indicators.
Cursor-Control Keys
NOTE: The word “cursor” refers to the indicator on the screen that lets you know
exactly where on your screen anything you type will appear. It can take the form of a
vertical or horizontal line, a block, or one of many other shapes.
Operating Your Tablet PC 2-5
Page is loading ...
Page is loading ...
Page is loading ...
Page is loading ...
Page is loading ...
Page is loading ...
Page is loading ...
Page is loading ...
Page is loading ...
Page is loading ...
Page is loading ...
Page is loading ...
Page is loading ...
Page is loading ...
Page is loading ...
Page is loading ...
Page is loading ...
Page is loading ...
Page is loading ...
Page is loading ...
Page is loading ...
Page is loading ...
Page is loading ...
Page is loading ...
Page is loading ...
Page is loading ...
Page is loading ...
Page is loading ...
Page is loading ...
Page is loading ...
Page is loading ...
Page is loading ...
Page is loading ...
Page is loading ...
Page is loading ...
Page is loading ...
Page is loading ...
Page is loading ...
Page is loading ...
Page is loading ...
Page is loading ...
Page is loading ...
Page is loading ...
Page is loading ...
Page is loading ...
Page is loading ...
Page is loading ...
Page is loading ...
Page is loading ...
Page is loading ...
Page is loading ...
Page is loading ...
Page is loading ...
Page is loading ...
Page is loading ...
Page is loading ...
Page is loading ...
Page is loading ...
Page is loading ...
Page is loading ...
Page is loading ...
Page is loading ...
Page is loading ...
Page is loading ...
Page is loading ...
Page is loading ...
Page is loading ...
Page is loading ...
Page is loading ...
Page is loading ...
Page is loading ...
Page is loading ...
Page is loading ...
Page is loading ...
Page is loading ...
Page is loading ...
Page is loading ...
Page is loading ...
Page is loading ...
Page is loading ...
Page is loading ...
Page is loading ...
Page is loading ...
Page is loading ...
Page is loading ...
-
 1
1
-
 2
2
-
 3
3
-
 4
4
-
 5
5
-
 6
6
-
 7
7
-
 8
8
-
 9
9
-
 10
10
-
 11
11
-
 12
12
-
 13
13
-
 14
14
-
 15
15
-
 16
16
-
 17
17
-
 18
18
-
 19
19
-
 20
20
-
 21
21
-
 22
22
-
 23
23
-
 24
24
-
 25
25
-
 26
26
-
 27
27
-
 28
28
-
 29
29
-
 30
30
-
 31
31
-
 32
32
-
 33
33
-
 34
34
-
 35
35
-
 36
36
-
 37
37
-
 38
38
-
 39
39
-
 40
40
-
 41
41
-
 42
42
-
 43
43
-
 44
44
-
 45
45
-
 46
46
-
 47
47
-
 48
48
-
 49
49
-
 50
50
-
 51
51
-
 52
52
-
 53
53
-
 54
54
-
 55
55
-
 56
56
-
 57
57
-
 58
58
-
 59
59
-
 60
60
-
 61
61
-
 62
62
-
 63
63
-
 64
64
-
 65
65
-
 66
66
-
 67
67
-
 68
68
-
 69
69
-
 70
70
-
 71
71
-
 72
72
-
 73
73
-
 74
74
-
 75
75
-
 76
76
-
 77
77
-
 78
78
-
 79
79
-
 80
80
-
 81
81
-
 82
82
-
 83
83
-
 84
84
-
 85
85
-
 86
86
-
 87
87
-
 88
88
-
 89
89
-
 90
90
-
 91
91
-
 92
92
-
 93
93
-
 94
94
-
 95
95
-
 96
96
-
 97
97
-
 98
98
-
 99
99
-
 100
100
-
 101
101
-
 102
102
-
 103
103
-
 104
104
-
 105
105


TAG MIL-BOOK 10 User manual
- Category
- Graphic tablets
- Type
- User manual
- This manual is also suitable for
Ask a question and I''ll find the answer in the document
Finding information in a document is now easier with AI
Related papers
Other documents
-
AirLive CAR-100USB Datasheet
-
Xtreme XCC8-1018-BLK User guide
-
Getac M230(791901160XXX) User manual
-
Motorola L3391 User manual
-
Fujitsu LIFEBOOK T900 User manual
-
RM C-Series User manual
-
HP Compaq tc1100 Tablet PC Quick start guide
-
-
-