American Hearth DFEV60LSS Frame for Exterior Wall Installation (Outdoor Kit) for VFLB60SP Owner's manual

Category
Fireplaces
Type
Owner's manual
EXTERIOR
DECORATIVE FRONT
DFEV60LSS-1
FOR USE ON VFLB60SP90(N,P)-1
INSTALLER:
Leave this manual with the appliance.
CONSUMER:
Retain this manual for future reference.
INSTALLATION INSTRUCTIONS
Page 2 40245-0-0219
CARTON CONTENTS
Items not shown to scale.
INDEX NUMBER DESCRIPTION QUANTITY SUPPLIED REPLACEMENT PART NUMBERS
1 Inner Glass and Frame 1 40313
2 Top Mount Bracket 1 40266
3 Side Mount Bracket 2 40265
4 Bottom Mount Bracket 1 40267
5 Screen Assembly 1 40314
6 Outer Glass and Frame 1 40315
N/S Outer Glass 1 R12431
N/S Silicone Gasket 21 ft R12433
For hardware pack contents, see page 3.
1
2
3
6
3
4
5
40245-0-0219 Page 3
HARDWARE PACK CONTENTS
#10X½ HEX HEAD SCREW
#10X1 HEX HEAD SCREW
#10 X ½" HEX HEAD SCREW
#10 X 1" HEX HEAD SCREW
#10X½ HEX HEAD SCREW
#10X1 HEX HEAD SCREW
DESCRIPTION QUANTITY SUPPLIED
10 X 1/2 Phillips
Hex Head Screw
24
10 X 1 Phillips
Hex Head Screw
4
HARDWARE PACK
Page 4 40245-0-0219
INTRODUCTION
INSTRUCTIONS TO INSTALLER
1. Leave instruction manual with owner after installation.
2. HaveownerregisteronlineorlloutandmailProduct
RegistrationCardsuppliedwithunventedreplace.
3.
This decorative front is for installation on an exterior wall only.
Consult the local Building Department regarding regulations,
codes or ordinances which apply to the installation of an
unventedreplacewithexteriordecorativefront.
The installation must conform with local codes or, in the absence
of local codes, with the National Fuel Gas Code, ANSI Z223.1.*/
NFPA 54.
*Available from the American National Standards Institute, Inc.
1430 Broadway, New York, N.Y. 10018.
BEFORE BEGINNING
This stainless steel exterior decorative front is designed to be
installedonanexteriorwallofyourresidence.Thereplace
amewillbevisibleonaporchorareaoutsideoftheresidence.
The other side will be inside the residence. Glass panels will
closeofftheexteriorsideofthereplaceandwillactlikean
exteriorwindow.Theheatfromthereplacewillbeprojected
into the residence.
This kit includes an inner glass panel and frame that replaces
thescreenframeassemblyincludedwithreplace.Itinstallsto
thereplacerst.Theouterglassframeattachestothereplace
next, inside the exterior decorative front.
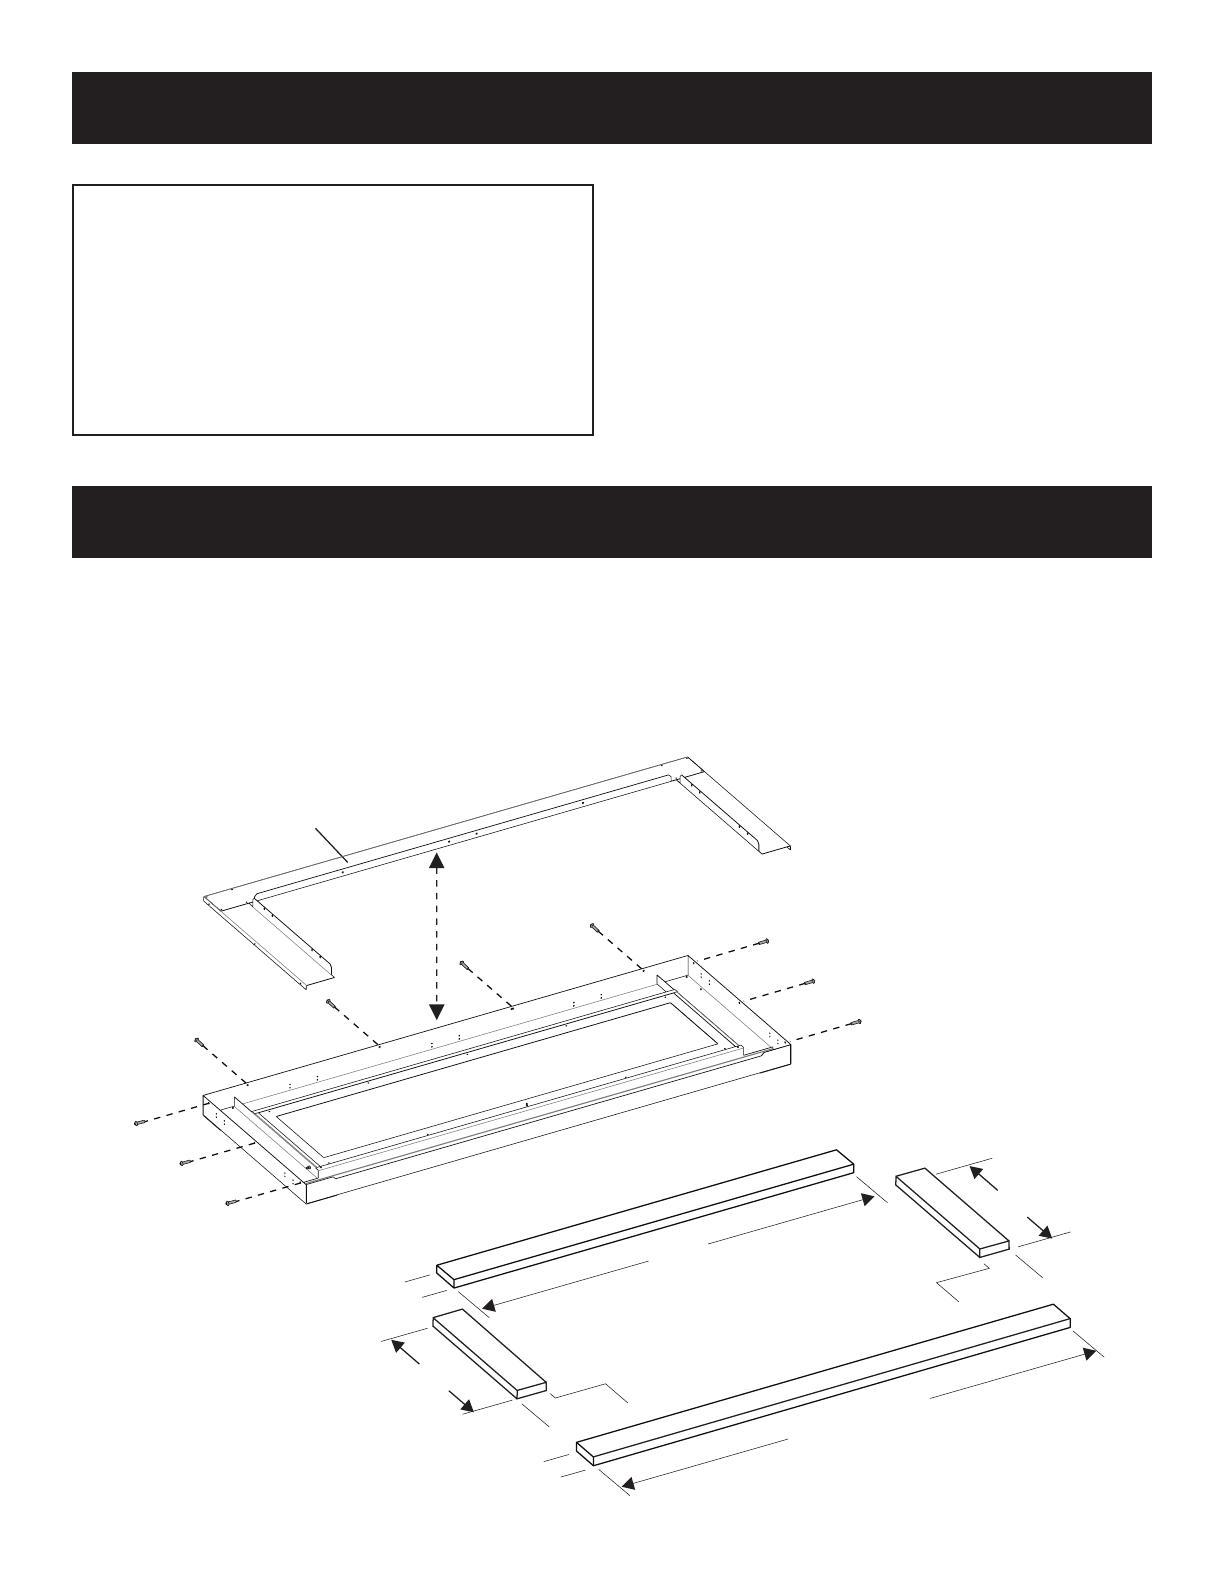
OPTIONAL ADDITION OF R-13 INSULATION
NOTICE: Insulation is not required, but can help reduce your
heating and cooling bills.
• Remove the decorative front from its packaging and place
exterior face down on scratch-free surface to protect the
stainless steel.
• Remove black pan-head screws on outer glass-frame top
and sides.
• Liftthemetalllerandplacetotheside.
• CutstripsofR-13insulationtotchambersinsidet
he
decorative front. (See illustration). Remove the combustible
backing from the insulation and place insulation into channels.
• Replacemetalllerandattachwithscrewsremovedearlier.
4 5/8”
22 3/8”
64”
73 1/2”
4 1/2”
22 3/8”
4 3/4”
4 3/4”
METAL FILLER
R13 INSULATION
(4) PIECES
OPTIONAL - ADDING R-13 INSULATION
40245-0-0219 Page 5
FIREPLACE PREPARATION
NOTICE: The exterior decorative front must be attached to the
replacebeforetheunithasbeeninstalledintotheframing.
PREPARING THE FIREPLACE
The exterior decorative front slides onto the top and sides of the
linearreplace.
1. Determinewherethereplacewillbeinstalledandwhich
side is to be the exterior side (side toward the outside of
the residence). Valve controls will be on the side of the
unit facing the inside living space. The opposite side of the
replaceisthepreferredsidefortheExternalDecorative
Front. See Figure 1fororientationofreplacewithpre-
ferred side of External Decorative Front.
PREFERRED SIDE
OF OUTDOOR
INSTALLATION KIT
SIDE OF
FIREPLACE
JUNCTION BOX
LOCATED ON
THIS SIDE
Figure 1
2. Uncratethereplaceusingtheinstructionsprovided.
3. Locate top mount bracket shown in Figure 2 and attach with
four provided #10 x ½ inch screws as shown.
NOTE:Thisbracketmountsusingtheholesunderthetopange
of the unit.
TOP MOUNTING BRACKET
Figure 2
4. Locate bottom mount bracket shown in Figure 3 and attach
with four provided #10 x 1/2 inch screws as shown.
BOTTOM MOUNTING
BRACKET
Figure 3
5. Locate side mount brackets shown in Figure 4 and attach
with four provided #10 x 1/2 inch screws as shown.
SIDE MOUNTING BRACKET
Figure 4
Page 6 40245-0-0219
FIREPLACE PREPARATION (CONT'D)
CAUTION
Do not put pressure on glass inside the frame. Glass is
loose until secured after the installation.
6. Locate the inner glass-frame. With the bottom of the inner
glass-frameangledouttowardstheinstaller,hooktheange
of the inner glass-frame onto the top mount bracket. Center
the inner glass-frame, and bring the bottom of inner glass-
framedowntothereplace.Thebottomoftheframewill
slide over the side brackets.
NOTE: Suggest 2-person install.
U:\INSTRUCTIONS\Instructions Original Graphics\VFLB Outdoor Kit\EPS\Outdoor Glass Frame Assembly - 020719
1st
2nd
Figure 5
7.
Examinegasketalongthesideofthereplacetoverifythe
seal is against the side mount brackets. See Figure 6.
Figure 6
8.
Using four provided #10 x 1 inch screws, attach the bottom of
theinnerglass-frametothereplaceasshowninFigure 7.
Figure 7
9. Remove the plastic covering the stainless on the exterior
decorative front.
10. Slide the outer glass and frame over the top and sides of the
replace.See Figure 8.
NOTE: Suggest 2-person install.
Figure 8
40245-0-0219 Page 7
FIREPLACE PREPARATION (CONT'D)
11. Securetheouterglassandframetothetopofthereplace
using four provided #10 x ½ inch screws. See Figure 9.
Figure 9
12.
Securetheouterglassandframetothesidesofthereplace
using four provided #10 x ½ inch screws. See Figure 10.
Figure 10
13. Repeat for other side.
14. When installed on an exterior wall, the following supplied
component is not required:
• OneScreenFrameAssembly
This assembly can be discarded. The screen frame
assemblyisrequiredonthesideofthereplaceinsidethe
residence.
Page 8 40245-0-0219
FINISHING EXTERIOR DECORATIVE FRONT
NOTICE: The replacemustbeprotectedduringnishing.Donot
allowacidwashtogetontothereplace.
1. The stainless may be covered in full or in part by a
non-combustiblestone,tileorothernishingmaterial.Itis
recommended that the outer perimeter face of the outdoor
kitbecoveredwithnon-combustiblenishingmaterial.
See Figure 11.
OUTSIDE
INSIDE
Figure 11
2. Sheathing and framing may be placed to the stainless top,
bottom and side surfaces. The back side of the outdoor kit
andthetopsurfaceofthereplacearenon-combustible
zones. See Figure 12.
Figure 12
3a. Figure 13 shows minimum recommended coverage over the
face of the outdoor kit. This covers rivets exposed on the
outsideofthereplace.Thenon-combustiblefacingmaybe
placed to the opening. See Figure 13.
5/8”
Figure 13
3b. Exteriornon-combustiblenishingmaterialisplacedoverthe
face of the outdoor kit. See Figure 14.
EXTERIOR
NON-COMBUSTIBLE
FINISHING
MATERIAL
RESIDENCE
WALL BOARD
Figure 14
4. Insert the screen assembly into the top of the outer glass
frame. Bring the bottom of the screen assembly against the
face. Lower the screen assembly to catch the shoulder
screw on the side of the glass. See Figure 15.
1st
2nd
Figure 15
40245-0-0219 Page 9
MAINTENANCE - GLASS CLEANING
GLASS CLEANING
Clean the glass before use and as needed. During start-up
condensation (which is normal) forms on the inside of the glass
and causes lint, dust and other airborne particles to cling to the
glasssurface.Alsoinitialpaintcuringmaydepositaslightlm
on the glass. Use a non-abrasive household cleaner and warm
water(werecommendgasreplaceglasscleaner).
CAUTION
Do not use Ammonia-based or abrasive cleaners on glass.
To prevent ectching or discoloring, clean the glass with
Fireplace Glass Cleaner (available from the dealer).
Do not attempt to clean glass when glass is hot.
WARNING
• Avoidbreakingtheglass.
• Donotoperatethisappliancewithouttheglasspanel
andbarrierscreen,orwithabrokenglasspanel.
• Replace only with Empire Comfort Systems parts.
Only glass approved for use by the manufacturer may be used
for replacement. The glass replacement should be done by a
licensedorqualiedserviceperson.
WARNING
1. The use of substitute glass will void all product warranties.
2.
Caremustbetakentoavoidbreakageoftheglass.
3.
Undernocircumstancesshouldthisreplacebe
operatedwithouttheglassfrontorwithabroken
glassfront.Replacementoftheglass(withgasket)
as supplied by the manufacturer should be done by a
qualiedserviceperson.
4.
Donotabusetheglassbystrikingorhittingit.
WARNING
Handletheglasswithcaretoavoidbreakingit.Neverstrike
the glass. To prevent etching or discoloring, clean the glass
with Fireplace Glass Cleaner (available from your dealer).
Never use cleaners that contain ammonia or abrasives. Never
clean the glass while it is hot or even warm. Touching hot
glass can cause severe burns. Using liquids or aerosols on
hotglasswillcauseittoshatter.Neveroperatethereplace
withtheglassremovedorcracked.Haveyourdealerreplace
damaged glass only with glass and gasket material from
Empire Comfort Systems. Using substitute glass will void
the warranty.
Page 10 40245-0-0219
This page intentionally left blank.
40245-0-0219 Page 11
This page intentionally left blank.
37831-0-0517
www.empirecomfort.com
Empire Comfort Systems Inc.
Belleville, IL
If you have a general question
about our products, please e-mail
If you have a service or repair
question, please contact your dealer.
  • Page 1 1
  • Page 2 2
  • Page 3 3
  • Page 4 4
  • Page 5 5
  • Page 6 6
  • Page 7 7
  • Page 8 8
  • Page 9 9
  • Page 10 10
  • Page 11 11
  • Page 12 12

American Hearth DFEV60LSS Frame for Exterior Wall Installation (Outdoor Kit) for VFLB60SP Owner's manual

Category
Fireplaces
Type
Owner's manual

Ask a question and I''ll find the answer in the document

Finding information in a document is now easier with AI