
07-07-1N04564834
*04564834 - 01*


3
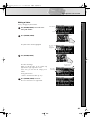
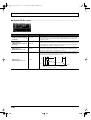
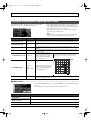
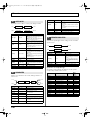
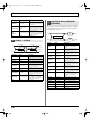
USING THE UNIT SAFELY
001
• Before using this unit, make sure to read the instruc-
tions below, and the Owner’s Manual.
..........................................................................................................
002d
• Do not open or perform any internal modifications
on the unit or its AC adaptor. (The only exception
would be where this manual provides specific
instructions which should be followed in order to put in
place user-installable options; see p. 47, p. 50.)
..........................................................................................................
003
• Do not attempt to repair the unit, or replace parts
within it (except when this manual provides specific
instructions directing you to do so). Refer all
servicing to your retailer, the nearest Roland Service
Center, or an authorized Roland distributor, as listed on
the “Information” page.
..........................................................................................................
004
• Never use or store the unit in places that are:
• Subject to temperature extremes (e.g., direct
sunlight in an enclosed vehicle, near a heating
duct, on top of heat-generating equipment); or
are
• Damp (e.g., baths, washrooms, on wet floors); or are
• Humid; or are
• Exposed to rain; or are
• Dusty; or are
• Subject to high levels of vibration.
..........................................................................................................
005
• This unit should be used only with a BKT-S that is
recommended by Roland (p. 30).
..........................................................................................................
006
• When using the unit with the BKT-S and PDS-10
recommended by Roland, the rack or stand must
be carefully placed so it is level and sure to remain
stable. If not using a rack or stand, you still need to
make sure that any location you choose for placing
the unit provides a level surface that will properly
support the unit, and keep it from wobbling.
..........................................................................................................
008c
• Be sure to use only the AC adaptor supplied with
the unit. Also, make sure the line voltage at the
installation matches the input voltage specified on
the AC adaptor’s body. Other AC adaptors may use a
different polarity, or be designed for a different voltage, so
their use could result in damage, malfunction, or electric
shock.
..........................................................................................................
008e
• Use only the attached power-supply cord. Also, the
supplied power cord must not be used with any
other device.
..........................................................................................................
009
• Do not excessively twist or bend the power cord,
nor place heavy objects on it. Doing so can
damage the cord, producing severed elements and
short circuits. Damaged cords are fire and shock hazards!
..........................................................................................................
010
• This unit, either alone or in combination with an
amplifier and headphones or speakers, may be
capable of producing sound levels that could cause
permanent hearing loss. Do not operate for a long
period of time at a high volume level, or at a level
that is uncomfortable. If you experience any
hearing loss or ringing in the ears, you should
immediately stop using the unit, and consult an
audiologist.
..........................................................................................................
011
• Do not allow any objects (e.g., flammable material,
coins, pins); or liquids of any kind (water, soft
drinks, etc.) to penetrate the unit.
..........................................................................................................
Used for instructions intended to alert the
user to the risk of injury or material
damage should the unit be used
improperly.
* Material damage refers to damage or
other adverse effects caused with
respect to the home and all its
furnishings, as well to domestic animals
or pets.
Used for instructions intended to alert the
user to the risk of death or severe injury
should the unit be used improperly.
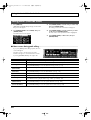
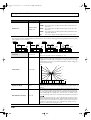
The ● symbol alerts the user to things that must be
carried out. The specific thing that must be done is
indicated by the design contained within the circle. In
the case of the symbol at left, it means that the power-
cord plug must be unplugged from the outlet.
The symbol alerts the user to important instructions or
warnings.The specific meaning of the symbol is
determined by the design contained within the triangle.
In the case of the symbol at left, it is used for general
cautions, warnings, or alerts to danger.
The symbol alerts the user to items that must never
be carried out (are forbidden). The specific thing that
must not be done is indicated by the design contained
within the circle. In the case of the symbol at left, it
means that the unit must never be disassembled.
SonicCell_e.book 3 ページ 2007年7月2日 月曜日 午後3時50分

4
012b
• Immediately turn the power off, remove the AC
adaptor from the outlet, and request servicing by
your retailer, the nearest Roland Service Center, or
an authorized Roland distributor, as listed on the
“Information” page when:
• The AC adaptor, the power-supply cord, or the
plug has been damaged; or
• If smoke or unusual odor occurs
• Objects have fallen into, or liquid has been
spilled onto the unit; or
• The unit has been exposed to rain (or otherwise
has become wet); or
• The unit does not appear to operate normally or
exhibits a marked change in performance.
..........................................................................................................
013
• In households with small children, an adult should
provide supervision until the child is capable of
following all the rules essential for the safe
operation of the unit.
..........................................................................................................
014
• Protect the unit from strong impact.
(Do not drop it!)
..........................................................................................................
015
• Do not force the unit’s power-supply cord to share
an outlet with an unreasonable number of other
devices. Be especially careful when using
extension cords—the total power used by all
devices you have connected to the extension cord’s
outlet must never exceed the power rating (watts/
amperes) for the extension cord. Excessive loads
can cause the insulation on the cord to heat up and
eventually melt through.
..........................................................................................................
016
• Before using the unit in a foreign country, consult
with your retailer, the nearest Roland Service
Center, or an authorized Roland distributor, as
listed on the “Information” page.
..........................................................................................................
022b
• Always turn the unit off and unplug the AC adaptor
before attempting installation of the circuit board
(model no. SRX series; p. 19).
..........................................................................................................
023
• DO NOT play a CD-ROM disc on a conventional
audio CD player. The resulting sound may be of a
level that could cause permanent hearing loss.
Damage to speakers or other system components
may result.
..........................................................................................................
101b
• The unit and the AC adaptor should be located so
their location or position does not interfere with
their proper ventilation.
..........................................................................................................
102c
• Always grasp only the plug on the AC adaptor
cord when plugging into, or unplugging from, an
outlet or this unit.
..........................................................................................................
103b
• At regular intervals, you should unplug the AC
adaptor and clean it by using a dry cloth to wipe
all dust and other accumulations away from its
prongs. Also, disconnect the power plug from the
power outlet whenever the unit is to remain unused
for an extended period of time. Any accumulation
of dust between the power plug and the power
outlet can result in poor insulation and lead to fire.
..........................................................................................................
104
• Try to prevent cords and cables from becoming
entangled. Also, all cords and cables should be
placed so they are out of the reach of children.
..........................................................................................................
106
• Never climb on top of, nor place heavy objects on
the unit.
..........................................................................................................
107c
• Never handle the AC adaptor or its plugs with wet
hands when plugging into, or unplugging from, an
outlet or this unit.
..........................................................................................................
108b
• Before moving the unit, disconnect the AC adaptor
and all cords coming from external devices.
..........................................................................................................
109b
• Before cleaning the unit, turn off the power and
unplug the AC adaptor from the outlet (p. 19).
..........................................................................................................
110b
• Whenever you suspect the possibility of lightning in
your area, disconnect the AC adaptor from the
outlet.
..........................................................................................................
115a
• Install only the specified circuit board(s) (model no.
SRX series). Remove only the specified screws (p.
47, p. 50).
..........................................................................................................
118c
• Keep any screws you may remove and the
included wrench in a safe place out of children’s
reach, so there is no chance of them being
swallowed accidentally.
..........................................................................................................
120
• Always turn the phantom power off when
connecting any device other than condenser micro-
phones that require phantom power. You risk
causing damage if you mistakenly supply phantom
power to dynamic microphones, audio playback
devices, or other devices that don’t require such
power. Be sure to check the specifications of any
microphone you intend to use by referring to the
manual that came with it.
(This instrument’s phantom power: 48 V DC, 10 mA Max)
..........................................................................................................
SonicCell_e.book 4 ページ 2007年7月2日 月曜日 午後3時50分

5
IMPORTANT NOTES
291a
In addition to the items listed under “USING THE UNIT SAFELY” on page 3–4, please read and observe the following:
Power Supply
301
• Do not connect this unit to same electrical outlet that is
being used by an electrical appliance that is controlled by
an inverter (such as a refrigerator, washing machine,
microwave oven, or air conditioner), or that contains a
motor. Depending on the way in which the electrical
appliance is used, power supply noise may cause this unit
to malfunction or may produce audible noise. If it is not
practical to use a separate electrical outlet, connect a
power supply noise filter between this unit and the electrical
outlet.
302
• The AC adaptor will begin to generate heat after long
hours of consecutive use. This is normal, and is not a cause
for concern.
307
• Before connecting this unit to other devices, turn off the
power to all units. This will help prevent malfunctions and/
or damage to speakers or other devices.
Placement
351
• Using the unit near power amplifiers (or other equipment
containing large power transformers) may induce hum. To
alleviate the problem, change the orientation of this unit; or
move it farther away from the source of interference.
352a
• This device may interfere with radio and television
reception. Do not use this device in the vicinity of such
receivers.
352b
• Noise may be produced if wireless communications
devices, such as cell phones, are operated in the vicinity of
this unit. Such noise could occur when receiving or initi-
ating a call, or while conversing. Should you experience
such problems, you should relocate such wireless devices
so they are at a greater distance from this unit, or switch
them off.
354a
• Do not expose the unit to direct sunlight, place it near
devices that radiate heat, leave it inside an enclosed
vehicle, or otherwise subject it to temperature extremes.
Excessive heat can deform or discolor the unit.
355b
• When moved from one location to another where the
temperature and/or humidity is very different, water
droplets (condensation) may form inside the unit. Damage
or malfunction may result if you attempt to use the unit in
this condition. Therefore, before using the unit, you must
allow it to stand for several hours, until the condensation
has completely evaporated.
360
• Depending on the material and temperature of the surface
on which you place the unit, its rubber feet may discolor or
mar the surface.
You can place a piece of felt or cloth under the rubber feet
to prevent this from happening. If you do so, please make
sure that the unit will not slip or move accidentally.
Maintenance
401a
• For everyday cleaning wipe the unit with a soft, dry cloth or
one that has been slightly dampened with water. To remove
stubborn dirt, use a cloth impregnated with a mild, non-
abrasive detergent. Afterwards, be sure to wipe the unit
thoroughly with a soft, dry cloth.
402
• Never use benzine, thinners, alcohol or solvents of any
kind, to avoid the possibility of discoloration and/or defor-
mation.
Repairs and Data
452
• Please be aware that all data contained in the unit’s
memory may be lost when the unit is sent for repairs.
Important data should always be backed up on an USB
memory, or written down on paper (when possible). During
repairs, due care is taken to avoid the loss of data.
However, in certain cases (such as when circuitry related to
memory itself is out of order), we regret that it may not be
possible to restore the data, and Roland assumes no
liability concerning such loss of data.
*** on a RAM card/DATA card
Additional Precautions
551
• Please be aware that the contents of memory can be
irretrievably lost as a result of a malfunction, or the
improper operation of the unit. To protect yourself against
the risk of loosing important data, we recommend that you
periodically save a backup copy of important data you
have stored in the unit’s memory on an USB memory.
552
• Unfortunately, it may be impossible to restore the contents
of data that was stored in the unit’s memory or on an USB
memory once it has been lost. Roland Corporation assumes
no liability concerning such loss of data.
553
• Use a reasonable amount of care when using the unit’s
buttons, sliders, or other controls; and when using its jacks
and connectors. Rough handling can lead to malfunctions.
554
• Never strike or apply strong pressure to the display.
555
• A small amount of noise may be heard from the display
during normal operation.
556
• When connecting / disconnecting all cables, grasp the
connector itself—never pull on the cable. This way you will
avoid causing shorts, or damage to the cable’s internal
elements.
558a
• To avoid disturbing your neighbors, try to keep the unit’s
volume at reasonable levels. You may prefer to use
headphones, so you do not need to be concerned about
those around you (especially when it is late at night).
559a
• When you need to transport the unit, package it in the box
(including padding) that it came in, if possible. Otherwise,
you will need to use equivalent packaging materials.
SonicCell_e.book 5 ページ 2007年7月2日 月曜日 午後3時50分

6
562
• Some connection cables contain resistors. Do not use
cables that incorporate resistors for connecting to this unit.
The use of such cables can cause the sound level to be
extremely low, or impossible to hear. For information on
cable specifications, contact the manufacturer of the cable.
563
• Unauthorized duplication, reproduction, hiring, and
lending prohibited.
Handling CD-ROMs
801
• Avoid touching or scratching the shiny underside (encoded
surface) of the disc. Damaged or dirty CD-ROM discs may
not be read properly. Keep your discs clean using a
commercially available CD cleaner.
Copyright
851
• Recording, duplication, distribution, sale, lease, perfor-
mance, or broadcast of copyrighted material (musical
works, visual works, broadcasts, live performances, etc.)
belonging to a third party in part or in whole without the
permission of the copyright owner is forbidden by law.
852a
• This product can be used to record or duplicate audio or
visual material without being limited by certain techno-
logical copy-protection measures. This is due to the fact that
this product is intended to be used for the purpose of
producing original music or video material, and is therefore
designed so that material that does not infringe copyrights
belonging to others (for example, your own original works)
can be recorded or duplicated freely.
853
• Do not use this unit for purposes that could infringe on a
copyright held by a third party. We assume no responsi-
bility whatsoever with regard to any infringements of third-
party copyrights arising through your use of this unit.
204
* Microsoft and Windows are registered trademarks of
Microsoft Corporation.
206e
* The screen shots in this document are used in compliance
with the guidelines of the Microsoft Corporation.
206j
* Windows
®
is known officially as: “Microsoft
®
Windows
®
operating system.”
207
* Apple and Macintosh are registered trademarks of Apple
Computer, Inc.
209
* Mac OS is a trademark of Apple Inc.
213
* Pentium is a registered trademark of Intel Corporation.
220
* All product names mentioned in this document are trade-
marks or registered trademarks of their respective owners.
233
* VST is a trademark of Steinberg Media Technologies AG.
add
* MatrixQuest™ 2007 TEPCO UQUEST, LTD.
All rights reserved.
The SonicCell’s USB functionality uses Matrix-
Quest middleware technology from TEPCO
UQUEST, LTD.
* SONAR is a registered trademark of Twelve Tone Systems,
Inc.
* MPEG Layer-3 audio compression technology is licensed
from Fraunhofer IIS Corporation and THOMSON Multi-
media Corporation.
SonicCell_e.book 6 ページ 2007年7月2日 月曜日 午後3時50分

7
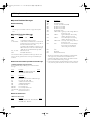
Contents
USING THE UNIT SAFELY........................................................................ 3
IMPORTANT NOTES............................................................................... 5
Main Features...................................................................................... 12
User Guide 13
Panel Descriptions................................................................................ 14
Top Panel ....................................................................................................... 14
Playing the Demo Songs..........................................................................................15
Rear and Front Panels..................................................................................... 16
Turning the Power On/Off ................................................................... 18
Basic Operation of the SonicCell........................................................... 20
About the display and [CURSOR/VALUE]..................................................................20
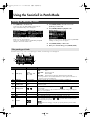
Using the SonicCell as a MIDI Sound Module......................................... 22
Playing the
SonicCell in Performance Mode ....................................................................... 22
Playing the SonicCell in Patch Mode ................................................................ 23
Modifying the Sound (editing a patch) ......................................................................24
Using the Editor and Librarian......................................................................... 27
Playing Songs (Portable Backing Machine)............................................ 28
Playback Procedure ........................................................................................ 28
Creating a Playlist........................................................................................... 30
Performing via MIDI while a Song Plays ..........................................................30
Connecting the SonicCell to Your Computer........................................... 31
Specifications of the dedicated plug-in version of the editor .........................................32
Windows XP users.........................................................................................33
Installing the Driver .................................................................................................33
Windows Settings...................................................................................................34
Installing SonicCell Editor ........................................................................................34
Windows Vista Users ...................................................................................... 35
Installing the Driver .................................................................................................35
Windows Settings...................................................................................................36
Installing SonicCell Editor ........................................................................................36
Mac OS X Users.............................................................................................. 37
Installing the Driver .................................................................................................37
Installing SonicCell Editor ........................................................................................38
Settings .................................................................................................................38
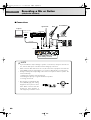
Recording a Mic or Guitar(USB/Audio Interface) ................................... 40
Connecting a Mic...................................................................................................41
SonicCell_e.book 7 ページ 2007年7月2日 月曜日 午後3時50分

8
Contents
Connecting a Guitar ...............................................................................................41
Using the Line Input.................................................................................................42
Adjusting the Input Volume ......................................................................................42
Input Effect Settings......................................................................................... 43
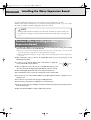
Installing the Wave Expansion Board.................................................... 46
Cautions When Installing an Wave Expansion Board........................................ 46
How to Install a Wave Expansion Board .......................................................... 47
Checking the Installed Wave Expansion Boards ...............................................48
Installation de la carte d’extension Wave
(French language for Canadian Safety Standard) .................................. 49
Precautions a prendre lors de l’installation d’une carte d’expansion Wave........49
Installation d’une carte d’expansion Wave ...................................................... 50
Verification des cartes d’extension audio apres installation .............................. 51
MIDI Sound Module 53
Overview ............................................................................................ 54
Performance Mode and Patch Mode ................................................................ 54
How a Performance is structured ..............................................................................54
How a Patch is structured ........................................................................................54
How a Rhythm Set is structured.................................................................................55
Calculating the Number of Voices Being Used ...........................................................55
About the Effects............................................................................................. 56
Effects in Performance Mode....................................................................................56
Effects in Patch Mode..............................................................................................56
About Memory ............................................................................................... 57
Temporary Memory ................................................................................................57
Rewritable Memory.................................................................................................57
Non-Rewritable memory ..........................................................................................57
Using the SonicCell in Performance Mode ............................................. 58
Viewing the MIDI INST (MIDI sound module) screen..........................................58
Viewing the menu screen (Performance Menu screen).......................................59
Switching the sound mode (Sound Mode screen) .............................................. 60
Specifying the recommended performance tempo
(Performance General screen).......................................................................... 60
MIDI-related settings (Perform MIDI Filter screen).............................................. 60
Viewing the part settings (Part View screen)..................................................... 62
If the patch type is Patch..........................................................................................62
If the patch type is Rhythm Set..................................................................................64
Selecting patches from a patch list by category (Patch List (Ctg) screen).........................65
Selecting patches from a patch list by group (Patch List (Grp) screen)............................66
Selecting a rhythm set from a list (Rhythm Set List screen) .............................................67
SonicCell_e.book 8 ページ 2007年7月2日 月曜日 午後3時50分

9
Contents
Editing parts (Part Edit screen) .........................................................................68
Scale Tune settings (Scale Tune screen) .....................................................................72
Sound Control Initialize ...................................................................................73
Performance Initialize ..................................................................................... 73
Performance Write..........................................................................................73
Editing effects .................................................................................................75
Selecting the item to edit (Effect Routing screen)..........................................................77
Editing the multi-effects related settings (MFX1–3/MFX1–3 Output screens)....................78
Chorus-related settings (Chorus/Chorus Output screen) ...............................................78
Reverb-related settings (Reverb/Reverb Output screen) ................................................79
Changing how the multi-effects are combined (MFX Structure screen) ............................80
Selecting how effects will operate (Effect Source screen)..............................................80
Using MIDI to control the multi-effects (MFX1–3 Control screens)...................................81
Using the SonicCell in Patch Mode ........................................................ 82
Viewing the Patch Play screen......................................................................... 82
If the patch type is Patch..........................................................................................82
If the patch type is Rhythm Set..................................................................................83
Viewing the menu screen (Patch Menu screen) .................................................84
Switching the sound mode (Sound Mode screen) .............................................. 84
Selecting patches from a patch list................................................................... 85
Selecting patches from a patch list by category (Patch List (Ctg) screen).........................85
Selecting patches from a patch list by group (Patch List (Grp) screen)............................86
Selecting a rhythm set from a list (Rhythm Set List screen) .............................................87
Editing patches (Patch Edit screen) ...................................................................88
Overall settings for the entire patch (Patch General screen)..........................................90
Selecting how tones are combined (Patch Structure screen)..........................................93
Settings for matrix control (Patch Mtrx Ctrl1–4 screens) ...............................................95
Waveform-related settings (Patch WG/Patch Pitch Env screen).....................................98
TVF settings (Patch TVF/Patch TVF Env screen)..........................................................102
TVA settings (Patch TVA/Patch TVA Env screen) .......................................................105
Patch/Tone output-related settings (Patch Output screen)............................................108
LFO settings (Patch LFO1, 2/Patch Step LFO screen).................................................109
Specifies how the tones will be heard (Patch TMT screen) ..........................................112
Controller-related settings (Patch Ctrl screen) ............................................................114
Tone Copy....................................................................................................115
Patch Initialize ..............................................................................................115
Patch Write ..................................................................................................116
Editing rhythm sets (Rhythm Edit screen) ........................................................117
Edits overall settings for the entire rhythm set (Rhythm General screen) ........................118
Waveform-related settings (Rhythm Wave screen).....................................................120
Specifying how a rhythm tone will be heard (Rhythm WMT screen) ............................122
Pitch-related rhythm tone settings (Rhythm Pitch/Rhythm Pch Env screen) ......................122
TVF settings (Rhythm TVF/Rhythm TVF Env screen).....................................................124
TVA settings (Rhythm TVA/Rhythm TVA Env screen) ..................................................127
SonicCell_e.book 9 ページ 2007年7月2日 月曜日 午後3時50分

10
Contents
Output-related settings for the rhythm set and rhythm tones (Rhythm Output screen).......129
Rhythm Tone Copy........................................................................................ 130
Rhythm Tone Initialize................................................................................... 130
Rhythm Set Initialize .....................................................................................130
Rhythm Set Write.......................................................................................... 131
Editing the effects (Patch/Rhythm Set) ............................................................ 132
Selecting the item to edit (Effect Routing screen)........................................................134
Multi-effect settings (MFX/MFX Output screen)..........................................................134
Chorus settings (Chorus/Chorus Output screens) ......................................................135
Reverb settings (Reverb/Reverb Output screens) .......................................................136
Controlling the multi-effects via MIDI (MFX Control screen).........................................137
Audio Connections 139
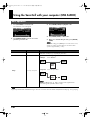
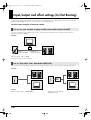
Using the SonicCell with your computer (USB AUDIO).......................... 140
Basic operation............................................................................................. 140
Accessing the Menu screen............................................................................ 141
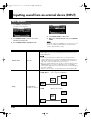
Inputting sound from an external device (INPUT)................................. 142
Basic operation............................................................................................. 142
Accessing the Menu screen............................................................................ 143
Input/output and effect settings (In/Out Routing)................................. 144
Selecting the item to edit (In/Out Routing screen) ...........................................147
Input effect settings (Input Effect/Input FX Output screen)................................147
Selecting the signal sent to your computer (To Computer screen) ..................... 148
Specifies how MFX3 will be used (MFX3 Location screen) ...............................149
Saving the MFX3 settings.......................................................................................149
System Write................................................................................................ 150
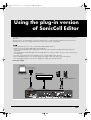
Using the plug-in version of SonicCell Editor
151
SONAR LE ......................................................................................... 152
SONAR 6.2 ....................................................................................... 157
Cubase 4........................................................................................... 160
Logic Pro 7.2 ..................................................................................... 163
SonicCell_e.book 10 ページ 2007年7月2日 月曜日 午後3時50分

11
Contents
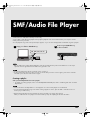
SMF/Audio File Player 167
Playing back songs............................................................................ 168
SMF/audio files that can be played ...............................................................168
Song playback .............................................................................................168
Selecting and playing a song from within a playlist ..................................................171
Playlist Write ................................................................................................173
Changing the song order ..............................................................................173
Deleting a song from the playlist ...................................................................173
Other Settings 175
System Settings.................................................................................. 176
General settings (System screen).................................................................... 176
Patch Scale Tune settings............................................................................... 178
Settings for the Preview function (System Preview screen) ...............................179
Settings for Control-related functions (System Control screen).......................... 179
MIDI-related settings (System MIDI screen) ..................................................... 180
Viewing information about SonicCell
(System SRX Info/System Version Info screens) ..............................................180
Editing the mastering effect (Mastering Effect screen) ...................................... 181
Utility functions.................................................................................. 182
Backing up user data (User Backup) .............................................................. 182
Restoring backed-up data into the SonicCell (User Restore) .............................182
Returning to the factory settings (Factory Reset)..............................................183
Initializing USB memory (USB Memory Format) .............................................. 183
Adjusting the overall tone of the audio output (Master Equalizer)......... 184
Appendices 185
Troubleshooting............................................................................................186
Error Messages............................................................................................. 191
Effects List..................................................................................................... 192
Performance List ........................................................................................... 222
Patch List ......................................................................................................223
Rhythm Set List ............................................................................................. 233
Waveform List ..............................................................................................242
MIDI Implementation.....................................................................................246
Specifications................................................................................................ 278
Index ........................................................................................................... 279
SonicCell_e.book 11 ページ 2007年7月2日 月曜日 午後3時50分

12
Main Features
Superior Desktop Synthesizer
• 128-voice sound module with new sound set featuring true-to-life instruments
• Two SRX sound expansion slots for sound set personalization
USB Audio/MIDI Interface
• USB audio interface functionality w/MIC and GUITAR (Hi-Z) inputs
• Record using the professional on-board DSP effects
• PC/Mac VSTi/AU Editor and Cakewalk SONAR LE software included
Portable Backing Machine
• SMF, WAV, AIFF and MP3 playback capability via optional USB-
memory is perfect for the gig
• Build playlists of any file-type combination using the playlist editor
SonicCell_e.book 12 ページ 2007年7月2日 月曜日 午後3時50分

13
User Guide
SonicCell_e.book 13 ページ 2007年7月2日 月曜日 午後3時50分

USER‘S GUIDE
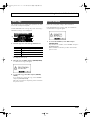
14
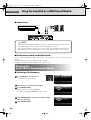
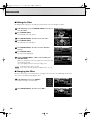
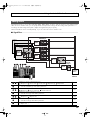
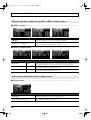
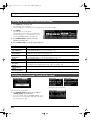
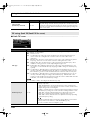
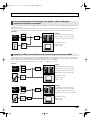
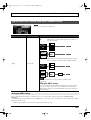
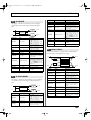
Panel Descriptions
fig.kakubu-topPanel.eps
Top Panel
Display
Various information is shown
here according to your operations.
USB MEMORY ACCESS Indicator
This will light when you’re playing song data from
USB memory that's connected to the SonicCell,
or when you're saving data to USB memory.
MIDI MESSAGE Indicator
MIDI
This will light when MIDI messages are being received
from a MIDI device connected to the MIDI IN connector.
USB
This will light when MIDI messages are being received
from the connected computer.
EXIT Button
Press this button to cancel
an operation.
MENU Button
You can press this button to switch to a menu
screen for the current mode or editing screen.
• The menu screen of each main mode
→ p. 59, p. 68, p. 76, p. 84, p. 88, p. 117, p. 133,
p. 141, p. 143, p. 146, p. 169, p. 171, p. 181
SMF/AUDIO PLAYER Buttons
Press these buttons when you’re using
the SonicCell as an SMF/audio player.
• Playing a song → p. 28, p. 168
• Creating a playlist → p. 30
(Play/Pause) Button
Plays/pauses the song data.
SRX Slot
You can install SRX series wave
expansion boards here.
•
Installation
→
p. 46
•
Selecting a wave
→
p. 98
SonicCell_e.book 14 ページ 2007年7月2日 月曜日 午後3時50分

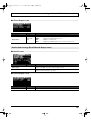
Panel Descriptions
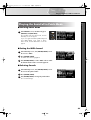
15
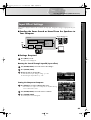
■ USER`S GUIDE
■
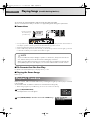
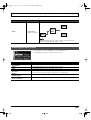
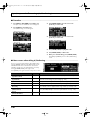
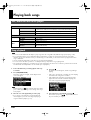
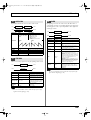
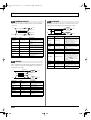
Playing the Demo Songs
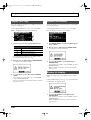
fig.disp-plylstslct-demo.eps
Press [SMF/AUDIO PLAYER].
fig.disp-demosongs.eps
Press [ ].
Playback will start from the first song.
* If USB memory containing song file is connected, select [Demo Songs] in the playlist list screen. For details on
playing from a playlist, refer to p. 28.
981a
* All rights reserved. Unauthorized use of this material for purposes other than private, personal enjoyment is a
violation of applicable laws.
982
* No data for the music that is played will be output from MIDI OUT.
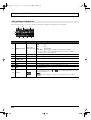
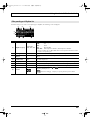
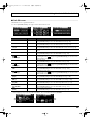
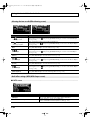
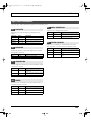
No.
Title Composer
Copyright
1
Welcome Back Yo Sakaue © 2007 Roland Corporation
2 Mach Juan Adrian Scott © 2007 Roland Corporation
3 Big & Bold Scott Tibbs © 2007 Roland Corporation
4 Human Sonic YUHKI © 2007 Roland Corporation
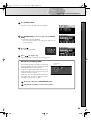
CURSOR/VALUE Dial
Use this to move the cursor, select
a parameter, or edit a value.
Press the dial to confirm the value.
• How to use [CURSOR/VALUE] → p. 20
EFFECTS Button
Press this button when you want to make effect-related settings.
• Applying effects to a performance → p. 78
• Applying effects to a patch → p. 26, p. 132
• Applying effects to the signal from the Input jack → p. 43
PART VIEW Button
If the MIDI sound module is in Performance
mode (p. 54), press this button when you
want to make settings for each part.
By pressing this button together with
the [MIDI INST] button, you can switch
between Performance mode and Patch mode.
INPUT Button
Press this button when you want to
apply an effect to the signal from a
device connected to the INPUT jack,
or to make output-related settings.
• Recording a mic or guitar → p. 40
• Inputting sound from an external
device → p.142
USB AUDIO Button
Press this button when you
want to apply an effect to the
audio signal from the connected
computer, or to make
output-related settings.
• USB AUDIO → p. 140
MIDI INST Button
Press this button when you
want to use the SonicCell as
a MIDI sound module.
• MIDI connections → p. 22, p. 54
• Performance → p. 22, p. 58
• Patch → p. 23, p. 82
1
2
SonicCell_e.book 15 ページ 2007年7月2日 月曜日 午後3時50分

USER‘S GUIDE
16
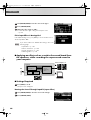
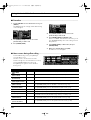
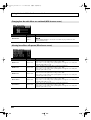
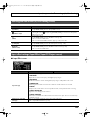
fig.kakubu-rearPanel.eps
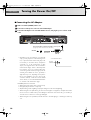
Rear and Front Panels
Rear Panel
Front Panel
USB COMPUTER Connector
Use a USB cable to connect your computer here.
This connection can handle both MIDI and audio.
• Using the SonicCell with your computer
→ p.31, p.135
USB MEMORY Connector
You can connect USB memory here and
use the SonicCell to play back files (songs)
that have been stored on USB memory.
• Playing back songs → p.28, p.167
DC IN Jack
Connect the included AC adaptor
here (p. 18). Do not use any AC
adaptor other than the included
one; doing so may cause
malfunctions.
POWER Switch
Turns the power on/off
(p. 18).
MIDI IN/OUT Connectors
You can connect these to other MIDI
equipment to send and receive MIDI
messages.
• Using the SonicCell as a MIDI
sound module → p. 22, p. 54
Security Slot
http://www.kensington.com
SAMPLING RATE Switch
This specifies the sampling rate used to record or play back audio data.
After changing this setting, you’ll need to turn the SonicCell’s power off,
then on again. If you’re using software, you’ll also need to restart your software.
Be sure to set the [SAMPLING RATE] switch to match the sampling rate setting of
the software you’re using.
MASTER VOLUME Dial
This adjusts the volume of the
signals output from the PHONES
jack and OUTPUT jacks (p. 19).
PHONES Jack
This is a stereo mini-type jack for connecting headphones.
This jack will output the sound received from the INPUT jack
mixed with the sound from the USB-connected computer and
the sound from the SonicCell itself.
Connecting headphones will not mute the sound from the OUTPUT jack.
SonicCell_e.book 16 ページ 2007年7月2日 月曜日 午後3時50分

Panel Descriptions
17
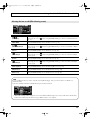
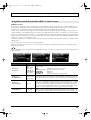
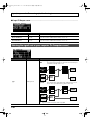
■ USER`S GUIDE
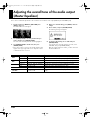
INPUT LEVEL Knob
Adjusts the input level of the
signal received at INPUT.
• Adjusting the input level → p. 42
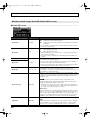
L/GUITAR/MIC Jack (combo input jack)
You can connect either a mic, guitar, or line equipment here.
This instrument is equipped with balanced (XLR/TRS) type
jacks. Wiring diagrams for these jacks are shown below.
Make connections after first checking the wiring diagrams
of other equipment you intend to connect.
INPUT SOURCE Switch
Set this as appropriate for the device you’ve
connected to the LINE (L) jack.
If you’ve connected your source to the LINE (R)
jack, you must set this switch to LINE (L).
LINE (L):
Connect a line-level device such as an audio
device (e.g., CD player) or keyboard.
GUITAR (Hi-Z):
Connect an electric guitar that’s not being
sent through an effects processor
(high-impedance connection).
MIC:
Connect a mic.
• Recording a mic or guitar → p. 40, 142
LINE (R) Jack
When using LINE (L) and LINE (R) for stereo input,
input the signal for the R channel here.
* If you’re inputting in mono, connect it to the
LINE (L) jack.
You can’t use this jack if the INPUT gain select
switch is not at the LINE (L) position.
• Recording a mic or guitar → p. 40, 142
OUTPUT Jacks (R, L/MONO)
These jacks output the audio signal.
If you’re outputting in mono, connect to the
L/MONO jack.
These jacks output the combined signals of the
sound received from INPUT, the sound from the
USB-connected computer, and the sound from
the SonicCell itself.
INPUT/OUTPUT Jacks
These jacks input or output audio signals.
Switch
LINE
GUITAR
Dynamic
MIC
Condenser
Plug/connector accepted
1/4“ phone plug (unbalanced)
1/4“ phone plug (unbalanced)
(High impedance supported)
1/4“ phone plug (balanced or unbalanced),
XLR connector
* Switch OFF “Phantom Power“ in the INPUT screen.
XLR connector (48 V phantom power supported)
Connecting a phantom-powered condenser mic
→In the INPUT screen, turn “Phantom Power” on (p.142)
Nominal input level
-30 – -10 dBu
-30 – -10 dBu
-50 – -30 dBu
SonicCell_e.book 17 ページ 2007年7月2日 月曜日 午後3時50分

USER‘S GUIDE
18
Turning the Power On/Off
■
Connecting the AC Adaptor
Make sure that the [POWER] switch is off.
Connect the included power cord to the included AC adaptor.
Connect the AC adaptor to the SonicCell’s DC IN connector, and plug the power cord into an AC
outlet.
fig.AC-setsuzoku.eps
fig.AC-setchi.eps
* Depending on the circumstances of a particular
setup, you may experience a discomforting sensa-
tion, or perceive that the surface feels gritty to the
touch when you touch this device, microphones
connected to it, or the metal portions of other
objects, such as guitars. This is due to an infinitesi-
mal electrical charge, which is absolutely harm-
less. However, if you are concerned about this,
connect the ground terminal (see figure) with an
external ground. When the unit is grounded, a
slight hum may occur, depending on the particu-
lars of your installation. If you are unsure of the
connection method, contact the nearest Roland
Service Center, or an authorized Roland distribu-
tor, as listed on the “Information” page.
Unsuitable places for connection
• Water pipes (may result in shock or electrocution)
• Gas pipes (may result in fire or explosion)
• Telephone-line ground or lightning rod (may be dangerous in the event of lightning)
* When turning the unit upside-down, get a bunch of newspapers or magazines, and place them under
the four corners or at both ends to prevent damage to the buttons and controls. Also, you should try to
orient the unit so no buttons or controls get damaged.
* When turning the unit upside-down, handle with care to avoid dropping it, or allowing it to fall or tip
over.
1
2
3
DC IN
Place the AC adaptor so that its lamp light is on the top side.
(it lights up when connected to an AC outlet)
AC Adaptor
(PSB-1U)
AC Outlet
Power Cord
Lamp
Ground
Terminal
SonicCell Bottom Panel
SonicCell_e.book 18 ページ 2007年7月2日 月曜日 午後3時50分

Turning the Power On/Off
19
■ USER`S GUIDE
■
Turning the Power On
fig.PowerOn.eps
Minimize the volume of the SonicCell and of your con-
nected audio equipment.
Turn on the [POWER] switch.
* This unit is equipped with a protection circuit. A brief interval
(a few seconds) after power up is required before the unit will
operate normally.
Use the [MASTER VOLUME] knob to adjust the volume.
■
Turning the Power Off
Minimize the volume of the SonicCell and of your connected audio equipment.
Turn off the power of your connected audio equipment.
Turn off the [POWER] switch.
The indications in the display will disappear, and the power will turn off.
NOTE
Once the connections have been completed, turn on power to your various devices in the order
specified. By turning on devices in the wrong order, you risk causing malfunction and/or dam-
age to speakers and other devices.
MASTER VOLUME Knob
POWER Switch
Rear Panel
Front Panel
1
2
3
1
2
3
SonicCell_e.book 19 ページ 2007年7月2日 月曜日 午後3時50分

USER‘S GUIDE
20
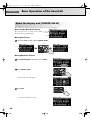
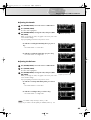
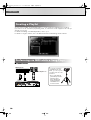
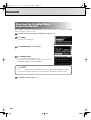
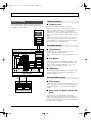
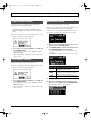
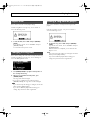
Basic Operation of the SonicCell
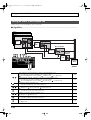
We’ll explain this using the Performance mode Part View screen as an example.
fig.display-sample.eps.
Accessing the Part View Screen
After turning the power on, make sure that [MIDI
INST] is lit, then press [PART VIEW].
Moving the Cursor
The cursor will move when you turn [CURSOR/VALUE].
cursor.eps
Moving Between Screens
fig.dispCursor3.eps
Turn [CURSOR/VALUE] to move the cursor to [PATCH].
fig.cursor-push-eps
Press [CURSOR/VALUE].
fig.disp-PatchEdit.eps
The Patch Edit screen will appear.
fig.exit-push.eps
Press [EXIT].
fig.disp-cursor.eps
You’ll return to the Part View screen.
About the display and [CURSOR/VALUE]
Cursor
the Name of
the display
1
Turn
Cursor
Cursor
1
Press
2
Press
3
SonicCell_e.book 20 ページ 2007年7月2日 月曜日 午後3時50分
Page is loading ...
Page is loading ...
Page is loading ...
Page is loading ...
Page is loading ...
Page is loading ...
Page is loading ...
Page is loading ...
Page is loading ...
Page is loading ...
Page is loading ...
Page is loading ...
Page is loading ...
Page is loading ...
Page is loading ...
Page is loading ...
Page is loading ...
Page is loading ...
Page is loading ...
Page is loading ...
Page is loading ...
Page is loading ...
Page is loading ...
Page is loading ...
Page is loading ...
Page is loading ...
Page is loading ...
Page is loading ...
Page is loading ...
Page is loading ...
Page is loading ...
Page is loading ...
Page is loading ...
Page is loading ...
Page is loading ...
Page is loading ...
Page is loading ...
Page is loading ...
Page is loading ...
Page is loading ...
Page is loading ...
Page is loading ...
Page is loading ...
Page is loading ...
Page is loading ...
Page is loading ...
Page is loading ...
Page is loading ...
Page is loading ...
Page is loading ...
Page is loading ...
Page is loading ...
Page is loading ...
Page is loading ...
Page is loading ...
Page is loading ...
Page is loading ...
Page is loading ...
Page is loading ...
Page is loading ...
Page is loading ...
Page is loading ...
Page is loading ...
Page is loading ...
Page is loading ...
Page is loading ...
Page is loading ...
Page is loading ...
Page is loading ...
Page is loading ...
Page is loading ...
Page is loading ...
Page is loading ...
Page is loading ...
Page is loading ...
Page is loading ...
Page is loading ...
Page is loading ...
Page is loading ...
Page is loading ...
Page is loading ...
Page is loading ...
Page is loading ...
Page is loading ...
Page is loading ...
Page is loading ...
Page is loading ...
Page is loading ...
Page is loading ...
Page is loading ...
Page is loading ...
Page is loading ...
Page is loading ...
Page is loading ...
Page is loading ...
Page is loading ...
Page is loading ...
Page is loading ...
Page is loading ...
Page is loading ...
Page is loading ...
Page is loading ...
Page is loading ...
Page is loading ...
Page is loading ...
Page is loading ...
Page is loading ...
Page is loading ...
Page is loading ...
Page is loading ...
Page is loading ...
Page is loading ...
Page is loading ...
Page is loading ...
Page is loading ...
Page is loading ...
Page is loading ...
Page is loading ...
Page is loading ...
Page is loading ...
Page is loading ...
Page is loading ...
Page is loading ...
Page is loading ...
Page is loading ...
Page is loading ...
Page is loading ...
Page is loading ...
Page is loading ...
Page is loading ...
Page is loading ...
Page is loading ...
Page is loading ...
Page is loading ...
Page is loading ...
Page is loading ...
Page is loading ...
Page is loading ...
Page is loading ...
Page is loading ...
Page is loading ...
Page is loading ...
Page is loading ...
Page is loading ...
Page is loading ...
Page is loading ...
Page is loading ...
Page is loading ...
Page is loading ...
Page is loading ...
Page is loading ...
Page is loading ...
Page is loading ...
Page is loading ...
Page is loading ...
Page is loading ...
Page is loading ...
Page is loading ...
Page is loading ...
Page is loading ...
Page is loading ...
Page is loading ...
Page is loading ...
Page is loading ...
Page is loading ...
Page is loading ...
Page is loading ...
Page is loading ...
Page is loading ...
Page is loading ...
Page is loading ...
Page is loading ...
Page is loading ...
Page is loading ...
Page is loading ...
Page is loading ...
Page is loading ...
Page is loading ...
Page is loading ...
Page is loading ...
Page is loading ...
Page is loading ...
Page is loading ...
Page is loading ...
Page is loading ...
Page is loading ...
Page is loading ...
Page is loading ...
Page is loading ...
Page is loading ...
Page is loading ...
Page is loading ...
Page is loading ...
Page is loading ...
Page is loading ...
Page is loading ...
Page is loading ...
Page is loading ...
Page is loading ...
Page is loading ...
Page is loading ...
Page is loading ...
Page is loading ...
Page is loading ...
Page is loading ...
Page is loading ...
Page is loading ...
Page is loading ...
Page is loading ...
Page is loading ...
Page is loading ...
Page is loading ...
Page is loading ...
Page is loading ...
Page is loading ...
Page is loading ...
Page is loading ...
Page is loading ...
Page is loading ...
Page is loading ...
Page is loading ...
Page is loading ...
Page is loading ...
Page is loading ...
Page is loading ...
Page is loading ...
Page is loading ...
Page is loading ...
Page is loading ...
Page is loading ...
Page is loading ...
Page is loading ...
Page is loading ...
Page is loading ...
Page is loading ...
Page is loading ...
Page is loading ...
Page is loading ...
Page is loading ...
Page is loading ...
Page is loading ...
Page is loading ...
Page is loading ...
Page is loading ...
Page is loading ...
Page is loading ...
Page is loading ...
Page is loading ...
Page is loading ...
Page is loading ...
Page is loading ...
Page is loading ...
Page is loading ...
Page is loading ...
Page is loading ...
Page is loading ...
Page is loading ...
Page is loading ...
Page is loading ...
Page is loading ...
Page is loading ...
Page is loading ...
Page is loading ...
Page is loading ...
Page is loading ...
Page is loading ...
Page is loading ...
Page is loading ...
-
 1
1
-
 2
2
-
 3
3
-
 4
4
-
 5
5
-
 6
6
-
 7
7
-
 8
8
-
 9
9
-
 10
10
-
 11
11
-
 12
12
-
 13
13
-
 14
14
-
 15
15
-
 16
16
-
 17
17
-
 18
18
-
 19
19
-
 20
20
-
 21
21
-
 22
22
-
 23
23
-
 24
24
-
 25
25
-
 26
26
-
 27
27
-
 28
28
-
 29
29
-
 30
30
-
 31
31
-
 32
32
-
 33
33
-
 34
34
-
 35
35
-
 36
36
-
 37
37
-
 38
38
-
 39
39
-
 40
40
-
 41
41
-
 42
42
-
 43
43
-
 44
44
-
 45
45
-
 46
46
-
 47
47
-
 48
48
-
 49
49
-
 50
50
-
 51
51
-
 52
52
-
 53
53
-
 54
54
-
 55
55
-
 56
56
-
 57
57
-
 58
58
-
 59
59
-
 60
60
-
 61
61
-
 62
62
-
 63
63
-
 64
64
-
 65
65
-
 66
66
-
 67
67
-
 68
68
-
 69
69
-
 70
70
-
 71
71
-
 72
72
-
 73
73
-
 74
74
-
 75
75
-
 76
76
-
 77
77
-
 78
78
-
 79
79
-
 80
80
-
 81
81
-
 82
82
-
 83
83
-
 84
84
-
 85
85
-
 86
86
-
 87
87
-
 88
88
-
 89
89
-
 90
90
-
 91
91
-
 92
92
-
 93
93
-
 94
94
-
 95
95
-
 96
96
-
 97
97
-
 98
98
-
 99
99
-
 100
100
-
 101
101
-
 102
102
-
 103
103
-
 104
104
-
 105
105
-
 106
106
-
 107
107
-
 108
108
-
 109
109
-
 110
110
-
 111
111
-
 112
112
-
 113
113
-
 114
114
-
 115
115
-
 116
116
-
 117
117
-
 118
118
-
 119
119
-
 120
120
-
 121
121
-
 122
122
-
 123
123
-
 124
124
-
 125
125
-
 126
126
-
 127
127
-
 128
128
-
 129
129
-
 130
130
-
 131
131
-
 132
132
-
 133
133
-
 134
134
-
 135
135
-
 136
136
-
 137
137
-
 138
138
-
 139
139
-
 140
140
-
 141
141
-
 142
142
-
 143
143
-
 144
144
-
 145
145
-
 146
146
-
 147
147
-
 148
148
-
 149
149
-
 150
150
-
 151
151
-
 152
152
-
 153
153
-
 154
154
-
 155
155
-
 156
156
-
 157
157
-
 158
158
-
 159
159
-
 160
160
-
 161
161
-
 162
162
-
 163
163
-
 164
164
-
 165
165
-
 166
166
-
 167
167
-
 168
168
-
 169
169
-
 170
170
-
 171
171
-
 172
172
-
 173
173
-
 174
174
-
 175
175
-
 176
176
-
 177
177
-
 178
178
-
 179
179
-
 180
180
-
 181
181
-
 182
182
-
 183
183
-
 184
184
-
 185
185
-
 186
186
-
 187
187
-
 188
188
-
 189
189
-
 190
190
-
 191
191
-
 192
192
-
 193
193
-
 194
194
-
 195
195
-
 196
196
-
 197
197
-
 198
198
-
 199
199
-
 200
200
-
 201
201
-
 202
202
-
 203
203
-
 204
204
-
 205
205
-
 206
206
-
 207
207
-
 208
208
-
 209
209
-
 210
210
-
 211
211
-
 212
212
-
 213
213
-
 214
214
-
 215
215
-
 216
216
-
 217
217
-
 218
218
-
 219
219
-
 220
220
-
 221
221
-
 222
222
-
 223
223
-
 224
224
-
 225
225
-
 226
226
-
 227
227
-
 228
228
-
 229
229
-
 230
230
-
 231
231
-
 232
232
-
 233
233
-
 234
234
-
 235
235
-
 236
236
-
 237
237
-
 238
238
-
 239
239
-
 240
240
-
 241
241
-
 242
242
-
 243
243
-
 244
244
-
 245
245
-
 246
246
-
 247
247
-
 248
248
-
 249
249
-
 250
250
-
 251
251
-
 252
252
-
 253
253
-
 254
254
-
 255
255
-
 256
256
-
 257
257
-
 258
258
-
 259
259
-
 260
260
-
 261
261
-
 262
262
-
 263
263
-
 264
264
-
 265
265
-
 266
266
-
 267
267
-
 268
268
-
 269
269
-
 270
270
-
 271
271
-
 272
272
-
 273
273
-
 274
274
-
 275
275
-
 276
276
-
 277
277
-
 278
278
-
 279
279
-
 280
280
-
 281
281
-
 282
282
-
 283
283
-
 284
284
-
 285
285
-
 286
286
-
 287
287
-
 288
288


Roland SONIC CELL Owner's manual
- Type
- Owner's manual
- This manual is also suitable for
Ask a question and I''ll find the answer in the document
Finding information in a document is now easier with AI
Related papers
-
Roland SRX BRASS Owner's manual
-
-
-
-
-
-
-
-
-
Other documents
-
Boss ES-8 Owner's manual
-
Cakewalk Sonar X1 User guide
-
Casio XW-G1 MIDI Implementation
-
Boss ES-5 Owner's manual
-
Boss BR-800 Owner's manual
-
Moog Voyager XL LFO 2 Owner's manual
-
 Encore Electronics Jupiter 8 MIDIkit User manual
-
Boss VE-500 Owner's manual
-
 Boss Audio Systems Recording Equipment BR-1600CD User manual
-
Edirol UA-101 Owner's manual

