
AJA and Apple Applications
Version 15.5
Published December 9, 2019
Quick Start Guide

AJA and Apple Applications Quick Start Guide v15.5 2 www.aja.com
Notices
Trademarks
AJA® and Because it matters.® are registered trademarks of AJA Video Systems, Inc.
for use with most AJA products. AJA™ is a trademark of AJA Video Systems, Inc. for
use with recorder, router, software and camera products. Because it matters.™ is a
trademark of AJA Video Systems, Inc. for use with camera products.
CION®, Corvid Ultra®, lo®, Ki Pro®, KONA®, KUMO®, ROI® and T-Tap® are registered
trademarks of AJA Video Systems, Inc.
AJA Control Room™, KiStor™, Science of the Beautiful™, TruScale™, TruZoom™,
V2Analog™ and V2Digital™ are trademarks of AJA Video Systems, Inc.
All other trademarks are the property of their respective owners.
Copyright
Copyright © 2019 AJA Video Systems, Inc. All rights reserved. All information in
this manual is subject to change without notice. No part of the document may be
reproduced or transmitted in any form, or by any means, electronic or mechanical,
including photocopying or recording, without the express written permission of AJA
Video Systems, Inc.
Contacting AJA Support
When calling for support, have all information at hand prior to calling. To contact AJA
for sales or support, use any of the following methods:
Telephone +1.530.271.3190
FAX +1.530.271.3140
Web https://www.aja.com
Support Email suppor[email protected]
Sales Email [email protected]

AJA and Apple Applications Quick Start Guide v15.5 3 www.aja.com
Contents
Notices . . . . . . . . . . . . . . . . . . . . . . . . . . . . . . . . . . . . . .2
Trademarks . . . . . . . . . . . . . . . . . . . . . . . . . . . . . . . . . . . . . . . . . . . 2
Copyright . . . . . . . . . . . . . . . . . . . . . . . . . . . . . . . . . . . . . . . . . . . . 2
Contacting AJA Support . . . . . . . . . . . . . . . . . . . . . . . . . . . . . . . . . . . 2
Chapter 1 – AJA and Apple Overview . . . . . . . . . . . . . . . . . . .4
Apple Applications Supported . . . . . . . . . . . . . . . . . . . . . . . . . . . . . . . 4
macOS Support . . . . . . . . . . . . . . . . . . . . . . . . . . . . . . . . . . . . . . . 4
Hardware Products Supported . . . . . . . . . . . . . . . . . . . . . . . . . . . . . . .4
Chapter 2 – AJA and Apple Installation . . . . . . . . . . . . . . . . . .7
Installing AJA Software. . . . . . . . . . . . . . . . . . . . . . . . . . . . . . . . . . . .7
Download . . . . . . . . . . . . . . . . . . . . . . . . . . . . . . . . . . . . . . . . . . 7
AJA Desktop Software Installation and Re-installation . . . . . . . . . . . . . . 7
AJA Desktop Software Package Components. . . . . . . . . . . . . . . . . . . .7
AJA Hardware Firmware Update . . . . . . . . . . . . . . . . . . . . . . . . . . . . . .8
Getting Started. . . . . . . . . . . . . . . . . . . . . . . . . . . . . . . . . . . . . . . . .8
Mac OS System Preferences . . . . . . . . . . . . . . . . . . . . . . . . . . . . . . . 9
Apple Applications. . . . . . . . . . . . . . . . . . . . . . . . . . . . . . . . . . . . .9
Chapter 3 – Using Final Cut Pro X . . . . . . . . . . . . . . . . . . . . . 10
System Conguration Requirements . . . . . . . . . . . . . . . . . . . . . . . . . . 10
FCP X Quick Start System Conguration . . . . . . . . . . . . . . . . . . . . . . . . 10
Final Cut Pro X Audio Congurations . . . . . . . . . . . . . . . . . . . . . . . . . . 14
Importing Clips for Use in Final Cut Pro X . . . . . . . . . . . . . . . . . . . . . . . 17
Capturing Clips for Use in Final Cut Pro X . . . . . . . . . . . . . . . . . . . . . . . 18
Chapter 4 – AJA Hardware as Audio Interface . . . . . . . . . . . . . 22
Mac Core Audio Conguration . . . . . . . . . . . . . . . . . . . . . . . . . . . . . . 22
Using AJA Hardware Audio Input and Output . . . . . . . . . . . . . . . . . . . . 22
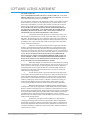
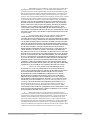
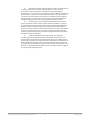
SOFTWARE LICENSE AGREEMENT . . . . . . . . . . . . . . . . . . . . .23
Index. . . . . . . . . . . . . . . . . . . . . . . . . . . . . . . . . . . . . . .26

AJA and Apple Applications Quick Start Guide v15.5 4 www.aja.com
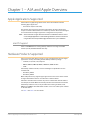
Chapter 1 – AJA and Apple Overview
Apple Applications Supported
AJA hardware is tightly integrated for video and audio workflows with the
following Apple application:
• Final Cut Pro X (video and audio)
This manual does not provide operational information for Apple applications
except as related to AJA hardware and software operations. Please read the Apple
user documentation for Apple application configuration and operation.
NOTE: AJA recommends using the latest AJA software in combination with the current
version of Apple applications. For demanding workflows, AJA also recommends
using the latest OS with up to date high performance host system hardware.
macOS Support
AJA's Io and KONA devices running Desktop Software v15.5 support macOS
Catalina (v10.15) and Metal GPU functionality.
Hardware Products Supported
AJA in association with Apple provides a range of hardware that supports Apple
applications courtesy of installing the AJA desktop software package:
• Io 4K Plus, Io IP, Io 4K, Io XT, Io Express
• KONA 5, KONA 4, KONA IP, KONA 1, KONA LHi, KONA LHe Plus
• T-TAP
AJA desktop software installer, and associated Apple compatibilities are also
available with:
• Avid Artist | DNxIV
• Avid Artist | DNxIP
Other AJA products may support Apple applications in the future. In this manual
all supported hardware devices are referred to as "AJA hardware".
All features described in this manual may not be available with all AJA hardware.
For example, the Audio Mixer functionality introduced to AJA Control Panel with
AJA Desktop Software v14.0, is only available when running Io4KPlus, Io4K,
KONA4, and KONAIP. The Audio Mixer enables access to all audio inputs available
on the AJA device.
See Table 1 and Table 2 for more details.

AJA and Apple Applications Quick Start Guide v15.5 5 www.aja.com
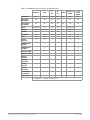
Table 1. AJA Hardware Feature Summary, Thunderbolt Devices
Io 4K Plus Io IP
Io
4K
Io
XT
T-TAP
Avid Artist
DNxIV
Avid
Artist
DNxIP
Tbolt Ports Tbolt 3 Tbolt 3 Tbolt 2 Tbolt 1 Tbolt 1 Tbolt 3 Tbolt 3
Max Input
Resolution
4K 4K 4K 2K 4K 4K
Max Output
Resolution
4K 4K 4K 2K 2K 4K 4K
SDI In 12G/6G/3G 3G 3G 3G 12G/6G/3G
SDI Out 12G/6G/3G 3G (monitor) 3G 3G 3G 12G/6G/3G
HDMI In 2.0 1.4 1.3 2.0
HDMI Out 2.0 2.0 1.4b 1.4 1.3 2.0 2.0
HDR √ √ √ √ √
Closed
Captions
√ √ √ √ √
SMPTE 2022-6
(10GbE)
√ √
SMPTE 2022-7
(10GbE)
√ √
IP Video In/Out √ √
IP Audio in/Out √ √
Analog
Video In
Analog
Video Out
√
Analog
Audio In
√ √ √ √
Analog
Audio Out
√ √ √ √ √ √
Control Panel
Audio Mixer
√ √ √ √ √
XLR Mic Input √ √
√ = Supported (blank) = Unsupported

AJA and Apple Applications Quick Start Guide v15.5 6 www.aja.com
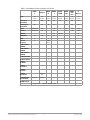
Table 2. AJA Hardware Feature Summary, PCIe Devices
KONA
5
KONA 4
KONA
IP
KONA
1
KONA
HDMI
KONA
LHi
KONA
LHe
Plus
Io
Express
PCIe 3.0
8-lane
2.0
8-lane
2.0
8-lane
2.0
2-lane
2.0
8-lane
1.0
4-lane
1.0
4-lane
1.0
1-lanes
Max Input
Resolution
8K 4K 4K 2K 4K 2K HD HD
Max Output
Resolution
8K 4K 4K 2K 2K HD HD
SDI In 12G/6G/3G 3G 3G 3G 1.5G 1.5G
SDI Out 12G/6G/3G 3G 3G 3G 1.5G 1.5G
HDMI In 1.3 2.0/1.4b 1.3 1.3
HDMI Out 2.0 1.4b 1.4 1.3 1.3 1.3
HDR √ √ √
Closed
Captions
√ √ s2022
only
SMPTE 2022-6
(10GbE)
√
SMPTE 2022-7
(10GbE)
√
SMPTE 2022-7
(10GbE)
√
IP Video In/Out √
IP Audio in/Out √
Analog
Video In
√ √
Analog
Video Out
√ √ √ √
Analog
Audio In
√ √
Analog
Audio Out
with K3G
box
√ √ √
Control Panel
Audio Mixer
4K Mode 4K Mode √ √
XLR Mic Input
√ = Supported (blank) = Unsupported

AJA and Apple Applications Quick Start Guide v15.5 7 www.aja.com
Chapter 2 – AJA and Apple Installation
Installing AJA Software
Download
Go to the AJA website and download the latest AJA Desktop Software package
containing the AJA Control Panel application, other related applications, drivers
and plug-ins.
https://www.aja.com/en/support/downloads/
System software updates may occasionally become available for AJA products
on our website (www.aja.com). We recommend checking occasionally for both
software updates and additional product information.
NOTE: If your computer has previously had another video capture or multimedia device
installed, ensure you uninstall any related software before installing the AJA
Desktop Software package. This will prevent any hardware or software conflicts.
IMPORTANT: Please read the brief Release Notes PDF file that accompanies your AJA
software. The Release Notes describe important features and fixes.
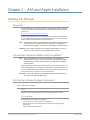
AJA Desktop Software Installation and Re-installation
NOTE: Always uninstall previous versions of AJA software before updating your
computer with new software. Go to your AJA Utilities (on the Mac) or Windows
Control Panel to uninstall existing AJA software. This helps prevent hardware/
software conflicts.
Before installing the AJA Desktop Software package, ensure that your video and
audio editing applications are installed as detailed in its user documentation. You
cannot use AJA hardware with a third-party application until the application has
been installed and run at least once on your workstation.
IMPORTANT: If you install or update a supported Apple application at a later date, you
must run the AJA installer program again.
AJA Desktop Software Package Components
Mac Software Package
Drivers
AJA device drivers allow tightly integrated hardware/software operation.
AJA Control Panel
The AJA Control Panel application provides:
• Source selection and control of your AJA hardware.
• A block diagram to show visually what routing and processing is being
performed.
• AJA hardware firmware update.

AJA and Apple Applications Quick Start Guide v15.5 8 www.aja.com
AJA Control Room
AJA Control Room is a software application for ingest, playback and output with
AJA products.
AJA System Test
System Test provides accurate and detailed evaluations of drive and PCIe
performance statistics, allowing you to measure the capabilities of your system
for recording and playing back of various resolutions and codecs.
3rd-Party Plugins
AJA provided plugins for popular 3rd-party Professional Video Applications from
Adobe, Avid, Apple, Telestream, and others.
NMOS Support
AJA IP capable devices support Networked Media Open Specifications (NMOS),
for network device discovery and registration.
See https://amwa-tv.github.io/nmos/ for technical information.
Documentation
PDFs of AJA hardware and software manuals are also installed (by default) at the
following computer location:
Mac - Applications / AJA Utilities / Docs
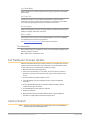
AJA Hardware Firmware Update
After the AJA Software Package has been installed on a computer with your AJA
hardware installed, the firmware on that AJA device can be updated if a newer
version of firmware is included with that software package.
1. Open the AJA Control Panel application.
2. If more than one AJA device is connected, choose the device you want to
update by selecting its name from the drop-down menu at the top of the
screen.
3. Go to the AJA Control Panel Firmware Screen.
4. Select the rmware version (if multiple versions exist) in the Desired
dropdown.
5. Click on Install. Messages appear and when nished, rmware update
completed messages are shown.
6. Click Shutdown to power down the computer.
7. Restart the computer.
8. Open AJA Control Panel. The AJA hardware with the updated rmware
should be recognized by the Control Panel application.
Getting Started
NOTE: On first use, you will need to tell your operating system to use AJA hardware as
the default Audio Input and Output device.

AJA and Apple Applications Quick Start Guide v15.5 9 www.aja.com
Mac OS System Preferences
For Mac go to System Preferences > Sound > and select AJA Device for both Input
and Output.
Figure 1. Mac System Preferences, Sound
Apple Applications
In most cases, using AJA hardware with Apple applications is set and forget.
Simply set your NLE or other application to point at AJA hardware for all input
and output operations and that’s it. No need to switch drivers, switch to desktop
audio, etc.

AJA and Apple Applications Quick Start Guide v15.5 10 www.aja.com
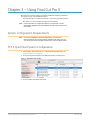
Chapter 3 – Using Final Cut Pro X
Besides non-linear video editing, Final Cut Pro X offers the following capabilities
that apply to using compatible AJA hardware.
• Play and view video on professional displays connected to your AJA hardware.
• Play, listen to, and record audio through your AJA hardware.
NOTE: Final Cut Pro X does not support video capture or record to tape. The AJA
Control Room application (free download from the AJA website) provides that
functionality.
System Configuration Requirements
NOTE: For system configurations required for AJA products, refer to the AJA
documentation for your specific AJA device available on the AJA website. For
system requirements for using Apple Final Cut Pro X, refer to the Apple website.
FCP X Quick Start System Configuration
1. Set your Mac's System Preferences > Sound to the AJA hardware (see "Mac
OS System Preferences" on page 9).
2. Go to your Applications folder, locate AJA Control Panel, and then run it.
Figure 2. Mac Applications Folder
3. Go to the AJA Control Panel Control Tab.

AJA and Apple Applications Quick Start Guide v15.5 11 www.aja.com
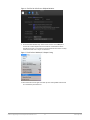
Figure 3. AJA Control Panel Control Screen (not externally controlled)
NOTE: If FCP X is open and the Window > AV Output setting is checked, the AJA Control
Panel application will be controlled by FCP X (indicated with red text in upper
right corner of the window) and you will not be able to configure some Control
Panel settings. Either uncheck the AV Output setting, or close FCP X to make the
following AJA Control Panel adjustments.
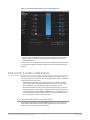
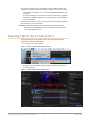
4. Go to the AJA Control Panel Format Tab.

AJA and Apple Applications Quick Start Guide v15.5 12 www.aja.com
Figure 4. AJA Control Panel Format Screen (not externally controlled)
5. Set the format and frame rate for the output format/frame rate you'd like to
obtain from FCP X.
6. Other AJA Control Panel settings that may be involved include:
• Format screen: Follow Input checkbox
• SDI Out screen: SDI output settings
• HDMI screen: HDMI output settings
• HDR screen: High Dynamic Range output settings
NOTE: See the AJA Installation and Operation Guide for your AJA device for detailed
information.
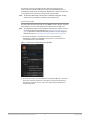
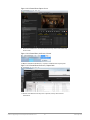
7. If necessary, launch Final Cut Pro X, go to the Final Cut Pro X pull-down
menu and select Preferences.
Figure 5. Final Cut Pro X Preferences Dropdown
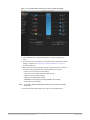
8. Locate the A/V Playout menu in Playback Preferences and conrm that A/V
Output reports the AJA hardware.

AJA and Apple Applications Quick Start Guide v15.5 13 www.aja.com
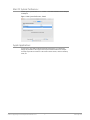
Figure 6. Final Cut Pro X Preferences Playback Window
9. Go to the FCP X Window drop-down menu and click on A/V Output to
select it. The video output from Final Cut Pro X and the AJA hardware
should now appear on a baseband connected broadcast monitor. You may
need to first scrub over a clip to see the video.
Figure 7. Final Cut Pro X Window, A/V Output Setting
10. The AJA Control Panel application will report In use by FCPX and will now
be controlled by Final Cut Pro X.

AJA and Apple Applications Quick Start Guide v15.5 14 www.aja.com
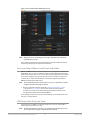
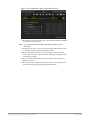
Figure 8. AJA Control Panel Format Screen (Controlled by FCP X)
11. If you need to change the AJA hardware's video output format, turn o A/V
Output in FCP X, change the settings in AJA Control Panel, and then turn
A/V Output back on.
For ease of use and clarity about the selected video output format and frame rate,
you may keep the AJA Control Panel application open when working with Final
Cut Pro X.
Final Cut Pro X Audio Configurations
An FCP X session can be configured for audio in different ways. Which method
you use depends on the audio task at hand, the AJA hardware's audio capabilities,
and the audio sources to be used.
• AJA hardware audio setup provides optimum A/V sync output using AJA
hardware for input and output, including zero latency voice-over recording.
Use this method if your AJA hardware supports your audio sources.
• Because AJA hardware products are Core Audio compliant, they can also be
used with the Mac's internal audio system for input and output. For example,
some AJA hardware devices (KONA LHi, KONA LHe Plus, Io XT, Io Express) may
need to use the Mac's internal audio system for voice-over. However, audio
sync is not guaranteed when using this method.
AJA Hardware Audio Mixer Voice-over Setup
If your AJA hardware supports the Audio Mixer feature, you can use one of the
AJA hardware audio inputs (selected in AJA Control Panel) to add an ultra-low
latency voice-over track to your project timeline.

AJA and Apple Applications Quick Start Guide v15.5 15 www.aja.com
For example, when using the AJA Io 4K Plus, FCP X Voiceover Record can
make use of Analog Audio In (DB25 Line Level), embedded HDMI Audio In, or
embedded SDI Audio In. On the Avid Artist | DNxIV there is additional support for
an Analog Mic input via the front panel (Line, Mic, Phantom 48V).
NOTE: The Avid Artist DNxIV built-in mic pre has a +40 db max output gain. You may
want to use an external mixer, especially if using a dynamic mic.
Audio Configuration
Recommended settings for FCP X when using KONA 4, Io 4K, Io 4K Plus, and Avid |
Artist DNxIV for Voice-over with AJA Desktop Software v14.0 and higher are:
NOTE: The following procedure assumes the Mac System Preferences Sound is set to use
the AJA device for both input and output (see "Mac OS System Preferences" on
page 9), and that the AJA Control Panel and your FCP X session are configured
properly for video (see "FCP X Quick Start System Configuration" on page 10).
1. In FCP X go to Window > Record Voiceover and ensure the input is
AJADevice, and Monitor is Off. Other settings on this screen depend on
your individual voice-over workflow.
Figure 9. Final Cut Pro X, Record Voiceover Window
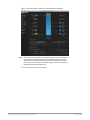
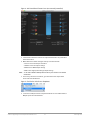
2. In AJA Control Panel, go to Audio Mixer Screen/Playback Monitor, check AJA
Input, Item Select the input device, and adjust source gain for monitoring.
This AJA Control Panel screen is active even while being controlled by an
external application.

AJA and Apple Applications Quick Start Guide v15.5 16 www.aja.com
Figure 10. AJA Control Panel Audio Mixer Screen
NOTE: Adjustments to the monitoring levels or mix does NOT affect any audio being
recorded into the timeline.
These settings simultaneously provide FCP X Voiceover Record with full-duplex
zero latency monitoring and capture to the timeline.
Voice-over Setup Without Control Panel Audio Mixer
KONA LHi, KONA LHe Plus, Io XT, and Io Express do not support the Control Panel
Audio Mixer. You can use one of the these device's audio inputs (selected on the
AJA Control Panel) to add a voice-over track to your project timeline. For example,
if your device supports analog audio input your source could be a microphone
connected to an audio mixer, with the line-level mixer output connected to a
KONA/Io breakout panel audio input.
NOTE: This method should not be used when precise A/V sync is required on the output.
A slight, measurable, delay may be induced.
1. Use the configuration setting described in "Audio Configuration" on page
15, except for Step 2 on page 15 you use your external audio hardware
to control your audio record and monitoring levels (these AJA devices do
not support the AJA Control Panel Audio Mixer).
These settings provide voice-over record (monitoring) on the timeline, but exact
A/V sync is not guaranteed.
USB Device Audio Voice-over Setup
If you wish to use a USB mic or computer audio source, you can use the Mac's
internal audio system for voice-over.
NOTE: The Mac internal audio system voice-over should not be used when precise A/V
sync is required on the output. A slight delay may be induced.

AJA and Apple Applications Quick Start Guide v15.5 17 www.aja.com
The example settings below are intended for use with a USB headset Mic and
headphones (Logitech headset, for example) to perform a voice-over recording.
• Set the Mac System Preferences > Sound to the Logitech Headset for input
and output.
• In FCP X go to Window > Record Voiceover and ensure the input is Logitech,
and Monitor is Off. Other settings on this screen depend on your individual
voice-over workflow.
These settings provide voice-over record (monitoring) on the timeline captured,
but exact A/V sync is not guaranteed.
IMPORTANT: When finished with the voice-over recording, return the Mac System
Preferences to use AJA hardware, to ensure the remainder of your work in the
session has the proper A/V sync.
Importing Clips for Use in Final Cut Pro X
Importing existing clips using FCP X is simple. The same procedure is used
regardless of the type of AJA hardware.
1. In FCP X, go to File > Import Media
Figure 11. Final Cut Pro X Import Media Selection
2. Navigate to the location of the clip(s) to be imported (multiple les can be
selected for import).
Figure 12. Final Cut Pro X Import Media Screen

AJA and Apple Applications Quick Start Guide v15.5 18 www.aja.com
3. If desired, set import parameters on the right side of the pane (Figure 12 on
page 17 ), including:
• Select into which Event the clip will be added.
• Select Copy to library or Leave files in place.
• Keywords
• Audio Roles
• Transcoding
• Analyze and Fix
NOTE: Refer to Apple's Final Cut Pro X documentation for detailed information.
4. Click Import Selected on the lower right corner of the pane (Figure 12 on
page 17 ).
5. The clip is added to the chosen FCP X Event and will be available to be
added to the FCP X timeline of that Project.
Capturing Clips for Use in Final Cut Pro X
Final Cut Pro X does not support direct video capture. The AJA Control Room
application operating in conjunction with the AJA Control Panel application
provides video and audio capture functionality.
Once you have captured a clip, it can be imported into the FCP X session as
described above.
NOTE: Refer to the AJA Control Room Installation and Operation Guide for more
complete information.
AJA Control Room Clip Capture Quick Start
1. Connect the video and audio inputs and outputs to the AJA hardware.
2. If you wish to use RS-422 control with a playback device, connect a DB-9
cable between the device and the AJA hardware and enable RS-422 control
on the playback device.
3. Either close FCP X, or uncheck the A/V Output parameter to ensure the AJA
Control Panel application will not be controlled.
NOTE: Only one application at a time should be set to control AJA Control Panel.
4. Open AJA Control Panel and go to the AJA Control Panel Format Tab.

AJA and Apple Applications Quick Start Guide v15.5 19 www.aja.com
Figure 13. AJA Control Panel Format Screen (not externally controlled)
5. Select Follow Input to automatically match the capture settings to the
input.
6. In AJA Control Panel, depending on your AJA hardware, congure the audio
setting as required. See "Final Cut Pro X Audio Congurations" on page 14
for more information.
7. Other AJA Control Panel settings that may be, involved for video conversion
and audio routing, depending on your AJA hardware, may include:
• Format screen: Secondary Format settings
• Input Select screen: Video and Audio Input settings
• SDI Out screen: SDI output settings
• HDMI screen: HDMI output settings
• HDMI HDR screen: High Dynamic Range HDMI output settings
• Audio Setup screen settings
NOTE: See the AJA Installation and Operation Guide for your AJA device for detailed
information.
8. Run the AJA Control Room application and click on the Capture tab.

AJA and Apple Applications Quick Start Guide v15.5 20 www.aja.com
Figure 14. AJA Control Room Capture Screen
9. Ensure the AJA Device is selected in the Device Drop-down menu at the top
of the screen.
Figure 15. AJA Control Room, AJA Device Selected
10. Open Control Room Preferences > Capture and Choose the capture path.
Figure 16. AJA Control Room Preferences, Capture Path
11. Enter the File Name for the clip to be captured, and any other desired
information.
Page is loading ...
Page is loading ...
Page is loading ...
Page is loading ...
Page is loading ...
Page is loading ...
-
 1
1
-
 2
2
-
 3
3
-
 4
4
-
 5
5
-
 6
6
-
 7
7
-
 8
8
-
 9
9
-
 10
10
-
 11
11
-
 12
12
-
 13
13
-
 14
14
-
 15
15
-
 16
16
-
 17
17
-
 18
18
-
 19
19
-
 20
20
-
 21
21
-
 22
22
-
 23
23
-
 24
24
-
 25
25
-
 26
26


Ask a question and I''ll find the answer in the document
Finding information in a document is now easier with AI
Related papers
Other documents
-
Avid Technology System 5-MC Getting Started Manual
-
 Ultimate Ears Ultimate Ears BOOM 2 Portable Waterproof & Shockproof Bluetooth Speaker - Cherrybomb Edition click here.
-
HP MP7001 Software License Agreement
-
Brenthaven 6101 Datasheet
-
MUTOH kona apparel Series User manual
-
-
-
-
