Black & Decker LE750 TYPE 4 Owner's manual
- Category
- Power tools
- Type
- Owner's manual
This manual is also suitable for

I ST CTI UAL
Catalog No. LE750, EH1000
TYPE 6
Thank you for choosing Black & Decker!
Go to www.Blackand Decker.corn/NewOwner
to register your new product.
PLEASE READ BEFORE RETURNING THiS
PRODUCT FOR ANY REASON:
Ifyouhaveaquestionorexperiencea problemwithyourBlack&Deckerpurchase,goto
HTTP://WWW.BLACKANDDECKER.COM/INSTANTANSWERS
for instantanswers24hoursaday.
Ifyoucan'tfindtheanswerordonothaveaccesstotheinternet,
call1-800-544-6986from8 a.m.to5 p.m.ESTM0n.-- Fri.tospeakwithanagent.
Pleasehavethecatalognumberavailablewhenyoucall.
KEY INFORMATION YOU SHOULD KNOW:
• Your edger is designed to eject clippings and other debris forward, away from the operator.
Inspect and thoroughly clean your edger at the start of each edging season.
• The blade on this tool is not intended to be sharp. Do not sharpen it in any way.
Make sure edging area (100 ft.) is clear of other persons or pets prior to starting operation.
VEA EL ESPAklOL EN LA CONTRAPORTADA.
INSTRUCTIVO D.E OPERACION, CENTROS DE SERVICIO Y POLIZA DE GARANTiA.
ADVERTENClA: LEASE ESTE INSTRUCTIVO ANTES DE USAR EL PRODUCTO.
CAT. NO. LE750, EH1000 FORM NO. 90592543
Copyright © 2012 Black & Decker
OCTOBER 2012
PRINTED IN CHINA
m
;AFETY GUIDELINES - DEFINITIONS
is important for you to read and understand this manual.
he information it contains relates to protecting YOUR SAFETY and PREVENTING
PROBLEMS. The symbols below are used to help you recognize this information.
/_ DANGER: Indicates an imminently hazardous situation which, if not avoided, will result
in death or serious injury.
_WARNING: Indicates a potentially hazardous situation which, if not avoided, could result
in death or serious injury.
CAUTION: Indicates a potentially hazardous situation which, if not avoided, may result in
minor or moderate injury.
CAUTION: Used without the safety alert symbol indicates a potentially hazardous situation
which, if not avoided, may result in property damage.
When using electric gardening appliances, basic safety precautions should
always be followed to reduce risk of fire, electric shock, and personal injury, including the
following.
Z_.vWARNING Some dust created by this product contains chemicals known to the State of
California to cause cancer, birth defects or other reproductive harm. Some examples of these
chemicals are: • compounds in fertilizers
• compounds in insecticides, herbicides and pesticides
• arsenic and chromium from chemically treated lumber
To reduce your exposure to these chemicals, wear approved safety equipment such as dust
masks that are specially designed to filter out microscopic particles.
Z_WARNING: This product contains chemicals, including lead, known to the State of
California to cause cancer, and birth defects or other reproductive harm. Wash hands after
handling.
/_CAUTION: Wear appropriate personal hearing protection during use. Under some
conditions and duration of use, noise from this product may contribute to hearing loss.
READ ALL INSTRUCTIONS
TO REDUCE RISK OF INJURY:
• Before any use, be sure everyone using this tool reads and understands all safety
instructions and other information contained in this manual.
• Save these instructions and review frequently prior to use and in instructing others.
READ ALL INSTRUCTIONS
o
o
o
o
USE RIGHT APPLIANCE. Do not use the appliance for any job except that for which it is
intended.
DRESS PROPERLY. Do not wear loose clothing or jewelry. They can be caught in moving
parts. Rubber gloves, long pants and substantial, non-skid footwear are recommended when
working outdoors. Do not go barefoot or wear sandals. Wear protective hair covering to
contain tong hair.
USE SAFETY GLASSES AND OTHER SAFETY EQUIPMENT. Use safety goggles or safety
glasses with side shields, complying with applicable safety standards and, when needed, a
face shield. Also use face or dust mask if operation is dusty. This applies to all persons in the
work area. Also use a hard hat, hearing protection, gloves, safety shoes and dust collection
systems when specified or required. Safety glasses or the like are available at extra cost at
your local dealer or Black & Decker Service Center.
DON'T ABUSE CORD. Never carry appliance by cord or yank it to disconnect from
receptacle. Keep cord from heat, oil, and sharp edges.
DON'T OVERREACH. Keep proper footing and balance at all times.
MAINTAIN APPLIANCE WiTH CARE. Keep cutting edge clean for best performance and to
reduce the risk of injury. Follow instructions for lubricating and changing accessories. Inspect
appliance cord periodically and if damaged, have it repaired by authorized service facility.
Inspect extension cords periodically and replace if damaged. Keep handles dry, clean, and
free from oil and grease.
DISCONNECT APPLIANCES. Disconnect the appliance from the power supply when not in
use, before servicing, and when changing accessories such as blades and the like.
AVOID UNINTENTIONAL STARTING. Don't carry plugged-in appliance with finger on
switch. Be sure switch is off when plugging in.
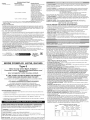
EXTENSION CORDS. Make sure your extension cord is in good condition. Cord insulation must
be intact with no cracks or deterioration. Plug connectors must be undamaged. When using an
extension cord, be sure to use one heavy enough to carry the current your product will draw.
An undersized extension cord will cause a drop in line voltage resulting in loss of power and
overheating, which can shorten the life of the motor. The table shows the correct size to use
depending on cord length and nameplate ampere rating. If in doubt, use the next heavier gauge.
The smaller the gauge number, the heavier the cord.
Minimum Gauge for Cord Sets
Volts Total Length of Cord in Feet
120V 0-25 26-50 51-100 101-150
(0-7,6m) (7,6-15,2m)(15,2-30,4m)(30,4-45,7m)
240V 0-50 51-100 101-200 201-300
(0-15,2m)(15,2-30,4m)(30,4-60,9m)(60,9-91,4m)
Ampere Rating
More Not more American Wire Gauge
Than Than
0 6 18 16 16 14
6 10 18 16 14 12
10 12 16 16 14 12
12 16 14 12 Not Recommended
[] indicates the Edger is "DOUBLE INSULATED"
• OUTDOOR USE EXTENSION CORDS z_WARNING: To reduce the risk of electric shock,
use only with an extension cord intended for outdoor use, such as an extension cord of type
SW-A, SOW-A, STW-A, STOW-A, SJW-A, SJOW-A, SJTW-A, or SJTOW-A.
• GROUND FAULT CIRCUIT INTERRUPTER (GFCl) protection should be provided on the
circuits or outlets to be used for the gardening appliance. Receptacles are available having
built in GFCI protection and may be used for this measure of safety.
• STAY ALERT. Watch what you are doing. Use common sense. Do not operate appliance
when you are tired, ill or under the influence of any drugs or alcohol.
• CHECK DAMAGED PARTS. Before further use of the appliance, a guard or other part
that is damaged should be carefully checked to determine that it wilt operate properly and
perform its intended function. Check for alignment of moving parts, binding of moving parts,
breakage of parts, mounting, and any other conditions that may affect its operation. A guard
or other part that is damaged should be properly repaired or replaced by an authorized
service center unless otherwise indicated elsewhere in this manual.
• REPAIRS AND SERVICE. Repairs, maintenance and any adjustments not specified in this
manual should be performed by Black & Decker authorized service centers or other qualified
service organizations, always using identical replacement parts.
• USE OF ACCESSORIES AND ATTACHMENTS. The use of any accessory or attachment
not recommended for use with this appliance could be hazardous. Note: Refer to the
accessory section of this manual for further details.
1. Keep guard in place.
2. Keep blade area clean.
Z_ DANGER: Risk of injury. Keep hands and feet away from blade and cutting area.
z_WARNING:
When using the edger, stones, pieces of metal and other objects can be thrown out at high
speed by the blade. The tool and guard are designed to reduce the danger. However, the fol-
lowing special precautions should be taken:
1. Wear safety glasses or other eye protection, gloves, long pants and substantial footwear.
2. Make sure that other persons and pets are at least 100 feet away.
3. Always stand to left side of main handle.
4. Before Landscaping or Trenching, check for buried electrical cables.
5. To reduce the risk of rebound (ricochet) injury, work going away from any nearby solid
object such as a wall, steps, large stone, tree, etc. Use great care when working close to
solid objects or into the wind, and, where necessary, do edging or trimming by hand.
SAVE THESE INSTRUCTIONS
REPLACEMENT PARTS: When servicing use only identical Black & Decker replacement
parts.
To reduce the risk of electric shock, this equipment has a polarized plug (one blade is wider
than the other). This equipment must be used with a suitable polarized 2 wire or 3 wire
extension cord. Polarized connections will fit together only one way. Make sure that the
receptacle end of the extension cord has large and small blade slot widths. If the plug does
not fit fully into the extension cord, reverse the plug. If it still does not fit, obtain a suitable
extension cord. If the extension cord does not fit fully into the outlet, contact a qualified
electrician to install the proper outlet. Do not modify the appliance plug or extension cord in
any way.
THIS TOOL CAN BE DANGEROUS. Follow all warnings and Safety Instructions in this
manual. The operator is responsible for following warnings and instructions in this manual
and on unit. Restrict use of this power tool to persons who read, understand and follow
warnings and instructions in this manual and on unit.
• AVOID DANGEROUS ENVIRONMENT. Don't use appliances in damp or wet locations. Don't
use appliances in the rain.
• KEEP CHILDREN AWAY. All other persons and pets should be kept at a safe distance from
work area.
• STORE IDLE APPLIANCES INDOORS. Appliances should be stored indoors in dry, secured
area- out of reach of children.
• DON'T FORCE APPLIANCE. It wilt do the job better and with less likelihood of a risk of injury
at the rate for which it was designed.
O

®
O Hex nut with conical washer[3
Ecrou Hexagonal muni d'une rol_lelle coniqu_
Tuerca hexagonal con roldana conica
4. Keep extension cord clear of operator, unit, and any obstacles at all times. Do not expose
the cord to heat, oil, water, or sharp edges.
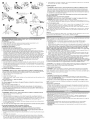
BLADE (FIGURE 9)
z_ DANGER: UNPLUG TOOL! WAIT FOR BLADE TO COME TO COMPLETE STOP!
The blade, two spacers and hex head nut with conical washer should be attached to your
edger in the order shown. Please check that the blade has been properly mounted before
using your edger. The edger blade has two wear indicators that show when blade needs to
be replaced. When the blade wears to the small hole at each end of the blade it will give only
1/4 in. depth of cut and should be replaced.
Tip: To increase blade life, keep initial cutting depth at minimum and increase depth
setting as blade wears.
TO REMOVE THE BLADE FOR REPLACEMENT:
Z_DANGER: UNPLUG TOOL! WAIT FOR BLADE TO COME TO COMPLETE STOP!
Z_DANGER: Blade rotates momentarily after the switch is released.
1. Loosen the hex head nut (9/16 in.). Use a 1 in. wrench on the outer spacer, or a 2 in. x
4 in. wood block between the blade and guard if necessary to hold the blade from turning.
TO ATTACH NEW BLADE:
2. Ensure inner spacer is on shaft--"flats" in spacer hole must engage with "flats" on shaft.
3. Holding the spacer in place, put the blade on the shaft, as shown (Figure 9).
4. Hold the blade against the spacer and install the outer spacer, again aligning the flats in
the spacer with the flats on the shaft.
5. Install the hex head nut and conical washer, then tighten with a wrench (140 in. pounds).
Note: Replace hex head nut and conical washer only with identical replacement part, see
Service Information.
SWITCH
To turn toot ON, squeeze the trigger switch. The trigger has been designed so that it is very
easy to hold in the ON position. To turn tool OFF, release the trigger.
BEFORE ASSEMBLING YOUR EDGER, CHECK THAT YOU HAVE RECEIVED THE
FOLLOWING IN THE SHIPPING CARTON.
SEE FIGURE 1.
A. LE750 Landscape/Edger
B. Edger blade with nut, conical washer and spacer system (assembled to unit)
C. Handle tube bolts and knobs (assembled to handle tubes)
D. Auxiliary handle, with bolt and knob.
ASSEMBLING THE HANDLE
Assemble Handle Tubes (Figure 2 and 3)
1. Remove knobs and curved head bolts from handle tube mounting holes.
2. Remove tape which secures internal jacketed cable to tubes.
3. Slide middle tube into upper tube and fasten handle tubes together with the knob and
curved head bolt. Note that when you first insert the bolt it may be necessary to wiggle it
carefully to get it past the jacketed cable inside the tube. There are two positions
available for adjustment to your preferred height setting. See Figure 11 for upper handle
orientation. Ensure the cable moves smoothly into the handle tubes while assembling.
4. Push jacketed cable down into lower tube to remove the slack. Slide the middle tube into
the lower by locating the groove and the bump. Fasten handle tubes together with the
remaining knob and curved head bolt. Note that when you first insert the bolt it may be
necessary to wiggle it carefully to get it past the jacketed wire inside the tube.
Z_CAUTION: NEVER use a sharp object to move jacketed wires out of the way.
POSITION AUXILIARY HANDLE (FIGURE 4)
1. Undo the knob from the bolt in the auxiliary handle and push/pull the bolt out of the handle.
2. Slide the auxiliary handle onto the main handle. The auxiliary handle can be positioned
for either left or right-hand operation whichever is more comfortable. The auxiliary handle
is NOT adjustable forward/back.
3. Insert the bolt back into the auxiliary handle hole on the side with the hex recess, attach the
knob and fully tighten.
CUT DEPTH ADJUSTMENT (FIGURE 5)
DANGER: UNPLUG TOOL! WAIT FOR BLADE TO COME TO COMPLETE STOP!
The front wheel can be adjusted to allow a deeper or shallower cut, and to increase the life of
the blade. Change the cut depth from the shipping position to your desired depth by:
1. Wait for blade to come to complete stop!
2. UNPLUG TOOL!
3. Loosen the Cut Depth Knob.
4. Adjust wheel depth, using the depth indicator on the wheel bracket and the marking on the
front housing.
Note: Recommend 1 in. depth for edging.
5. Tighten Knob firmly.
Tip: Thick overgrowth may drag on the guard. Reduce cut depth to minimum to help
reduce this effect.
PULL-UP EDGE GUIDE (FIGURE 6, 7)
The edge guide is useful for cutting a straight path along sidewalks. For landscaping or
trenching in the yard the edge guide can interfere with moving the edger through hard soil
or sod. The edge guide can be adjusted so that the tool will also perform TRENCHING and
LANDSCAPING operations.
TO CHANGE POSiTiON OF THE EDGE GUIDE
/_ DANGER: UNPLUG TOOL! WAIT FOR BLADE TO COME TO COMPLETE STOP!
1. Wait for blade to come to complete stop!
2. UNPLUG TOOL!
3. Pull Edge Guide Knob sideways to unlock from the guard tab, see Figure 6 detail, in
direction of small arrow. Lift the knob up until the lower square notch in the lever lines up
with the tab on the guard. In this position the edge guide is lifted up (Figure 7) so the tool
can easily cut along the edges of flower and shrubbery beds, and around trees in
preparation for trenching or sod removal.
4. To return edge guide to lower position, pull lever sideways and push down until guard tab
fits into upper lever hole.
Tip: You may need to tilt edger back to allow edge guide to be moved into down position.
ATTACHING EXTENSION CORD TO EDGER (FIGURE 8)
IMPORTANT SAFETY iNSTRUCTiONS: POLARIZED PLUGS
To reduce the risk of electric shock, this equipment has a polarized plug (one blade is
wider than the other). Do not modify the appliance plug or extension cord in any way.
Read iMPORTANT SAFETY INSTRUCTIONS at beginning of manual. Note: Check the
extension cord safety instructions provided earlier.
1. To prevent disconnection of edger cord, secure extension cord by tying the power plug as
shown.
2. Insert plug into cord socket.
3. An extension cord retainer is built into the switch handle to reduce strain on the power
cord. To use this feature, simply double the extension cord as shown, about a foot from
the end, and insert it into the end of the handle. Hook the loop formed by doubling the cord
over the tab. Gently tug on the cord to ensure that it is firmly retained in the handle.
NOTE: The edger is a major appliance and should not be operated simultaneously with other
major appliances on the same household circuit.
Z_WARNING: Make sure that other persons and pets are at least 100 feet away.
1. Set cut depth at 1 in. and set edge guide to the down position, refer to Assembly
Instructions.
2. Before starting the edger, line up the tool so the edge guide rests against the edge of the
paved surface (Figure 10). Both rear wheels should be on the paved surface when edging.
Tip: When there is heavy overgrowth of grass over the paved surface it may drag on
the guard. An initial cut may be required with the edger on the grass side. This will
require lifting up the edge guide and may require reducing the depth of cut (see Edge
Guide and Depth Adjustment instructions).
3. To avoid kickback of edger, tilt the handle down so the blade is above the ground (Figure 11).
4. Turn switch ON and allow blade to spin without moving tool.
5. Slowly lift the handle to lower the blade, finding the edge of the paved surface and start
edging. Then move toot forward slowly along edge of paved surface, keeping the edge
guide pressed lightly against the pavement edge.
For the first edging each season, it is best to move forward slowly because grass is thickest then.
Subsequent edging will be completed more rapidly. Ifthe tool slows down, back it up an inch or
two until the blade comes up to normal speed. During edging some sparks may be
generated from hitting stones. This is normal. Do not attempt to edge when the grass or soil is
wet or moist--for electrical safety and to prevent clogging of the blade chamber. Ifyou must edge
under conditions that cause the blade chamber to become clogged, release trigger, wait for blade
to come to complete stop! UNPLUG TOOL! open door and remove clogged material with a stick.
To continue to operate the tool in a clogged condition will seriously overload the motor.
Z_CAUTION: Do not attempt to unclog the blade chamber by dropping or tapping the tool on
the ground. This can damage the unit. Keep hands clear of edge guide and blade when
cleaning as these wear to a very sharp point during edging.
LANDSCAPING/TRENCHING
Z_WARNING: Before Landscaping or Trenching, inspect and ensure there are no exposed or
buried cables, pipes or other objects that may create a hazard or interfere with operating the
edger. Set depth to only that required for the job. Do not overload. Iftool slows, pull back slightly
and wait until blade comes up to normal speed.
STORAGE
Z_WARNING: Be sure the tool is unplugged.
Remove and clean any debris from the outside of the edger and inside of guard before
storage. See MAINTENANCE section. If necessary, the edger may be stored by hanging on
a hook by its handle. See Figure 12.
Z_CAUTION: DO NOT HANG EDGER ON THE SWITCH TRIGGER OR POWER CORD!
Note: Do not store the tool on or adjacent to fertilizers or chemicals. Such storage can cause
rapid corrosion.
PREVENTING CORROSION
Fertilizers and other garden chemicals contain agents that greatly accelerate the corrosion
of metals. If you use the tool in areas where fertilizers or chemicals have been used, the tool
should be cleaned immediately afterwards.
Wipe all exposed parts with a damp cloth. You may lubricate only metal parts with a light
petroleum based oil.
When cleaning, DO NOT immerse tool in water or squirt it with a hose.
Use only mild soap and damp cloth to clean the toot. Never let any liquid get inside the toot;
never immerse any part of the tool into a liquid.
IMPORTANT: To assure product SAFETY and RELIABILITY, repairs, maintenance and
adjustment should be performed by authorized service centers or other qualified service
organizations. Use only identical replacement parts.
Inspect and thoroughly clean your edger at the beginning of each edging season for longer life
and better performance.
ACCESSORIES
Recommended accessories for use with your tool are available from your local dealer or
authorized service center. Ifyou need assistance regarding accessories, please call:
1-800-544-6988.
Z_WARNING: The use of any accessory not recommended for use with this toot could be
hazardous.

Problem
• Unit will not start.
TROUBLESHOOTING
Possible Cause
• Cord not plugged in.
• Circuit fuse is blown.
• Circuit breaker is tripped.
• Cord or switch is damaged.
Possible Solution
• Plug tool into a working outlet.
• Replace circuit fuse.
(If the product repeatedly
causes the circuit fuse to
blow, discontinue use
immediately and have it
serviced at a Black &
Decker service center or
authorized servicer.)
• Reset circuit breaker.
(If the product repeatedly
causes the circuit breaker to
trip, discontinue use immediately
and have it serviced at a
Black & Decker service center
or authorized servicer.)
• Have cord or switch replaced
at Black & Decker Service
Center or Authorized Servicer
For assistance with your product, visit our website www.blackanddecker.com for the
location of the service center nearest you or call the BLACK & DECKER help line at
1-800-544-6986.
SERVICE INFORMATION
All Black & Decker Service Centers are staffed with trained personnel to provide customers
with efficient and reliable power tool service. Whether you need technical advice, repair, or
genuine factory replacement parts, contact the Black & Decker location nearest you. To find
your local service location, refer to the yellow page directory under "Tools--Electric" or call:
1=800=544-6986 or visit www.blackanddecker.com
FULL TWO-YEAR HOME USE WARRANTY
Black & Decker (U.S.) Inc. warrants this product for two years against any defects in material
or workmanship. The defective product will be replaced or repaired at no charge in either of
two ways.
The first, which will result in exchanges only, is to return the product to the retailer from whom
it was purchased (provided that the store is a participating retailer). Returns should be made
within the time period of the retailer's policy for exchanges (usually 30 to 90 days after the
sale). Proof of purchase may be required. Please check with the retailer for their specific return
policy regarding returns that are beyond the time set for exchanges.
The second option is to take or send the product (prepaid) to a Black & Decker owned or
authorized Service Center for repair or replacement at our option. Proof of purchase may be
required.Black & Decker owned and authorized Service Centers are listed under
"Tools-Electric" in the yellow pages of the phone directory.
This warranty does not apply to accessories. This warranty gives you specific legal rights and
you may have other rights which vary from state to state or province to province. Should you
have any questions, contact the manager of your nearest Black & Decker Service Center. This
product is not intended for commercial use.
FREE WARNING LABEL REPLACEMENT: If your warning labels become illegible or are
missing, call 1-800-544-6986 for a free replacement.
LATIN AMERICA: This warranty does not apply to products sold in Latin America. For
products sold in Latin America, check country specific warranty information contained inthe
packaging, call the local company or see the website for warranty information.
Imported by
Black & Decker (U.S.) Inc.,
701 E. Joppa Rd.
Towson, MD 21286 U.S.A.
See 'Tools-
Electric'
Yellow Pages-
for Service &
Sales
MODE D'EMPLOI LE750, EH1000
Type 6
Merci d'avoir choisi Black & Decker!
Consulter le site Web www.BlackandDecker.com/
NewOwner
pour enregistrer votre nouveau produit.
A LIRE AVANT DE RETOURNER CE PRODUIT
POUR QUELQUE RAISON QUE CE SOIT •
Sidesquestions0udespr0blemessurgissentapresI'achatd'unpr0duitBlack&Decker,
consulterlesiteWeb
HTTPJ/WWW.BLACKANDDECKER.C0_INSTANTANSWERS
pour0btenirdesrep0nsesinstantanement24heuresparj0ur.
Silarep0nseestintr0uvable0uenI'absenced'accesaInternet,composerle
1-800-544-6986de8 ha 17h HNE,dulundiauvendredi,pourparleravecunagent.
Priered'av0irlenumer0decatalogues0uslamain10rsdeI'appel.
RENSEIGNEMENTS IMPORTANTS
• Le coupe-bordure est con£_upour ejecter les brins d'herbe et autres debris vers
I'avant, loin de I'utilisateur.
• Inspecter et bien nettoyer le coupe-bordure au debut de chaque saison de coupe.
• La lame du produit ne dolt pas _tre tranchante. Ne I'aff0ter en aucun cas.
• S'assurer qu'il n'y a ni personnes ni animaux dans la zone de coupe (30 m (100 pi))
avant le debut des travaux.
LIGNES DIRECTRICES EN lVlATII_RE DE SECURITE - DI_FINITIONS
It est important que vous lisiez et compreniez ce mode d'emptoi. Les inform.ations qu'it
contient concernent VOTRE SECURITE et visent & EVlTER TOUT PROBLEME. Les
symboles ci-dessous servent & vous aider & reconnaftre cette information.
//_ DANGER : Indique une situation dangereuse imminente qui, si elle n'est pas _vit6e, causers
la mort ou des graves blessures.
_AVERTISSEMENT : Indique une situation potentiellement
dangereuse qui, si elle n'est pas _vit6e, pourrait causer la mort ou de graves blessures.
/_MISE EN GARDE : Indique une situation potentiellement dangereuse qui, si elle n'est pa_
6vit6e, pourrait causer des blessures mineures ou mod_r6es.
MISE EN GARDE : Utitis6 sans le symbote d'alerte & la s6curit6, indique une situation potentiel.
lement dangereuse qui, si elle n'est pas 6vit6e, peut r6sutter en des dommages & la propri6t&
Z-_AVERTISSEMENT : Afin de r6duire les risques d'incendie, de secousses _lectriques ou de
btessures Iorsqu'on utilise des outits de jardinage 61ectriques, it faut toujours respecter les
mesures de s6curit6 suivantes.
Z_AVERTISSEMENT : Le produit g6n_re de la poussi_re qui peut renfermer des produits
chimiques. Selon 1'6tat de la Californie, ces produits chimiques peuvent causer le cancer
ainsi que des malformations cong6nitates, et its pr_sentent d'autres dangers au syst_me
reproductif humain. Voici des exemples de tels produits chimiques :
• les compos_s d'engrais;
• les compos6s d'insecticides, d'herbicides et de pesticides;
• I'arsenic et le chrome provenant de bois trait&
Afin de minimiser les risques, porter de 1'6quipement de s6curit6 approuv6 comme des
z_aAsquesantipoussi_res sp6cialement congu pour filtrer les particutes microscopiques.
VERTISSEMENT : Le produit renferme des produits chimiques dont du plomb. Selon
1'6tatde la Californie, ce produit chimique peut causer le cancer ainsi que des malformations
cong6nitates et it pr6sente d'autres dangers au syst_me reproductif humain. Se laver les
roans apr_s ut sat on.
Z_MISE EN GARDE : Porter un dispositif appropri6 de protection de I'oufe Iors de
I'utilisation du produit. Dans certaines conditions et dur6es d'utilisation, le produit peut
6mettre un niveau de bruit provoquant la perte de I'oufe.
LIRE TOUTES LES DIRECTIVES,
AFIN DE RI_DUIRE LES RISQUES DE BLESSURES :
• Avant toute utilisation, s'assurer que tous ceux qui se servent de I'outil lisent et comprennent
toutes les mesures de s6curit6 et tout autre renseignement contenu dans le pr6sent guide.
• Conserver ces mesures et les relire fr6quemment avant d'utitiser I'outil et d'en expliquer le
fonctionnement &d'autres personnes.
Z_AVERTISSEMENT : Le produit renferme des produits chimiques, dont du ptomb. Selon
I'_tat de la Californie, ce produit chimique peut causer le cancer ainsi que des
malformations cong6nitales, et il pr6sente d'autres dangers au syst_me reproductif
z_umain. Se laver les mains apres I'utitisation.
MISE EN GARDE : Porter un dispositif appropri6 de protection de I'oufe Iors de
I'utitisation du produit. Dans certaines conditions et dur6es d'utitisation, le produit peut
6mettre un niveau de bruit provoquant la perte de I'oufe.
Z._AVERTISSEMENT : Afin de r6duire les risques d'incendie, de secousses 61ectriques ou de
btessures Iorsqu'on utilise des outils 61ectriques, il faut toujours respecter les mesures de
s6curit6 suivantes.
PIECES DE RECHANGE : Lors des travaux d'entretien, utiliser seutement des pi_ces de
rechange Black & Decker identiques.
Le produit est muni d'une fiche polaris6e (une lame plus large que I'autre) afin de minimiser
les risques de secousses _lectriques. Le produit dolt alors _tre utilis6 avec un cordon de
raltonge bifitaire ou trifitaire appropri& Ce genre de fiche n'entre que d'une fa(_ondans une
prise polaris_e. S'assurer que la douille de la raltonge poss_de une fente plus large que
I'autre. Lorsqu'on ne peut insurer la fiche & fond dans la rallonge, il faut tenter de le faire
apr_s avoir invers_ les lames de c6t& Si la fiche n'entre toujours pas dans la rallonge, il
faut se procurer une raltonge appropri_e. Lorsqu'on ne peut insurer la fiche de la rallonge &
fond dans la prise, il faut communiquer avec un _lectricien certifi_ pour qu'il installe une prise
appropri_e. I1ne faut pas modifier la fiche de I'outit ni la rallonge.
• L'OUTIL PRESENTE DES RISQUES. Respecter tousles avertissements et mesures de
s_curit_ du present guide et ceux indiqu_s sur I'outil; I'utitisateur a la responsabilit_ de s'y
conformer. Seules les personnes qui ont lu et compris ces avertissements et mesures de
s_curit_, et qui ont I'intention de s'y conformer peuvent se servir de I'outil de jardinage
_lectrique.
• TENIR COMPTE DU MILIEU DE TRAVAIL. Ne pas utiliser I'outit dans un endroit mouill_ ou
humide. Ne passe servir I'outit sous la ptuie.
• ELOIGNER LES ENFANTS. Tousles visiteurs et les animaux domestiques doivent _tre
tenus & I'_cart de I'aire de travail.
• RANGER LES OUTILS INUTILISI_S A L'INTERIEUR. Itfaut ranger les outits dans un endroit
sec et sOr, hors de laport_e des enfants.
• NE JAMAIS FORCER L'OUTIL. Afin d'obtenir un rendement efficace et avec moins de
risques de btessures, utiliser I'outit &son rendement nominal.
• UTILISER L'OUTIL APPROPRII_. Se servir de I'outil selon I'usage pr_vu.
• PORTER DES VETEMENTS APPROPRP_S. Eviter de porter des v_tements amptes et des
bijoux qui peuvent _tre happ_s par les pi_ces en mouvement. Porter des gants de caoutchouc,
des pantalons et des chaussures robustes &semelte antid_rapante pour travaitler & I'ext_rieur.
Ne passe servir de I'outil pieds nus ou en sandales. Prot_.ger lachevelure sielte est tongue.
• PORTER DES LUNETTES DE SECURITI_ ET AUTRE EQUIPEMENT DE SI_CURITI_.
Porter des lunettes de protection ou de s_curit_ &_crans lat_raux, conform_ment aux
normes de s_curit_ appropri_es, et, au besoin, un _cran facial. Porter _galement un masque
respiratoire si le travail de coupe produit de la poussi_re. La pr_sente mesure vaut pour toute
personne dans la zone de travail. It faut _galement porter un casque, des prot_ge-tympans,
des gants et des chaussures de s_curit_ ainsi qu'utitiser des syst_mes de d_poussi_rage
Iorsque sp_cifi_ ou exig& Les lunettes de s_curit_ et autre materiel semblabte sont vendus
s_par_ment chez les d_taillants et dans les centres de service Black & Decker.
°NE PAS MANIPULER LE CORDON DE FA(_ON ABUSIVE.. Ne pas transporter t'outil par le
cordon ni tirer sur ce dernier pour le d_brancher de la prise. Eloigner lecordon des sources
de chaleur,.des flaques d'huile et des ar_tes tranchantes.
° NE PAS DEPASSER SA PORTEE. Toujours demeurer dans une position stable et garder
son _quilibre.
° PRENDRE SOIN DES OUTILS. S'assurer que le rebord tranchant est propre afin d'optimiser
le rendement de I'outil et de minimiser les risques de btessures. Suivre les directives
concernant la lubrification et le remplacement des accessoires. Inspecter r_guli_rement
le cordon de t'outil et te faire r_parer au besoin & un atelier d'entretien autoris& Inspecter
r_guli_rement les cordons de rallonge et les remplacer Iorsqu'its sont endommag_s.
S'assurer que les poign_es sont toujours propres, s_ches et libres de toute tache d'huile ou
de graisse.
° DEBRANCHER LES OUTILS NON UTILISI_S. Respecter cette mesure Iorsqu'on ne se
sert pas de I'outil, ou qu'on dolt te r_parer ou en changer un accessoire.
° EVITER LES DEMARRAGES ACCIDENTELS. Ne pas laisser le doigt sur I'interrupteur
Iorsqu'on transporte I'outil. S'assurer que I'interrupteur est &la position hors circuit
Iorsqu'on branche I'outit.
° CORDONS DE RALLONGE. S'assurer que le cordon de raltonge est en bon _tat.
L'isolation du cordon dolt _tre intacte, sans fissures ni usure. Les connecteurs de la fiche
ne doivent pas _tre endommag_s. Lorsqu'on se sert d'un cordon de ratlonge, s'assurer qu'il
est de calibre appropri_ pour la tension n_cessaire au fonctionnement de I'outit. L'utilisation
d'un cordon de calibre inf_rieur occasionne une baisse de tension entrafnant une perte
de puissance et ta surchauffe; ce qui peut r_duire la dur_e du moteur. Le tableau suivant
indique le calibre appropri_ selon la Iongueur du cordon et tes mentions de la plaque
signal_tique de I'outil. En cas de doute, utiliser un cordon de calibre sup_rieur. Le chiffre
indiquant le calibre est inversement proportionnel au calibre du cordon.
Calibre minimal des cordons de rallonge
Tension
120V
240V
Intensite (A)
Au Au
moins plus
0 6
6 10
10 12
12 16
Longueur totale du cordon en pieds
0-25 26-50 51-100 101-150
(0-7,6m) (7,6-15,2m) (15,2-30,4m) (30,4-45,7m)
0-50 51-100 101-200 201-300
(0-15,2m) (15,2-30,4m)(30,4-60,9m)(60,9-91,4m)
Calibre moyen des ills (AWG)
18 16 16 14
18 16 14 12
16 16 14 12
14 12 Non recommande
Page is loading ...
Page is loading ...
Page is loading ...
Page is loading ...
-
 1
1
-
 2
2
-
 3
3
-
 4
4
-
 5
5
-
 6
6
-
 7
7


Black & Decker LE750 TYPE 4 Owner's manual
- Category
- Power tools
- Type
- Owner's manual
- This manual is also suitable for
Ask a question and I''ll find the answer in the document
Finding information in a document is now easier with AI
in other languages
Related papers
-
Black & Decker LE750 EdgeHOG 2-in-1 Landscape Edger User manual
-
-
-
BLACK DECKER LE760 User manual
-
-
-
-
-
-
Other documents
-
Craftsman CMEED400 Owner's manual
-
Sears 172.79183 User manual
-
-
-
Morrison Electric Edger Owner's manual
-
909 EDG4 User manual
-
-
Global Machinery Company EDG3 User manual
-
-
EGO ME0801 Owner's manual