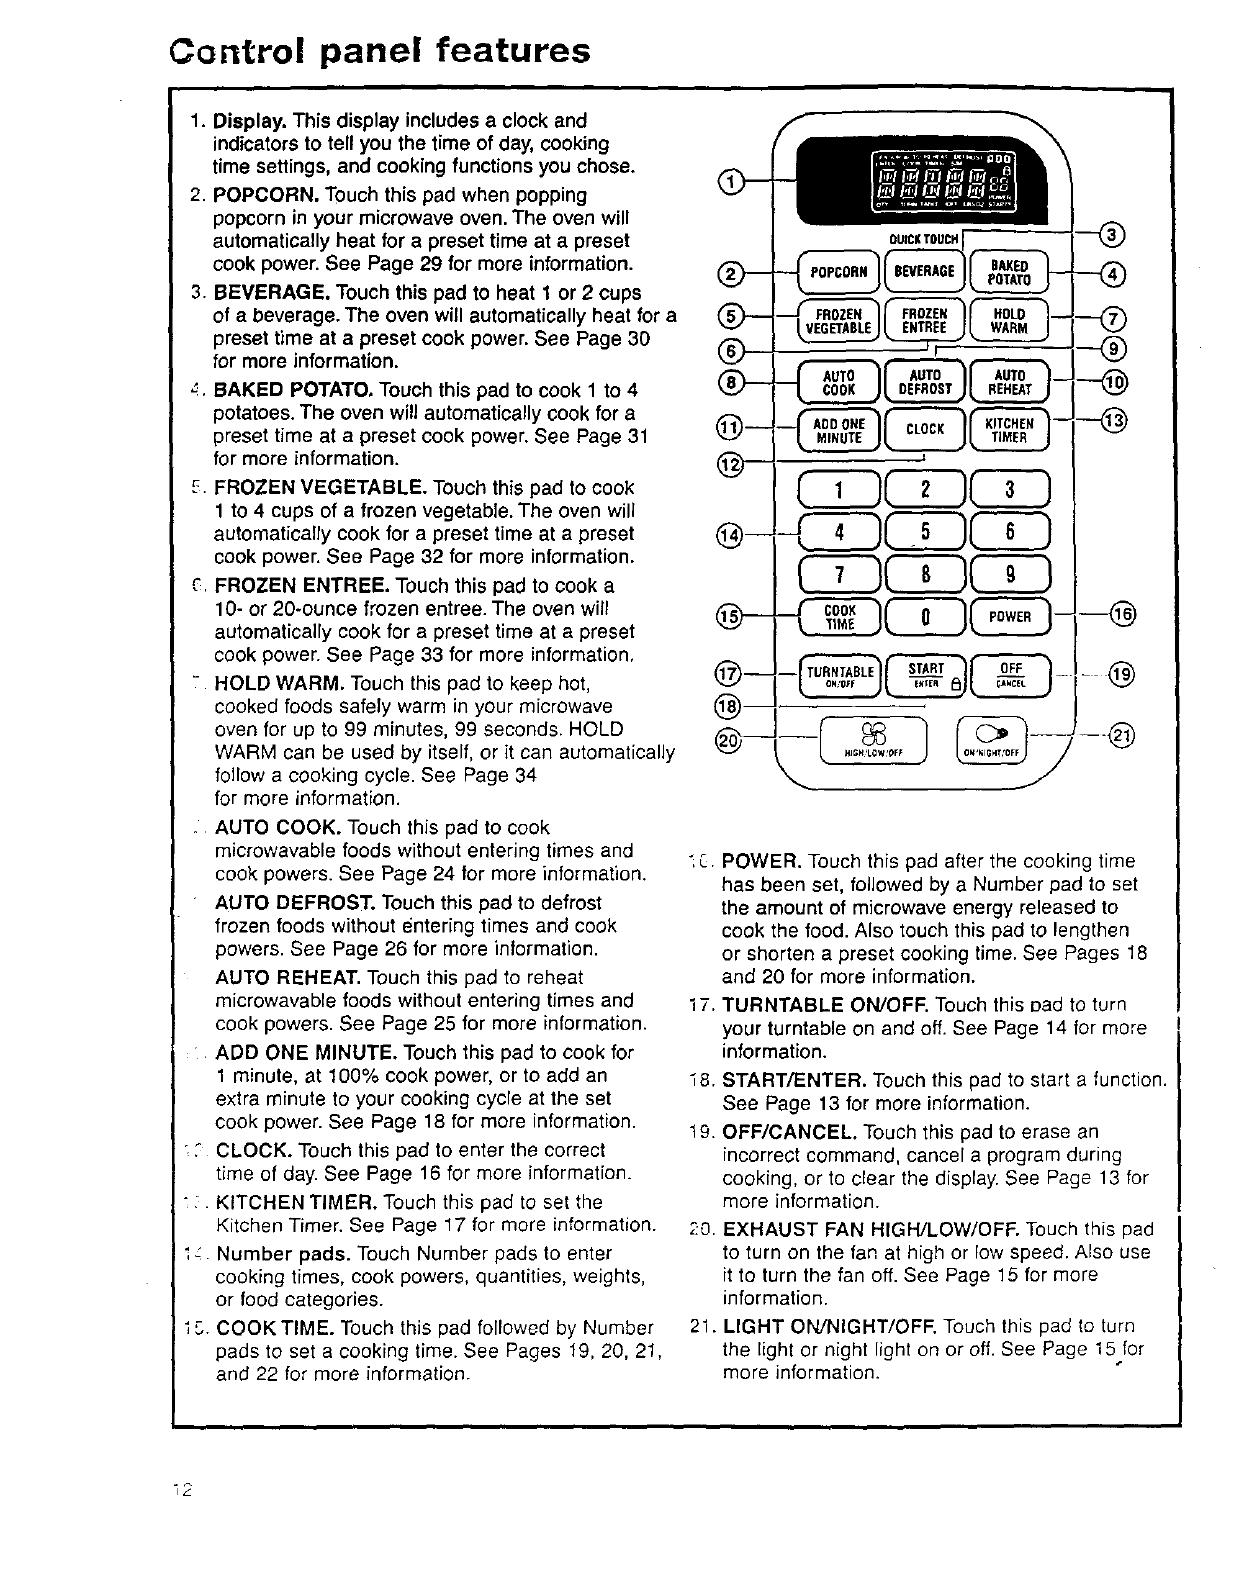
Control panel features
1. Display. This display includes a clock and
indicators to tell you the time of day, cooking
time settings, and cooking functions you chose.
2. POPCORN. Touch this pad when popping
popcorn in your microwave oven.The oven will
automatically heat for a preset time at a preset
cook power. See Page 29 for more information.
3. BEVERAGE. Touch this pad to heat 1 or 2 cups
of a beverage. The oven will automatically heat for a
preset time at a preset cook power. See Page 30
for more information.
4. BAKED POTATO. Touch this pad to cook 1 to 4
potatoes. The oven will automatically cook for a
preset time at a preset cook power. See Page 31
for more information.
£. FROZEN VEGETABLE. Touch this pad to cook
1 to 4 cups of a frozen vegetable. The oven will
automatically cook for a preset time at a preset
cook power. See Page 32 for more information.
_, FROZEN ENTREE. Touch this pad to cook a
10- or 20-ounce frozen entree. The oven will
automatically cook for a preset time at a preset
cook power. See Page 33 for more information,
- HOLD WARM. Touch this pad to keep hot,
cooked foods safely warm in your microwave
oven for up to 99 minutes, 99 seconds, HOLD
WARM can be used by itself, or it can automatically
follow a cooking cycle. See Page 34
for more information.
• AUTO COOK. Touch this pad to cook
microwavable foods without entering times and
",C.
cook powers. See Page 24 for more information.
AUTO DEFROST. Touch this pad to defrost
frozen foods without entering times and cook
powers. See Page 26 for more information.
AUTO REHEAT. Touch this pad to reheat
microwavable foods without entering times and 17.
cook powers. See Page 25 for more information.
ADD ONE MINUTE. Touch this pad to cook for
1 minute, at 100% cook power, or to add an 18.
extra minute to your cooking cycle at the set
cook power. See Page 18 for more information. 19.
•: CLOCK. Touch this pad to enter the correct
time of day. See Page 16 for more information•
_ KITCHEN TIMER. Touch this pad to set the
Kitchen Timer. See Page 17 for more information. 20.
i_ Number pads. Touch Number pads to enter
cooking times, cook powers, quantities, weights,
or food categories.
i 5. COOKTIME. Touch this pad followed by Number
pads to set a cooking time. See Pages 19, 20, 21,
and 22 for more information.
®
OUICKTOUCH
\
POWER. Touch this pad after the cooking time
has been set, followed by a Number pad to set
the amount of microwave energy released to
cook the food. Also touch this pad to lengthen
or shorten a preset cooking time. See Pages 18
and 20 for more information.
TURNTABLE ON/OFF. Touch this Dad to turn
your turntable on and off. See Page 14 for more
information.
START/ENTER. Touch this pad to start a function.
See Page 13 for more information.
OFF/CANCEL. Touch this pad to erase an
incorrect command, cancel a program during
cooking, or to clear the display. See Page 13 for
more information.
EXHAUST FAN HIGH/LOW/OFF. Touch this pad
to turn on the tan at high or low speed. Also use
it to turn the fan off. See Page 15 for more
information.
21. LIGHT ON/NIGHT/OFF. Touch this pad to turn
the light or night light on or off. See Page 15 for
more information.
i2


