Page is loading ...

Radiant Convection
Self-Cleaning Freestanding
Electric Range
Eslula El_clrica
Radiante a Convecci6n
Tipo "lndependiente" con Autolimpieza
Models, Modelos 911.99002, 99003, 99004, 99009
! J
m
Z
Q
F
m
Z
m
t_
ZI
O
F
229C4020P252 Sears, Roebuck and Co.,
(SR-10454) Hoffman Estates, IL 60179 U.S.A. www.searsocom

RADIANTSELF-CLEAMNG
FREE-STANDINGRANGE
TABLEOF CONTENTS
Range Safety ........................ 3-8
Anti-Tip Bracket .................... 3-4
Protecting the Cooktop ............. 8
Features of Your Range ........... 9
Removal of Packaging Tape .... 9
Cooking Zones ....................... 10
Hot Cooktop Indicator
Lights ...................................... 10
Cooking Utensils and Woks ... 10
Home Canning Tips ................ 10
Checking Your Cookware ....... 11
Cookware Performance .......... 11
Radiant Coils .......................... 11
Temperature Limiter ............... 11
Control Settings ...................... 11
Bridge Surface Unit ................ 12
Dual Cooking Zones ............... 12
Surface Warmer ...................... 13
Oven Control, Clock,
Timer ................................. 14-15
Control Display ....................... 16
Clock ...................................... 17
Kitchen Timer ......................... 17
Tones ...................................... 18
F Code .................................... 18
Oven Cooking Tips ........... 19-21
Baking With Margarine ........... 20
Baking .................................... 22
Convection Baking Tips ......... 23
Convection Roasting
Tips ................................... 24-25
Convection Baking and
Roasting ........................... 26-27
Favorite Recipe ................ 27-29
Multi-Stage Cooking ......... 29-30
Broiling ................................... 31
Setting Special Features ... 32-33
Self-Clean Cycle ............... 34-35
Glass-Ceramic Cooktop ... 36-37
Control Panel .......................... 38
Broiler Pan and Grid ............... 38
Self-Clean Oven Interior ......... 38
Drawer and Sides of Range ...38
Oven Door Glass .................... 38
Door Vent Trim ........................ 38
Stainless Steel ........................ 38
Surface Control Knobs ........... 39
Oven Light Bulbs .............. 39-40
Oven Racks ............................ 40
Oven Door ........................ 40-41
Storage Drawer ...................... 42
Storage Drawer Liner ............. 42
Before Calling for
Service .............................. 43-46
Temperature Adjustment ..21,47
Warranty ................................. 50
Consumer Service
Numbers ............................... 100
For your convenience and future reference, please write down your model
and serial numbers in the space provided, They are located on the frame
behind the storage drawer,
MODEL NUMBER: SERIAL NUMBER:
© Sears, Roebuckand Co.
2

iMPORTANTSAFETY
iNSTRUCTiONS
SAVE THESE INSTRUCTIONS
Read aiJ instructions before using this appJiance. When using gas or
electrical appliances, basic safety precautions should be followed,
including the following:
13.Use the bracket as a template
and mark 2 hole positions on the
wall and 2 hole positions on the
floor. Use either the wood or
concrete floor set of positions,
depending on your floor type.
See Fig. 1.
Adjacent Cabinet or
Final Location of Range
Side Panel
These ANTI-TIP bracket installation
instructions are for wood or concrete
floors and walls. Any other type of
construction may require special
installation techniques to provide
adequate fastening of the ANTI-TIP
bracket to the floor and wall.
The use of this bracket does not
prevent tipping of the range when
bracket is not properly installed.
NOTE: The installation of the ANTI-
TIP bracket must meet all local codes
for securing appliance.
Step 1
Locating the bracket
A. Locate the bracket against the
rear wall and either the right or
left cabinet. If the countertop
overhangs the cabinet, offset the
bracket from the cabinet by the
amount of overhang. If there is no
adjacent cabinet, position the
edge of the bracket at the desired
location of the range side panel.
Wood
Floor Holes
Bracket
Side
Rear
Leveling Leg
Wall
Holes
Concrete
Floor
Holes
Fig. 1
continued on next page

iMPORTANTSAFETY
iNSTRUCTiONS
Anti-Tip Bracket (contd.)
Step 2
Anti-tip bracket installation
A, Wood Construction:
1, Floor: Drill a 1/8"pilot hole in
the center of each pre-marked
wood floor hole position (a nail
or awl may be used if a drill is
not available),
AND
2. Wall: Drill an angled W' pilot
hole (as shown in Fig. 2) in the
center of each pre-marked
wall hole position (a nail or awl
may be used if a drill is not
available).
ATTACHMENT TO WALL AND FLOOR
Bracket. iI
'tl wo
I Screw Must Plate
EnterWood HI 'T-
orMeta --
Fig. 2
B. Mount the ANTI-TIP bracket
with the 4 screws provided as
illustrated in Fig. 2.
C. Concrete Construction:
1,
2,
Hardware required:
4 each 1//x 11/2"lag bolt
4 each 1/2"O.D. sleeve
anchor
Drill the recommended size
hole for the anchors into the
concrete at the center of each
pre-marked concrete floor and
wall hole position. Install the
sleeve anchor into the drilled
holes and then install the lag
bolts through the bracket.
DO NOT OVERTIGHTEN THE
BOLTS.
Step 3
Checking the installation
A. Complete the installation of
the range per the installation
instructions provided with it.
B. Check if the ANTI-TIP bracket is
installed and engaged properly.
Remove the kick panel or storage
drawer and inspect the REAR
LEVELING LEG. Make sure it fits
securely into the slot. See Fig. 1.
4

IMPORTA#TSAFETY
I#STRUCTIO#S
WARNJNG_ To prevent
[ _J accidental tipping of the
range from abnormal
use, including excessive loading
of the oven door, attach the
range to the wail or floor by
installing the Anti-Tip device
supplied. If the range is moved
for cleaning, servicing or any
reason, be sure the Anti-Tip
device is re-engaged properly
when the range is slid back in
the opening. Failure to do so
could result in the range tipping
and may cause personal injury.
To inspect the Anti-Tip device,
remove the storage drawer and
look to see if the rear leg leveler
fully engages the slot in the
bracket.
important: To ensure safety for
yourself, family, and home, please
read your Use and Care Guide
carefully. Keep it handy for reference.
Pay close attention to Safety Sections.
BE SURE your appliance is installed
and grounded by a qualified technician.
• DO NOT leave children alone or
unattended near an appliance in use.
• TEACH CHILDREN not to play with
controls or any part of the appliance,
and not to sit, climb or stand on the
door, or any other part of the
appliance.
* CAUTION: NEVER STORE items of
interest to children on the backguard
or incabinets above the appliance.
Children climbing on the appliance
could be seriously injured.
* KEEP THIS book for later use.
* NEVER USE your appliance for
warming or heating the room.
* NEVER TRY to repair or replace
any part of the appliance unless
instructions are given in this manual.
All other work should be done by a
qualified technician.
* ALWAYS KEEP combustible wall
coverings, curtains, dishcloths,
towels, potholders, and other linens a
safe distance from the appliance.
* NEVER HEAT unopened food
containers. Pressure buildup can
cause the container to burst and
cause injury.
* NEVER LEAVE containers of fat or
drippings in your oven.
* ALWAYS KEEP the oven and
surface unit areas free from things
that will burn. Food, wooden utensils,
and grease buildup could catch fire.
Plastic utensils could melt and
canned foods could explode. Your
appliance should never be used as
a storage area.
* ALWAYS KEEP your appliance clear
of things that will burn (gasoline and
other flammable vapors or liquids).
* NEVER TRY to clean a hot surface.
Some cleaners produce noxious
fumes, and wet cloths or sponges
could cause steam burns.
* NEVER WEAR loose-fitting clothing
when using your appliance.
* NEVER USE a towel or other bulky
cloth as a potholder. Make sure the
potholder is dry. Moist potholders
and wet cloths or sponges could
cause steam burns. DO NOT let
potholders touch hot heating
elements.

iMPORTANTSAFETY
iNSTRUCTiONS
DO NOT touch cooking zones,
surfaces near them, or interior oven
surfaces. These may be hot enough
to cause burns even though they
are dark in color. During and after
use, do not touch or let clothing or
flammable material contact the
zones or hot surfaces until they have
had time to cool. Other surfaces
near the oven vent openings, oven
door and window, and cooktop
surfaces may also be hot enough to
cause burns.
* NEVER LEAVE cooking zones
unattended at high settings.
Boilovers result in smoking or
greasy spills which could catch fire.
* NEVER cook on a broken cooktop;
cleaning solutions and spillage
could penetrate it and create the
risk of electrical shock or fire.
Contact a qualified technician for
repairs.
* ALWAYS TURN utensil handles
inward and away from other cooking
zones to reduce the risk of burns,
ignition, unintended contact, and
spillage.
* WHEN PREPARING flaming foods
under the vent hood, turn the fan on.
ONLY certain kinds of glass or
ceramic cookware can be used for
cooktop cooking. Make sure the
cookware you choose to use is
designed for cooktop cooking
without breaking due to the sudden
temperature change.
ALWAYS USE care when
touching cooking zones. They will
retain heat after the range has been
turned off.
NEVER BLOCK the oven air vent
behind the right rear cooktop
cooking zone.
COOKWARE USED for
cooktop cooking should be flat
on the bottom and large enough to
cover the cooking zone being used.
Undersized utensils expose the
cooking zone and may result in
direct contact or ignition of clothing.
The proper size utensil will also
improve efficiency.
* PLACE OVEN RACKS in the
desired position while the oven is
cool. If racks must be moved while
oven is hot, do not let potholder
contact the hot oven element.
* AFTER BROILING, always take the
broiler pan and grid out of the oven
and clean them. Leftover grease in
the broiler pan could catch fire the
next time you use your oven.
* ALWAYS USE care when opening
the oven door. Let hot air and steam
escape before moving foods.
* NEVER USE aluminum foil to line
the oven bottom. Improper use of
foil could start a fire, or electrical
shock could result.

iMPORTANTSAFETY
iNSTRUCTiONS
* CLEAN ONLY the parts listed
in this manual. Follow all cleaning
instructions. Be sure to remove
broiler pan and grid before the
self-clean cycle.
* NEVER RUB, move, clean, or
damage the door gasket on self-
cleaning ranges. It is essential for
a good seal.
* NEVER TRY to clean utensils,
cookware, removable parts, or
broiler pan and grid in the self-
clean cycle.
* DO NOT USE oven cleaners--
No commercial oven cleaner or
protective coating of any kind
should be used in or around any
part of the oven.
* IF THE SELF-CLEANING mode
malfunctions, turn the oven off and
disconnect the power supply. Have
it serviced by a qualified technician.
IMPORTANT SAFETY
NOTICE!
The California Safe Drinking Water
and Toxic Enforcement Act requires
the governor of California to
publish a list of substances known
to the state to cause birth defects
or other reproductive harm and
requires businesses to warn their
customers of potential exposure
to such substances. The fiberglass
insulation in a self-cleaning oven
will give off a very small amount
of carbon monoxide during the
cleaning cycle. Exposure can be
minimized by venting with an
open door or window or using a
ventilation fan or hood.
IMPORTANT: The health of
some birds is extremely sensitive
to the fumes given off during
the self-clean cycle of any
range. Move birds to another
well-ventilated room.
READ AND UNDERSTAND
THIS INFORMATION NOWZ
Be sure everyone in your home
knows what to do in case of fire.
Never use water on a grease fire;
it will only spread the flames.
COOKTOP GREASE FIRE:
Never pick up a flaming pan...
1. Turn off the surface elements.
2. Smother the flame with a tightly
fitting lid, use baking soda, or
use a dry chemical, foam, or
halon-type extinguisher.
OVEN FIRE:
Do not try to move the pan!
1. Close the oven door and turn
controls off
2. If fire continues, carefully open the
door, throw baking soda on the
fire, or use a dry chemical, foam,
or halon-type extinguisher.

OPERATION
ProtectingtheCooktop
* DO NOT slide cookware across your
cooktop.
* DO NOT use a dishtowel or sponge
to clean or wipe your cooktop.
* DO NOT use scouring powders or
plastic, nylon, or metal cleaning pads
on your cooktop.
* DO NOT apply your cooktop
cleaning creme to the cooktop
surface if the surface is hot.
* READ the instruction label on the
cooktop cleaning creme bottle before
attempting to clean the surface of
your cooktop.
* AFTER cleaning the cooktop surface,
be sure to wipe off any residue that
may be left from the creme with a dry
paper towel.
* FOR MAJOR
spills, turn the
surface control
knob to OFF. Use
a dry paper towel to
wipe up spill, then use a razor
scraper (held with a potholder) at a
45° angle against the surface of the
cooktop to scrape remaining spill
from the hot cooking zone.
* DO NOT cook directly on the surface
of the glass.
* DO NOT use the cooktop as a cutting
board.
* DO NOT use a knife or any sharp
object on the cooktop seal around the
outer edge of the glass because it will
cut or damage it.
m
CAUTION: When the /
surfacecontrolsare /
turned off, the Hot |
Surface Indicator light will |
remain lit until the cooktop |
surface has cooled to |
approximately 150°F. The |
glass ceramic surface will |
retain heat after the indicator |
light goes out. Use caution |
until !he cooktop surface has |
had time to cool.
Sugar spills (such as jellies, fudge,
candy syrups) or melted plastic can
cause pitting of the cooktop surface
unless the spill is removed while it is still
hot. Special care should be taken when
removing hot substances.
Follow these instructions carefully and
remove soil while spill is hot.
1, Turn off the cooking zone affected
by the spill. Remove the utensils.
2, Wearing an oven mitt, hold the razor
scraper at a 45° angle against the
cooktop and scrape hot spill to a
cool area outside the cooking zone.
3, With spill in a cool area, use a dry
paper towel to remove the spillover.
Any spill remaining should be left
until the surface of the cooktop has
cooled. Do not continue to use the
soiled cooking zone until all of the
spill has been removed. Follow the
steps under For Heavy, Burned-on
Soil in the Glass-Ceramic Cooktop
Cleaning section to continue the
cleaning process.
8

OPERATION
Cooktop
Fluorescent Lk
(on some models)
Bridge Surface
Unit Control
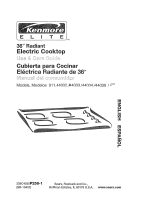
FEATURESOF YOURRANGE
Range Control
Control Knob for
Dual Zone
Hot Surface
ghts
4 Removable
Cooktop
Control
Ceramic
Glass Cookto
Bridge
Broiler Pan
Hidden Bake
(under oven floor)
Model and Serial
Number
Removable
Storage Drawer
Self-Clean Removable
Gasket Oven Door
Dual Cooking
Zone
Oven Door Latch
Oven Lights
Self-Clean
Oven Interior
Convection Bake
Fan and Element
on rear wal!-not
shown)
Removable Oven
(3)
To remove the adhesive residue left from packaging tape, use household
dishwashing liquid, mineral oil, or cooking oil. With a soft cloth rub into the area
and allow to soak. Rinse and dry well. Repeat procedure using an appliance
polish to ensure no damage is done to the range. This should be done before
the range is turned on for the first time. The tape cannot be removed once
the range has heated. Packaging tape may be found in the following areas:
Cooktop Surface, Control Panel Area, Door Handle, Door Trim, and Oven Area.

OPERATION
RadiantCooktopCooking
Before using your new radiant
cooktop, clean it with the Cooktop
Cleaning Creme ®.This will leave a
protective coating.
NOTE: On models with white
glass-ceramic, it is normal for the
surface to appear discolored when
cooking zones are hot. This is
temporary and will disappear as
the glass cools.
The cooking zones are shown by
the outline on the glass. The sign
above each control knob shows you
which cooking zone is turned on by
that knob.
NOTE: The surface warmer
(the center rear zone) is controlled
by the electronic control.
00
O0
Right
Rear
®0 O0
O0 00 O®
Left Left Right
Rear Front Front
A Hot Cooktop Indicator Light will
glow when the surface temperature
exceeds 150°F and will remain on
until the surface has cooled to
approximately 150°F.
Use pans and woks that are flat on
the bottom. The size of the pan should
be the same size as the zone used
when cooking.
_:::Z:Z._::::::::::::::_ Size of
Bottom I Cooking
Of Pan _ _............._;_-_ Zone
1"
Pans ehouJd be flat on bottom.
1, Be sure the canner is centered
over the zones.
2, Make sure the canner is flat on the
bottom.
3, Use recipes and procedures from
reputable sources. These are
available from manufacturers such
as Ball¢ and Kerr¢, and the
Department of Agriculture
Extension Service.
4, Use caution, while canning, to
prevent burns from steam or heat.
10

OPERATION
RadiantCooktopCooking(cont.)
If you don't know :::d::¢Y_:_i:;Y7}:l
if your cookware
is flat on the
bottom, try this
test. Turn your pan upside down on
the countertop, place the edge of a
ruler flat against the surface of the
pan. Rotate the ruler in a full circle,
checking as you turn for any space
between the two surfaces. The
bottom of the pan and the edge of
the ruler should fit flush against each
other all the way across.
Stainless Steel: Highly
recommended for use with your new
cooktop. Especially good with a clad
bottom.
Aluminum: Heavyweight aluminum
cookware recommended.
Cast Iron: Cast-iron cookware that is
completely covered with porcelain
enamel is recommended. Cast iron
that is not covered with porcelain
enamel may scratch the glass
ceramic surface of the cooktop.
Copper Bottom: Has good
performance, but it can leave a
residue on the cooktop surface if
allowed to boil dry.
Glass=Ceramic or Stoneware:
Usable. Check for rough edges or
burrs, which may scratch the cooktop
surface.
When the knobs are turned on, coils
beneath the glass radiate heat
through the glass to the cooking
utensil. It will take a few moments for
the coils to heat; as they do, a red
glow can be seen below the surface
of the cooktop (on all zones except
the warmer zone).
Every radiant surface unit has a
temperature limiter.
The temperature limiter protects the
glass cooktop from getting too hot.
The temperature limiter may cycle
the units off for a time if:
• The pan boils dry.
,,The pan bottom is not flat.
• The pan is off center.
,,There is no pan on the unit.
HI For quick starts, such as
bringing water to a boil.
MED For slow boil and sauteing.
LO For steaming foods or keeping
cooked foods at serving
temperature.
1. Push in to turn I_--_
the knob.
o'3
2. Set on or between o_F
numbers for _° "_
desired heat. _,/_'_i '
J
The "on" indicator light will glow when
any cooking zone is activated. The
surface warmer uses the words
"warmer" and "on" as indicators.
11

OPERATION
RadiantCooktopCooking(cont.)
The surface unit on the left side of
your cooktop is designed to let you
heat all parts of a large utensil that is
too large to fit on one surface unit.
The Bridge Surface Unit is made up of
a front section, a middle section, and
a rear section. You can heat all
sections at once, or the front and rear
section separately when cooking with
normal-size utensils.
To use the bridge surface unit:
Push in and turn F_O_I
CO
the left front _,_, co .....
surface unit control _. _[_'_ ....
knob in the /8 '// /_'_x 8\
clockwise direction _Q__4/_
to your desired 4 4
setting. This will
",_0 LO_
allow you to heat • .o,
S,mFA_
the front and
middle sections of the Bridge
Surface Unit.
To use only the left
front surface unit
without the middle
section, push in
and turn the left
front surface unit
control knob in the
counter-clockwise
direction to your
desired setting.
CO
OFF
HI H_
6 6
4 4
",_o _o_
• Eto_
S_m_A_
Use the left rear control knob to
heat the rear section of the Bridge
Surface Unit.
The right front element has two
cooking zones:
6" Zone
To use the dual cooking zones:
To use the small _°o,.
6" zone, push in o°°
and turn the _I,,_,_','_ OFF #_%•
_1 HI
cooktop control 48Lu_Lo 2'_
knob in the 6
counter-clockwise _
direction to your
desired setting ......
To use the large 9" _.....
co
zone, push in and ,,i_ oe _&
OFF
turn the cooktop % ._
control knob in /'8/_/_/_'_ 8_
the clockwise
direction to your 2 4
desired setting, u L
t4OT
SUb,ACE •
12

OPERATION
RadiantCooktopCooking(cont.)
The display will show 'Warmer" and
"HOT ON." The surface warmer will be
set at 1 (Low). Touch the pad again
for 2 (Medium). Touch the pad a third
time for 3 (High). Touch the pad again
to return to setting 1 (Low).
The surface warmer is used to keep
hot, cooked food warm. Always start _SURFACE_
with hot food. Placing uncooked or
cold food on the surface warmer ON/OFF
could result in food-borne illness.
For best results, foods placed on the
surface warmer should be covered
with aluminum foil or a lid. When
warming pastries or breads, vent
the cover to allow excess moisture SETTING
to escape. Do not cover food with 1 (Low)
plastic wrap. Plastic may melt on the 1 (Low)
glass-ceramic surface. 2 (Medium)
When using the surface warmer, use 2 (Medium)
only cookware or dishes that are
recommended for cooktop or oven 2 (Medium)
usage. Cookware and dishes will 3 (High)
become hot when placed on the 3 (High)
surface warmer. Always use potholders
when removing food from the surface
warmer.
Surface Warmer
To use the surface warmer:
1, ouch the SURFACE
WARMER pad. The
display will show "Set
ON/OFF Warmer."
2. Touch the POWERLEVEL pad.
3. When you remove food
from the surface
warmer, touch the
SURFACE WARMER
pad to turn off the
surface warmer.
WARMERGUIDE
FOOD
Bread/Pastries
Chocolate
Plate of food
Sauces, Stews,
Cream Soups
Vegetables
Soups (liquid)
Tea or Coffee
NOTES:
• The Power Level that you need will
depend on the amount and type of
food, the starting temperature of the
food, the utensil used for the food,
and the length of the holding time.
,,Cover all foods being warmed with
foil or a lid.
,,The surface warmer will not work
during the Self-Clean cycle.
,,You can recall or change the warmer
setting while the oven is being used.
Touch the POWER LEVEL pad
once to see the current setting.
Touch the pad again to change the
setting.
,,The surface warmer will not glow red
like the cooking elements.
13

OPERATION
OvenControl,Clock,and Timer
©@
e®®®@@
Your new touch pad oven control will allow you to set various functions with
ease. Below are the different types of functions and a description of each.
BAKE - Cooks foods in the traditional
oven with a temperature range of
170°F to 550°F,
FAVORITE RECIPE - Lets you
program up to five temperature/
cooking time combinations, With this
function you can bake or convection
bake/roast any one of five of your
favorite recipes without having to
choose the settings each time,
MULTI-STAGE - Lets you set the
oven to cook your recipes that require
two temperature/time settings,
BROIL - Cooks foods at 550°F HI
broil or 450 ° LO broil from the direct
heat of the upper element, Broiling
should be done with the door opened
to the broil stop position,
CLEAN - Cleans the inside area of
the oven for you, When the cycle
is finished, the oven will turn off
automatically,
NOTE: The oven door will
automatically latch and will only
unlatch once the oven has cooled
down,
Cooks food with hot air circulated over
and around foods by a
convection fan, located at the back
of the oven.
CONVECTION BAKE - Ideal for
baked foods cooked on multiple
shelves. Good for a large quantity of
foods.
CONVECTION ROAST- Good for
large tender cuts of meat, uncovered.
Set the amount of time you
want foods to cook. The oven
turns off automatically at the
end of this time.
Set the time of day you want
the oven to turn on. The oven
will turn on automatically at
the time you have set. When
DELAY START is used with
COOK TIME, FAVORITE
RECIPE, MULTI-STAGE,
or CLEAN, the oven will
also turn off automatically,
at the end of the cooking or
clean cycle.
14

OPERATION
Oven Centre/, C/ock, and Timer
(cent.)
The TEMP UP or DOWN
arrow pads set the oven
(_) temperature. The HOUR/MIN
UP and DOWN arrow pads
set the time of day, length of
cooking time, length of
cleaning time, the delayed
start time, and the time set on
the Kitchen Timer.
The START pad must be
touched to activate any oven ON/OFF
function.
The CLEAR/OFF pad is used
to cancel any oven function
and the end of cycle tone. It
wil! not cancel the Clock or
Kitchen Timer.
The KITCHEN TIMER
ON/OFF pad is used to turn
ON/OFFthe Kitchen Timer on or off. It
will not control any other
functions.
The CLOCK pad is used to
set the time of day.
The SURFACE LIGHT
pad turns the cooktop
fluorescent light on or off
(on some models),
The OVEN LIGHT pad turns
the lights inside the oven on
or off.
The I_ (CONTROL
LOCKOUT) pad locks down
the electronic oven control
so that it cannot be set if the
pads are touched.
The SURFACE WARMER
pad is used with the POWER
LEVEL pad to turn on the
Surface Warmer.
The POWER LEVEL pad
selects levels 1, 2, or 3 of
the Surface Warmer.
15

OPERATION
ControlDisplay
Set Oven Temperature On Function Time
indicator indicator Indicator indicator Indicator
Oven Function Surface Warmer Time Function
Indicator Indicator Indicator
The Control Display is an easy
reference for using your oven control.
Below are descriptions of how the
Control Display works.
OVEN TEMPERATURE
iNDiCATOR - This indicator has a
multiple purpose.
• Displays the temperature
• Displays Oven Problems -
If your control flashes "F" and
a number or letter, you have
experienced an oven problem.
Please read the section on
F=CODES in your manual.
"ON" INDICATOR - Will light when
the oven turns on.
SET INDICATORS - The set indicator
will flash during an oven function,
timed function, or surface warmer
setting to let you know you need to set
a temperature, time, or power level.
Example: "SET" will flash with
"BAKE" on solid to let you know you
need to set the bake temperature.
TIME INDICATOR - Displays the time
of day, cooking time, delay start time,
cleaning time, or the time set on the
kitchen timer.
* Displays reminder code "PUSH
START" - If the time indicator
flashes the word "PUSH START,"
then you need to press the START
pad to activate your setting.
OVEN FUNCTION INDICATORS -
Displays which oven function has
been set, when the oven door locks,
if multi-stage is selected, and if the
function is delayed.
FUNCTION INDICATOR- Graphically
displays the cooking function.
TIME FUNCTION
iNDiCATORS - Display which time
indicator has been set.
SURFACE WARMER
INDICATOR- Displays status of
Surface Warmer, Hot and On.
16

OPERATION
OvenControl,Clock,and Timer
The clock must be set for the correct
time of day before a delayed oven
function can work properly. The time
of day cannot be changed during
a timed oven function, but can be
changed during a bake or broil
function.
HOW TO SET THE CLOCK
1. Touch the CLOCK pad.
2. Touch the HOUR/MIN UP
and/or DOWN arrow pads to
set the time.
3. Touch the START pad.
RECALL THE CLOCK
While using your oven for cooking,
touch the CLOCK pad if you wish to
check the time of day. The current
time of day will show in the display.
POWER FAILURE
If you have experienced a power
failure, the time will flash in the display
and will be incorrect. Reset your
clock.
Any oven cooking function that was in
process will need to be reset.
The Kitchen Timer is used to
time cooking processes or other
household activities. It does not
control the oven. It can be set for up
to 9 hours and 59 minutes. It will
count down in minutes until the LAST
60 SECONDS is reached, then the
control will beep once. When the
countdown reaches ZERO, the
control will beep 3 times, followed by
one beep every 6 seconds until the
KITCHEN TIMER ON/OFF pad is
touched. The 6-second beep can be
removed for future cycles if desired.
For directions on removing this
continuous beep, see "Tones" on
the following page.
HOW TO SET THE TIMER
0N/0FF {_
1. Touch the KITCHEN TIMER ON/
OFF pad.
2. Touch HOUR/MIN UP and/or
DOWN arrow pads to set time.
3. Touch the START pad.
4. When the countdown has reached
zero, touch the KITCHEN TIMER
ON/OFF pad to turn off the beep.
To cancel the timer during the
countdown, touch the KITCHEN
TIMER ON/OFF pad TWICE.
17

OPERATION
Oven Centre/, C/ock, and Timer
(cont.)
Your new control has a series of
tones that will sound at different times.
These tones may sound while you set
the control for an oven function, or at
the end of the oven function. It will
also alert you that there may be a
problem with the functions. Below
are the types of tones and a brief
description of each.
TONES WHILE SETTING THE
CONTROL - When you touch a pad,
you will hear a beep. This beep will
let you know that the pad has been
activated. (The arrow pads do not
beep.)
END OF TIMED CYCLE TONE-
At the end of a timed cooking
function, you will hear 3 short beeps
followed by 1 beep every 6 seconds.
This beep will continue to sound
every 6 seconds until the CLEAR/
OFF pad is touched or you may
select the special feature to cancel
this 6-second beep from sounding
at the end of future cycles.
TO CANCEL THE 6-SECOND BEEP
1. Touch and hold the BAKE and
BROIL pads, at the same time
for 3 seconds, until the display
shows "SF."
2. Touch the KITCHEN TIMER ON/
OFF pad. The display will show
"con bEEP" (continuous beep).
3. Touch the KITCHEN TIMER ON/
OFF pad again. The display will
show "bEEP" (beep canceled).
4. Touch the START pad to cancel
the 6-second beep and leave the
special feature mode.
If you would like to return the
6-second beep, repeat steps above
until the display shows your choice
and touch the START pad.
ATTENTION TONE - This tone will
sound if you make an error or an
oversight is made while setting an
oven function.
Examples would be:
a. Setting a clean cycle and the oven
door is not properly closed.
b. Setting function and not pressing
the START pad.
c. Touching an additional function
pad without first setting a
temperature or time.
Any of these can be quickly identified
by watching the display.
PREHEAT TONE - When you
set an oven temperature, the oven
automatically starts to heat. When the
temperature inside the oven reaches
the temperature you have set, a tone
will sound to let you know the oven is
ready for baking.
If you set an oven function and the
control beeps while the display is
flashing "F" and a number or letter
such as "F4" or "Fd," there may be a
problem with the control or oven.
Touch the CLEAR/OFF pad. If the
function code repeats, disconnect
all power to the range for at least 30
seconds and then reconnect the
power. Try setting the function again.
If the code repeats again, write down
the flashing code and call for service.
Tell the technician what code was
flashing.
18

OPERATION
OvenCookingTips
It is normal to have some odor when
using your oven for the first time. To
help eliminate this odor, ventilate the
room by opening a window or
using a vent hood.
IMPORTANT:
Never cover the
oven bottom or
oven rack with
aluminum foil.
Improper use can cause poor heat
flow, poor baking results, and may
damage the oven finish. To prevent
staining from spillovers, you may
place a piece of aluminum foil or a
cookie sheet on a rack below the
food which may spill over.
Preheating is bringing the oven
temperature up to the temperature
you will be using during baking. Let
the oven preheat when recipes call
for preheating.
The low temperature zone of your
oven (between 170°F and 200°F)is
available to keep hot cooked foods
warm. However, foods should not be
kept at these temperatures longer
than 2 hours.
When using your convenient Delay
Start operation, foods such as dairy
products, fish, poultry, etc., should
never sit more than 1 hour before
cooking. Room temperatures and the
heat from the oven light promote
bacterial growth.
The oven vent is located behind
the right rear zone. This area could
become hot during oven use. It is
normal for steam to come out of the
vent and/or collect moisture
underneath when the oven is in use.
The vent is important for proper air
circulation. Never block this vent.
__ Oven Vent
_--_-_ .Location
To prolong the life of your
oven light bulbs, follow
this helpful tip: Always
turn the lights off when the oven is not
in use or during a clean cycle. If your
oven lights are left on for an extended
period of time, the oven will be warm
when the door is opened due to the
heat generated from the oven light
bulbs.
Opening the door often to check
foods will cause heat loss and poor
baking results.
19

OPERATION
OvenCookingTips(cont.)
Most recipes for baking have been
developed using high-fat products
such as butter or margarine (80% fat
by weight--the federal requirement
for products labeled "margarine").
You will get poor results if cakes, pies,
pastries, cookies, or candies are
made with low-fat spreads. Low-fat
spreads contain less fat and more
water. The high moisture content of
these spreads affects the texture and
flavor of favorite baked recipes. The
lower the fat content of a spread
product, the more noticeable these
differences become. To ensure best
results, use margarine, butter, or stick
spreads containing at least 70%
vegetable oil.
The bake element is under the oven
floor. Do not place food on the oven
bottom for cooking.
The Oven Temperature Sensor at the
back of the oven continuously senses
and controls the temperature inside
the oven. To keep a constant set
temperature, the elements will cycle
(turn on and off during cooking).
Baking results will be ] -_ L_"_
better if baking pans __._f_"_i
are centered in the
oven as much as __
possible. If baking with
more than one pan, place the pans so
each has at least 1" to 11/2"of air
space around it. If baking four cake
layers at the same time, place two
layers on rack 2 and two layers on
rack 4. Stagger pans on the rack so
one is not directly above the other.
FLAT COOKIE !!i_,
SHEETS, without
sides, allow air to
circulate all around
the cookies for even
browning.
SHINY PANS reflect heat, and are
perfect for cakes and quick breads
that need a golden brown crust.
GLASS, DARK NON=STICK, OR
DARKENED-BY-AGE BAKEWARE
absorbs heat and can be used for
yeast breads, pie crust, or foods that
need a brown crust. The oven
temperature, when using these pans,
should be reduced by 25°F.
2O
/