Canon imageCLASS D880 Operating instructions

Category
Multifunctionals
Type
Operating instructions

This manual is also suitable for

Set-Up Instructions
Set-Up Instructions
Thank you for purchasing Canon imageCLASS D800 Series.
To get your machine ready for use, please follow the instructions in this document before referring to any other documentation.
Series
Unpack the machine and its components.
Check that you have the following:
Power cord
Telephone cable*
Documentation
Set-Up Instructions
Basic Guide
Fax Guide*
Registration Card**
Limited Warranty Notice
CD-ROM
* imageCLASS D880 Model
** U.S.A. only
Slide the platen unit
to the left until the
I4 mark appears.
Remove the shipping
material.
2
1
Lift the platen unit
lever
1 and slide the
platen unit to the left
2.
Open the cartridge
cover.
Machine
Output tray
L50 S-Cartridge
Destination labels*
3 4
65
Remove the shipping materials.
Place the machine on a flat surface.
Remove
all shipping tapes from the exterior of the machine.
1
2
E111MB Set-Up Sheet.qxd 6/21/04 9:11 AM Page 1
Grasp the cartridge
with one hand, firmly
and slowly pull out
the sealing tape tab
with the other hand.
Remove the sealing
tape completely.
Place the cartridge on
a flat and stable
surface, grip the
sealing tape tab,
and snap in the
direction shown. Make
sure that the tab is
detached from the
cartridge.
Slide the cartridge
into the machine with
the arrow mark up as
far as it will go.
Close the cartridge
cover and slide the
platen unit back to the
original position.
Pull out the
cassette until it
stops.
Load the paper stack beneath
the cassette’s length guide
1
and width guides 2.
Make sure that the paper stack does not
exceed the length and width guides in
the cassette.Failure to do so will cause a
paper jam.
Gently insert the cassette as
far as it will go.
Load paper.
Install the cartridge.
Remove the cartridge
from its bag.
Rock the cartridge
several times to
distribute the toner
evenly.
Arrow Mark
3
5
4
6
1
2
1
2
E111MB Set-Up Sheet.qxd 6/21/04 9:11 AM Page 2
Connect the machine to your computer.
Connect the telephone cable and any necessary external device.
(Only for the imageCLASS D880 model)
Using a parallel cable
PARALLEL
Parallel interface connection
Make sure that the other end is securely connected
to your computer.
Make sure that the computer is turned off before connecting the cable.
Using a USB cable
PAR
USB interface connection
Connect to your computer using USB cable.
Make sure that the other end is securely connected
to your computer.
USB interface connection
Attach the output tray.
NOTE
Printer cables are not included.
Hook the tab on
the output tray
onto the opening
on the left side of
the machine.
1
External device (optional)
Connect the cord of an
extension telephone,
answering machine or
data modem to the jack.
Telephone line cord
Connect the supplied
telephone line to the
L
L
jack.
Then connect the other end to the
telephone line jack on your wall.
Connect external devices as follows:
•Telephone or answering machine
•Telephone and answering machine
•Telephone and modem (external modem)
Built-in computer modem and telephone
:Telephone line jack
:External device jack
LL
Machine
LL
Machine
Telephone
line
Telephone or answering
machine
Telephone
line
Telephone
Telephone
line
Telephone
Modem
LINE
TEL.
Computer
Serial
Connector
Machine
Telephone
Computer
LINE
TEL.
Machine
LL
Answering
machine
LINE
TEL.
LL
LL
E111MB Set-Up Sheet.qxd 6/21/04 9:11 AM Page 3
Connect the power cord.
When the power cord is
plugged into both the
machine and a power
outlet, the machine will turn
on. The LCD displays PLEASE
WAIT. Please wait until the
LCD display returns to the
Copy Mode standby display.
Connect the supplied power cord to the power cord
connector on the left side of the machine.
Then connect the other end into a properly grounded
standard 120 V three-prong outlet.
Copy Mode standby display
NOTE
The machine does not have a power switch.
Set the fax receive mode. (Only for the imageCLASS D880 model)
Press FAX to switch the machine to the Fax Mode.
Press Receive Mode until the mode you want appears.
You can select from the following modes:
FAX ONLY: if you use the machine to receive only faxes.
DRPD: to distinguish between fax and voice calls by using
Distinctive Ring Patterns.
MANUAL: you can receive faxes by pressing Start before hanging
up the handset on the telephone.
AnsMode: if you want to receive faxes automatically and route voice calls to an answering machine.
FaxTel: when a telephone is connected to the machine, the machine automatically switches between faxes and voice calls.
NOTE
•The machine does not ring when it receives a fax in FaxOnly. If you want to be alerted when a fax is received, connect a telephone to
the machine, and enable the INCOMING RING setting.
Fax Guide
•For AnsMode, you need to connect an answering machine or a telephone with an answering machine to the machine (see step ).
•Follow these guidelines when using the machine with an answering machine:
—Set the answering machine to answer on the first or second ring.
When recording the outgoing message on the answering machine, the entire message must be no longer than 15 seconds.
DRPD is an optional service that must be set up through your telephone company.
Press
Set.
The selected receive mode is set and the machine returns to the standby mode. The current date and the selected receive mode are
displayed.
1
2
3
4
Turn over to
continue
Turn over to
continue
ex:
ex:
E111MB Set-Up Sheet.qxd 6/21/04 9:11 AM Page 4
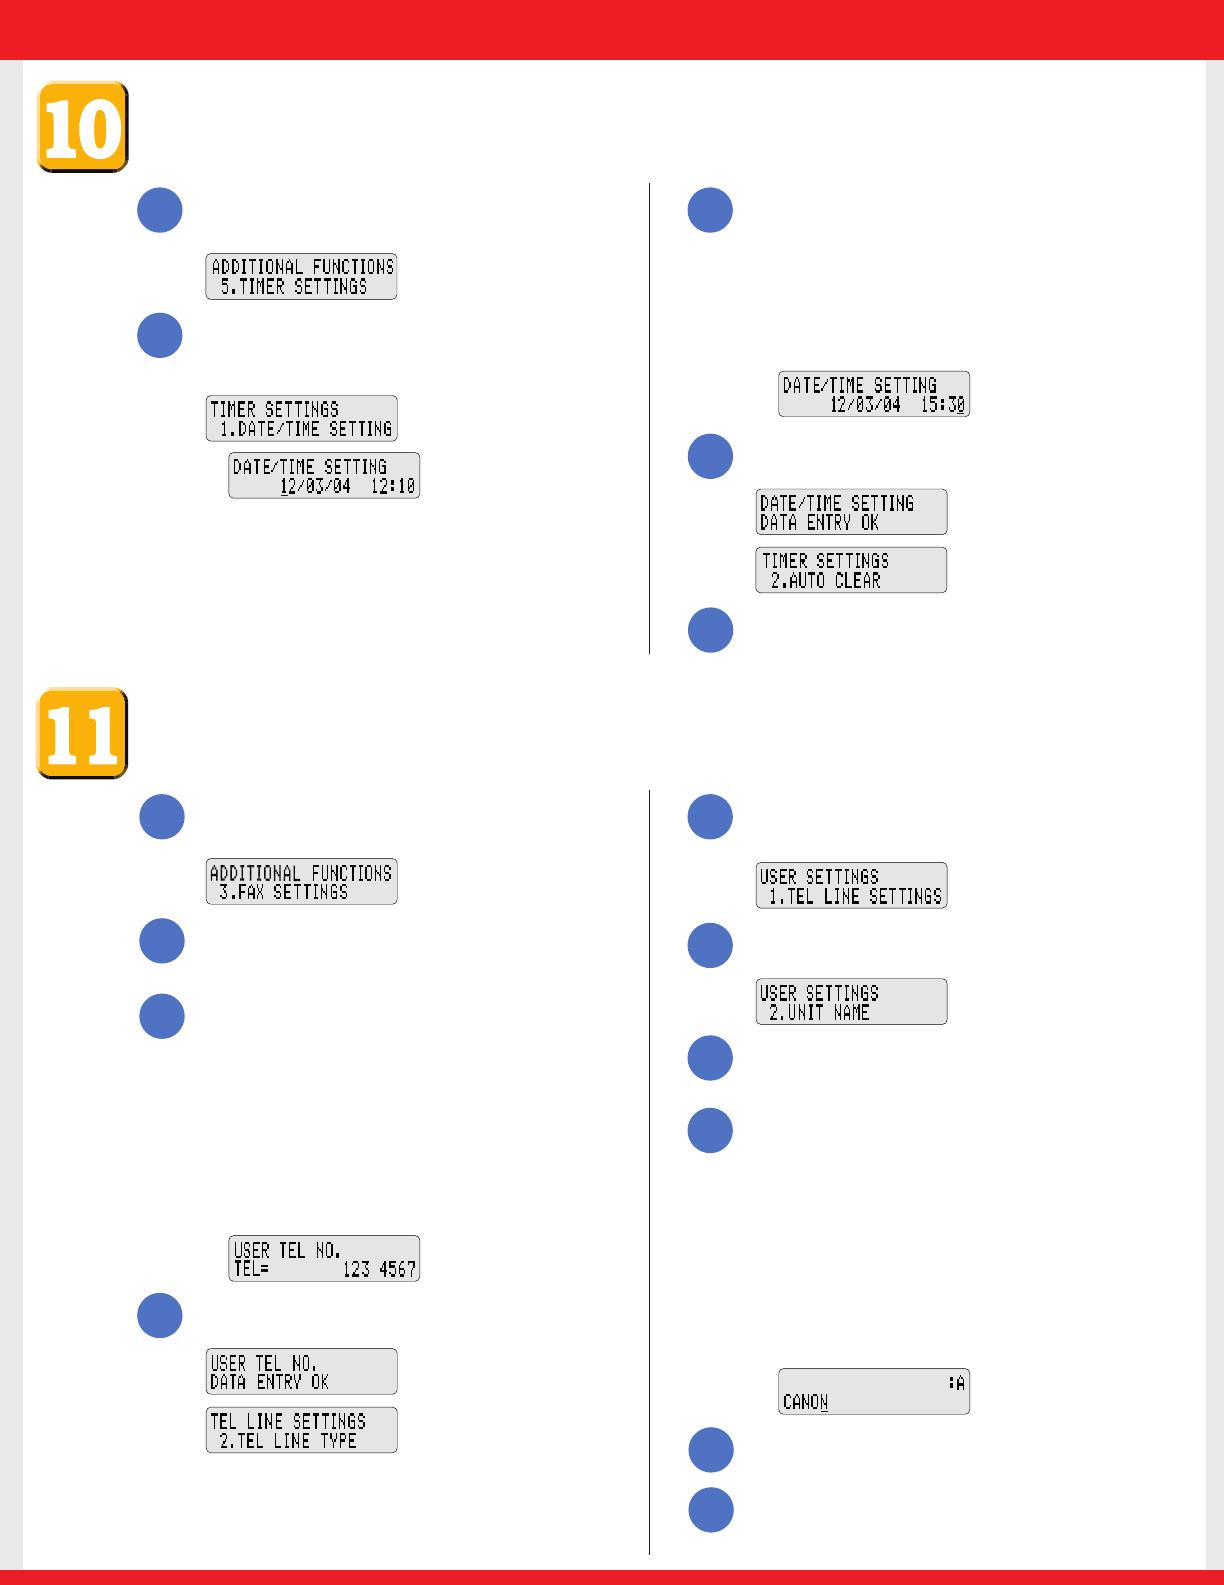
Enter the Date and Time.
Press Additional Functions.
Use
4 (–) or e (+) to select 5.TIMER SETTINGS.
Press
Set twice.
The date and time currently set for the machine are
displayed.
ex:
1
2
Use the numeric keys to enter the correct month, day,
year and time in this order.
•Use
4 (–) or e (+) to move the cursor under the
number you want to change, then enter the correct
number.
•Enter only the last two digits of the year.
•Use the 24-hour format for the time setting (e.g.1:00
p.m. as 13:00).
ex:
Press
Set.
Press
Stop/Reset to return to the standby display.
3
4
5
Press Additional Functions.
Use
4 (–) or e (+) to select 3.FAX SETTINGS.
Press
Set four times.
Use the numeric keys to enter your fax number (max. 20
digits, including spaces).
•If you have already registered your fax/telephone
number, the previous entry will be displayed.To
change your fax/telephone number, use the numeric
keys.
•Press
Space to enter a space.
•To enter a plus sign
(+) before the number, press + key.
•If you make a mistake, press
Delete or 4 (–) to delete
the last number or press
Clear to delete all the
numbers you entered.
ex:
Press
Set.
1
2
3
4
Press Additional Functions.
Use
4 (–) or e (+) to select 2.UNIT NAME.
Press
Set.
Use the numeric keys to enter your name or company’s
name (max. 24 characters, including spaces).
•If you are unsure how to enter characters,
FaxGuide.
•If you have already registered your name or company’s
name, previous entry will be displayed.To change your
name, press
Clear to delete the previous entry and
re-enter.
•Press
Space to enter a space and move the cursor to
the right.
•If you make a mistake, press
4 (–) or e (+) to move the
cursor to the incorrect character, then press
Delete.Or
press
Clear to delete all the characters you entered.
ex:
Press
Set.
Press
Stop/Reset to return to the standby display.
Register Your Fax/Telephone Number and Name.
5
6
7
8
9
10
E111MB Set-Up Sheet.qxd 6/21/04 9:11 AM Page 5
Install the printer driver (CAPT).
For parallel connection:
<Windows 95/98/Me>
Make sure that the computer is turned off, and that the parallel cable is securely connected to the machine and the computer.
Plug the machine’s power cord into a power outlet to turn it on.
Turn the computer on and start Windows.
Plug and Play will activate and the
Found New Hardware Wizard (in Windows 95, New Hardware or Device Wizard) dialog box appears.
Click
Cancel.
Place the CD-ROM into the CD-ROM drive of your computer. The CD-ROM Menu starts automatically.
When the installation is
complete, the dialog box
shown on the left appears.
To close the dialog box,
click
OK.
Click Canon iC D800
Install
.
The
Add Printer Wizard
dialog box appears.
Select Local Printer, then
click
Next.
The Manufacturers/Printers
selection dialog box
appears.
Use Browseto select
the directory that contains
the printer driver, then
click
OK.
For example,if you are
using Windows 95/98, and
your CD-ROM drive is drive
D:, browseD:\English\Win9x,
and click
OK.
Select the port the
machine is connected to
(usually
LPT1:), then click
Next.The Printer name
dialog box appears.
If you select the port the
machine is not
connected to, the machine
will not print.
Click Next.
The Local
printer/Network printer
selection dialog box
appears.
Click Have Diskin the
Manufactures/Printers
dialog box.
The
Install From Disk
dialog box appears.
The printers selection
dialog box appears.
Click
Next.
The printer port
selection dialog box
appears.
Click Finish.
If you want to change the
printer name, type a new
name into the text box.
If you want to set this
printer as the default
printer, select
Ye s .
If no other printer driver
is installed on your
computer, this printer will
be set as the default
printer automatically.
NOTE
If the CD-ROM Menu does not start automatically, choose Run... from the Start Menu.Type D:\SETUP.EXE (if your CD-ROM drive is drive D:) in the
command line and click
OK.
1
2
3
4
5
6
7
10
11
12
13
8
9
E111MB Set-Up Sheet.qxd 6/21/04 9:11 AM Page 6
Click Canon iC D800
Install
.
The Add Printer Wizard
dialog box appears. Click
Next.
Click Have Diskin the
Manufacturers/Printer
dialog box.
The
Install From Disk
dialog box appears.
The printer selection
dialog box appears.
Click
Next.
The Printer name dialog
box appears.
Select
Use the
following port
.Select
the printer port the
machine is connected to
(usually
LPT1:
(Recommended Printer
Port)), then click
Next.
The Manufacturers/
Printers selection
dialog box appears.
Use Browseto select
the directory that
contains the printer
driver, then click
OK.
For example, if your
CD-ROM drive is drive
D:\English\WinXP, click
Open.
Click Next.
If you want to change
printer name, type a new
name into the text box.
If you want to set this
printer as the default
printer, select
Ye s .
If no other printer driver
is installed on your
computer, this printer
will be set as the default
priter automatically.
Select Local printer
attached to this
computer
, then click
Next.
The printer port
selection dialog box
appears.
Automatically
detect and install my
Plug and Play printer
is
not recommended.
<Windows XP/Server 2003>
Click Ye s if you want to
print a test page, or
No if
you do not want to print
a test page, then click
Next.
If this printer is shared
with other computers,
select
Share name, and
click
Next.
You can modify the
setting after installation,
from the
Printer
Properties
dialog box.
Click Finish.
5 6
7
8
9
10
11
12
13 14
Depending on your computer settings, this selection may not be
displayed.
**E111MB Set-Up Sheet.qxd 7/20/04 2:39 PM Page 7
Congratulations! You have now completed setting up your
machine.
Where to go from here...
Once you have completed all steps in this document, see the Basic Guide for paper handling or copy functions of your machine.
Detailed instructions for setting up, sending faxes and receiving faxes are provided in the Fax Guide.
The Printer Guide (in the CD-ROM) provides detailed instructions on how to configure the printer driver and print from your computer.
NOTE
Remember to register your machine to ensure product support.
The serial number is located on the back of the machine.
©2004 Canon Inc. Canon and imageCLASS are
trademarks of Canon Inc.
All other products and brand names are registered
trademarks or trademarks of their respective owners.
Specifications subject to change without notice.
Part no. FA7-5983 (010)
PRINTED IN CHINA
If you opted to print a test page, the test page will be printed
after the installation is complete. If the test page is printed
correctly, click
Yes on the dialog box that appears.
When installation is complete, the following dialog box
appears. Click
OK.
For installation instructions under Windows 2000/NT 4.0 Printer Guide
For installation help and operational instructions, call us at:
1-800-828-4040 1-800 OK CANON
U.S.A. CUSTOMERS CANADA CUSTOMERS
15
16
2
3
1
For USB connection:
<Windows 98/Me/2000/XP/Server 2003>
Make sure that the computer is turned off.
Make sure that the power cord of the machine is plugged into the power outlet and that the machine is connected to your computer
(cable not included).
Turn the computer on and the
Add New Hardware Wizard dialog box appears. Follow the instructions on screen to initiate
Plug and Play installation.When you are asked to select the directory that contains the printer driver, click
Browse....If your CD-ROM
drive is drive D:, browse to D:\English\Win9x in Windows 98, D:\English\WinMe in Windows Me, D:\English\Win2000 in Windows 2000,
and D:\English\WinXP in Windows XP/Server 2003.
Example: Windows 98 Example: Windows 2000
For installation instructions using Plug and Play for the USB Port
Printer Guide
NOTE
For installation instructions under Windows 95 "Parallel Port Users" in Printer Guide.
For installation instructions under Windows NT 4.0
"Windows NT 4.0 Add Printer Wizard" in Printer Guide.
1
2
3
*E111MB Set-Up Sheet.qxd 7/21/04 1:22 PM Page 8
  • Page 1 1
  • Page 2 2
  • Page 3 3
  • Page 4 4
  • Page 5 5
  • Page 6 6
  • Page 7 7
  • Page 8 8

Canon imageCLASS D880 Operating instructions

Category
Multifunctionals
Type
Operating instructions
This manual is also suitable for

Ask a question and I''ll find the answer in the document

Finding information in a document is now easier with AI