Pioneer SC-1224 Quick start guide

Category
Car video systems
Type
Quick start guide
What’s in the box
Contenido de la caja
Quick Start Guide
Guía de inicio rápido
Thank you for buying this Pioneer product. This Quick Start Guide
includes instructions for basic connections and operations to allow
simple use of the receiver. For detailed descriptions of the
receiver, see the “Operating Instructions” provided on the
included CD-ROM ( ).
Muchas gracias por haber adquirido este producto de Pioneer.
Esta Guía de inicio rápido incluye instrucciones para hacer las
conexiones y operaciones básicas que le permitirán hacer un uso
sencillo del receptor. Para conocer una descripción detallada del
receptor, consulte el “Manual de instrucciones” suministrado con
el CD-ROM ( ) incluido.
SC-1224-K
AV Receiver
Receptor AV
Remote Control
Mando a distancia
Setup microphone
Micrófono de configuración
AAA size IEC R03 dry cell batteries x2
Pilas secas AAA, IEC R03 x 2
AM loop antenna
Antena de cuadro de AM
FM wire antenna
Antena de hilos de FM
These quick start guide
Esta guía de inicio rápido
Safety Brochure
Folleto de Seguridad
Power cord
Cable de alimentación
CD-ROM
RECEIVER
D.ACCESS
DIMMER SLEEP
RCU SETUP
MPX
PRESET TUNE
BAND PTY
iPod
TUNER
INPUT
USBADPTROKU
BT
TV
TV
MHL
CD
OUT P.
DVDBD
ALL ZONE STBY
SOURCE
STANDBY/ON
MAIN
SAT
SUB ZONE CONTROL
SOURCE CONTROL
MUTE
VOLUME
VOL
TOP
MENU
HOME
MENU
TOOLS
MENU
ENTER
RETURN
CLASS
ENTER
CLR
CH
CH
2
546
8
0
79
13
AUDIO
DISP
SURRAUTO
CH LV.
ADV
STATUS
AUDIO P. VIDEO P.
Z2 Z3 HDZ
LISTENING MODE
HDMI
NET
ALL
Fav
RECEIVER
2
English
Connection and initial setup
Enjoy easy multichannel playback with this unit in 3 steps:
Connecting up
Initial setup
Basic playback
.
Connection and initial setup can be performed by referring to this Quick Start Guide, but it is easier when using the
Wiring Navi
in AVNavigator.
Perform connection and initial setup with either method according to the circumstances in which you are using AVNavigator.
Additionally, using the
Interactive Operation Guide
in AVNavigator allows you to learn basic operations effectively.
It is unnecessary to read this guide for explanations;
will be explained in the
Wiring Navi
.
Move on to “Using Built-in AVNavigator” in this guide.
You can use the
Interactive Operation Guide
in
.
The contents are linked interactively with the product, allowing you
to remember them while reading, and actually use the product while
becoming used to it.
Move on to
in this guide.
Quick Start
Guide
Connection and initial setup following the instructions
in the “Wiring Navi” in AVNavigator
(Connection to the network is required for the initial setup.)
Connection and initial setup by referring to
this Quick Start Guide
or
3
፩ၭ
Using Built-in AVNavigator
Connecting to the network through
LAN interface
LAN
(
10/100
)
DC OUTPUT
for WIRELESS LAN
(
OUTPUT 5 V
0.6 A MAX
)
LAN
(
10/100
)
WAN
3
2
1
LAN
LAN cable (sold separately)
Internet
Modem
Router
Computer
Connecting to a wireless LAN
Wireless connection to the network is possible through a
wireless LAN connection. Use the separately sold AS-WL300
for connection.
Use only the furnished accessory connecting cable.
Certain settings are required to use a wireless LAN
converter (AS-WL300). For instructions on making these
settings, see the operating instructions included with the
wireless LAN converter (AS-WL300).
LAN
(
10/100
)
DC OUTPUT
for WIRELESS LAN
(
OUTPUT 5 V
0.6 A MAX
)
LAN
(
10/100
)
DC OUTPUT
for WIRELESS LAN
(
OUTPUT 5 V
0.6 A MAX
)
WAN
DC 5V WPS
Ethernet
Wireless LAN converter (AS-WL300)
Internet
Modem
Router
Plugging in the receiver
After connecting to a LAN, connect the power cord of the
receiver to a power outlet.
CAUTION
Handle the power cord by the plug part. Do not pull out
the plug by tugging the cord, and never touch the power
cord when your hands are wet, as this could cause a short
circuit or electric shock. Do not place the unit, a piece of
furniture, or other object on the power cord or pinch the
cord in any other way. Never make a knot in the cord or tie
it with other cables. The power cords should be routed so
that they are not likely to be stepped on. A damaged power
cord can cause a fire or give you an electric shock. Check
the power cord once in a while. If you find it damaged,
ask your nearest Pioneer authorized independent service
company for a replacement.
Do not use any power cord other than the one supplied
with this unit.
Do not use the supplied power cord for any purpose other
than that described below.
The receiver should be disconnected by removing the
mains plug from the wall socket when not in regular use,
e.g., when on vacation.
Make sure the blue
u
STANDBY/ON
light has gone out
before unplugging.
1
Plug the supplied power cord into the AC IN
socket on the back of the receiver.
2
Plug the other end into a power outlet.
Turning the power on
Press
u
STANDBY/ON
to switch on the receiver and your
computer.
Wait a few minutes after turning the power on before
performing the following operation.
STANDBY/ON
SELECTOR
4
Using Built-in AVNavigator (continued)
Launching the built-in AVNavigator
Operate AVNavigator by following the screen prompts of your
computer, etc.
Operating environment
AVNavigator can be used in the following environments.
Windows PC: Microsoft
®
Windows
®
XP/Windows Vista
®
/
Windows
®
7/Windows
®
8/Windows
®
8.1
Mac: Mac OSX (10.7, 10.8 or 10.9)
iPad/iPhone/iPod touch: iOS 7
Android device: Android 4.0.4, 4.1.1, 4.1.2, 4.2, 4.2.2, 4.4.2
Some AVNavigator functions use an Internet browser. The
following browsers are supported:
Windows PC: Internet Explorer
®
8, 9, 10, 11
Mac/iPad/iPhone/iPod touch: Safari 6.0
Android device: Android browser
Depending on the computer network setting or security
setting, AVNavigator may not operate.
Using Windows PC
1
Start up Internet Explorer on your PC (open
any random Internet page).
2
Press STATUS on the remote control and check
the front panel display on the receiver (the IP
address of the receiver will appear).
(Example Text Display)
If 0.0.0.0 or 169.254.112.202 appears in the address, it indicates
that the receiver is not connected to the network. Check to
make sure that the receiver and router are properly connected.
3
Enter number in 2 above in the field in
Internet Explorer shown below and then press
the ENTER key.
(Example Input Format) 192.168.0.124
With a Windows PC other than Windows XP, you can use
the following method to launch AVNavigator.
Launch Explorer and then right-click <SC-1224>
displayed in the ‘
Network
’ folder, then click ‘
View device
webpage
’.
Using Mac
Launch Safari and click <SC-1224> displayed in ‘
Bonjour
’ on
the Bookmarks bar.
If ‘
Bonjour
’ is not displayed, tick the ‘
Include Bonjour in
the Favorites bar
’ check box on the ‘
Advanced
’ tab in
the Safari ‘
Preferences...
’ menu.
Using iPad/iPhone/iPod touch
Download a free application, iControlAV5, from the App Store.
After launching iControlAV5, follow the instructions on the
screen. After that, on the Home screen, press ‘
AVNavigator
or the icon.
iPad
iPhone/iPod touch
5
፩ၭ
Using iPad
On an iPad, you can operate AVNavigator for iPad. Download
AVNavigator for iPad from the App Store. After launching
AVNavigator for iPad, follow the instructions on the screen.
Using Android device
Download a free application, iControlAV5, from the Google Play
Store. After launching iControlAV5, follow the instructions on
the screen. After that, on the Home screen, press the icon.
Using Built-in AVNavigator (continued)
About using Wiring Navi
Wiring Navi starts when ‘
Wiring Navi
’ is pressed on the
AVNavigator screen.
When connection navigation is finished, proceed to
.
6
Connecting up
Connecting the speakers
The receiver will work with just two stereo speakers (the front speakers in the diagram) but using
at least five speakers is recommended, and a complete setup is best for surround sound.
To achieve the comfortable surround sound, install your speakers as shown below.
7.1 channel surorund system:
L
– Front Left
C
– Center
R
– Front Right
SL
– Surround Left
SR
– Surround Right
SBL
– Surround back Left
SBR
– Surround back Right
SW
– Subwoofer
Note
There are also other speaker connection
patterns (front height, front wide, etc.). For
details, see “Connecting your equipment
of the operating instructions.
Connecting the speaker cables
Make sure you connect the speaker on
the right to the right (
R
) terminal and the
speaker on the left to the left (
L
) terminal.
Also make sure the positive and negative
(
+/–
) terminals on the receiver match those
on the speakers.
1
Twist exposed wire strands together.
2
Loosen terminal and insert exposed wire.
3
Tighten terminal.
12 3
10 mm
CAUTION
Before making or changing
connections, switch off the power and
disconnect the power cord from the AC
outlet.
These speaker terminals carry
HAZARDOUS LIVE
voltage. To
prevent the risk of electric shock when
connecting or disconnecting the
speaker cables, disconnect the power
cord before touching any uninsulated
parts.
SL
L
R
SR
SBL
SBR
SW
C
After installing the speakers, connect them as shown below.
PRE OUT
(Single)
FRONT
SUBWOOFER
1
2
L
R
SPEAKERS
FRONTCENTER
A A
RL
SURROUND
RL
SURROUND BACK
RL
FRONT HEIGHT / FRONT WIDE /
B
RL
PRE OUT
(Single)
FRONT
SUBWOOFER
1
2
L
R
FRONT CENTER
A A
RL
SURROUND
RL
SURROUND BACK
RL
FRONT HEIGHT / FRONT WIDE /
B
RL
SPEAKERS
LINE LEVEL
INPUT
Subwoofer
(
SW
)
Front Right
(
R
)
Surround Right
(
SR
)
Surround Left
(
SL
)
Front Left
(
L
)
Center
(
C
)
Surround back Right
(
SBR
)
Surround back Left
(
SBL
)
Note
When only connecting one surround back speaker, connect it to the
SURROUND BACK L
(Single)
terminals.
This unit supports speakers with a nominal impedance of 4
W
to 16
W
.
7
፩ၭ
Connecting up (continued)
Connecting a TV and playback
components
HDMI
LAN
(
10/100
)
OUT 2
(HDZONE)
OUT 1
(CONTROL)
DC OUTPUT
for WIRELESS LAN
(
OUTPUT 5 V
0.6 A MAX
)
(
OUTPUT 5 V
0.9 A MAX
)
OPTICAL
ASSIGN-
ABLE
SELECTABLE
1
-
6
IN
1
(
DVD
)
BD IN
IN
2
(
SAT/CBL
)
IN
3
(
DVR/BDR
)
IN
4
IN
6
MHL
IN
1
(
TV
)
IN
2
(
DVR/BDR
)
ASSIGNABLE
OPTICAL
IN
1
(
TV
)
IN
2
(
DVR/BDR
)
ASSIGNABLE
OUT 2
(HDZONE)
OUT 1
(CONTROL)
SELECTABLE
IN
1
(
DVD
)
BD IN
DIGITAL OUT
COAXIAL
HDMI IN
HDMI OUT
OPTICAL
A
HDMI/DVI-compatible TV
HDMI/DVI-compatible
Blu-ray DIsc player
If the TV does not support the HDMI Audio Return Channel
function, optical digital cable (
A
) connection is required to
listen to the TV sound over the receiver.
If the TV supports the HDMI Audio Return Channel
function, the sound of the TV is input to the receiver via the
HDMI terminal, so there is no need to connect an optical
digital cable (
A
). In this case, set
ARC
at
HDMI Setup
to
ON
. For details, see “HDMI Setup” of the operating
instructions.
Please refer to the TV’s operation manual for directions on
connections and setup for the TV.
With factory default settings, video from the video cable
or component cable will not be output from the HDMI
terminal. To output video, you must switch video input to
the device connected with the video cable or component
cable and set
V.CONV
to
ON
. For details, see “Setting the
Video options” of the operating instructions.
Connecting antennas
ANTENNA
AM LOOP FM UNBAL 75
ANTENNA
AM LOOP FM UNBAL 75
1
4
5
2
3
ab c
FM wire
antenna
AM loop antenna
Note
Refer to the operating instructions in the included CD-
ROM if you wish to connect a TV or playback component
in a method other than an HDMI connection.
Refer to the operating instructions in the included CD-
ROM for other device connections.
Plugging in the receiver
Only plug in after you have connected all your components to
this receiver, including the speakers.
CAUTION
Handle the power cord by the plug part. Do not pull out
the plug by tugging the cord, and never touch the power
cord when your hands are wet, as this could cause a short
circuit or electric shock. Do not place the unit, a piece of
furniture, or other object on the power cord or pinch the
cord in any other way. Never make a knot in the cord or tie
it with other cables. The power cords should be routed so
that they are not likely to be stepped on. A damaged power
cord can cause a fire or give you an electric shock. Check
the power cord once in a while. If you find it damaged,
ask your nearest Pioneer authorized independent service
company for a replacement.
Do not use any power cord other than the one supplied
with this unit.
Do not use the supplied power cord for any purpose other
than that described below.
The receiver should be disconnected by removing the
mains plug from the wall socket when not in regular use,
e.g., when on vacation.
Make sure the blue
u
STANDBY/ON
light has gone out
before unplugging.
1
Plug the supplied power cord into the AC IN
socket on the back of the receiver.
2
Plug the other end into a power outlet.
VENTILATION CAUTION
When installing this unit, make sure to leave space
around the unit for ventilation to improve heat radiation
(at least 20 cm at top, 10 cm at rear
, and 20 cm at each
side)
.
WARNING
Slots and openings in the cabinet are provided for
ventilation to ensure reliable operation of the product,
and to protect it from overheating.
To prevent fire
hazard, the openings should never be blocked or
covered with items (such as newspapers, table-cloths,
curtains) or by operating the equipment on thick carpet
or a bed.
D3-4-2-1-7b*_A1_En
8
Initial Setup
Before you start
1
Put the batteries in the remote control.
The batteries included with the unit are to check initial
operations; they may not last over a long period. We
recommend using alkaline batteries that have a longer life.
2
Switch on the receiver and your TV.
ALL ZONE STBY
SOURCE
STANDBY/ON
MAIN
SUB ZONE CONTROL
Z2 Z3 HDZ
RECEIVER
3
Switch the TV input so that it connects to the
receiver.
4
Turn the subwoofer on and turn up the volume.
WARNING
Do not use or store batteries in direct sunlight or other
excessively hot place, such as inside a car or near a heater.
This can cause batteries to leak, overheat, explode or catch
fire. It can also reduce the life or performance of batteries.
CAUTION
When inserting the batteries, make sure not to damage
the springs on the battery’s (–) terminals. This can cause
batteries to leak or overheat.
When disposing of used batteries, please comply with
governmental regulations or environmental public
institution’s rules that apply in your country/area.
Automatically setting up for
surround sound (MCACC)
The Auto Multi-Channel ACoustic Calibration (MCACC) setup
uses the supplied setup microphone to measure and analyze
the test tone that is outputted by the speakers. This setup
enables automatic high precision measuring and settings;
utilizing it will create an optimum user listening environment.
Important
Measure in a quiet environment.
If you have a tripod, use it to place the microphone so that it’s
about ear level at your normal listening position. Otherwise,
place the microphone at ear level using a table or a chair.
Accurate measurements may not be possible if there are
obstacles between the speakers and the listening position
(microphone).
When measuring, step away from the listening position,
and operate using the remote control from the external
side of all the speakers.
1
Connect the supplied setup microphone.
MASTER
VOLUME
STANDBY/ON
INPUT
SELECTOR
iPod iPhoneHDMI
ADVANCED
MCACC
FL OFF
MCACC
SETUP
MIC
Tripod
Microphone
The
Full Auto MCACC
screen appears on your TV.
Speaker System : Normal
(
SB/FH
)
1a.Full Auto MCACC
A/V RECEIVER
Exit Return
START
EQ Type : ---
MCACC : M1.MEMORY 1
Measurement Type : Basic
2
Press MAIN RECEIVER on the remote control
and operate.
When the cursor is brought to
Measurement Type
and
Basic
is selected, the
Speaker Setting
/
Channel Level
/
Speaker Distance
is adjusted automatically. Selecting
Expert
allows you to automatically adjust
Standing
Wave
/
Acoustic Cal EQ
(frequency characteristics) as
well.
3
Bring the cursor to START and press the ENTER
button.
Automatic measuring will start.
Measuring will take about 3 to 12 minutes.
4
Follow the instructions on-screen.
Automatic setting is complete when the Home Menu
screen appears.
1. Advanced MCACC
2. MCACC Data Check
3. Data Management
4. System Setup
5. Network Information
6. Operation Mode Setup
Exit Return
HOME MENU
A/V RECEIVER
If
Reverse Phase
is displayed, the speaker’s wiring (+ and –)
may be inverted. Check the speaker connections.
Even if the connections are correct,
Reverse Phase
may be
displayed, depending on the speakers and the surrounding
environment. This does not affect measurements, however,
so select
Go Next
.
If the power cuts out, the core of the speaker cable may be
in contact with the rear panel, or the (+) and (–) cores may
be touching, causing the protection circuits to activate.
Re-twist the core of the speaker cable, and connect it so
that it does not protrude from the speaker terminal.
5
Make sure the setup microphone is
disconnected.
9
፩ၭ
Basic playback
Multichannel playback
RECEIVER
D.ACCESS
DIMMER SLEEP
RCU SETUP
MPX
PRESET TUNE
BAND PTY
iPod
TUNER
INPUT
USBADPTROKU
BT
TV
TV
MHL
CD
OUT P.
DVDBD
ALL ZONE STBY
SOURCE
STANDBY/ON
MAIN
SAT
SUB ZONE CONTROL
SOURCE CONTROL
MUTE
VOLUME
VOL
TOP
MENU
HOME
MENU
TOOLS
MENU
ENTER
RETURN
CLASS
ENTER
CLR
CH
CH
2
546
8
0
79
13
AUDIO
DISP
SURRAUTO
CH LV.
ADV
STATUS
AUDIO P. VIDEO P.
Z2 Z3 HDZ
LISTENING MODE
HDMI
NET
ALL
Fav
RECEIVER
1
Switch on the playback component.
E.g.) Turn the Blu-ray Disc player connected to the
HDMI
BD IN
terminal on.
2
Switch the input of the receiver.
E.g.) Press
BD
to select the
BD
input.
3
Press AUTO to select ’AUTO SURROUND’.
Also press
SURR
or
ADV
for multichannel playback. Select
your preferred listening mode.
4
Start the playback component’s playback.
E.g.) Start playback of the Blu-ray Disc player.
5
Use VOLUME +/– to adjust the volume level.
When a sound can not be heard from center and rear
speakers, press
SURR
or
ADV
to change listening modes.
E.g.) Press the
ADV
button for several times to select
EXT.STEREO
.
When there is no sound from the subwoofer
Cause – The front speaker is set to LARGE.
When a 2-channel audio source is input, the low-frequency
component is not output from the subwoofer but is output
from the front speaker.
Solution – To output from the subwoofer, change the
speaker setting.
Method 1: Change the front speaker setting to
SMALL
.
The low-frequency component is not output from the front
speaker but is output from the subwoofer. When the low-
frequency playback capability of the front speaker is high,
we recommend the setting not be changed.
Method 2: Change the subwoofer setting to
PLUS
.
The low-frequency component is output from the front
speaker and subwoofer. For that reason, low sounds
are sometimes output too much. In such a case, we
recommend not to change or to change to Method 1.
For details, see “Speaker Setting” of the operating
instructions.
When no sound is emitted, increase the volume to
approximately –30 dB.
Note
When the remote control cannot be used to operate the unit
When operating the receiver, press
MAIN
RECEIVER
before using it.
When operating functions such as the network, TUNER, or
iPod, press the appropriate function button (
NET
,
TUNER
,
iPod
, etc.) before using.
Listening to the radio
1
Press TUNER to select the tuner.
If necessary, press
BAND
to change the band (FM or AM).
2
Press TUNE +/– to tune to a station.
Press and hold
TUNE +/–
for about a second. The receiver
will start searching for the next station.
If you’re listening to an FM station but the reception is
weak, press
MPX
to select FM MONO and set the receiver
to the mono reception mode.
Saving station presets
If you often listen to a particular radio station, it’s convenient to
have the receiver store the frequency for easy recall whenever
you want to listen to that station.
1
Press TOOLS while receiving a signal from the
station you want to store.
The preset number is blinking.
2
Press PRESET +/– to select the station preset
you want, then press ENTER.
The preset number stop blinking and the receiver stores
the station.
Listening to station presets
You will need to have some presets stored to do this.
Press PRESET +/– to select the station preset
you want.
10
Basic playback (continued)
To enjoy the many functions of the
unit to the fullest extent
Launch AVNavigator, and use the “Interactive
Operation Guide”.
Load the CD-ROM into your computer and
download the “Operating Instructions” (PDF)
from the menu screen to read.
Functions
#
Playing a USB device
#
Bluetooth ADAPTER for Wireless Enjoyment of Music
#
Playback with NETWORK feature
#
Setting the Audio options
#
Setting the Video options
#
Using the MULTI-ZONE controls
FAQ
Glossary
Features index
Note
This unit supports AirPlay. For details, see “Using AirPlay
on iPod touch, iPhone, iPad, and iTunes” of the operating
instructions and the Apple website (http://www.apple.
com).
This unit’s software can be updated (“Software Update
of the operating instructions). With Mac OS, it can be
updated using Safari (“Using Safari to update the firmware
of the operating instructions).
Playing an iPod
About one minute is required between turning the power
on and completion of startup.
1
Connect your iPod.
An iPod/iPhone can be connected to the receiver.
MASTER
VOLUME
STANDBY/ON
INPUT
SELECTOR
iPod iPhoneHDMI
ADVANCED
MCACC
FL OFF
5V 1
A
iPod/iPhone
USB cable
included with the iPod
2
Press iPod USB to select the iPod/USB input.
When the display shows the names of folders and files,
you’re ready to play music from the iPod.
3
Use
/
to select a category, then press
ENTER to browse that category.
• To return to the previous level any time, press
RETURN
.
4
Use
/
to browse the selected category (e.g.,
albums).
• Use
/
to move to previous/next levels.
5
Continue browsing until you arrive at what
you want to play, then press
to start
playback.
Listening to Internet radio stations
About one minute is required between turning the power
on and completion of startup.
Important
When using a broadband Internet connection, a contract
with an Internet service provider is required. For more
details, contact your nearest Internet service provider.
To listen to Internet radio stations, you must have high-
speed broadband Internet access. With a 56 K or ISDN
modem, you may not enjoy the full benefits of Internet
radio.
Access to content provided by third parties requires a
high speed internet connection and may also require
account registration and a paid subscription. Third
party content services may be changed, suspended,
interrupted, or discontinued at any time without notice,
and Pioneer disclaims any liability in connection with such
occurrences. Pioneer does not represent or warrant that
content services will continue to be provided or available
for a particular period of time, and any such warranty,
express or implied, is disclaimed.
1
Press NET repeatedly to select the INTERNET
RADIO input.
It may take several seconds for this receiver to access the
network.
2
Use
/
to select the Internet radio station to
play back, and then press ENTER.
© 2014 PIONEER HOME ELECTRONICS CORPORATION.
All rights reserved.
11
፩ၭ
2
Español
Disfrute de la reproducción multicanal fácil con esta unidad en 3 pasos:
Conexiones
Configuración inicial
Reproducción básica
.
La conexión y la configuración inicial se pueden realizar consultando esta Guía de inicio rápido, pero es más fácil cuando se utiliza
Wiring Navi
en
AVNavigator.
Realice la conexión y la configuración inicial con cualquiera de los métodos en función de las circunstancias en las que use AVNavigator.
Adicionalmente, el uso de la
Interactive Operation Guide
de AVNavigator le permite aprender las operaciones básicas de forma efectiva.
Conexión y configuración inicial
No es necesario leer esta guía para obtener explicaciones;
se explicarán en
Wiring Navi
.
Vaya a “Uso del AVNavigator integrado” en esta guía.
Puede utilizar la
Interactive Operation Guide
del
.
Los contenidos están enlazados de forma interactiva con el producto,
lo que le permite recordarlos durante la lectura y usar el producto
mientras se familiariza con él.
Vaya a
en esta guía.
Guía de
inicio rápido
Conexión y conguración inicial siguiendo las
instrucciones del “Wiring Navi” en AVNavigator
(Para hacer la conguración inicial es
necesario estar conectado a la red.)
Conexión y conguración inicial
consultando esta Guía de inicio rápido
o bien
3
፩ၭ
Uso del AVNavigator integrado
Conexión a la red mediante la
interfaz LAN
LAN
(
10/100
)
DC OUTPUT
for WIRELESS LAN
(
OUTPUT 5 V
0.6 A MAX
)
LAN
(
10/100
)
WAN
3
2
1
LAN
Cable LAN (vendido por separado)
Internet
Modem
Enrutador
Ordenador
Conexión a una LAN inalámbrica
La conexión inalámbrica a la red se puede hacer a través de la
conexión de LAN inalámbrica. Use el AS-WL300 vendido por
separado para hacer la conexión.
Use solamente el cable de conexión accesorio
suministrado.
Para usar un convertidor LAN inalámbrico (AS-WL300)
se necesitan ciertos ajustes. Para conocer instrucciones
sobre cómo hacer estos ajustes, consulte el manual de
instrucciones incluido con el convertidor LAN inalámbrico
(AS-WL300).
LAN
(
10/100
)
DC OUTPUT
for WIRELESS LAN
(
OUTPUT 5 V
0.6 A MAX
)
LAN
(
10/100
)
DC OUTPUT
for WIRELESS LAN
(
OUTPUT 5 V
0.6 A MAX
)
WAN
DC 5V WPS
Ethernet
Convertidor de LAN inalámbrica (AS-WL300)
Internet
Modem
Enrutador
Conexión del receptor
Tras la conexión a una LAN, conecte el cable de alimentación
del receptor a una toma de corriente.
PRECAUCIÓN
Al manipular el cable de alimentación, sujételo por la
parte de la clavija. No desconecte la clavija tirando del
cable y nunca toque el cable de alimentación con las
manos mojadas, ya que esto puede causar cortocircuitos
o descargas eléctricas. No coloque el equipo, un mueble
ni ningún otro objeto encima del cable de alimentación,
y asegúrese de no aplastar el cable de ningún otro modo.
Nunca haga un nudo con el cable y no lo ate a otros
cables. Los cables de alimentación deben ser tendidos
de tal manera que la probabilidad de que alguien los pise
sea mínima. Un cable de alimentación dañado puede
causar fuego y descargas eléctricas. Revise el cable de
alimentación cada cierto tiempo. Si observa que está
dañado, solicite un cable de repuesto en el servicio
técnico Pioneer autorizado más cercano.
No utilice ningún cable de alimentación que no sea el que
se suministra con esta unidad.
No utilice el cable de alimentación suministrado para
ningún otro fin distinto del que se describe a continuación.
Cuando no vaya a usar el receptor durante un período de
tiempo prolongado (por ejemplo, durante las vacaciones),
desconecte la clavija de alimentación de la toma de
corriente mural.
Asegúrese de que la luz azul
u
STANDBY/ON
se ha
apagado antes de desenchufar la unidad.
1
Conecte el cable de alimentación suministrado
a la toma AC IN de la parte posterior del
receptor.
2
Conecte el otro extremo a una toma de
corriente.
Encendido
Pulse
u
STANDBY/ON
para encender el receptor y el
ordenador.
Espere unos minutos tras el encendido antes de realizar la
siguiente operación.
STANDBY/ON
SELECTOR
4
Uso del AVNavigator integrado (continuación)
Inicio del AVNavigator integrado
Controle AVNavigator siguiendo las instrucciones de la
pantalla del ordenador, etc.
Entorno de funcionamiento
AVNavigator se puede utilizar en los siguientes entornos.
PC con Windows PC: Microsoft
®
Windows
®
XP/Windows
Vista
®
/Windows
®
7/Windows
®
8/Windows
®
8.1
Mac: Mac OSX (10.7, 10.8 o 10.9)
iPad/iPhone/iPod touch: iOS 7
Dispositivo Android: Android 4.0.4, 4.1.1, 4.1.2, 4.2, 4.2.2, 4.4.2
Algunas funciones de AVNavigator utilizan un navegador
de Internet. Se admiten los siguientes navegadores:
PC con Windows PC: Internet Explorer
®
8, 9, 10, 11
Mac/iPad/iPhone/iPod touch: Safari 6.0
Dispositivo Android: navegador Android
En función de la configuración de red o la configuración
de seguridad del ordenador, es posible que AVNavigator
no funcione.
Uso de un PC con Windows
1
Inicie Internet Explorer en su PC (abra una
página aleatoria de Internet).
2
Pulse STATUS en el mando a distancia y
compruebe la pantalla del panel frontal en el
receptor (aparecerá la dirección IP del receptor).
(Visualización de texto de ejemplo)
Si aparece 0.0.0.0 o 169.254.112.202 en la dirección, indica
que el receptor no está conectado a la red. Asegúrese de que
el receptor y el enrutador están conectados debidamente.
3
Introduzca el número indicado en el paso 2
anterior en el campo de Internet Explorer
mostrado abajo y pulse a continuación la tecla
ENTER.
(Formato de entrada de ejemplo) 192.168.0.124
En un PC con una versión de Windows diferente de
Windows XP, puede utilizar el siguiente método para
iniciar AVNavigator.
Inicie Explorer y haga clic con el botón derecho en <SC-
1224> que se muestra en la carpeta ‘
Network
’ y, a
continuación, haga clic en ‘
View device webpage
’.
Uso de Mac
Inicie Safari y haga clic en <SC-1224> que se muestra en
Bonjour
’ en la barra Favoritos.
Si no se muestra ‘
Bonjour
’ active la casilla de verificación
Include Bonjour in the Favorites bar
’ en la pestaña
Advanced’ dentro del menú ‘
Preferences...
’ de Safari.
Uso de un iPad/iPhone/iPod touch
Descargue una aplicación gratuita, iControlAV5, de la App
Store. Tras iniciar iControlAV5, siga las instrucciones de
la pantalla. Posteriormente, en la pantalla Home, pulse
AVNavigator
’ o el icono.
iPad
iPhone/iPod touch
5
፩ၭ
Uso de un iPad
En un iPad, puede utilizar AVNavigator para iPad. Descargue
AVNavigator para iPad desde la App Store. Tras iniciar
AVNavigator para iPad, siga las instrucciones de la pantalla.
Uso de un dispositivo Android
Descargue una aplicación gratuita, iControlAV5, de Google
Play Store. Tras iniciar iControlAV5, siga las instrucciones de la
pantalla. Posteriormente, en la pantalla Home, pulse el icono.
Uso del AVNavigator integrado (continuación)
Acerca del uso de Wiring Navi
Wiring Navi se inicia cuando se pulsa ‘
Wiring Navi
’en la
pantalla de AVNavigator.
Cuando haya finalizado la conexión, vaya al paso .
6
Conexiones
Conexión de los altavoces
El receptor funcionará con solo dos altavoces estéreo (los delanteros en el diagrama), pero se
recomienda usar un mínimo de cinco, y el juego completo es lo mejor para el sonido envolvente.
Para obtener un sonido envolvente confortable, instale sus altavoces como se indica a
continuación.
Sistema de sonido envolvente de 7.1 canales:
L
– Delantero izquierdo
C
– Central
R
– Delantero derecho
SL
– Sonido envolvente izquierdo
SR
– Sonido envolvente derecho
SBL
– Sonido envolvente trasero izquierdo
SBR
– Sonido envolvente trasero derecho
SW
– Subwoofer
Nota
También hay otras formas de conectar
altavoces (delantero alto, delantero
ancho, etc.). Para conocer los detalles,
consulte“Conexión del equipo” en las
instrucciones de funcionamiento.
SL
L
R
SR
SBL
SBR
SW
C
Después de instalar los altavoces, conéctelos como se muestra a continuación.
PRE OUT
(Single)
FRONT
SUBWOOFER
1
2
L
R
SPEAKERS
FRONTCENTER
A A
RL
SURROUND
RL
SURROUND BACK
RL
FRONT HEIGHT / FRONT WIDE /
B
RL
PRE OUT
(Single)
FRONT
SUBWOOFER
1
2
L
R
FRONT CENTER
A A
RL
SURROUND
RL
SURROUND BACK
RL
FRONT HEIGHT / FRONT WIDE /
B
RL
SPEAKERS
LINE LEVEL
INPUT
Subwoofer
(
SW
)
Delantero
derecho
(
R
)
Sonido envolvente
derecho
(
SR
)
Sonido envolvente
izquierdo
(
SL
)
Delantero
izquierdo
(
L
)
Central
(
C
)
Sonido envolvente trasero
derecho
(
SBR
)
Sonido envolvente trasero
izquierdo
(
SBL
)
Nota
Cuando conecte un solo altavoz de sonido envolvente trasero, conéctelo a los terminales
SURROUND BACK L (Single)
.
Esta unidad soporta altavoces con una impedancia nominal de 4
W
a 16
W
.
Conexión de los cables de altavoces
Asegúrese de conectar el altavoz de la
derecha al terminal derecho (
R
) y el altavoz
de la izquierda al terminal izquierdo (
L
).
Asegúrese también de que los terminales
positivo y negativo (
+/–
) del receptor
concuerden con los de los altavoces.
1
Retuerza juntos los hilos del cable
expuesto.
2
Afloje el terminal e inserte el cable
expuesto.
3
Apriete el terminal.
12 3
10 mm
PRECAUCIÓN
Antes de extablecer o modificar las
conexiones, desconecte la alimentación
y desenchufe el cable de alimentación
de la toma de corriente.
Estos terminales de altavoces tienen
CORRIENTE PELIGROSA
. Para impedir
recibir una descarga eléctrica al
conectar o desconectar los cables de
los altavoces, desconecte el cable de la
alimentación antes de tocar cualquier
parte sin aislar.
7
፩ၭ
Conexiones (continuación)
Conexión de un televisor y
componentes de reproducción
HDMI
LAN
(
10/100
)
OUT 2
(HDZONE)
OUT 1
(CONTROL)
DC OUTPUT
for WIRELESS LAN
(
OUTPUT 5 V
0.6 A MAX
)
(
OUTPUT 5 V
0.9 A MAX
)
OPTICAL
ASSIGN-
ABLE
SELECTABLE
1
-
6
IN
1
(
DVD
)
BD IN
IN
2
(
SAT/CBL
)
IN
3
(
DVR/BDR
)
IN
4
IN
6
MHL
IN
1
(
TV
)
IN
2
(
DVR/BDR
)
ASSIGNABLE
OPTICAL
IN
1
(
TV
)
IN
2
(
DVR/BDR
)
ASSIGNABLE
OUT 2
(HDZONE)
OUT 1
(CONTROL)
SELECTABLE
IN
1
(
DVD
)
BD IN
DIGITAL OUT
COAXIAL
HDMI IN
HDMI OUT
OPTICAL
A
Televisor compatible con
HDMI/DVI
Reproductor de discos
Blu-ray compatible con
HDMI/DVI
Si el televisor no soporta la función de canal de retorno de audio
HDMI, la conexión del cable digital óptico (
A
) será necesaria
para escuchar el sonido del televisor a través del receptor.
Si el televisor soporta la función de canal de retorno de audio
HDMI, el sonido del televisor se introducirá en el receptor
a través del terminal HDMI, así que no será necesario
conectar un cable digital óptico (
A
). En este caso, ponga
ARC
de
HDMI Setup
en
ON
. Para conocer los detalles,
consulte “Configuración de HDMI” en las instrucciones de
funcionamiento.
Consulte el manual de instrucciones del televisor para hacer
las conexiones y la configuración del mismo.
Con los ajustes por defecto, el vídeo conectado con el
cable de vídeo o el cable de componentes no se emite
desde el terminal HDMI. Para reproducir vídeo, debe
cambiar la entrada de vídeo al dispositivo conectado con
el cable de vídeo o el cable de componentes y ajustar
V.CONV
en
ON
. Para conocer los detalles, consulte
Ajuste de las opciones de vídeo” en las instrucciones de
funcionamiento.
Conexión de antenas
ANTENNA
AM LOOP FM UNBAL 75
ANTENNA
AM LOOP FM UNBAL 75
1
4
5
2
3
ab c
Antena
alámbrica
de FM
Antena de
cuadro de AM
Nota
Consulte el manual del instrucciones del CD-ROM incluido si
quiere conectar un televisor o componente de reproducción
siguiendo otro método que no sea una conexión HDMI.
Consulte el manual de instrucciones del CD-ROM incluido
para las conexiones de otros aparatos.
Conexión del receptor
No conecte el receptor hasta que no haya conectado todos los
componentes de este receptor, incluidos los altavoces.
PRECAUCIÓN
Al manipular el cable de alimentación, sujételo por la parte de
la clavija. No desconecte la clavija tirando del cable y nunca
toque el cable de alimentación con las manos mojadas, ya
que esto puede causar cortocircuitos o descargas eléctricas.
No coloque el equipo, un mueble ni ningún otro objeto
encima del cable de alimentación, y asegúrese de no aplastar
el cable de ningún otro modo. Nunca haga un nudo con el
cable y no lo ate a otros cables. Los cables de alimentación
deben ser tendidos de tal manera que la probabilidad de
que alguien los pise sea mínima. Un cable de alimentación
dañado puede causar fuego y descargas eléctricas. Revise
el cable de alimentación cada cierto tiempo. Si observa que
está dañado, solicite un cable de repuesto en el servicio
técnico Pioneer autorizado más cercano.
No utilice ningún cable de alimentación que no sea el que
se suministra con esta unidad.
No utilice el cable de alimentación suministrado para
ningún otro fin distinto del que se describe a continuación.
Cuando no vaya a usar el receptor durante un período de
tiempo prolongado (por ejemplo, durante las vacaciones),
desconecte la clavija de alimentación de la toma de
corriente mural.
Asegúrese de que la luz azul
u
STANDBY/ON
se ha
apagado antes de desenchufar la unidad.
1
Conecte el cable de alimentación suministrado
a la toma AC IN de la parte posterior del
receptor.
2
Conecte el otro extremo a una toma de corriente.
PRECAUCIÓN PARA LA VENTILACIÓN
Cuando instale este aparat
o, asegúrese de dejar
espacio en torno al mismo para la ventilación con el fin
de mejorar la disipación de calor (por lo menos 20 cm
encima, 10 cm detrás, y 20 cm en cada lado)
.
ADVER
TENCIA
Las ranuras y aberturas de la caja del aparato sir
ven
para su ventilación para poder asegurar un
funcionamiento fiable del aparato y para protegerlo
contra sobrecalentamiento
. Para evitar el peligro de
incendio
, las aberturas nunca deberán taparse ni
cubrirse con nada (como por ejempl
o, periódicos,
manteles, cortinas) ni ponerse en funcionamiento el
aparato sobre una alfombra gruesas o una cama
.
D3-4-2-1-7b*_A1_Es
8
Configuración inicial
Antes de comenzar
1
Ponga las pilas en el mando a distancia.
Las pilas suministradas con la unidad son para verificar las
operaciones iniciales; puede que no duren mucho tiempo.
Recomendamos usar pilas alcalinas de duración más larga.
2
Encienda el receptor y el televisor.
ALL ZONE STBY
SOURCE
STANDBY/ON
MAIN
SUB ZONE CONTROL
Z2 Z3 HDZ
RECEIVER
3
Cambie la entrada del televisor para conectarlo
al receptor.
4
Apague el subwoofer y suba el volumen.
ADVERTENCIA
No utilice ni guarde las pilas a la luz solar directa ni en
otros lugares de mucho calor como, por ejemplo, dentro de
un automóvil o cerca de una calefacción. Esto puede ser la
causa de que las pilas tengan pérdidas, se sobrecalienten,
revienten o se incendien. También se puede reducir la
duración o el rendimiento de las pilas.
PRECAUCIÓN
Cuando inserte las pilas, asegúrese de no dañar los resortes
de los terminales (–) de las mismas. Esto puede causar fugas
o recalentamiento en las pilas.
Cuando tiene que desembarazarte de las baterías usadas, por
favor se adapte a los reglamentos gubernamentales o a las
disposiciones en materia ambiental en vigor en su país/área.
Configuración automática para
sonido envolvente (MCACC)
La configuración de calibración acústica automática de
múltiples canales (MCACC) usa el micrófono de configuración
suministrado para medir y analizar el tono de prueba que
sale por los altavoces. Esta configuración permite hacer
mediciones y ajustes automáticos de alta precisión; al utilizarla
se creará un entorno de audición óptimo para el usuario.
Importante
Mida en un entorno silencioso.
Si tiene un trípode, utilícelo para situar el micrófono de
modo tal que quede a nivel del oído en la posición de
audición normal. En caso contrario, sitúe el micrófono a
nivel del oído utilizando una mesa o silla.
Si hay obstáculos entre los altavoces y la posición de audición
(micrófono) puede que no sea posible tomar medidas precisas.
Cuando mida, apártese de la posición de audición y opere
utilizando el mando a distancia desde el lado externo de
todos los altavoces.
1
Conecte el micrófono de configuración suministrado.
MASTER
VOLUME
STANDBY/ON
INPUT
SELECTOR
iPod iPhoneHDMI
ADVANCED
MCACC
FL OFF
MCACC
SETUP
MIC
Trípode
Micrófono
La pantalla
Full Auto MCACC
aparece en su televisor.
Speaker System : Normal
(
SB/FH
)
1a.Full Auto MCACC
A/V RECEIVER
Exit Return
START
EQ Type : ---
MCACC : M1.MEMORY 1
Measurement Type : Basic
2
Pulse MAIN RECEIVER en el mando a distancia
para controlar el receptor.
Cuando el cursor se coloque sobre
Measurement Type
y se seleccione
Basic
,
Speaker Setting
/
Channel Level
/
Speaker Distance
se ajustarán automáticamente.
Si se selecciona
Expert
también se podrá ajustar
automáticamente
Standing Wave
/
Acoustic Cal EQ
(características de frecuencia).
3
Coloque el cursor sobre START y pulse el botón
ENTER.
La medición automática empezará.
La medición tardará entre 3 y 12 minutos aproximadamente.
4
Siga las instrucciones que aparecen en la
pantalla.
El ajuste automático se completa cuando aparece la
pantalla Home Menu.
1. Advanced MCACC
2. MCACC Data Check
3. Data Management
4. System Setup
5. Network Information
6. Operation Mode Setup
Exit Return
HOME MENU
A/V RECEIVER
Si se visualiza
Reverse Phase
, las conexiones de los
cables de los altavoces (+ y –) pueden estar invertidas.
Compruebe las conexiones de altavoz.
Aunque las conexiones sean correctas, puede que se
visualice
Reverse Phase
, dependiendo de los altavoces y
del entorno circundante. Sin embargo, esto no afecta a las
mediciones, así que seleccione
Go Next
.
Si se corta la alimentación, el núcleo del cable del altavoz
puede estar en contacto con el panel trasero o los núcleos
(+) y (–) pueden estar tocándose, lo que hace que los
circuitos de protección se activen. Vuelva a trenzar el
núcleo del cable del altavoz y conéctelo de forma que no
sobresalga del terminal del altavoz.
5
Asegúrese de que el micrófono de
configuración esté desconectado.
9
፩ၭ
Reproducción básica
Reproducción multicanal
RECEIVER
D.ACCESS
DIMMER SLEEP
RCU SETUP
MPX
PRESET TUNE
BAND PTY
iPod
TUNER
INPUT
USBADPTROKU
BT
TV
TV
MHL
CD
OUT P.
DVDBD
ALL ZONE STBY
SOURCE
STANDBY/ON
MAIN
SAT
SUB ZONE CONTROL
SOURCE CONTROL
MUTE
VOLUME
VOL
TOP
MENU
HOME
MENU
TOOLS
MENU
ENTER
RETURN
CLASS
ENTER
CLR
CH
CH
2
546
8
0
79
13
AUDIO
DISP
SURRAUTO
CH LV.
ADV
STATUS
AUDIO P. VIDEO P.
Z2 Z3 HDZ
LISTENING MODE
HDMI
NET
ALL
Fav
RECEIVER
2
3
5
1
Encienda el componente de reproducción.
Ej.) Encienda el reproductor de discos Blu-ray conectado
al terminal
HDMI BD IN
.
2
Cambie la entrada del receptor.
Ej.) Pulse
BD
para seleccionar la entrada
BD
.
3
Pulse AUTO para seleccionar ’AUTO SURROUND’.
Plse también
SURR
o
ADV
para la reproducción
multicanal. Seleccione su modo de audición preferido.
4
Inicie la reproducción del componente de
reproducción.
Ej.) Inicie la reproducción del reproductor de discos
Blu-ray.
5
Use VOLUME +/– para ajustar el nivel del
volumen.
Cuando no se pueda oír un sonido desde los altavoces
central y trasero, pulse
SURR
o
ADV
para cambiar los
modos de escucha.
P. ej.) Pulse el botón
ADV
varias veces para seleccionar
EXT.STEREO
.
Cuando no hay sonido del subwoofer
Causa - El altavoz delantero está ajustado en LARGE.
Cuando se recibe una fuente de audio de 2 canales, el
componente de baja frecuencia no se emite desde el
subwoofer pero se emite desde el altavoz delantero.
Solución – Para emitir desde el subwoofer, cambie el
ajuste del altavoz.
Método 1: Cambie el ajuste del altavoz delantero a
SMALL
.
El componente de baja frecuencia no se emite desde
el altavoz delantero pero se emite desde el subwoofer.
Cuando la capacidad de reproducción de baja frecuencia
del altavoz frontal es alta, se recomienda no cambiar el
ajuste.
Método 2: Cambie el ajuste del subwoofer a
PLUS
.
El componente de baja frecuencia se emite desde el
altavoz delantero y el subwoofer. Por ese motivo, la
emisión de sonidos bajos a veces es excesiva. En tal caso,
se recomienda no cambiar al Método 1.
Para conocer los detalles, consulte “Ajuste de altavoz
en las instrucciones de funcionamiento.
Cuando no se emita ningún sonido, aumente el volumen a
aproximadamente –30 dB.
Nota
Cuando no se pueda utilizar el mando a distancia para
controlar la unidad
Cuando utilice el receptor, pulse
MAIN
RECEIVER
antes de
usarlo.
Cuando controle funciones como la red, TUNER o iPod,
pulse el botón de función adecuado (
NET
,
TUNER
,
iPod
,
etc.) antes del uso.
Recepción de radio
1
Pulse TUNER para seleccionar el sintonizador.
Si es necesario, pulse
BAND
para cambiar la banda (FM o AM).
2
Pulse TUNER +/– para sintonizar una emisora.
Pulse y mantenga pulsado
TUNE +/–
durante más o menos un
segundo. El receptor empezará a buscar la siguiente emisora.
Si está escuchando una emisora de FM pero la recepción
es débil, pulse
MPX
para seleccionar FM MONO y ponga
el receptor en el modo de recepción mono.
Presintonización de emisoras
Si escucha una emisora de radio en particular a menudo,
puede ser conveniente almacenar la frecuencia de la emisora
en el receptor para luego recuperarla fácilmente cada vez que
desee escuchar dicha emisora.
1
Pulse TOOLS mientras recibe una señal de una
emisora que quiera presintonizar.
El número de presintonización está parpadeando.
2
Pulse PRESET +/– para seleccionar la emisora
que desea y luego pulse ENTER.
El número de presintonización deja de parpadear y el
receptor almacena la emisora.
Cómo sintonizar emisoras memorizadas
Para poder utilizar esta función, primero deberá presintonizar
alguna emisoras.
Pulse PRESET +/– para seleccionar la emisora
que desea sintonizar.
10
Reproducción básica (continuación)
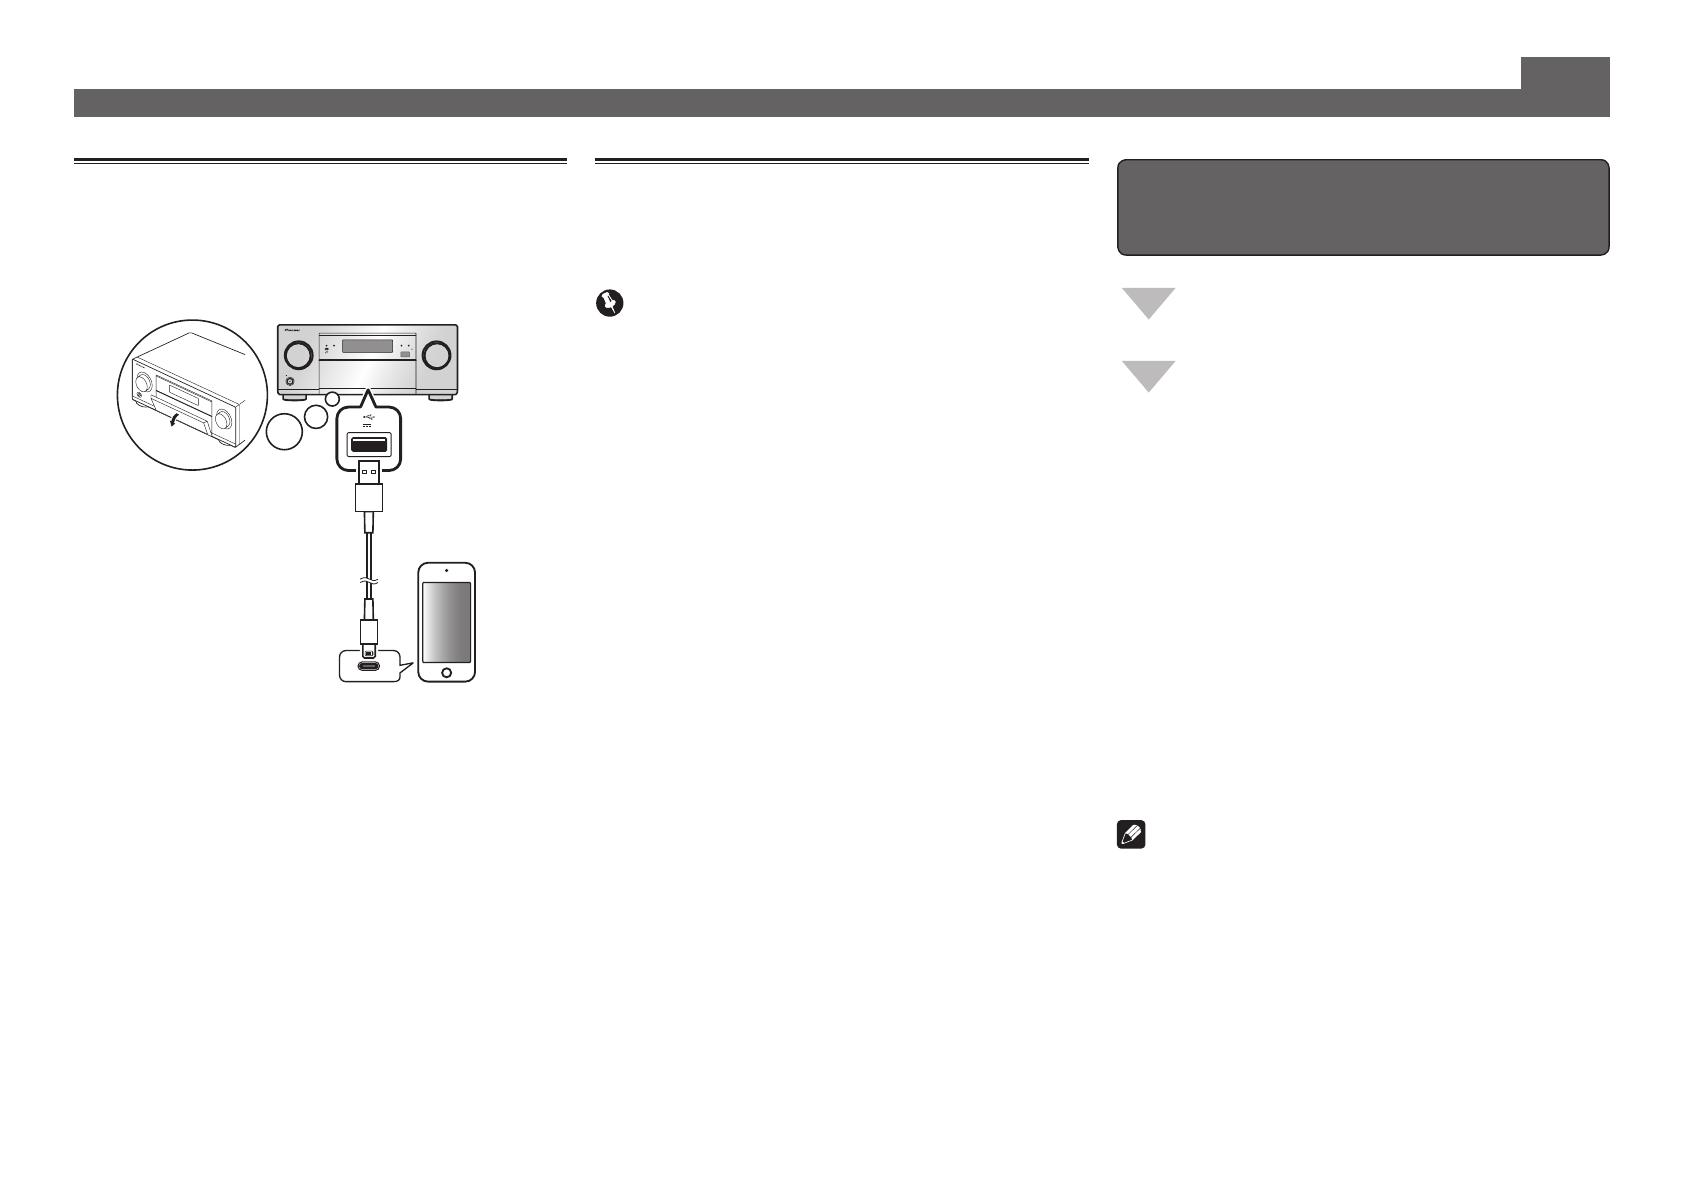
Reproducción de un iPod
Es necesario esperar aproximadamente un minuto desde
que se conecta la alimentación hasta que finaliza el inicio.
1
Conecte su iPod.
Al receptor se puede conectar un iPod/iPhone.
MASTER
VOLUME
STANDBY/ON
INPUT
SELECTOR
iPod iPhoneHDMI
ADVANCED
MCACC
FL OFF
5V 1
A
2
Pulse iPod USB para seleccionar la entrada
iPod/USB.
Cuando la pantalla muestra los nombres de carpetas y
archivos, usted puede empezar a reproducir música del iPod.
3
Utilice
/
para seleccionar una categoría y,
a continuación, pulse ENTER para buscar esa
categoría.
• Para volver al nivel anterior en cualquier momento, pulse
RETURN
.
4
Utilice
/
para examinar la categoría
seleccionada (p. ej., álbumes).
• Utilice
/
para desplazarse al nivel anterior/posterior.
5
Siga buscando hasta que encuentre lo que
quiere reproducir. A continuación, pulse
para iniciar la reproducción.
Recepción de emisoras de radio de
Internet
Es necesario esperar aproximadamente un minuto desde
que se conecta la alimentación hasta que finaliza el inicio.
Importante
Cuando use una conexión de Internet de banda ancha
necesitará firmar un contrato con un proveedor de
servicios de Internet. Para conocer más detalles, contacte
al proveedor de servicios de Internet más cercano.
Para escuchar emisoras de radio de Internet tendrá que
tener acceso a Internet de banda ancha de alta velocidad.
Con un modem de 56 K o ISDN tal vez no pueda disfrutar
de todos los beneficios de la radio de Internet.
El acceso al contenido provisto por terceros requiere
una conexión a Internet de alta velocidad, y también
puede que tenga que registrarse una cuenta y pagar una
subscripción. Los servicios de contenido de terceros
pueden ser cambiados, suspendidos, interrumpidos o
finalizados en cualquier momento y sin previo aviso, y
Pioneer no admite ninguna responsabilidad en tales
casos. Pioneer no representa ni garantiza que los
servicios de contenido continúen siendo provistos o estén
disponibles durante un periodo de tiempo particular, y
tampoco admite responsabilidad alguna, bien sea ésta
expresa o implícita.
1
Pulse repetidamente NET para seleccionar la
entrada INTERNET RADIO.
Este receptor puede tardar varios segundos en tener
acceso a la red.
2
Use
/
para seleccionar la emisora de radio
de Internet que va a reproducir y luego pulse
ENTER.
iPod/iPhone
Cable USB
incluido con el iPod
Para disfrutar al máximo de las
muchas funciones de la unidad
Inicie AVNavigator y utilice la “Interactive
Operation Guide”.
Cargue el CD-ROM en su ordenador y descargue
el “Manual de instrucciones” (PDF) desde la
pantalla de menú para leerlo.
Funciones
#
Reproducción de un aparato USB
#
ADAPTADOR Bluetooth para disfrutar de música
inalámbrica
#
Reproducción con la característica NETWORK
#
Ajuste de las opciones de audio
#
Ajuste de las opciones de vídeo
#
Uso de los controles MULTI-ZONE
Preguntas más frecuentes
Glosario
Índice de características
Nota
Esta unidad es compatible con AirPlay. Para conocer los
detalles, consulte “Usando AirPlay en iPod touch, iPhone, iPad
e iTunes” de las instrucciones del manual de instrucciones y
el sitio web de Apple (http://www.apple.com).
El software de esta unidad se puede actualizar (“Actualización
de software” de las instrucciones de uso). Con Mac OS,
se puede actualizar mediante Safari (“Uso de Safari para
actualizar el firmware” de las instrucciones de uso).
© 2014 PIONEER HOME ELECTRONICS CORPORATION.
Todos los derechos reservados.
  • Page 1 1
  • Page 2 2
  • Page 3 3
  • Page 4 4
  • Page 5 5
  • Page 6 6
  • Page 7 7
  • Page 8 8
  • Page 9 9
  • Page 10 10
  • Page 11 11
  • Page 12 12
  • Page 13 13
  • Page 14 14
  • Page 15 15
  • Page 16 16
  • Page 17 17
  • Page 18 18
  • Page 19 19
  • Page 20 20
  • Page 21 21
  • Page 22 22
  • Page 23 23
  • Page 24 24

Pioneer SC-1224 Quick start guide

Category
Car video systems
Type
Quick start guide

Ask a question and I''ll find the answer in the document

Finding information in a document is now easier with AI

in other languages